


New in BCC10
Overview
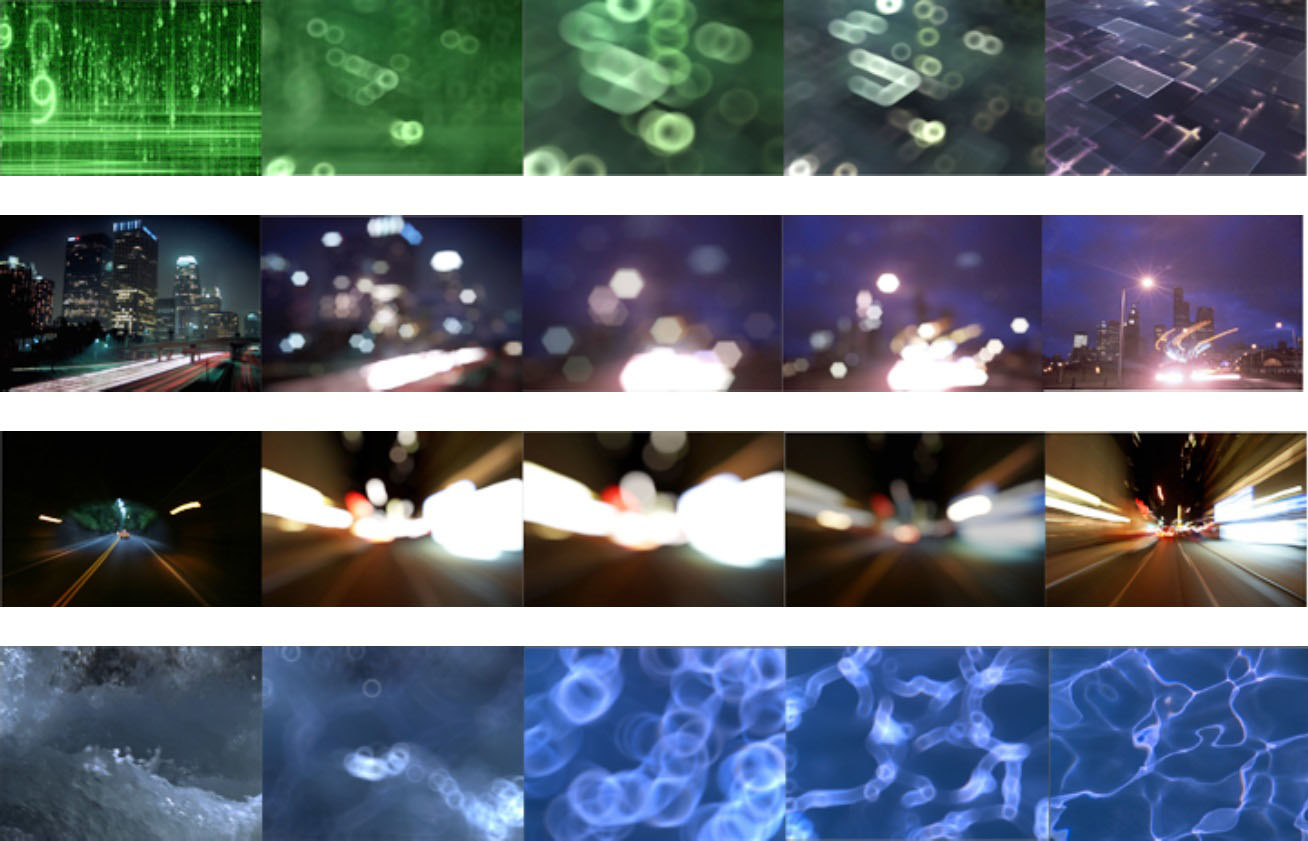
The BCC Lens Blur Dissolve is a 100% GPU accelerated replacement to or our original BCC Lens Transition filter. BCC Lens Blur Dissolve uses OpenCL to deliver greatly increased render performance with a streamlined interface. It applies a lens blur defocus/rack-focus style effect to the specular highlights of the outgoing and incoming image clips causing the highlights take on the shape of a simulated lens diaphragm. This filter includes a pop-up that can be used to match different looks that can be achieved in the physical world based on the lens aperture setting – a pleasing optical result is referred to in photographic terms as Bokeh. Like all of the other filters that are included in the Transitions category, BCC Lens Blur Dissolve includes user controls for the velocity of the transition with an optional on-screen display of the ease-in and ease-out velocity curve.
Parameter Controls
Presets and Common Controls
BCC filters come with a library of factory installed presets plus the ability to create your own custom presets and preview them with the BCC FX Browser™.
BCC filters also include common controls that configure global effect preferences and other host-specific effect settings.
For more information about working with presets and other common controls, Click Here.
Layer to Reveal: This layer selection popup is not relevant when you have applied the filter as a true NLE-style transition and it will be hidden or disabled in that context. When applied as a normal “effect” as opposed to a transition, however, this menu is used to select the “Incoming” or “Reveal” layer for the transition.
Animation: Menu controlling what drives the animation of the transition.
- Auto – automatically generates a transition based on the transition length (when used as a transition) or the clip length (when used as a filter).
- Percent Done – requires the user to set keyframes to control the transition progression. Can be useful in customizing the exact timing of the transition or when applying the filter as a stylized effect as opposed to a direct NLE-style transition.
Percent Done: Disabled/Hidden by default. When the Animation menu is changed to Percent Done then this slider can be manually keyframed to control the transition progression.
Quality pop-up: 3 way pop-up used to set the quality of the edges of the generated highlights.
- Normal – The standard, fast mode.
- Sharp – Generates a sharper result but takes longer to render than the Normal mode.
- Sharper – Generates the sharpest edges but is the slowest to render.
Iris Scale: Used to set the size of the highlight blur effect.
Scale X: Scales the highlight along the X axis only.
Scale Y: Scales the highlight along the Y axis only.
Gamma: Used to control the image highlight gamma.
Blur Alpha: Controls whether or not to blur the alpha channel along with the RGB channels.
Iris Group
Contains parameters to control the shape and look of the generated highlights.
V****iew Iris checkbox: When checked, displays the iris shape on a black background.
Iris Shape pop-up: Used to set the overall shape of the highlight.
- Circle – Generates circular highlights.
- 3-16 Sides – Generates non-circular highlights with 3-16 sides Iris.
***Curvature:***Similar to a pinch / bloat filter. Used to curve or smooth non-circular iris shapes.
Iris Rotation: Used to set the rotation of the iris.
Bokeh: Determines the overall look or bokeh of the Iris Shape – negative values erode the center of the shape, positive values erode the outside of the shape.
Bokeh Shading: Used to set the softness of the bokeh – negative values produce a soft result, positive values produce a sharp result.
Noise Group
Contains parameters to control the level of noise in the highlights.
Noise Intensity: Used to set the amount of noise in the highlights.
Noise Scale: Used to set the size of noise structure in the highlights.
Noise Stretch: Used to distort the noise structure in the highlights.
Noise Blur: Used to smooth the generated noise in the highlights.
Noise Seed: Used to set the random seed that controls the noise structure in the highlights.
Highlights Group
Contains parameters to control the highlights that are generated by the filter.
Boost/Sup Mode pop-up: Used to determine the way the highlights are composited into the image.
- RGB Max – Boosts the RGB values of the highlights.
- RGB Glow – Boosts the RGB and Saturation values of the highlights.
- Luma Boost to White – Boosts the Luminosity values and desaturates the highlights.
- Luma – Boosts the Luminosity values of the highlights.
Highlight Boost: Used to set the intensity of the highlight boosting – higher values result in brighter highlights.
Highlight Threshold: Used to set the cut-off point for highlight boosting.
Suppress Threshold: Used to set the intensity of the shadow boosting – higher values result in darker shadows.
Boost Soften: A slope control that softens the highlight and shadow boosting effect.
Color Group
Controls for color enhancements that auto-animate along with the transition. For example: boosting (or reducing) the Brightness or Contrast during the peak of the transition to maintain greater contrast, boosting intensity, or creating stylized variations of the basic dissolve.
Brightness Peak: Defines the maximum change to the Brightness at the midpoint of the transition. Auto-animates so that it has no effect at the beginning or end of the transition and peaks in intensity at the middle.
Contrast Peak: Defines the maximum change to the Contrast at the midpoint of the transition. Auto-animates so that it has no effect at the beginning or end of the transition and peaks in intensity at the middle.
Extras Group
These controls can be used to fine tune the way the blur interacts with the dissolve.
**Apply Blur To:**Determines how the blur is applied to the source and reveal layers.
- Dissolve – dissolves the two layers first and apply the blur to the output of the dissolve.
- Source Layer – applies the blur prior to the dissolve, but only to the source layer.
- Reveal Layer–** applies the blur prior to the dissolve, but only to the reveal layer.
- Source and Reveal–** applies the blur to both the source and reveal layers separately prior to dissolving between them.
- Off – disables the blur completely and just show the result of the basic dissolve.
A Iris Scale: Scales the blur amount for just the Source Layer.
**B Iris Scale:**Scales the blur amount for just the Reveal Layer.
Animation Tuning Group
These parameters control the overall timing of the transition. On hosts which permit on-screen heads up display widgets (such as AE, Premiere, and Avid), you should never need to modify these sliders directly since they can be configured in a more convenient and intuitive manner by manipulating the widgets directly in your comp/preview pane. On hosts without heads up display widgets, you can use these sliders directly to fine tune your animation timing, taking advantage of the View Ease Curve option to help visualize the animation rates.
**Ease In:**Controls how quickly or slowly the effect amount increases at the beginning of the transition.
Ease Out: Controls how quickly or slowly the effect amount decreases at the end of the transition.
Effect Delay: Controls the timing of the underlying dissolve relative to the timing of the rest of the transition. Negative values (recommended) cause the blur effect to begin prior to the underlying dissolve, whereas positive values cause the dissolve to begin prior to the blurring.
View Ease Curve: (Only visible/enabled in hosts that don’t support heads up display widgets for manipulating these controls directly on screen.) Enable this control to display a preview graph of the the animation curves rendered into in the composite window.