


Overview
BCC Beat Reactor is a filter that can be used within Adobe After Effects to generate keyframes based on an audio track within the composition. These keyframes can be used to affect other parameters within the composition by using very simple AE expressions to link the generated keyframes to other parameters or by copying and pasting the generated keyframes to other parameters. Beat Reactor uses features specific to Adobe After Effects, therefore it does not work in Adobe Premiere or other programs that can use AE plugins.
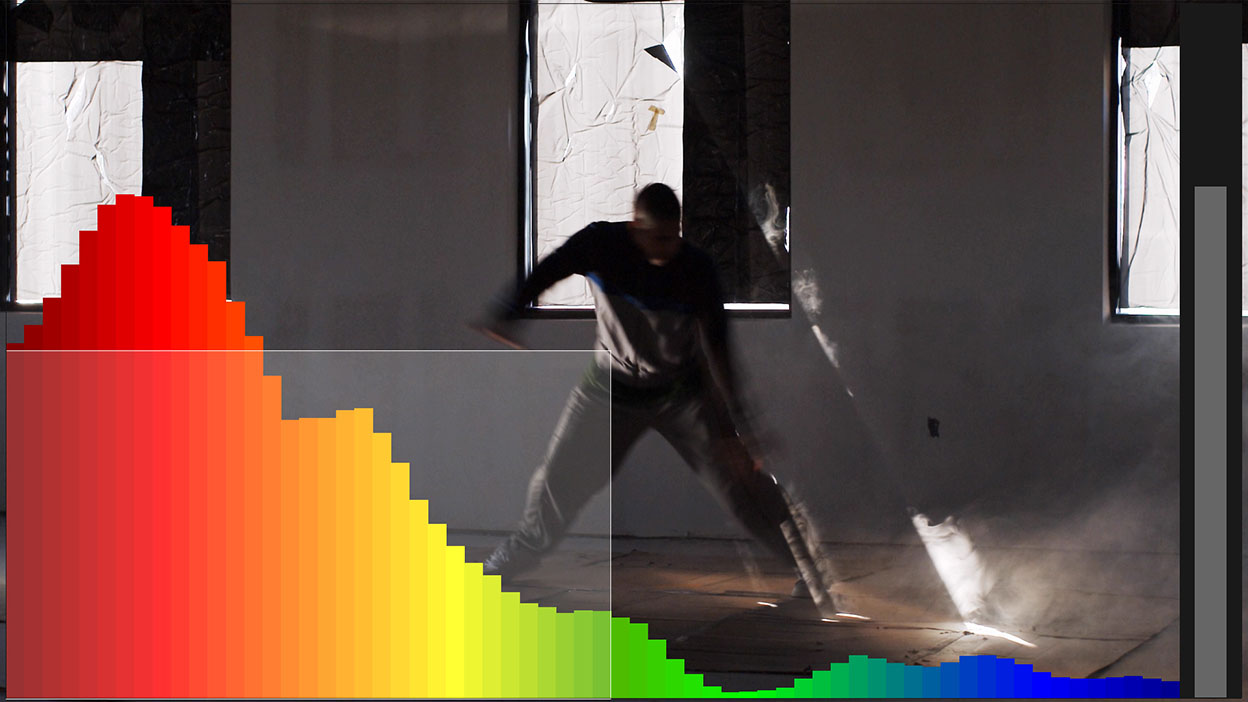
Beat Reactor displays a spectrum graph including vertical bands representing the audio levels within various frequency ranges. This graph can be used to help target particular elements within the audio track for use in generating keyframes. It is possible to apply theBeat Reactor filter to any graphic layer,but the recommended way to use the filter is to apply it to an AE color Solid layer which can easily be scaled down, moved, made partially transparent, or disabled as desired while working without affecting other visible elements of the composition.
Function
Presets and Common Controls
BCC filters come with a library of factory installed presets plus the ability to create your own custom presets and preview them with the BCC FX Browser™.
BCC filters also include common controls that configure global effect preferences and other host-specific effect settings.
For more information about working with presets and other common controls, Click Here.
Applying BCC Beat Reactor in Adobe After Effects
- In a composition including a layer with audio, create a comp sized Solid arranged so that it is fully visible within the composition (for example as the top layer in the timeline).
- Select the new Solid layer and apply BCC Beat Reactor from the BCC Time category.
- In its default state, Beat Reactor does not display anything. It is necessary to select a Layer in the Audio Layer popup menu.
The workflow for using BCC Beat Reactor can be thought of as involving 3 general stages in typical usage:
- Stage1: using the spectrum graph samplers for targeting specific audio events within the audio layer
- Stage2: adjusting output options and generating the desired keyframes based on the audio samplers
- Stage3: using AE expressions or copying/pasting keyframes to apply the generated keyframes to parameters
Stage 1: Targeting Audio Events
- The Audio Layer popup will display all layers present in the composition. To use Beat Reactor it is necessary to first select the layer including the audio you wish to use for generating keyframes.
- The View Mode popup must be set to one of the first 3 choices so that it will display the audio spectrum graph.
- The Channel popup allows for having the spectrum graph display Left, Right, or stereo Mix from the audio layer.
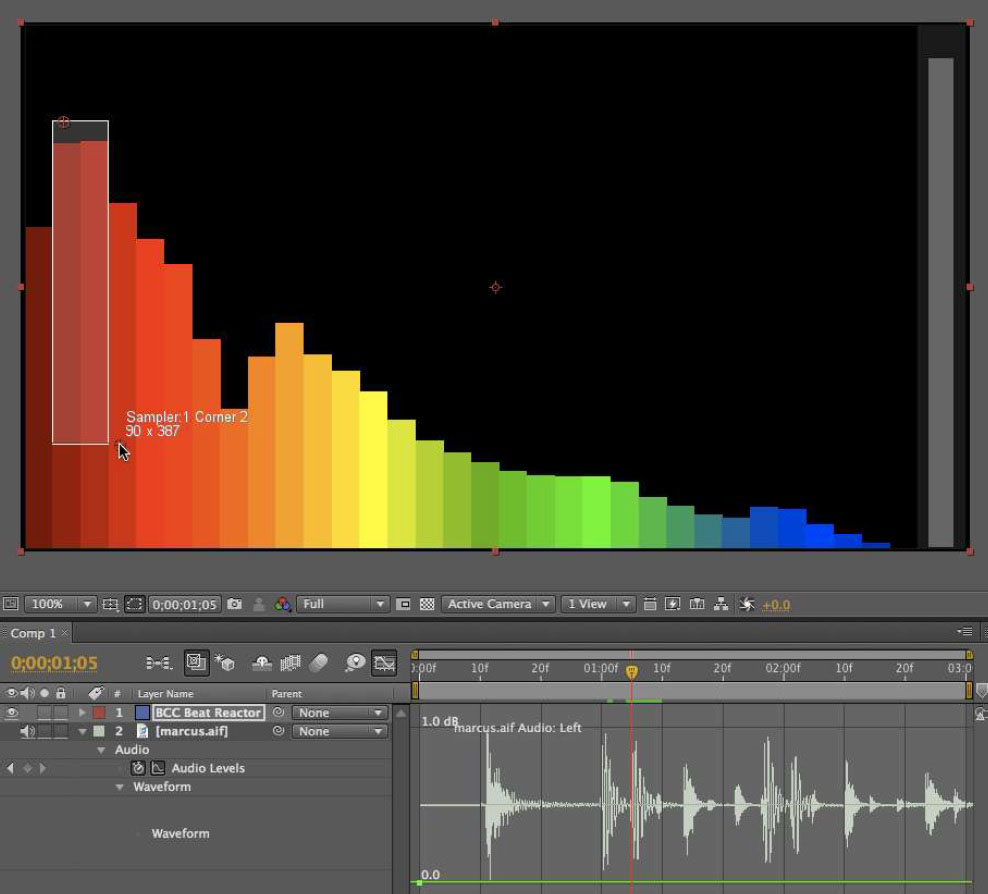 |
By default, Sampler 1 is enabled within the FX Output A group, and therefore Sampler 1‘s on-screen rectangle is visible. Each enabled sampler is represented by a white rectangle on the audio spectrum graph display. With an audio layer selected in the Audio Layer popup and the AE current-time indicator parked on a frame with some audio levels, the spectrum graph should show some vertical bands representing the audio occurring at that frame. While targeting audio events with Beat Reactor, it can be useful to expose the audio layer’s waveform display in the AE timeline panel to get a sense of the audio patterns over time and the relative audio level of the current frame. The process of using the audio spectrum graph sampler rectangles to isolate a particular audio element within an audio layer for use in generating keyframes involves a workflow process something like this ;
- Make sure that the AE audio playback can be clearly heard with as much detail as possible (turn up the speakers or plug in the headphones).
- Enable audio playback for the audio layer chosen in the Beat Reactor filter, and disable audio playback for any other layers in the comp (to be able to hear the important audio layer more clearly).
- In the AE timeline, set the work area to an area including the audio to be used for generating keyframes.
- Preview To Ram (PTR) with audio, listening carefully while closely watching the graph to see the movements in the spectrum bands that coincide with the audio event of interest. It is often useful to let the PTR loop a few times listening/watching carefully in order to get a good look at it.
- Pause PTR playback and position the current-time indicator on a frame at good instance of the audio event of interest. It can sometimes help to scrub the timeline with audio to do this accurately. To scrub audio and video in the AE Timeline panel, Ctrl-drag (Windows) or Command-drag (Mac OS) the current-time indicator. If you stop moving the current-time indicator while keeping the mouse button depressed, a short section of audio loops.
- Use the on-screen (Corner 1 and Corner 2) position points to place the sampler rectangle so it covers the area in which the audio event occurs, trying as much as possible to exclude spectrum band activity which is not part of the audio event.
- PTR with audio again, listening carefully and watching the sampler’s output meter (the white band on the far right edge of the graph) to see if the sampler is picking up the audio event well enough to use for generating useful keyframes. If necessary, pause PTR playback and re-adjust the sampler rectangle, PTR with audio again, readjust samplers and so on.
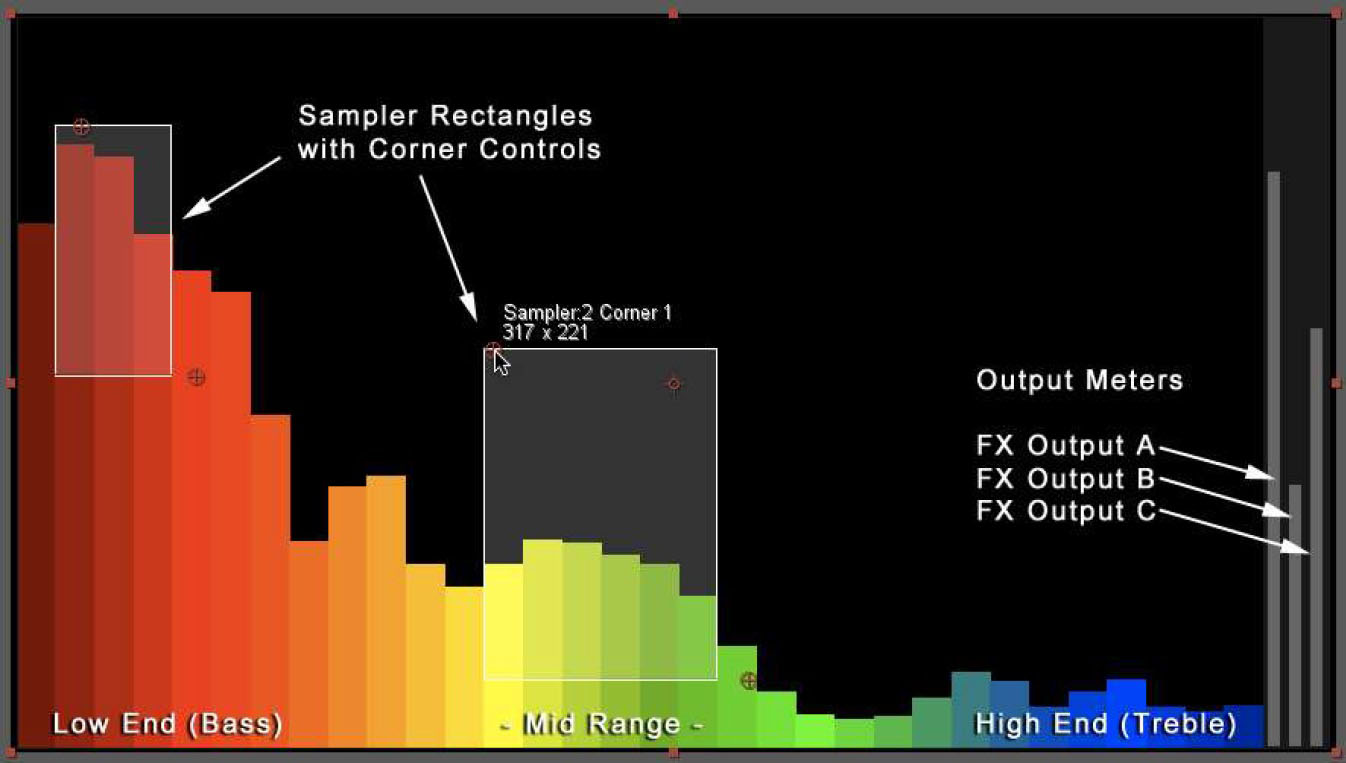 |
A sampler’s on-screen rectangle appears on the graph when the sampler is assigned in one of the FX Ouputs. Each instance of the Beat Reactor filter offers up to 3 FX Outputs (A, B, and C) and 3 Samplers (1, 2, and 3). Outputs and Samplers do not need to be used in a 1 to 1 relationship. It is possible to use multiple Samplers in a single FX Output, and it is possible to use the same Sampler in multiple FX Outputs.
The Samplers parameter group includes popup menus for determining each sampler’s mode.
- Box Percentage: mode finds the percentage of the sampler box area that is filled by the spectrum bands and fills that same percentage of the output meter.
- Max Frequency: mode compares spectrum bands and finds the one that is filling the greatest area of the sampler and then finds the percentage full on only that band (as if the rectangle were only as wide as that band) and fills that same percentage of the output meter.
- Toggle ON/OFF: mode will fill the whole output meter (Range Max value) if there is any piece of spectrum band within the sampler rectangle (and go straight to an empty meter as soon as there is no spectrum band within the rectangle).
This Samplers group also includes coordinate parameters for the sampler rectangles’ placement corners (these parameters are usually
adjusted using the on-screen position point since they are placed in relation to the audio spectrum bands).
- The Audio Spectrum group contains options for adjusting how the spectrum graph visualizes the audio.
- Freq Resolution determines how many distinct bands are used to represent the frequencies included in the graph. It is sometimes useful to increase the resolution in order to visualize and more accurately sample a specific audio event.
- Scale (%) can be used to adjust the vertical scale of all the bands in the graph (scaling them toward the top of the graph). For audio with lower levels it is often useful to boost the scale a bit so it better fills the graph area. Sub-Bass, Bass, Mid-Range, and Treble (%) offer the same functionality for individual areas of the spectrum (with Scale % acting as a master control).
- Low Cutoff dB determines what level is used as the cutoff point at the bottom of the graph.
- Min and Max Freq (Hz) determine the frequency range displayed in the graph.
- Smoothness (%) makes the graph smoother by averaging out the values of neighboring frequency bands. This can be useful for more easily visualizing broader patterns in the audio, although smaller smoothness values offer more precise isolation of sound.
- Note: Falloff and Delay are parameters that relate to keyframe generation (discussed in the next section of this document), but their effects are also reflected in the graph display output meters. For more direct and accurate audio visualization, disable these parameters by setting Delay amount to 0 and setting Falloff to Unused during the process of placing Samplers to isolate audio events on the graph.
Stage 2: Adjusting Output Options & Generating Keyframes.
Once Samplers have been placed so that they do a satisfactory job of targeting the audio events on which the generated keyframes will be based, then it’s time to start thinking about what kind of keyframe values and patterns should be generated for use in the composition. The parameters in the FX Output groups are used to determine that.
- The Sampler popup determines which sampler (or samplers) are being used by the output. It’s possible for a single output to use multiple samplers. The multi sampler choices including the “+” sign in their names add samplers together to use in the output. For example, if there are 2 samplers being added together then each sampler determines 50% of the output (if there are 3 samplers being added they each determine a third of the output). The multi sampler choices including “Max” in their names will compare the sampler values and use the highest one, and the multi sampler choices including “Min” in their names will compare the sampler values and use the lowest one.
- The Keyframe Output popup contains some fundamental choices about the keyframe values that are created.
- Output to Value will generate keyframes that replace any parameter value already assigned to Output Value.
- Add to Values will take the value derived from the samplers and add it to any parameter value already assigned to Output Value. This can be used to deviate below and above a specific value (by defining the range so both positive and negative values are added to the current value), and also useful to “superimpose” multiple keyframe patterns by generating keyframes to the same output more than once (with different FX Output values each time).
- Multiply by Values will take the value derived from the samplers and multiply it by any parameter value already assigned to Output Value.
- Output to Color (along with Color 100%, Middle Color, and Color 0%) offers a way to map the output to a color parameter according to a 2 or 3 color gradient. When used the FX Output meter will display the color for the current frame.
- Output to Checkbox (ON) and Output to Checkbox (OFF) allow for setting a threshold for an animatable checkbox parameter that will turn ON or OFF as the audio output meter goes above / below a user defined threshold.
- Range, Range Min, and Range Max determine the numeric range within which the keyframe values will be generated. In this case, Range Min does not need to be a lower number than Range Max. Range Min is the value mapped to the lowest (quietest) part of the output meter and Range Max is the value mapped to the highest (loudest) part of the output meter.
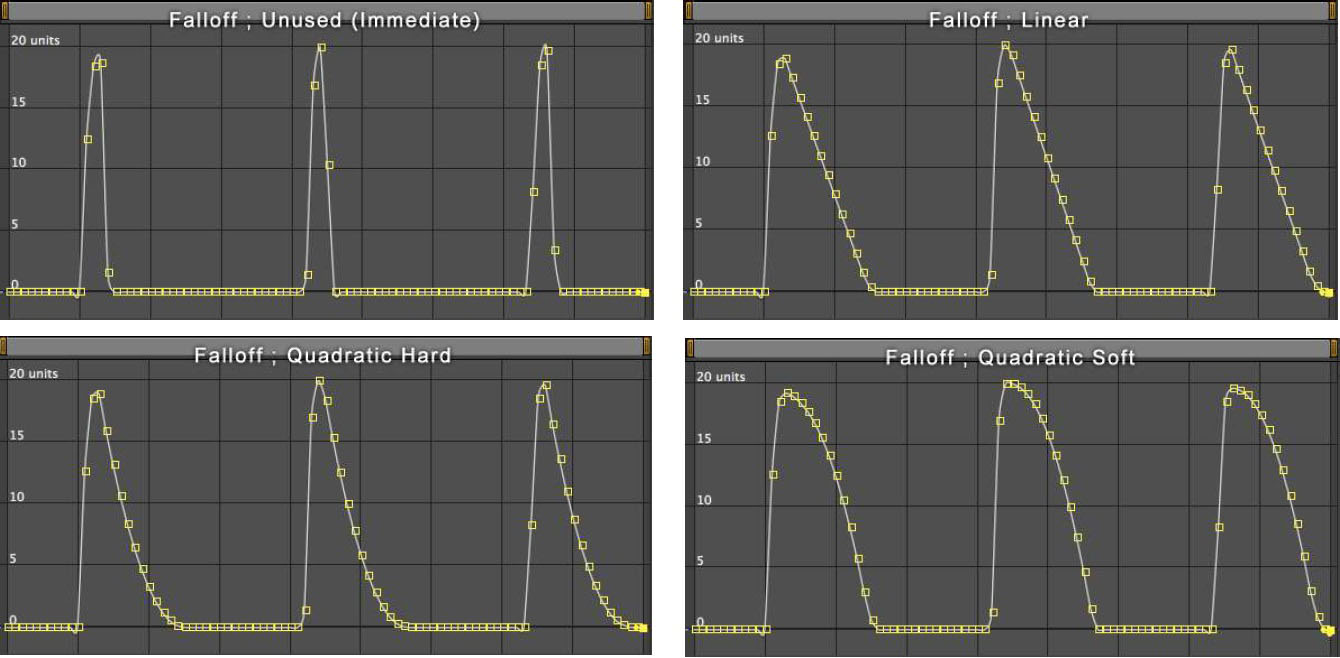
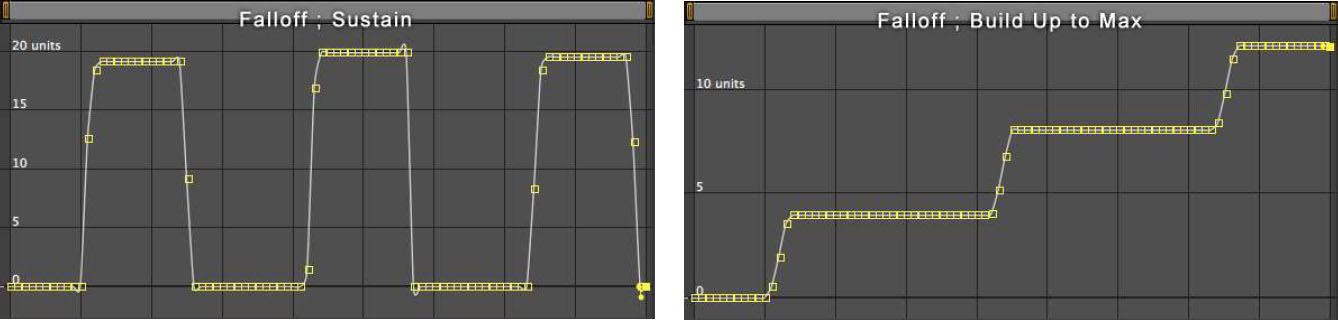
- Falloff and Falloff Time offer options for creating different behaviors for the keyframes immediately following the sampled audio event.
- Unused (Immediate) means there is no falloff beyond whatever is dictated by the sampled audio event.
- Linear creates a falloff where the keyframe curve would appear as a straight line.
- Quadratic Hard creates a falloff that starts a bit faster and eases toward the end of the falloff period.
- Quadratic Soft creates a falloff that eases at the peak and accelerates toward end of the falloff period.
- Sustain maintains the highest value within that occurrence of the audio event for the duration.
- Build Up to Max keeps adding to the value (integrated over the audio event period), up to the maximum value in the graph. With this falloff type, a large Falloff Time value will build up slower than a short Falloff Time.
- Integrate (None) makes it so there is no falloff and values generated from the sampler keep adding to the current value.
- Below are illustrations showing the same generated keyframe output using different Falloff types ;
 |
 |
Falloff Time determines the duration of the falloff in seconds.
Num Keyframes per Second determines the frequency of generated keyframes (in keyframes per second).
Use Comp FPS forces keyframe creation to occur for every frame.
Interpolation determines which AE interpolation type the keyframes will use when they are generated.
Scale Output % allows for scaling the effect of the sampler on the Output Value keyframes to be generated. Besides offering a quick way to increase or reduce the output, it provides a convenient way to animate (fade) the output up or down over time.
Output Value or Output Color or Output Checkbox is the actual parameter they keyframes appear on after being generated the keyframes to be used to apply to other parameters in the composition by AE expression or copy / pasting.
Generate Output is the button that needs to be clicked to generate keyframes. When this button is clicked, Beat Reactor will generate keyframes on the Output within the AE work area (as defined in the AE timeline).
Delay (sec) offsets the spectrum graph display in time from the audio (so it should be applied after sampler rectangles are set). This allows for offsetting the generated keyframes in time from the audio upon which they are generated. This is something that could also be achieved by sliding the actual keyframes horizontally in the timeline, but using the Delay parameter is more convenient and can persist through keyframe regeneration. Negative values result in the keyframes starting ahead of the audio event and positive values result in the keyframes following the audio event**.** It is often useful to use a small positive value (.1 second for example) to create the impression that the audio event caused the change created by the keyframes.
Note: Any adjustments made to the Samplers or the FX Output parameters will require a generation (or regeneration) of keyframes for the keyframes to be updated with those changes. Therefore the effects of such parameter changes will not be apparent until the keyframes have been generated / regenerated.
Stage 3: Applying the Generated Keyframes
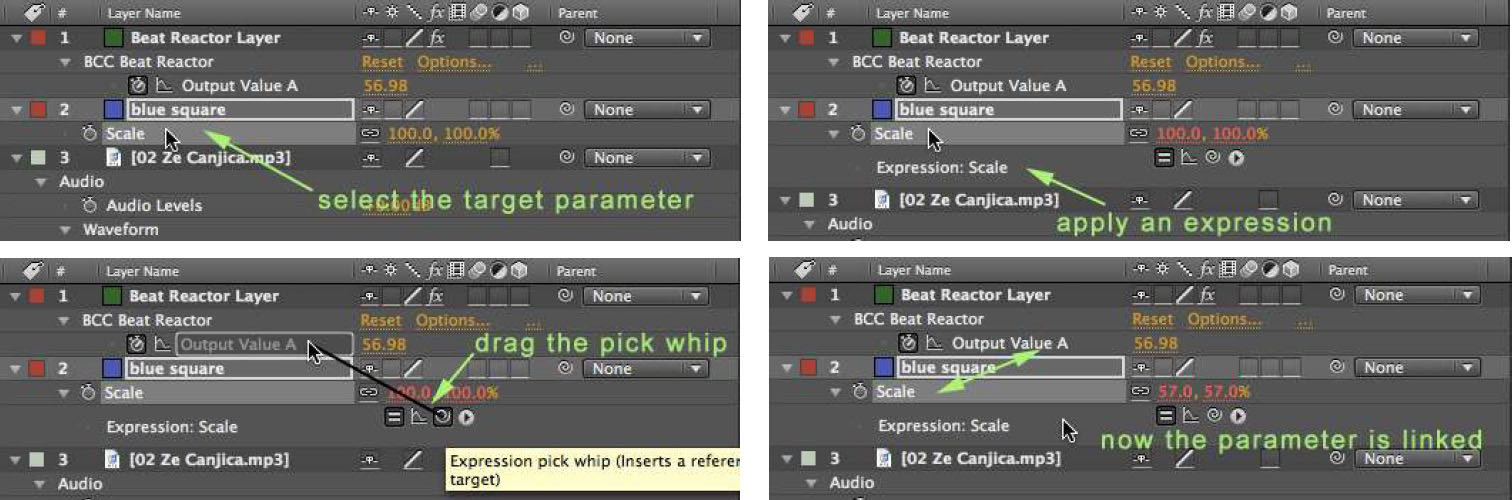
A useful and convenient way to apply a BCC Beat Reactor output to a parameter within the composition is to apply an expression to the target parameter and use the pick whip to link the expression to the Output parameter. The basic steps for doing this are as follows:
- In the timeline, expose the Beat Reactor Output (Output Value, Output Color, or Output Checkbox depending on the effect), and expose and select the parameter the Output is to be applied to (the target parameter).
- Under the Animation menu, choose “Add Expression”.
- In the timeline, drag the expression pick whip from the target parameter to the Output value parameter and release it.
Another method is to copy the keyframes from the Beat Reactor Output parameter and paste them onto the target parameter. An advantage to using the expression method is that it maintains a dynamic link between the Beat Reactor filter and the target parameter. There may be situations where maintaining a link is not desirable and in that case the copy / paste method can be used. It is also possible to convert an existing expression to keyframes by selecting the parameter with the expression applied and choosing Convert Expression to Keyframes from the Keyframe Assistant submenu under the Animation menu. The sequence of illustrations below show what the AE timeline looks like while linking a parameter (in this case the Scale of the layer called “blue square”) to a Beat reactor Output (Output Value A in this case).
 |
Using these simple application methods it is possible to use Beat Reactor output to control slider, angle dial, and checkbox parameters. Animatable checkboxes can be triggered using one of the Output to Checkbox Keyframe Output options, or when using numeric output values a checkbox parameter will be off (checkbox disabled) when it is set to value less than .5 and on (checkbox enabled) when it’s set to a value of .5 or above.
A simple way to specifically link to the X, Y, or Z value of a layer’s position coordinate (without affecting the other 2 values) is to first break the parameter into “separate dimensions” which can be done by selecting the parameter and choosing Separate Dimensions from under the Animation menu (also available when right-clicking on the parameter in the timeline). Once the dimensions of a position coordinate parameter have been separated, it’s possible to easily link a specific dimension (X, Y, or Z) to a Beat Reactor output without affecting the other dimensions.
Some Very Simple AE Expression Editing (for those who are interested) ;
Once a parameter is linked to the Beat Reactor output by the pick whip, it’s possible to easily add simple math functions to the expression to modify the effect. For example, after using the pick whip to link the expression to the Beat Reactor output, the expression automatically appears in the AE timeline something like this ;
thisComp.layer(“Medium Gray-Green Solid 6”).effect(“BCC Beat Reactor”)(“Output Value A”)
It’s possible to double the strength of the effect by multiplying by 2 (adding a couple characters onto the end of the expression) which would look like this ;
thisComp.layer(“Medium Gray-Green Solid 6”).effect(“BCC Beat Reactor”)(“Output Value A”)*2
Halving the strength of the effect would look like this ;
thisComp.layer(“Medium Gray-Green Solid 6”).effect(“BCC Beat Reactor”)(“Output Value A”)*.5
or
thisComp.layer(“Medium Gray-Green Solid 6”).effect(“BCC Beat Reactor”)(“Output Value A”)/2
Adding and subtracting also works simply in the same way as the multiplication and division illustrations above. The advantages to modifying it this way (rather than using the Scale Output % in the Beat Reactor FX Output) are that editing the expression does not require a regeneration of keyframes to take effect, and if the Beat Reactor output is linked to multiple parameters editing the expression does not affect the other parameters (which might be desirable depending on the situation). The advantages to using the Scale Output % are that it is easily animatable and that it affects all parameters linked to the output (if that is the desired result).
Position coordinates in a filter cannot be separated into individual parameters the way that they can for an AE layer. In the case of a filter coordinate parameter including multiple dimensions, it is possible to create an expression that allows for individual control of each dimension. After using the pick whip to link a Beat Reactor output to a filter X/Y position parameter, the expression will appear something like this ;
temp = thisComp.layer(“Pale Gray-Blue Solid 2”).effect(“BCC Beat Reactor”)(“Output Value A”);[temp, temp]
which will result in the Beat Reactor Output A determining the value for both the X and the Y position (which will always be the same value). This is usually not the desired result. Below is a modified expression that will allow for the Y position to be determined by the Beat Reactor Output A, and the X position to use a static value of 360 ;
temp = thisComp.layer(“Pale Gray-Blue Solid 2”).effect(“BCC Beat Reactor”)(“Output Value A”);[360, temp]
And again below is another modified expression that will allow for the Y position to be determined by the Beat Reactor Output A, and the X position to be determined by a slider called “Slider” in an expression control effect called “X Position” applied to the same solid as the Beat Reactor ;
tempY = thisComp.layer(“Pale Gray-Blue Solid 2”).effect(“BCC Beat Reactor”)(“Output Value A”)
tempX = thisComp.layer(“Pale Gray-Blue Solid 2”).effect(“X Position”)(“Slider”);
[tempX, tempY]
This same expression technique (the one immediately above) can be used to determine a specific dimension of the scale parameter of an AE layer. In that case the expression would be allowing for individual control of Scale X and Scale Y as opposed to Position X and Position Y.
A deeper understanding of writing expressions for After Effects allows for even more possibilities, but it is not necessary to know much of anything about AE expressions to get good results using BCC Beat Reactor.