


NEW IN CONTINUUM 2022.5, the BCC+ Rack Focus Dissolve filter automatically animates a true camera defocus by introducing lens Bokeh effects as your transition progresses to obscure the dissolve between clips.
Presets and the FX Editor
The FX Editor provides a convenient way to store and retrieve factory installed and/or user generated filter presets. To select a preset, open the FX Editor interface and pick one from the Presets panel. Click the apply button in the FX Editor to return to the host user interface.
To save a custom preset, click the “Create Custom Preset” icon in the top right corner of the parameter list, next to the filter name, set a name for the new custom preset in the dialog that appears and click done.
Filter Parameters
GPU Rendering: allows for the selection of GPU or CPU software rendering.
- Default: Uses the GPU to render the effect.
- 16 bit float
- 32 bit float
- Disabled: disables GPU rendering and allows for CPU software rendering.
Animation: Menu controlling what drives the animation of the transition.
- Auto – automatically generates a transition based on the transition length (when used as a transition) or the clip length (when used as a filter).
- Manual – requires the user to set keyframes to control the transition progression. Can be useful in customizing the exact timing of the transition or when applying the filter as a stylized effect as opposed to a direct NLE-style transition.
Layer to Reveal – This layer selection popup is not relevant when you have applied the filter as a true NLE-style transition and it will be hidden or disabled in that context. When applied as a normal “effect” as opposed to a transition, however, this menu is used to select the “Incoming” or “Reveal” layer for the transition.
Percent Done: Disabled/Hidden by default. When the Animation menu is changed to Percent Done then this slider can be manually keyframed to control the transition progression.
Blur X: The image is blurred along the horizontal axis using a quality blur.
Blur Y: The image is blurred along the veritical axis using a quality blur.
Blur Gang: links the Blur X and Y parameters together when enabled.
Aperture
Blend: Determines the blend mode to be used when adding Bokeh.
- Add: Bokeh’s are added to your image.
- Screen: The Bokeh are combined with the image using a Screen blend mode. This looks kind of like the Add blend mode, but highlights are retained.
Brightness: Brightens the Bokeh.
Facets: Set the number of Bokeh facets when the Curvature parameter is set to 0.
Curvature: Controls the curvature of the Bokeh. When set to 100, the Bokeh are completely round. Set to a value of 0 to see a polygonal shape.
Angle: Rotates the Bokeh.
Color: Sets the Bokeh color.
Blur: Sets the softness of the Bokeh. This can be useful when using high threshold values.
Matte
A matte is used to create the Bokeh effect.
Position: Pinpoints the color values to be used in the matte. For a luminance matte, a Position value of 100 would make a white matte of the highlights and a value of 0 would make a white matte of the shadows. In the flower image below, look at how the matte varies for different Position values in a red extraction. When the Position is at a value of 100, the red flowers are shown as white in the matte.
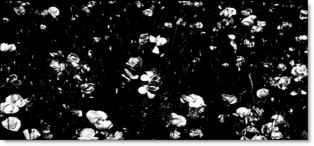 Position=100, Range=25
When the Position is moved to 50, the red flowers turn black.
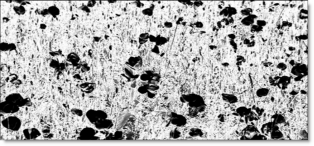 Position=50, Range=25
**Range:**Increases or decreases the range of values in the matte. A low Range value indicates a narrow range of values. A high Range value indicates a large range of values included in the matte.
Color Correction Group
The Color Correction group provides a range of color correction tools to adjust the overall look of the transition.
Hue: Control the overall hue of the transition.
Saturation: Control the overall saturation of the transition.
Brightness: Control the overall brightness of the transition.
Contrast: Control the overall contrast of the transition.
Gamma: Control the overall gamma of the transition.
**Temperature:**Control the overall temperature of the transition. Moving the Temperature slider to the left (negative values) will yield a cooler result, while moving the slider to the right will warm up the shot.
Cyan/Magenta: Control the overall amount of cyan/magenta in the image.. Moving the slider to the left (negative values) will add a cyan tint, while moving the slider to the right will add a magenta tint.
Red: Adjusts the overall value of the red color channel.
Green: Adjusts the overall value of the green color channel.
Blue: Adjusts the overall value of the blue color channel.
Animation Tuning Group
These parameters control the overall timing of the transition. On hosts which permit on-screen heads up display widgets (such as AE, Premiere, and Avid) you should never need to modify these sliders directly since they can be configured in a more convenient and intuitive manner by manipulating the widgets directly in your comp/preview pane. On hosts without heads up display widgets you can use these sliders directly to fine tune your animation timing, taking advantage of the View Ease Curve option to help visualize the animation rates.
**Glow Ease In:**Control how quickly or slowly the glow amount increases at the beginning of the transition.
**Glow Ease Mid:**Control the rate of change of the glow amount (how quickly it reaches its peak amount and how long it holds there) during the middle of the transition.
Glow Ease Out: Control how quickly or slowly the glow amount decreases at the end of the transition.
Dissolve Duration: Control the timing of the underlying dissolve relative to the timing of the rest of the transition.
OSC Enable: Only visible in hosts that support heads up display widgets for manipulating these controls directly on screen. Enables/Disables on screen controls.
View Ease Curve: (Only visible/enabled in hosts that don’t support heads up display widgets for manipulating these controls directly on screen.) Enable this control to display a preview graph of the the animation curves rendered into in the composite window*.*