


Color can significantly impact how a scene is perceived and what emotions it evokes. In the early days of filmmaking, color balance and lighting were meticulously adjusted while filming: filmmakers used camera settings, natural light, and other techniques to create desired illumination. Today, you can achieve exceptional results in post-production thanks to plug-ins and effects that aim to upgrade the color and lighting of your scenes.
In today's article, you'll learn the basic editing workflow to color grade in Adobe Premiere Pro, whose tools are among the best for innovative visual solutions for content creation and filmmaking. Adjust lighting, black and whites, use the color wheel and curve settings to color grade, achieve accurate skin tones, and finally, learn more about the cutting-edge effects we developed to bring to life professional color grading results.
The Importance of Color Grading
In filmmaking post-production, there are two concepts you'll encounter when adjusting color: color grading and color correction. Let's analyze these two concepts.
You may use different cameras to film different shots in multiple locations with all types of light and reflections, which might create some color inconsistencies and skin tones issues you'll need to fix via color correction. This involves adjusting white balance, temperature, saturation, highlights, and shadows to color match the footage and achieve visual consistency.
The color grading process goes beyond basic correction: it can be a creative tool that uses the color palette to induce emotions or even physical sensations like warmth or cold.
With Adobe Premiere Pro, you can create those stunning effects in the desert, tropical island, or snowy mountains, even if your camera can't fully capture the true essence of the natural landscape while filming.
Preparing Your Color Grading Workflow
First, create your sequence in Premiere Pro and work on the basic video editing like cutting, trimming, and getting your video clips ready. This way, you don't have to worry about going back to edit a video clip at a later stage in the post-production process.
Step 1: Create an Adjustment Layer
The first thing you should do is create an adjustment layer, which will allow you to do all color grades in the adjustment layer without affecting your raw footage.
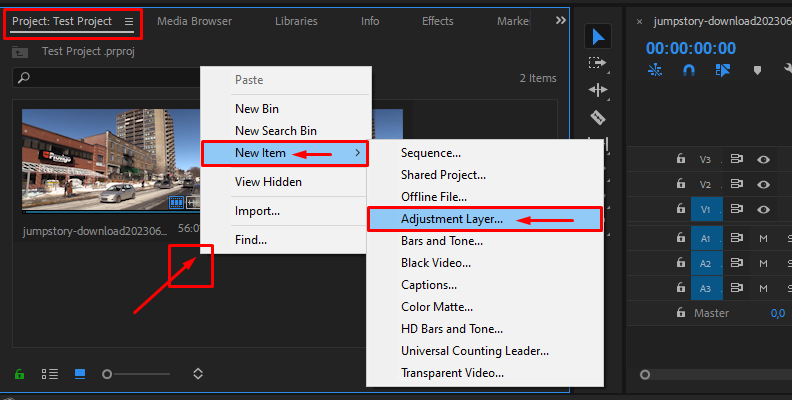
Right-click in your Project panel and select New Item > Adjustment Layer from the dropdown menu. You can leave the video settings as they are: Premiere Pro automatically uses the ones from your sequence. Click OK, and your new adjustment layer will be in your Project panel. Drag it to the timeline above your sequence and adjust it to the length of your sequence or to the clips that require color correction.

Step 2: Color Workspace: The Lumetri Color and Scopes Panel
Adobe Premiere Pro has different workspaces that allow you to move from editing video to audio or color tools in the same application. For color grading and correction, you’ll use the Lumetri Color panel in the Color workspace.
Go to the Window menu and search for Workspaces. Select Color to change from the Editing workspace to the Color Workspace. In this workspace, you'll have your video in the middle section, the Lumetri Color panel to your right, and the Lumetri Scopes panel to your left.
The Lumetri Scopes panel displays and analyzes the color and brightness of your video in waveform graphs. You can also use it for reference when you adjust the color in your videos. You can change the Scopes by right-clicking and selecting one of the following:
Vectorscope: Measures and monitors saturation and hue in a circular pattern.
Histogram: Shows a statistical breakdown of the pixel density for each degree of color intensity. It analyzes shadows, mid-tones, and highlights with precision to correct the tonal scale of the image.
Parade Scope: Displays individual waveforms for RGB values, making comparing and adjusting colors from the image quite simple.
Waveform: Displays RGB, IRE, luminance, and chrominance from video clips.
The Lumetri Color panel is where all the color grading tools are. Here, you'll find basic color correction and many other tools, such as white balance, curves, color wheels, HSL, and vignettes. Take your time to familiarize yourself with the Lumetri Color Panel as it'll be the center of your color-correction process.
Step 3: Basic Correction Tab
We recommend starting with the basic correction section before the color grading process. From this step, you can import a LUT (look-up table). LUTs are great tools for adding a specific style or doing quick skin tone fixes with presets.
To import LUTs, click on Input LUT and browse for the LUT on your computer. You can use LUTs as a starting point and make further adjustments to color, or you could start from scratch, playing with all the settings basic color correction offers.
You can use Auto Color to apply color correction to the entire sequence and get a baseline, then fine-tune each parameter to add more personality to your video. For instance:
White Balance: Lets you select the whites from your video clip and adjust tint and temperature. This is a crucial step to fix skin tones.
Tone tools: Adjust the mood of your image. Set the overall brightness with exposure, change the range between light and dark colors with Contrast, and target bright areas with Highlights and dark ones with Shadows.
Whites and Black sliders: Adjust the threshold lights and shadows, respectively.
Saturation: Affects the intensity of color in your video footage. If you like an image with more gray tones, set a low saturation using the sliders.
Remember to use the Lumetri Scopes as a reference as you fine-tune color to maintain consistency.
Step 4: Advanced Color Grading Tools
Creative Tab
Under the Creative tab, you can apply creative LUTs to enhance your film's style. You'll find film stock and presets camera looks under Lumetri Presets in the Effects menu of Premiere Pro. You can edit how much of the effect to apply with the intensity slider.

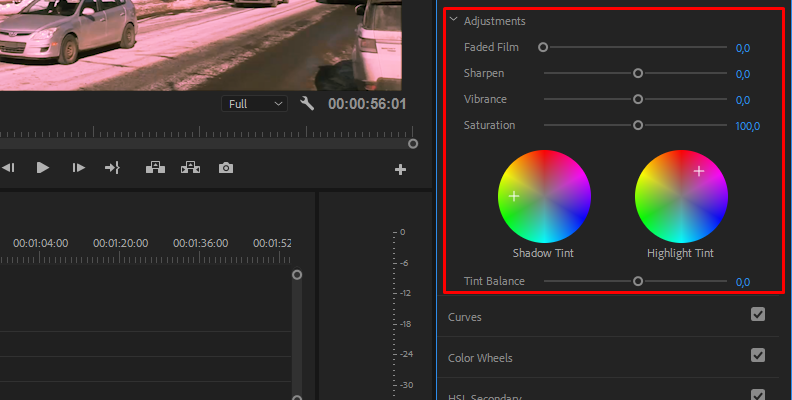
There are more adjustments under Creative, such as Faded Film, to give a vintage look to your film and Sharpen to increase edge definition. Play with Vibrance, Saturation, and the Tint Wheels for shadows, highlight tints, or to add a blue or green tint to your indoor footage.
RGB and Hue Saturation Curves
Adobe Premiere Pro features two types of curves to fine-tune color more precisely to produce authentic tones: RGB and Hue Saturation.
The RGB Curves allow you to change your video clips' Luma and tonal ranges. Add highlights by creating and dragging a point in the upper-right area, and use the lower-left area for shadows. Click on each color value to adjust the area with the curves.
With the Hue Saturation curves, you can fine-tune in more detail using the following curves:
The Hue versus Saturation curve adjusts saturation from any hue in the footage. For example, to alter skin tones or the sky color to create colder scenarios.
The Hue versus Hue curve allows you to change the color of elements in the image, like plants, clothes, or furniture.
The Hue versus Luma curve allows you to adjust the lightness for specific colors.
The Luma versus Saturation curve changes saturation according to image tonality instead of hue.
The saturation versus Saturation curve selectively alters the saturation of an image without affecting similar colors.
Using Color Wheels
A Color wheel is more intuitive than a curve for color management. There are three main color wheels, one for shadows, mid-tones, and highlights, allowing you to customize these areas individually.
Use a color match to compare two shots from your sequence and ensure consistency in color and light across multiple scenes. Select a scene, click the Comparison View button, and choose the reference clip from your sequence using the playhead.
HSL Secondary
The HSL secondary tab gives you more control over specific colors, which is helpful when you’re telling a story through colors to make the primary color of your story stand out among the others. It’s usually the last step after basic correction and other color-grade techniques.
Display the Key tab and use the eye dropper to choose a color from the frame. Check the Color/Gray box and use the H, S, and L sliders to narrow the selection. You can also use the Refine tab to remove noise and soften the edges.
Uncheck the Color/Gray box and open the correction tab to adjust the color of your selected range. You can preview your changes as you adjust the correction controls.
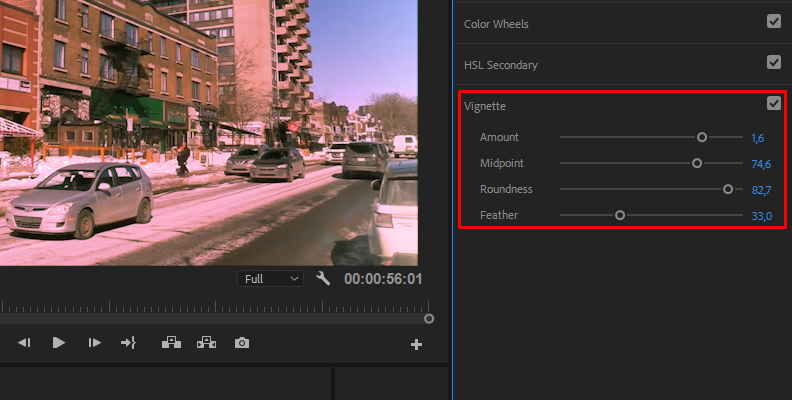
Add Vignettes
Vignettes help attract more attention to the main focus of a scene: it looks like a fade-out effect from the edges to the center, where it's brighter. On the vignette section, you can adjust the amount of dark or bright fade out, the midpoint, and the size of the vignette.
Step 5: Finalizing and Exporting Your Video
Take your time to color grade your video in Premiere Pro until you have the desired look for your film. The next and final step is to export your video to distribute or share online. Go to File > Export > Media. Rename your video, choose a destination folder, and click Export.
How to Color Grade in Premiere Pro Using Sapphire
Now we will guide you on color grading in Premiere Pro using tools from our Sapphire plug-ins. These effects from Sapphire come with presets you can use as a starting point to create instant color grading without much hassle. One of our favorites is the S_ColorFuse.
With ColorFuse, you can easily create cinematic color grades using one of the 50 included presets. Or combine up to three LUTs and adjust their settings to create your own mix. There is also a free trial version of Sapphire available for Premiere Pro.
Step 1: Add an Adjustment Layer to Your Sequence
Create an Adjustment Layer to apply all color grade effects instead of your original clips.

Go to your project panel, right-click, and choose New Item > Adjustment Layer. Drag the new layer from the bin to the timeline above the sequence you want to edit color. Adjust the layer to the length of your sequence to cover all clips to make a balanced color grade.
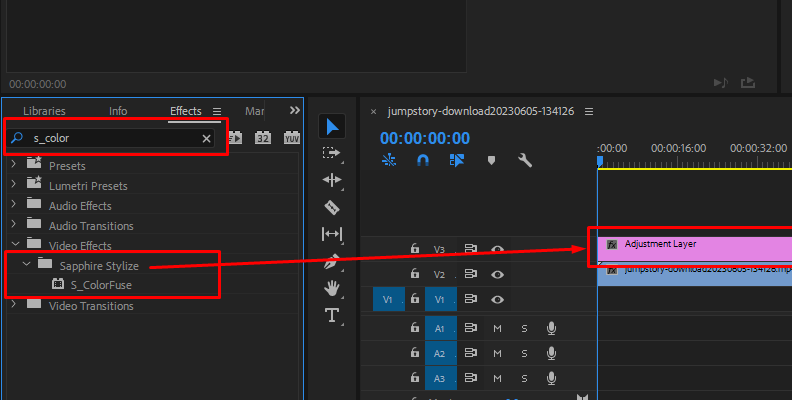
Step 2: Apply the Effect to the Adjustment Layer
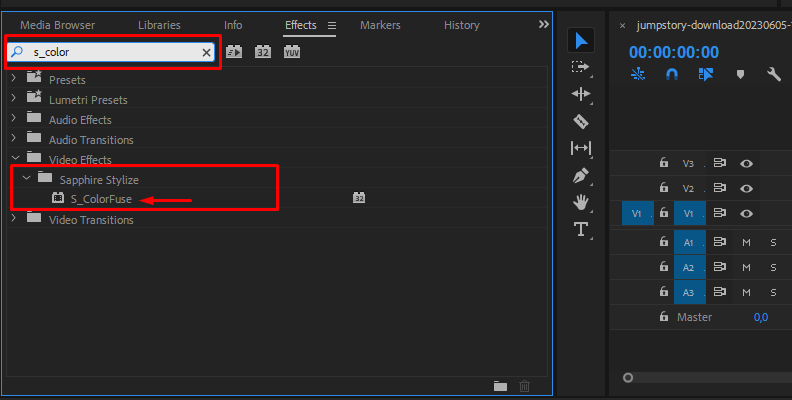
Go to your Effects panel and search for your color grade effects from Boris FX, like S_ColorFuse. Other good effects are S_Gradient, S_FilmEffect, S_TriTone, and S_Tint. Try them to see how each adds unique traits to your video and enhances its quality.
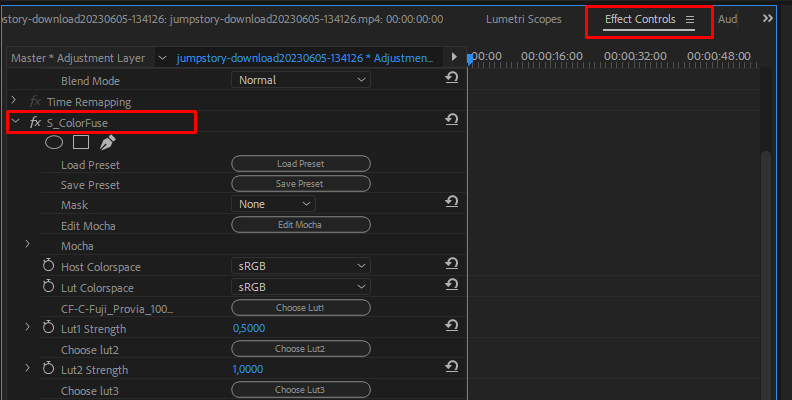
Step 3: Make Color Adjustments
Even if you use the default settings or one of the presets from ColorFuse or other Boris FX effects, you can still make adjustments from the Effects Controls panel. Experiment with each value to understand how they interact with each other to create different textures with your color grading.
Step 4: Export Your Video
The last step is to export your final video in your preferred format to distribute it or upload it to your YouTube channel to share your new skills with friends and followers.
Final Thoughts
Color grading in Premiere Pro is a way to transform your footage into professional videos, magnify emotions through vivid colors, and draw the viewer's attention.
Knowing how to color grade in Premiere Pro is essential to boost your work's quality, and it offers plenty of accessible tools for beginners and professionals alike. If you’re looking for a professional solution to transform your videos into visually-stunning projects, add Sapphire or Continuum to your toolkit to enhance the beauty and power of your work.
Good luck, and stay creative!


