


Color grading plays a significant role in both photography and videography. This is because colors alone can alter the entire mood of the image presented to the viewer and how they interpret the context.
Suppose you've ever taken a photo or recorded a video and added the material to even the most basic editing software, like the built-in ones we have on smartphones. In that case, you've likely noticed that color grading is always one of the main offered editing options (tools).
It may not always be called "color grading," but it can exist as "tones" or "adjust". Essentially, it's the same tool, and it is always there.
In this guide, we'll talk about color grading, what it is, how it works, why it is important, and most importantly, how you can do it for your work. There's a lot to cover, so without further ado, let's get straight into it.
What is Color Grading?
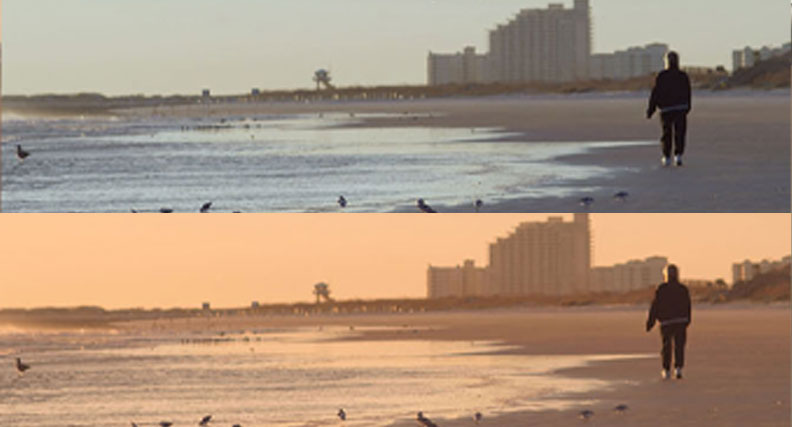
Color grading is a post-production technique that allows you to creatively adjust the color, tone, and contrast of an image or video to achieve a specific artistic style, vibe, or cinematic effect. It's way more than just color correction that supports storytelling: it can boost the emotional impact of a scene through natural and immersive color palettes.
Think of it as playing with a coloring book. The original drawing is your raw footage, and color grading means choosing the perfect colors to make that raw footage more interesting and impactful. You can make it warmer for a cozier feel, cooler for a calm or more serious vibe, or add contrast to make the colors pop or create a more dramatic look.
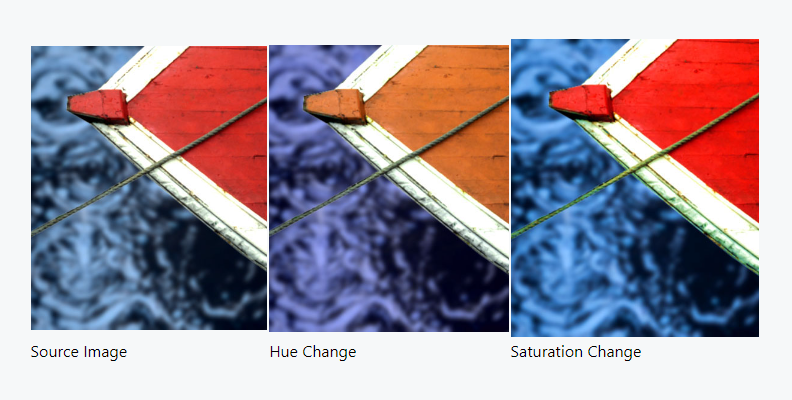
In practical terms, color grading involves adjusting three main things: hue (the actual color), image saturation (how intense the color is), and brightness (how light or dark the color appears). By adjusting these elements, you can completely transform the look of your photo or video.
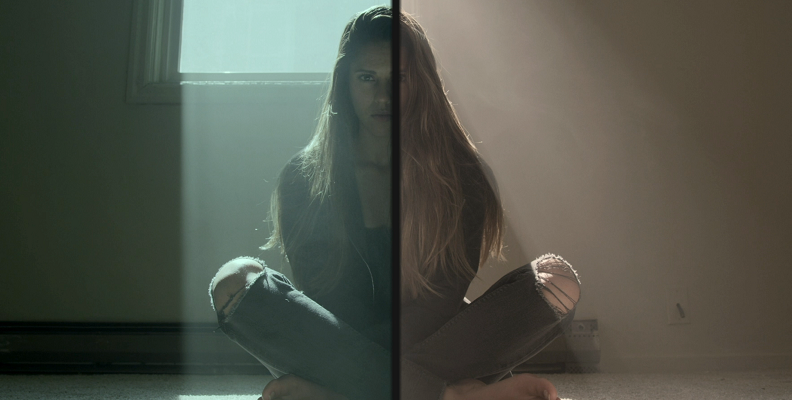
Filmmakers, photographers, and even Instagram enthusiasts use color grading to tell stories visually or enhance the look of the image/video in a way that benefits the related topics. For example, a warm, golden tone might be used for a nostalgic flashback in a movie, while a cool, desaturated look could convey a futuristic or mysterious atmosphere. Playing with brightness and contrast is often used in the fitness sphere, as it adds much better lighting that showcases a physique.
With all of the above said, color grading is the artistic touch that takes your images and videos from okay to outstanding, allowing you to evoke emotions and tell a more compelling visual story. Yes, colors have that much of an impact on storytelling and emotions!
What is Color Grading in Video
Color grading is essentially the same for both photographs and videos. A professional colorist would apply the same methods and principles when working on (editing) a photo or a video.
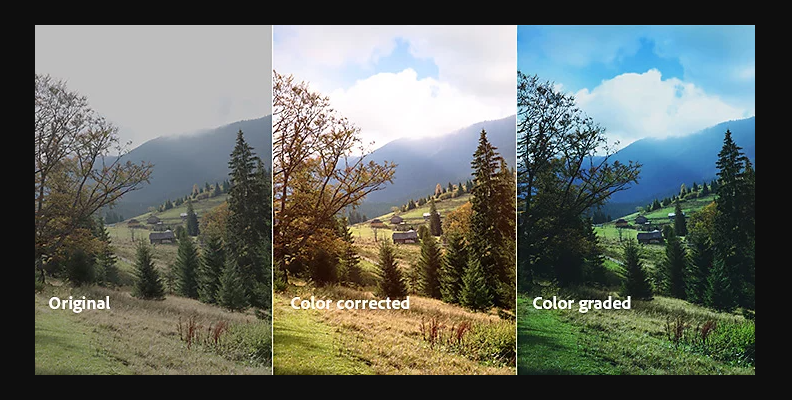
One thing to note is that there is a difference between color grading and color correction.
For example, a color "correction" would only be needed if the video turned out to have colors way different than what was expected or what's considered "natural" for that type of scene. It can happen as a result of not adjusting the recording equipment properly or facing some other circumstances that impact the look.
Color correction is used to ensure that colors are accurately shown in the footage, which is why you'll often hear that color correction is used for accuracy, while color grading is used to create a specific style that your film/project would be known and recognized for.
Color correcting is also often used to make one shot "match" the rest of the recorded footage if there are any inconsistencies.
Color grading, however, could be simply tweaking a few parameters to give the look of the video a slight makeover and make it more appealing to the viewer's eye. It's usually done after the color correction process, as ensuring there are balanced and natural-looking colors in the video is a priority.
For example, if the film director wants to emphasize that a specific environment in a scene is known for its beautiful nature and greenness, they will ensure that the grading is focused on that and they can turn even dull-looking nature into a picture that breathes life and freshness.
Modern editing software also allows us to isolate specific parts of the footage using masking and tracking, and color grade or color correct only some areas, like the sky, for example. Obviously, this is much more difficult to do in a video compared to a picture, as the elements shown on screen are moving and you have to track everything.
How to do Color Grading
So, now that you know the difference between color correction and color grading, it's time to learn how to do it yourself. Before getting into the actual methods, which will be in the next two sections, let's take a look at some of the basics of color grading and what settings, parameters, and data you should monitor and work with.
- White Balance: Adjusts the overall color temperature of the footage to ensure whites appear neutral. This is crucial for setting the baseline color.
- Exposure/Contrast: Controls the overall brightness and contrast of the image. Adjusting exposure ensures that the video is neither too dark nor too bright.
- Hue, Saturation, and Luminance (HSL) Controls: Allows you to selectively adjust the hue, saturation, and luminance of specific colors in your footage. This is useful for fine-tuning individual color ranges.
- Color Wheels/Grading Wheels: Provides control over the balance between shadows, mid-tones, and highlights in terms of color temperature. This helps create a specific mood or look.
- Curves: Enables precise adjustments to the tonal range of your footage. The RGB curve allows individual manipulation of red, green, and blue channels.
- Color Grading Presets/LUTs: Look-Up Tables (LUTs) or presets are pre-defined color grading settings that can be applied to footage for a specific look or style.
- Vignette: Darkens or lightens the edges of the frame, drawing attention to the center. It can add a cinematic touch to your footage.
- Gamma Correction: Adjusts the luminance of mid-tones in your footage, affecting its overall brightness and contrast.
- Color Correction vs. Color Grading: Distinguishes between fixing color issues (correction) and creative enhancement (grading). Understanding when to correct or grade is essential.
- Secondary Color Correction: This allows you to isolate and adjust specific areas or objects in your footage without affecting the entire image.
- Saturation Control: Adjusts the overall vividness of colors in your footage. Be cautious not to oversaturate, which can result in unnatural looks.
- Soft Clipping and Hard Clipping: Controls how colors are clipped or limited in the highlights and shadows. Soft clipping produces a more gradual transition, while hard clipping is more abrupt.
- Grain and Film Emulation: Adds simulated film grain or emulates the characteristics of different film stocks for a cinematic feel.
- Split Toning: Applies different colors to the shadows and highlights independently, allowing for creative color toning.
Experiment with these parameters and tools to find the right balance for your specific project, keeping in mind the mood, style, and narrative you want to convey.
How to do Color Grading with Continuum
Continuum is a renowned plug-in (pack) by Boris FX containing many top-level video and photo editing assets. From filters to color correction and color grading tools, you can find it all, and what's even more exciting is that you can try Continuum by Boris FX for free. Download it, accept the terms, and enjoy!
In this section, we'll show you how to do color grading with Continuum in Adobe Premiere Pro. Note that Continuum is available for all popular video editing programs, not just Adobe's. So, let's get into it.
Load Up Premiere Pro, Create a Project, and Import Media
Once you launch your editing software of choice (remember, this doesn't have to be Premiere Pro, as Continuum is available for After Effects, Avid, DaVinci Resolve, and more) we recommend creating a new project.
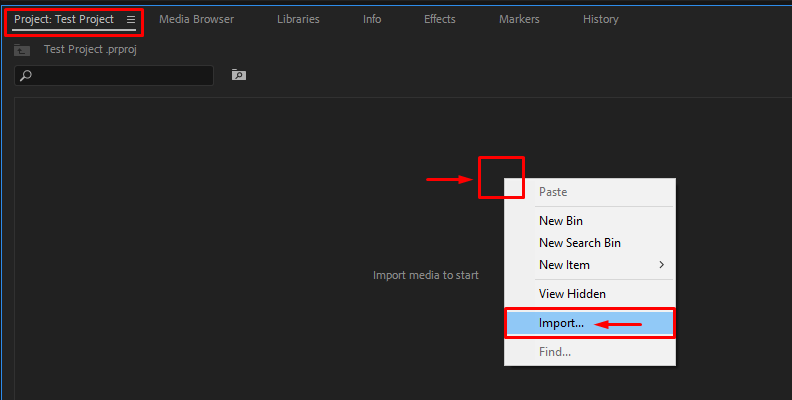
Then, import the images/videos you wish to color correct/color grade. In this specific case using Premiere Pro, the image below will show you how to import. When done importing, move on to the next step.
Create a Sequence, Search, and Apply the Color Grading Effect
Once you have your media within the software, it's time to create a sequence. You can do this by dragging and dropping the media from the "Project" tab onto the timeline area.
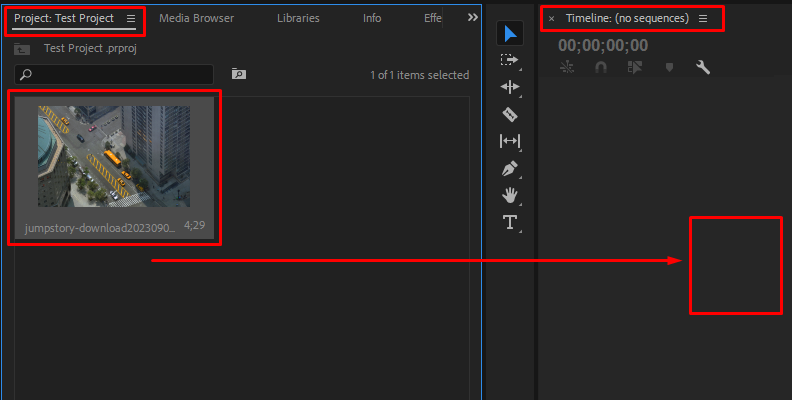
This will create a sequence. Now, your video/image is ready to be trimmed, color graded/corrected, edited, and more. Your next step is to apply one of the Continuum color grading effects.
To do this, click on the "Effects" tab, then search for a folder named "BCC Color & Tone". If you've properly installed Continuum for your editing software, you should be able to see this folder.
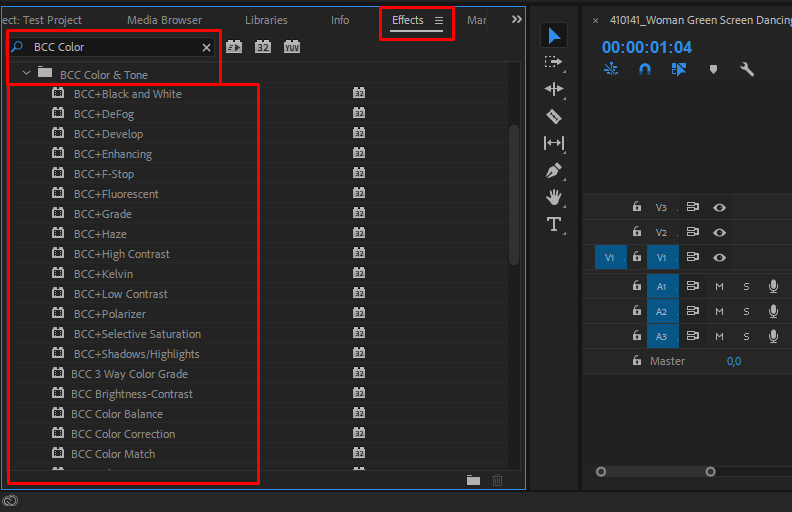
Inside the folder, there are many tools available for your task. You can take a look at each of the Color and Tone tools along with a description here.
If you're already an experienced colorist, feel free to pick any of the tools and apply them to your video. Then, experiment with the settings. For this tutorial, we'll focus on the "BCC+ Grade" effect. So, find it on the list, then drag and drop it over the video/image on your timeline.
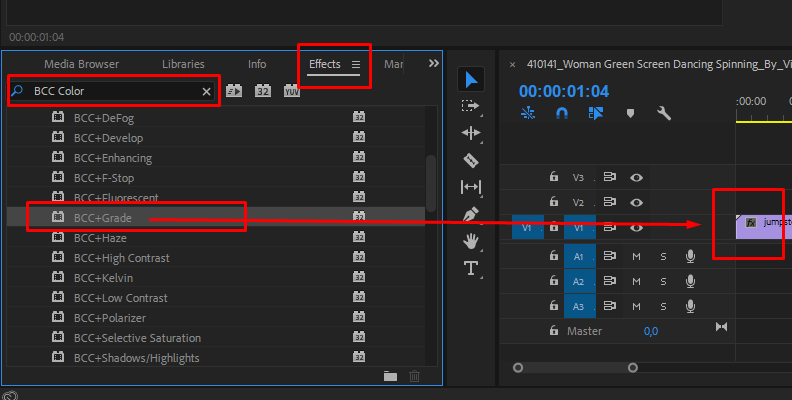
You won't notice an immediate change after the effect is applied, but the next step is adjusting the various parameters to get the look you're after. Also, note that it may take a few seconds for the effect to apply to your video, and this will mostly depend on your computer hardware.
Adjust Parameters and Preview the Changes
Now that the "BCC+ Grade" effect is applied to your image/video, it's time to visit the Effect Controls panel and modify the myriad available settings offered by this tool. To do this, click on the video on your timeline, then choose "Effect Controls" from the top.
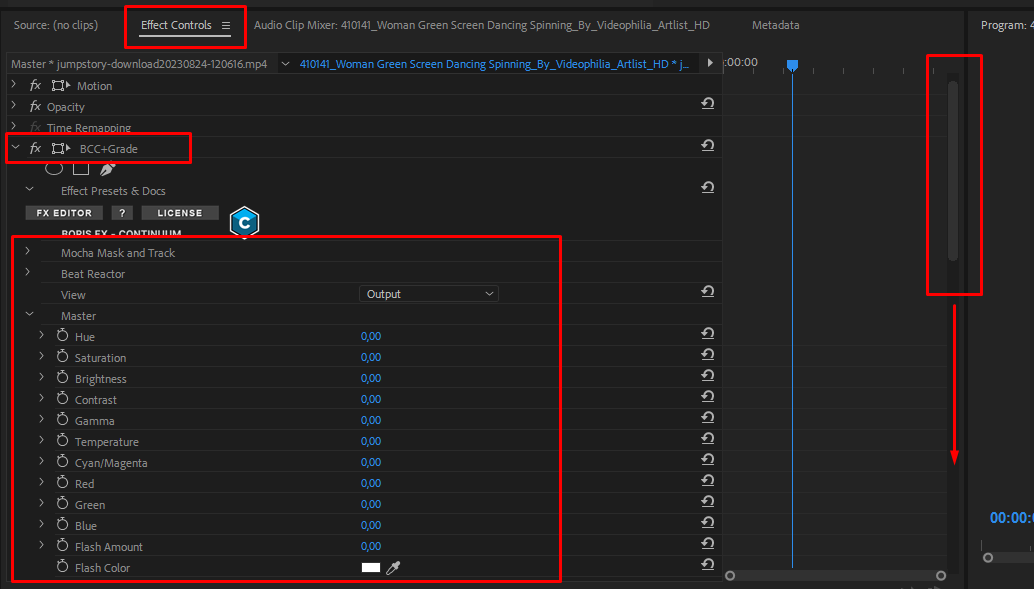
As you can see, you can scroll down a list of a dozen settings that you can change to properly color grade your video/image. There are separate settings for red, green, and blue, cyan and magenta, as well as brightness, contrast, gamma, saturation, and everything else that you would need to professionally grade a video.
It's helpful if you have someone more experienced by your side who monitors your output when doing manual grading, but BCC+ Grade makes this very easy for absolute beginners too, and here's how.
You can access the presets panel by clicking on the "FX Editor" button as shown in the image below. Here, you can choose the color grading styles of some of the most popular films ever.
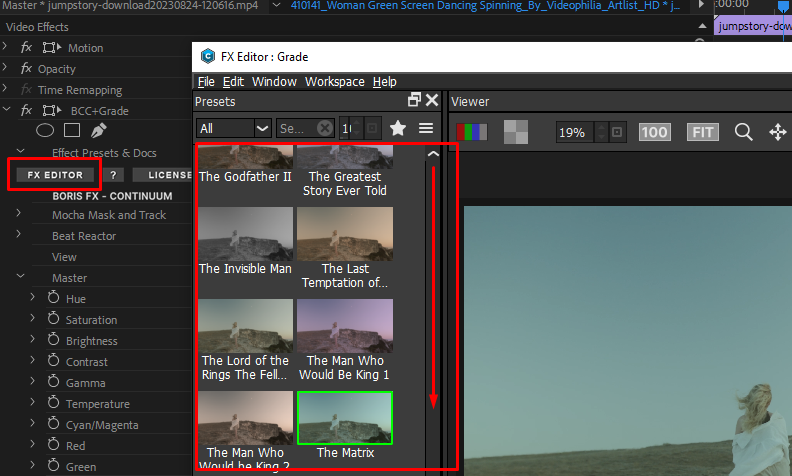
This is great if you are a beginner or simply wish to match the style of a personal favorite without the support of anyone, as it only requires a few clicks to apply these genius grades to your project.
Save and Export the Video
When done editing, save and export the video. Please note that your video/image will look different on different monitors, depending on how they're calibrated.
If you want to grade like a professional colorist, you must ensure that you have screens with perfect calibration.
Final Words
That covers everything you need to know about color grading and color correction. Hopefully, what you learned in this tutorial will improve your work in the future.
Good luck!
FAQ
This section contains some of the most frequently asked questions (and answers) users have on the color grading and color correction topic.
How do I learn color grading/color correction?
There are many ways to learn color grading and correction. You can manually experiment in your software of choice and watch helpful guides from professional colorists. We have a video guide that should make things much clearer for you, explaining the process step-by-step. You can watch it here
Do I need to rely on third-party plug-ins for color grading/correction?
No, you can manually color grade and color correct in your software of choice. However, plug-ins make your work much easier and more automated, especially if you are a beginner.


