


Within the photography realm, the camera lens flare effect is a notable phenomenon, distinguished by its ability to impart a distinct enchantment to visual compositions.
Originating from incidental interactions with light, lens flares have transitioned from perceived imperfections to intentional, celebrated elements within the craft.
In this guide, we embark on an exploration of lens flares, delving into their origins, distinctive characteristics, and the deliberate ways photographers leverage them to enhance their artistic narratives. You'll also learn how to create lens flare effects for your photos, and reduce lens flare amount or completely remove it if needed.
Without further ado, let's get straight into it.
What is Lens Flare?
In one of our other guides covering how to add a Lens Flare in Photoshop, we describe the occurrence of lens flares as a bright light source entering the camera lens system, creating an "unwanted" artifact when capturing the photo or video.
However, this "unwanted" artifact would only be unwanted if it occurred accidentally, without you planning to incorporate it into your work on purpose. Otherwise, there are many cases when artists intentionally manipulate the scene, lightning, and lens elements as they want to achieve a lens flare effect for either aesthetic or functional purposes.
When this isn't possible, we add lens flares with the help of digital software, in popular editing apps, like Adobe Photoshop or Optics by Boris FX.
A lens flare is an optical phenomenon in photography and cinematography that manifests as unintended light scattered or flared in a lens system, most often caused by direct sunlight or strong artificial light sources.
These artifacts are bright, often geometrically shaped, streaks or circles in the image, adding a distinctive and sometimes aesthetically pleasing quality to the photograph. While initially considered a flaw, many photographers now intentionally incorporate lens flares into their work to create a sense of warmth, atmosphere, or dreaminess.
There are different types of lens flares that you may see in images, so take a look at the next section where we discuss all of them.
Types of Lens Flare
When a lens flare occurs in a photograph, it could be due to various factors, as we mentioned in the section above.
For most people not professionally involved in photography or videography, understanding lens flare effects and bright light sources that cause them is not really needed. They may like or dislike how the effect looks in a photo, so they'll either lean towards wanting more lens flare or avoid lens flare effects completely.
Luckily, thanks to modern technology, AI tools, refined filters, and effects such as those available in the Continuum pack at our disposal, we can add or remove lens flares with ease.
Still, it's worth knowing how to categorize lens flares, so let's take a look at some of the different types we know of.
Ghosting
One of the most frequently occurring lens flares appears as rings or circles that look like artifacts emanating from the primary light source. Unlike the starburst flare, this one can occur naturally in your photos and does not require any special adjustments or circumstances to make it happen.
Starburst
This particular type of lens flare occurs when the photographer intentionally lowers the aperture, which results in less light reaching the sensor. This results in smaller but sharper starburst-like artifacts from the light sources, instead of larger and "softer" circles seen in the "Ghosting" lens flare type. The name "starburst" comes from the shape of these artifacts.
Veiling
This type of lens flare occurs when the primary light source causing the flare is outside the frame. Although you can't see the lens flare directly in the frame, its rays still hit the lens, leaving a veil of light over the entire scene. This type is easy to misuse, as too much can make the photo washed out or faded.
Anamorphic Lens Flar
Widely used in cinematography, the anamorphic lens flare is the most challenging to produce organically. The reason is that you need an anamorphic lens to recreate them. If you've ever seen any films directed by JJ Abrams (and mainly in his version of Star Trek), you might recognize lens flare.
Please note that this is just how we categorize lens flares, and you may run into different names used for each lens flare effect type when getting information from a different source.
What Causes Lens Flare? (How to Get the Lens Flare Effect)
To get a lens flare in your photos or videos, it's important to understand what causes this effect. Lens flare occurs when unwanted light enters a camera lens and interacts with the internal lens elements, creating artifacts in the resulting image.
The primary cause of lens flare is the presence of bright light sources within or near the frame. When direct sunlight or strong artificial light enters the lens at oblique angles, it may reflect off lens surfaces, causing scattered light to create visible patterns in the image.
The optical elements within a lens, such as lens coatings, lens elements, and the aperture, play significant roles in the formation of lens flares. Lens coatings, designed to reduce reflections and enhance contrast, can unintentionally contribute to flaring under certain conditions.
Additionally, the shape and design of the lens aperture impact the appearance of flares; geometrically shaped apertures, like hexagons, may produce corresponding shapes in the flares.
You can experiment with your equipment and achieve different types of lens flares for your projects by doing so. For example, zoom lenses are often used for sun flare effects, while a wide-angle lens is used to make the light source appear smaller. You can swap between these depending on your project's needs. If you're a beginner or a student, however, you may not have wide-angle lenses, prime lenses, or anamorphic lenses available. In such cases, it's better to rely on adding this effect digitally.
When undesired, you can minimize flare effects by using a lens hood to block extraneous light or adjusting the shooting angle to lower the impact of direct light sources.
You can also remove unwanted lens flare effects in most modern digital software, but that's slightly more time-consuming, and better to avoid it in the shooting process if possible. If not, we have a section below covering how to do that.
How to Add a Lens Flare in Photography
To add a lens flare to a photo, you can use any of the popular image editing programs, like Adobe Photoshop, for example.
There are multiple approaches when it comes to adding a lens flare effect, but we'll show you how we do it in a step-by-step tutorial in this section.
Load Photoshop, Create a Project, and Import Media
The first step is to open Photoshop on your PC, then create a new project so you don't experiment on one that already has ongoing work. Import your media, in this case, a photo to which you wish to add a lens flare effect.
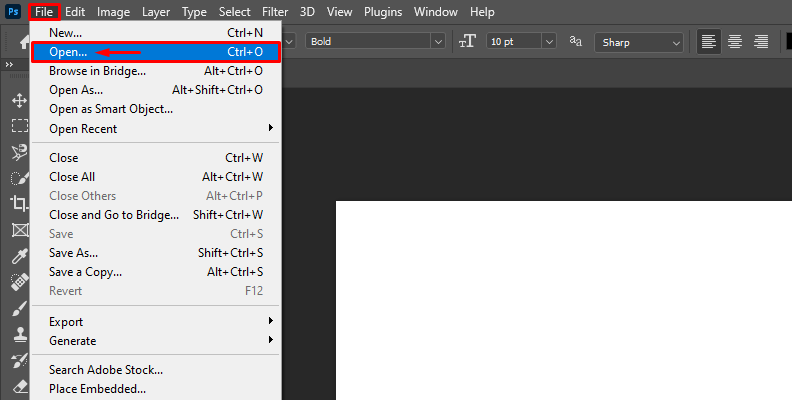
You can import media by choosing File -> Open, as shown in the screenshot below.
Once the photo is imported, move on to the next steps.
Duplicate the Image Layer, Then Add the Effect
Almost always, when working on something in Photoshop, it's good practice to duplicate your main image layer, or even create as many new ones as possible so that you can structure and organize your work.
This way, if you want to reverse a change that you did long ago, you won't have to undo everything until you get there, but instead find the layer containing the change you want gone, and simply disable or delete it.
So, select your main image layer, then duplicate it as shown in the image below.
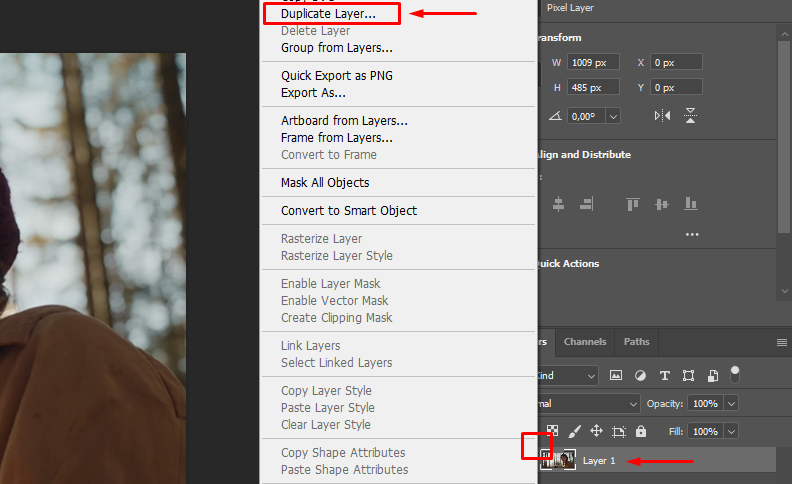
This will be the layer to which you'll be adding your lens flare effect, so you can also rename it to "Lens Flare" for better project structuring.

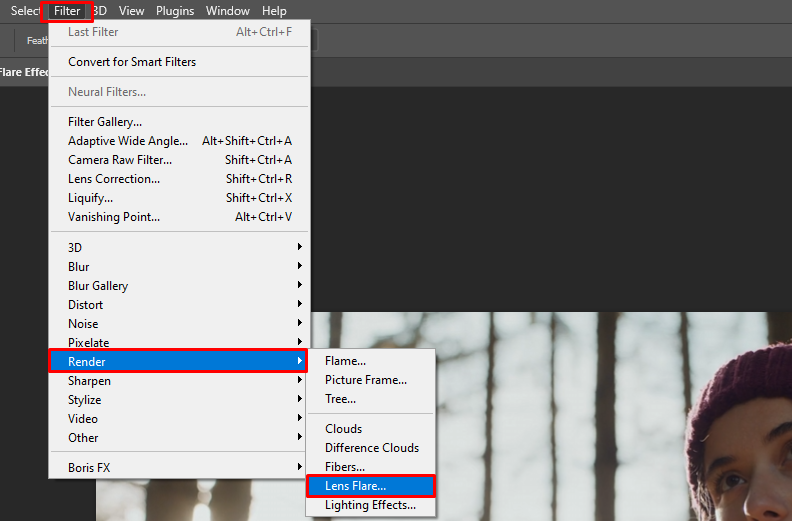
Now, it's time to add the effect. For this, go to Filter -> Render -> Lens Flare, as shown in the image below.
Choose the Lens Flare Position and Adjust Parameters
Once you add the effect to your lens flare layer like we just did, you'll notice a panel showing up on your screen. Here, you can adjust the lens flare position by moving it around on the image. When you are satisfied with the position, you can click "OK" as shown in the image below.
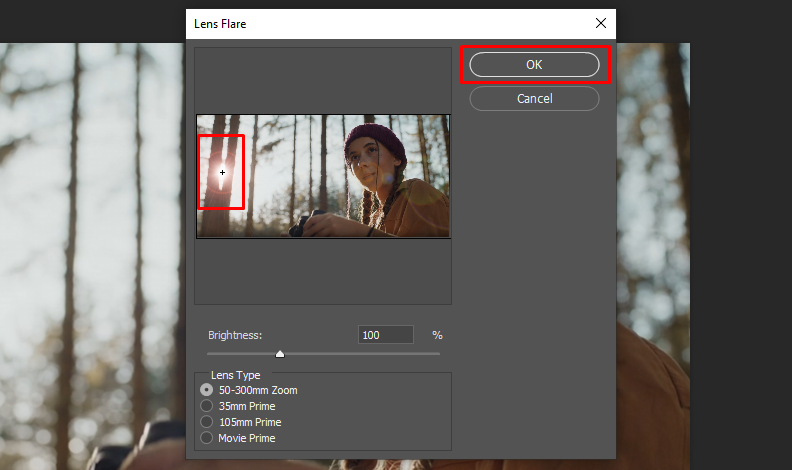
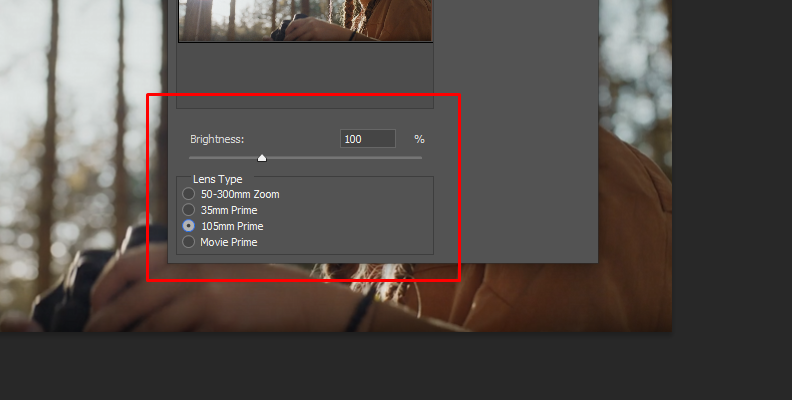
Or, you can change the lens type and preview how it looks, as different lens types are better for different images. You can also adjust the brightness using the slider.
And that's all there's to it!
Here's how our image looks now with an added lens flare.
How to Add a Lens Flare with Optics from Boris FX
Plug-ins make everything easy and save you a lot of time, which is why in this section we'll show you how to add a lens flare using Optics by Boris FX, one of the most renowned plug-ins for photo editing programs among industry professionals.
Step 1: Load Photoshop and Import Your Media
Open Photoshop on your PC, then create a new project. Once the new project is loaded, go to File -> Open in the top-right of your screen and import your image into the software.
Step 2: Duplicate Your Layer After Importing the Image
Upon importing the image to which you want to add the lens flare effect, select the main layer and duplicate it. You can also use the "CTRL+J" keyboard shortcut for this.
Step 3: Open Optics within Photoshop
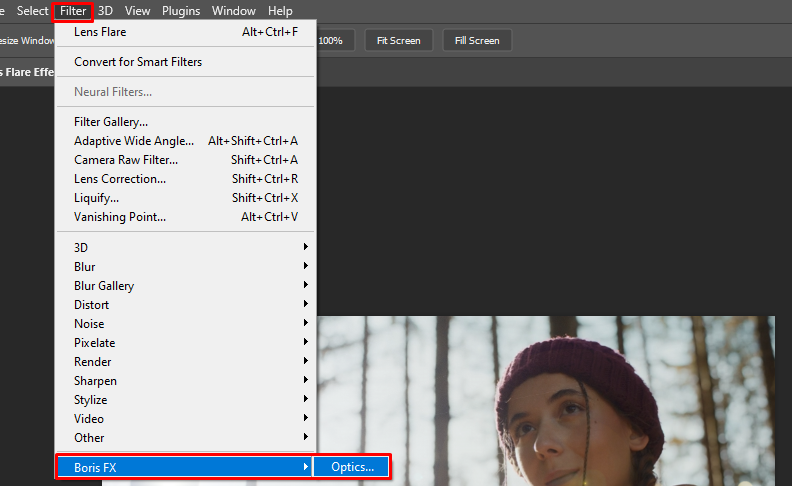
Select the duplicated layer. Now, click on Filter -> Boris FX -> Optics, as shown below. This opens Optics as a plug-in inside Photoshop.
Step 4: Search for the Lens Flare Effect and Apply It
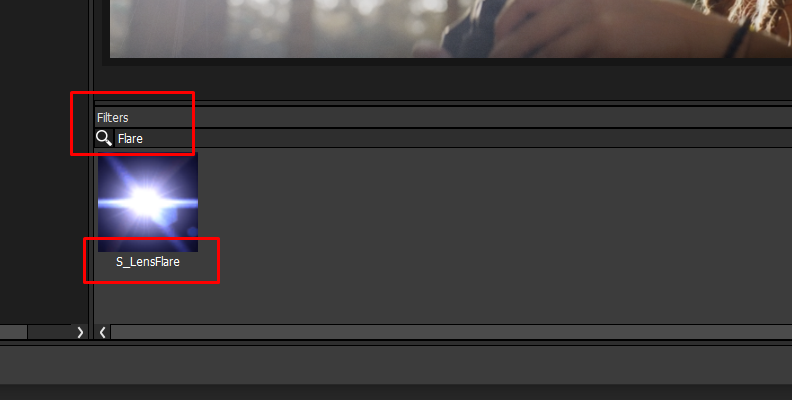
The Optics work panel is simple and user-friendly. When it loads, click on the search bar and type in "Lens Flare" so you won't have to look for the effect manually. If you click on the effect, you'll see a separate panel for it along with some effect controls showing up on your screen.
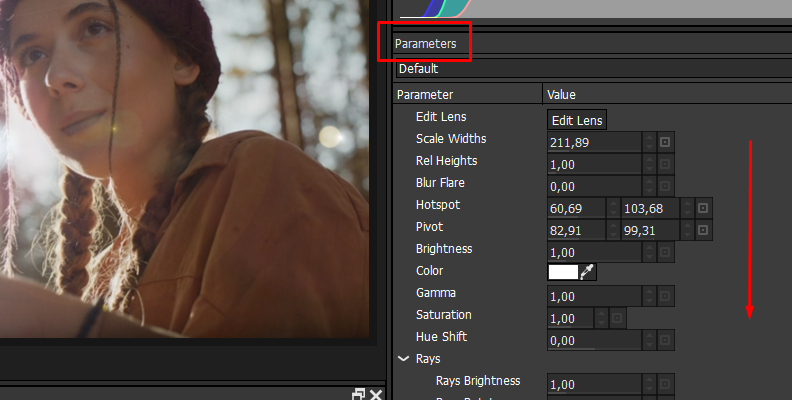
Step 5: Modify the Effect and Its Parameters
Move the large circle to position the lens flare, and move the small circle to adjust the angle at which you want the light to come from.
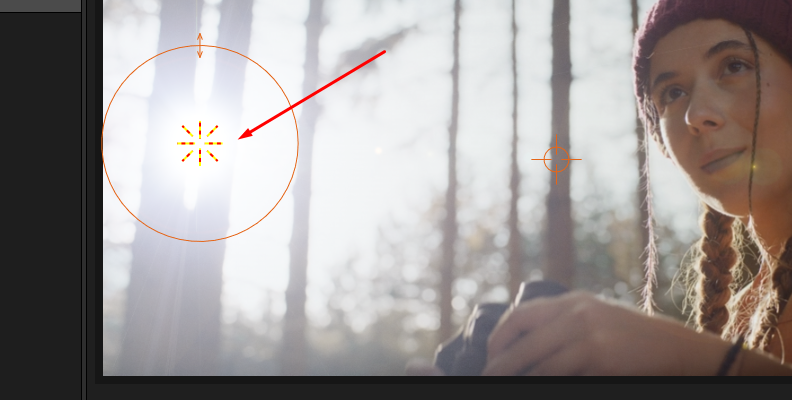
On the right side, you can adjust many different parameters to get the desired effect.
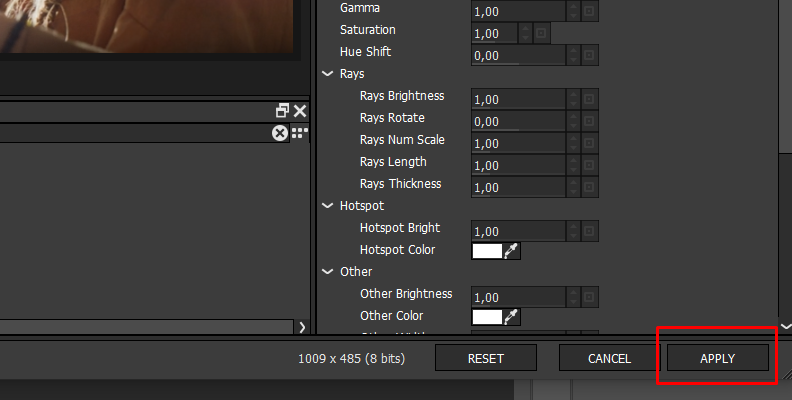
When done, simply click the "Apply" button in the bottom-right corner of the screen to save the changes.
How to Get Rid of Lens Flare in Photography with Continuum
To remove a lens flare from a photo, we'll use the "BCC Remover" effect which is a part of the Boris FX Continuum pack. You can download and install a free trial version of this pack for your software of choice.
Once you download and install Continuum for your host of choice, launch it and import the photo with a lens flare in it.
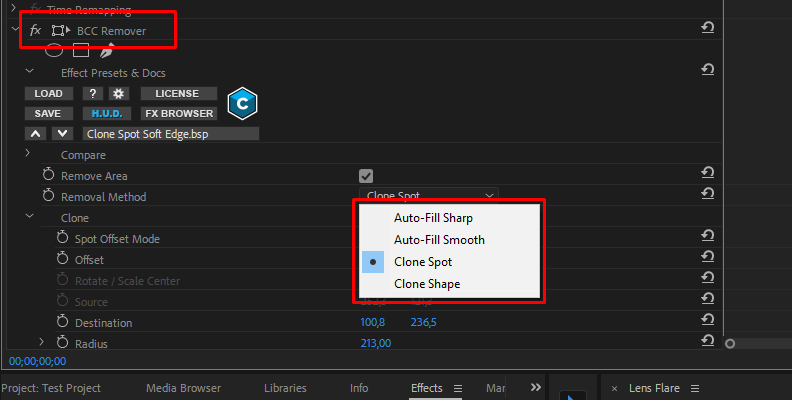
Apply the "BCC Remover" effect to it, then open the panel where you can control the effect's parameters and functions.
From here, it's up to you which approach you'll choose. You can use four different types of removal for the lens flare in your photo: Auto-Fill Sharp, Auto-Fill Smooth, Clone Shape, and Clone Spot. You can read about all of them in this guide covering all BCC Remover features.
Experiment with the parameters until you like the result, then, simply save the changes and export your image.
For more information on how the BCC Remover effect works, as well as seeing it in action, take a look at this informative video guide.
That should cover everything!
Final Words
With that said, you now know a lot more about lens flares, how they work, how to get them both "naturally" and digitally within your images, and even how to prevent them from occurring so much in your work.
Hopefully, this knowledge will help you take your work to the next level in the future. Good luck!


