


Shooting and editing video is no trivial task. Sometimes, after hours spent in post-production to correct and enhance your footage, you find artifacts in the image when you play it back on your computer or TV screen or after you've already uploaded it to YouTube. While you can spot these artifacts during post-production on your editor's viewer, they're not always easy to notice, and you might realize these imperfections too late.
These artifacts that look like heavy bands or blocks of colors are called banding, color banding, or posterization. They are most noticeable in gradients of color in backgrounds, skies, and sunsets and can make your video image look less smooth. Sadly, banding issues are more common than you might think: you can often see it in ads, YouTube content, and video streaming platforms.
In this article, you'll learn what banding is, what causes color banding, and how you can reduce banding in your videos. I'll provide a step-by-step guide with several ways to reduce color banding on different video editing software to fix banding using various techniques.
Let’s dive in!
What is Banding?
Color banding, also called posterization, is a visual effect that affects backgrounds with gradients, making the changes of color in an area more visible and less smooth. Banding looks like sharp color bars in your footage, like placing one image after the other without gradually fading. It's usually more present in darker areas when the color transitions from a lighter to a darker tone within the same color tones.
Banding can appear at any moment of production and occurs for different reasons. There are several ways to fix banding depending on the causes and the video editing software you are using. Let's start by looking at why it happens before getting to the tutorial.
What Can Cause Banding in Video
Understanding the causes of color banding will give you the knowledge to prevent it or correct it in post-production. Some banding issues are caused by how your footage is recorded, and sometimes you can cause banding during the video editing process when you add effects to your video clips due to rendering or compressing too much.
Here are the top common causes of color banding in a video.
Bit Depth
Insufficient color depth or bit depth is the most common cause of banding. But first, what is bit depth? Think of bit depth as color information that a video image contains. Each frame of a video is an image of the real world recreated digitally using pixels that contain one bit each.
Computers use binary code to store information in 0s and 1s. A bit uses these values to store color information using 0 and 1 for black and white. The more pixels and bits an image have, the more color it will represent.
An image with a low bit depth, let's say 1-bit depth, will present a black and white color image because it only has two combinations, and 4-bit will display a greyscale because it has more combinations of the black and white colors stored.
For example, an 8-bit color depth can store 256 tones, a 16-bit depth stores 65,536 tones, a 24-bit depth up to 16.7 million, and so on. A higher bit depth allows you to display images more accurately according to human perception. On the other hand, a low bit depth will present less color and tones, which means less information for smooth gradients.
Banding is a sign of missing information in the footage. A gradient sunset will look totally different with the 256 tones in an 8-bit configuration than the 65,536 tones from a 16-bit depth image. The 16-bit image will look smoother, while the 8-bit image will present banding. In other words, the more color information the image has, the less banding will appear.
Noise Reduction Plug-ins
Noise is another factor that always affects videos. It's so common that almost any video editing software includes a noise reduction effect, and many developers have created noise reduction plug-ins and tools specialized for this issue. Most of the time, they will help you get a cleaner image. However, sometimes they can accentuate a problem not visible before, like banding.
I'm not saying noise reduction filters will introduce banding in your image, but rather enhance it if it’s already there. Sometimes banding is there but is not noticeable enough, and a noise reduction effect can make the image so clean that it will expose the subtle banding.
Color Correction and Color Grading
Using color correction in video editors can be daunting, so after all the hard work, the last thing you want is to find banding issues in your image. But the truth is that color grading and color correction can accentuate banding occasionally.
Using color correction filters to create complex and artificial gradients in your video can cause more unexpected issues than expected. It might look great on your editor and computer monitor once you export the video, but some TVs or streaming platforms might not be ready to display such a range of colors, causing banding to be visible to the end user.
Compression
Banding can occur due to lossy codecs during compression. Reduce the compression ratio when exporting videos and avoid compressing the video several times. Also, remember that some streaming platforms, like Netflix, YouTube, and Vimeo, will automatically compress your video, altering it and potentially adding banding or bringing back banding that was already present but less obvious in the output format.
Low-Quality Displays
Low-quality PC and TV monitors won't have enough bit depth to reproduce the original colors in the video. The truth is the average consumer doesn't use a high-end monitor like the ones video editors do, so even if you see a neat video without banding, a low-quality display with low bit depth will make banding appear. The key is matching your work to the average monitor that'll be used to watch your content and using multiple monitors as a reference to edit your footage.
Shooting with Low Exposure
Finally, maybe the problem was in the way you shot the video. An image with low exposure will usually show a banding issue when you start editing in post-production. It may present banding even in your camera, and trying to fix lighting in post-production can add more banding. In this case, you must add some effects to correct the image and diminish banding.
How to Reduce Banding
The techniques used to reduce banding in post-production include increasing the bit depth of your projects and applying a combination of plug-ins to hide banding, preventing it from appearing once exported and avoiding reappearance due to YouTube and other video streaming platforms' compression.
I'll show you how to do it in the most common video editing software and using different effects, including the professional plug-ins from Boris FX. We'll use a mix of noise reduction, demand effects, and film grain to achieve professional results.
Reduce Banding in Adobe Premiere Pro
Follow these steps to reduce banding when you edit in Adobe Premiere Pro. The first method is for situations where you have plenty of color correction and need to export in a higher bit depth to reduce possible banding issues. This is very easy to do, thanks to Premiere Pro's rendering settings.
First Method: Rendering at A Higher Bit Depth
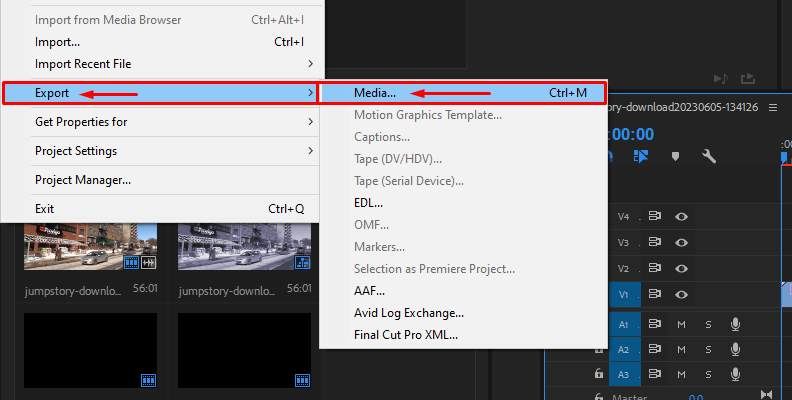
![banding in video]()
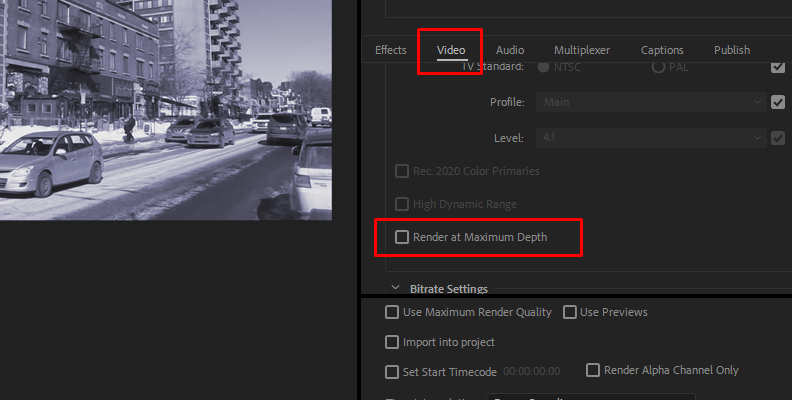
When you're ready to export your video, go to Video File > Export > Media. In the Export settings window, go to the Video tab to check Render at Maximum Depth. Use this only if you're working with 16-bit or 32-bit color depth in your timeline, and be ready for longer encoding times.
![]()
Second Method: Deband Effect
Boris FX Sapphire and Continuum have a Deband effect ready to use in Premiere Pro.
Select your video clips in the timeline.
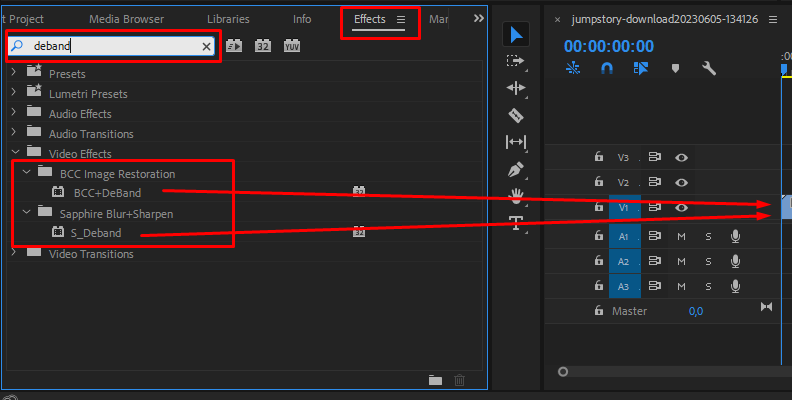
Go to your Effects library and search for “Deband.” You can use S_Deband or BCC+DeBand.
![]()
Drag the effect to your clip and adjust parameters in your Effects Control panel or launch the FX Browser to select a preset.
![]()
Third Method: Adding Noise/Grain
Another efficient way to fix banding is by adding noise or film grain.
Select your video clips in the timeline.
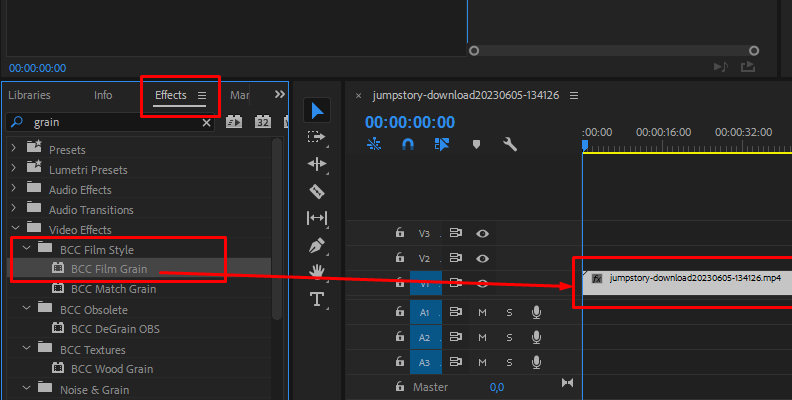
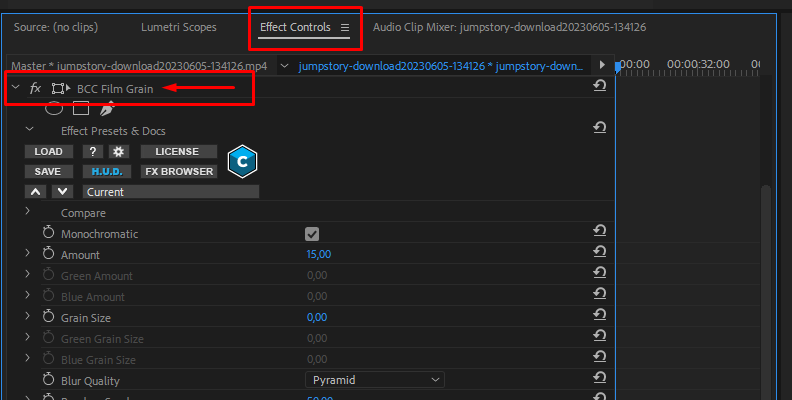
Search your Effects library for a noise reduction filter such as Sapphire's S_Grain or BCC Film Grain.
![]()
Drag it to your clip and adjust the parameters in your Effects Control panel. Find a balance to avoid noisy footage but enough to help reduce banding.
![]()
You can launch the FX Browser to select the presets from BorisFX Continuum. Select and preview the effect.
Click Apply and close the window to continue editing your video in Premiere Pro.
You can also use the built-in effect in Premiere Pro Noise & Grain.
Use the search box in the Effects library and type Noise & Grain.
Drag the effect to the clip.
Adjust settings in the Effect Controls panel.
If you're grading color, using an adjustment layer is a great idea. If you find banding, you can change the settings in the adjustment layer or delete it if you need to start over without affecting your original videos.
Reduce Banding in DaVinci Resolve
DaVinci Resolve does not have a Render at Maximum Depth settings like Premier Pro. You can select higher resolutions to export using codecs H.264 or H.265. Additionally, you can choose an export preset for YouTube, Vimeo, or Twitter.
First Method: Deband Effect
DaVinci Resolve comes with a native Deband effect you can use if you don’t have Boris FX dedicated Deband effects.
![]()
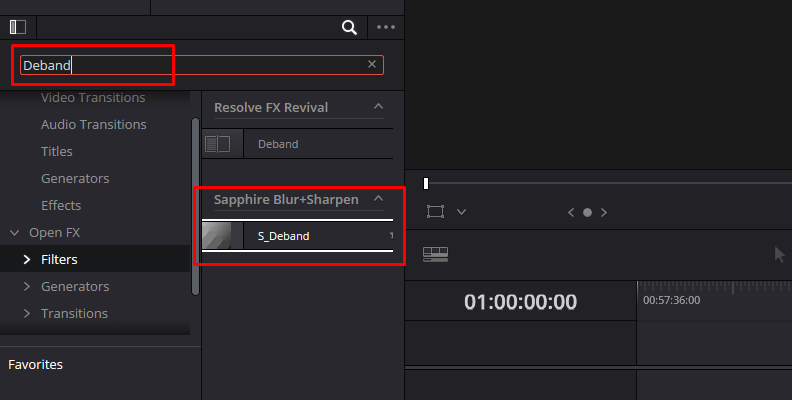
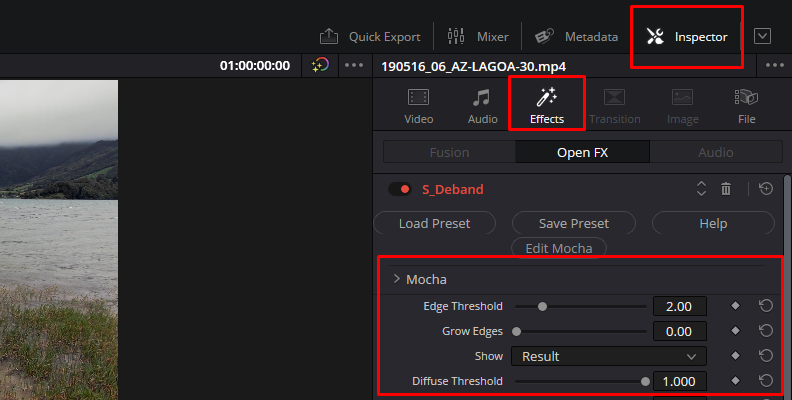
In your Effects workspace, type "Deband" in the search field. You can use Boris FX S_Deband and BCC+DeBand, or DaVinci Resolve's Deband.
![]()
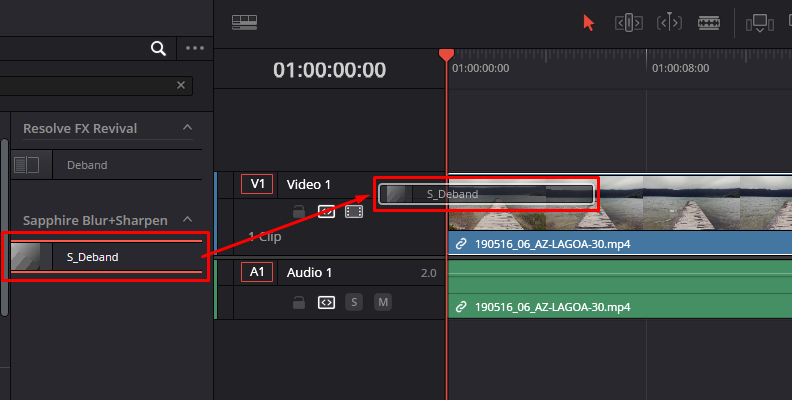
Drag the effect to your clip and adjust parameters in your Effects Control panel or launch the FX Browser to select a preset.
![]()
These effects are straightforward and target banding efficiently.
![]()
Second Method: Adding Grain Effect
Adding effects in DaVinci Resolve is quite simple. We'll use the BCC Film Grain effect, but you can also use Resolve FX Film Grain if you use DaVinci Resolve Studio.
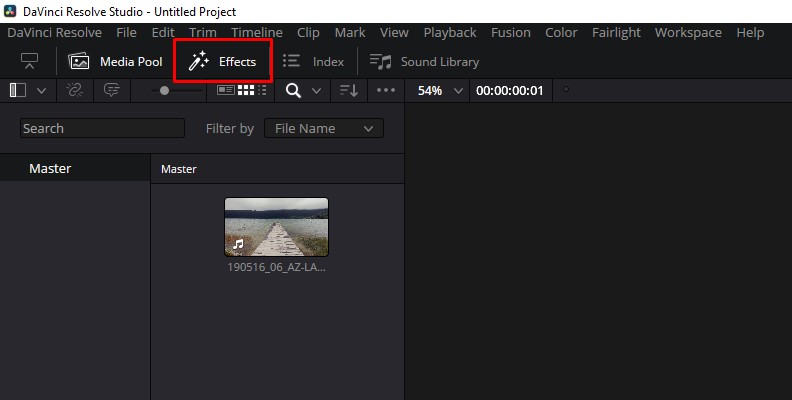
Switch to the Edit tab by selecting it from the menu at the bottom of the screen. If you don't have this menu, go to the upper main menu, and under Workspace, select Show Page Navigation.
Click on Effects or click Workspace > Show Panel in Workspace > Effects. Use the search box to find a noise effect.
Select the effect and drag it to the video clip.
Click on the inspector at the top right corner, or go to Workspace > Show Panel in Workspace > Inspector, and select the Effects tab. You will see all the parameters you can adjust for the noise effect.
For Boris FX plug-ins, you'll always have the FX Browser or FX Editor that allows you to select presets.
Third Method: Grain Overlay
You can use a grain overlay if you don't want to use plug-ins. You can download a sample grain video from a gallery video stock footage for this method.
From your Media tab, right-click the noise sample and select Add to Media Pool as a Matte.
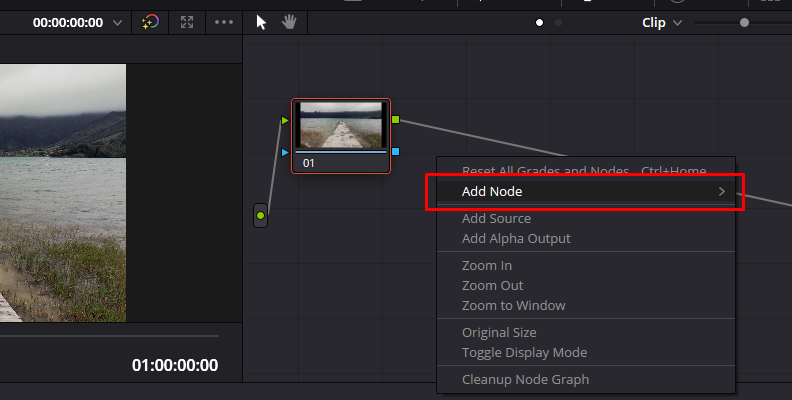
Switch to the Color tab and add a new node.
![]()
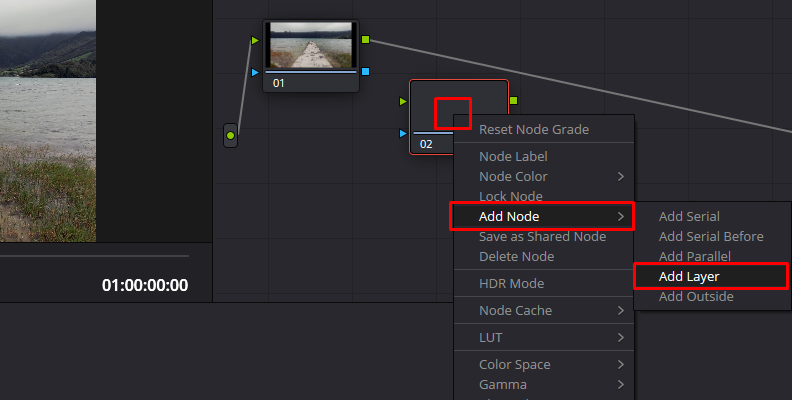
Right-click the new node and select Add Nose > Add Layer. Now unlink the left side of the layer node.
![]()
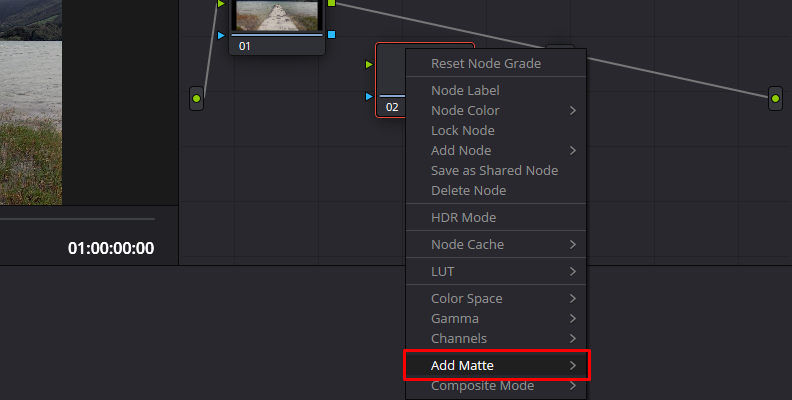
Right-click the layer node and select Add Matte > Timeline Mattes. The noise sample should appear there. Click it to add it.
![]()
Delete the link between the Ext. Matte and the layer node and create a new one using the bottom point (the green one).
Select the Ext. Matte and switch to the Key tab in the color correction menu. Uncheck Lock Matte to enable the transform parameters.
Right-click the Layer Mixer, go to Composite Mode, and choose Overlay.
Now, you should be able to see the grain overlay on your video.
Before adding any noise reduction effect to a video, I recommend you analyze the noise present in your video first. If there's a light noise, keep it at low/medium levels to avoid banding. If there's too much noise, apply some noise reduction first (not too much), then add grain and play with the settings to find a good balance between banding and noise.
Reduce Banding in Final Cut Pro
Final Cut Pro also comes with some native noise and grain effects. The following steps to avoid banding work for native and external plug-ins. We'll be doing this with Boris FX Continuum plug-ins.
First Method: Add A Deband Effect
The steps are the same to add any effects in Final Cut Pro.
Click the Effects button to open the Effects browser.
Search for Deband and locate S_Deband and BCC+DeBand.
Select the effect you want to use and drag it to a video clip in the timeline.
Adjust settings in the inspector.
Open the FX Browser to find a preset to match your project. Using presets can save you time instead of manually adjusting each parameter.
Second Method: Film Grain Effect
With your videos in the timeline, open your effects browser by clicking the Effects button on the top-right corner.
Use the search field to type in BCC Film Grain or other effect you want to use.
Drag the effect to the timeline to apply it to the video clips.
Adjust settings in the inspector.
You can open the FX Browser for Continuum Effects to find a preset to match your project. Using presets can save you time instead of manually adjusting each parameter.
The native Film Grain and Noise effects in Final Cut Pro will do a great job if you don't have Boris FX plug-ins. You can find them in the Effects browser.

Examples of Banding in Your Video
The following images are from stock videos I downloaded to show you as an example of banding. Also, consider the compression from these images in the blog might affect how you perceive banding.
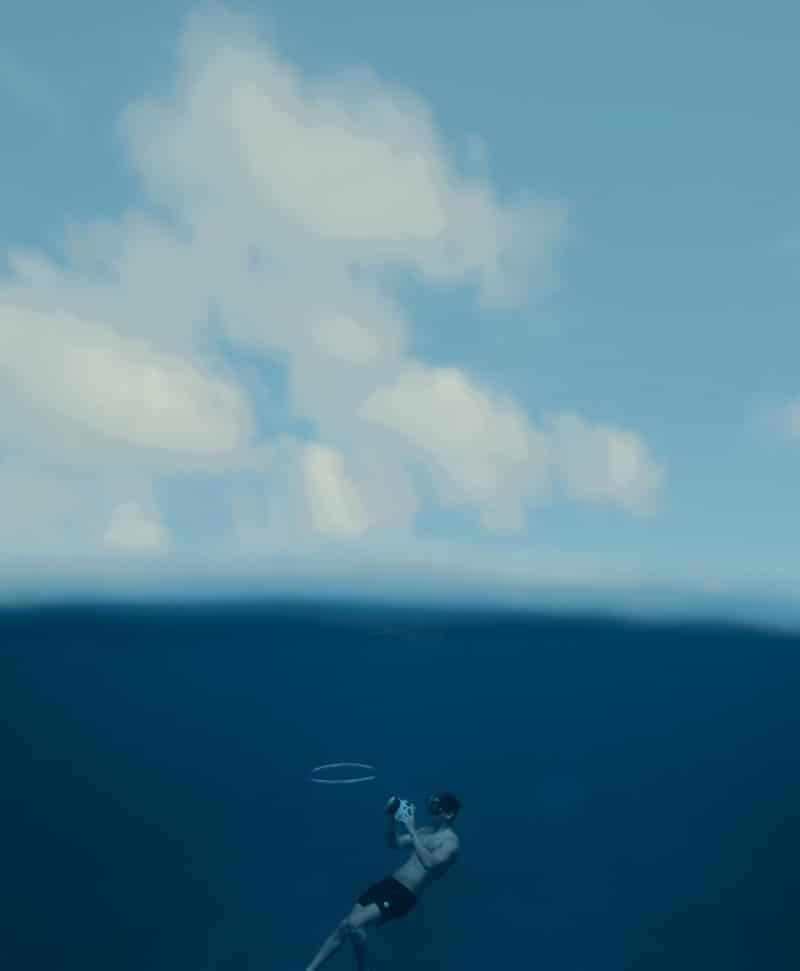
In this first video, banding is more visible in the line between the sky and the sea.
In this video, the image seems to be fixed with blur or noise, but you can still see some banding in the background. An example to show that adding noise can hide banding to some extent.

In shots like this sunset, the banding is more visible around the sun, where colors should be more gradient.

This calibration video will not only help you adjust your TV or monitor screen, but it's also helpful to illustrate banding. Try watching it on different displays, such as a mobile phone, computer, and TV, and you'll notice the difference. Consider that YouTube compresses videos, so you might see more banding than intended.
Final Words
Color banding manifests itself in block colors that can appear in every video, even ones made by experienced editors. The main cause is a low bit depth, which equals insufficient information to display colors correctly.
The best solutions are using higher resolutions to export the full video and noise and color filters to mask banding. Luckily, there are dedicated effects to fix banding, like S_Deband and BCC+DeBand from Boris FX. Also, more developers are now including them in their software, like DaVinci Resolve's Deband effect, making it easier to fix banding with built-in effects.
It's important to remember that sometimes the solutions may add or expose other issues, such as noise, poor color correction, and so on. Finally, since every footage is different, what worked with one video may not work with a different one. Try and experiment with the techniques mentioned in this guide, and find the perfect balance to enhance the beauty of your content.
Good luck!


