


Have you ever noticed weird lines or patterns in your photos, perhaps after you've imported them onto a different device or posted them online? These lines, known as color banding, have been a frustrating problem for photographers since the dawn of digital photography.
Today, I'll discuss what causes color banding, how to reduce it using various methods and editing software, and provide some tips on avoiding it altogether. So, is color banding something you have to accept, or can you minimize its effects?
Let’s find out!
What is Color Banding?
I’m sure you’ve seen banding and know what it is without me telling you. It’s an effect that appears in large areas of an image where there should be a pleasant and smooth gradient; instead of a nice color gradient from one tone to another, you will see bands (thus its name), blocks, stripes, or circles of colors in the image.

Color banding in videos and images appears because of different tones of the same color. Think of a picture of a clear blue sky: looking up with your eyes, you see this beautiful, endless blue sky. But when you take a picture, instead of seeing wonderful shades of blue in the sky around the sun, you see harsh bands, circles, and blocks of two or three tones of blue that look like an 8-bit pixel video game.
It's common to find color banding in digital images once you import them to your computer, Photoshop, or another photo editor. Sometimes, it’s only visible after hours of editing, which is why it can be extremely frustrating to find out there's banding in an image after all the hard work.
What Causes Color Banding?
Color banding results from an inaccurate representation of a color gradient in images. The main reason is insufficient information to display the tonal values in a photo, thus making the gradient less smooth. Banding is even more evident in transitions from light to darker tones of the same color, as in clear blue skies pictures around the sunlight.
Also, bit depth plays a crucial role in color banding issues. A picture taken or displayed in a low bit depth won’t have enough resources (color information) to display the number of shades of a color needed for a smooth transition. The more bit depth an image has, the more colors it will show. For example, an 8-bit image contains 256 tones, while a 16-bit image contains 65,536 color tones. Nowadays, HDR digital cameras can capture images in 24-to-32-bit depth.
Compression is another cause of banding. You could take photos in the highest quality, but if you compress them to JPEG files with a lower bit depth, you will likely have color banding showing up. When you compress an image to reduce its size, some colors are "removed" from the image and affect the gradual transition of color.
Post-production can also create banding problems when pushing the color grading processing too much, adding exposure and saturation, or compressing the final image. However, color banding can also be caused by intentionally adding a posterization effect. Finally, color banding can be used to add creative effects for graphic design and video editing.
As you can see, color banding might happen for various reasons, and each cause requires certain solutions that we'll analyze in the next section.
How to Reduce Color Banding in Digital Images
Banding may appear at any point in your post-production process, which is why it's important to assess why it occurs and know how to fix color banding.
Verify Your Monitor is Not The Cause
When you suddenly notice banding in an image that didn’t show any signs of it before, the first thing to check is if it's your computer screen that's the issue. You want to avoid fixing color banding in your editing software and realize there was no banding in the first place!
Display the same image on your computer, laptop, mobile, etc., and see if the color banding is present in every device. If you only see it on your computer, it's probably caused by your monitor. You can use a calibration video and make a color banding test to correct the issue.
Fix Color Banding With Optics by Boris FX
When color banding is actually there, using photo editing software to reduce it is your best bet. I'll show you how to do it with Optics by Boris FX because its filters and presets deal with banding efficiently and in just a few clicks. You can use Optics as a standalone application or as a plug-in for Photoshop and Adobe Lightroom. Follow the same steps for both editors unless I indicate otherwise.
Launch Optics

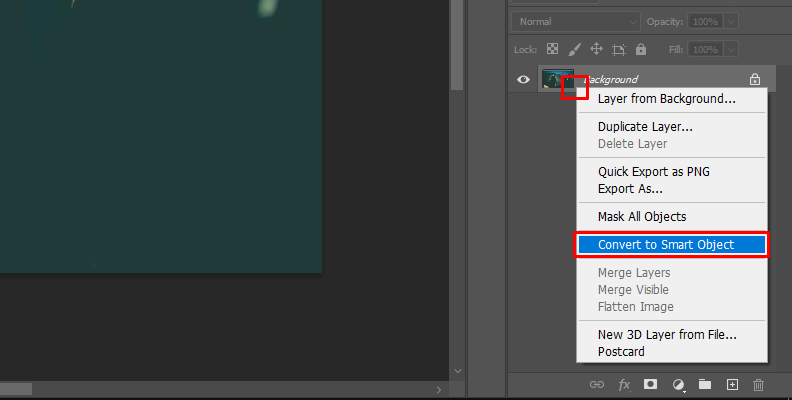
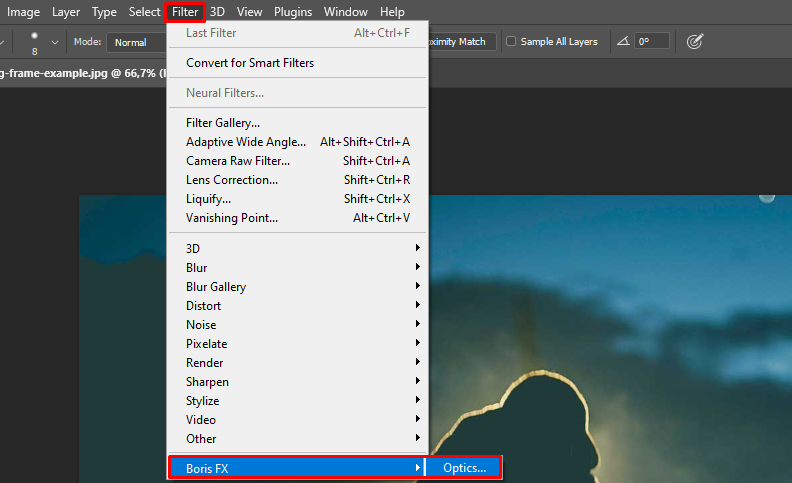
Import your image file to Optics. If you're using the plug-in version, import your image to Photoshop and convert the layer into a smart object, then apply Optics from Filter > BorisFX > Optics. Optics will automatically launch and import the image into its user interface.
Add Filters
Adding a filter to smooth the color banding is one of the quickest solutions. However, it would be best to be careful with the amount of blur, dithering, or noise you add. Try combining different filters to create a more natural look for your image and avoid over-processing the image. Depending on your image, there will be filters that work better than others.
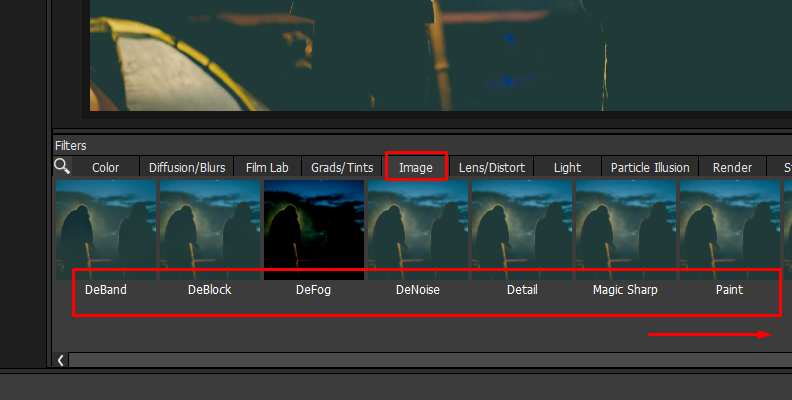
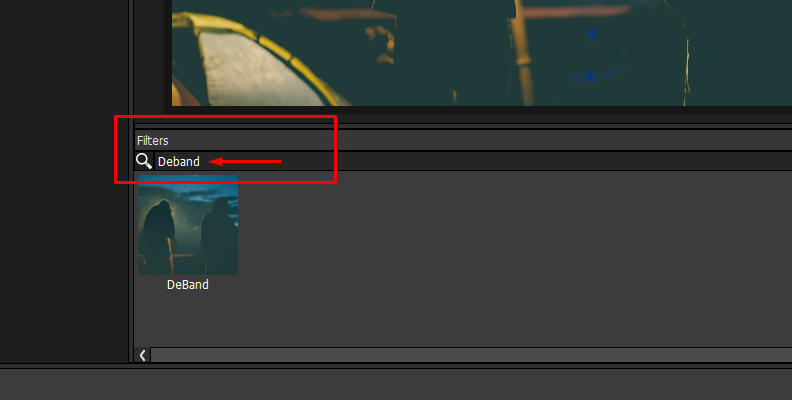
The first filter you can try is one specific for banding called DeBand. It’s in the Image category, where you can find filters such as DeNoise, DeBlock, and Sharpen, among others.
However, you usually achieve the best results by using different layers of filters on the image. Follow this basic color banding removal workflow using blur and grain from Optics.
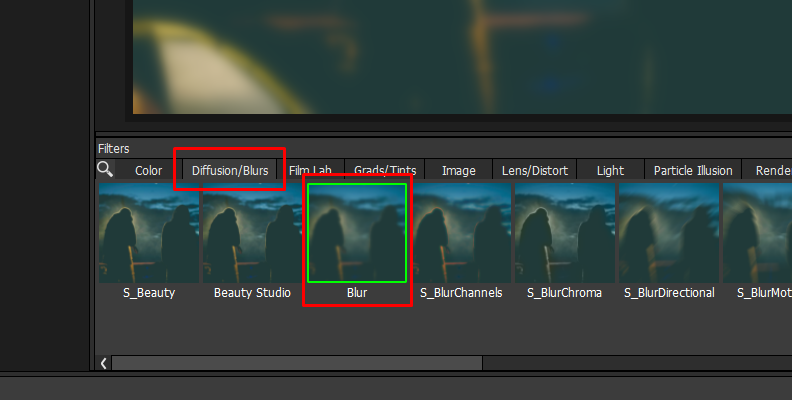
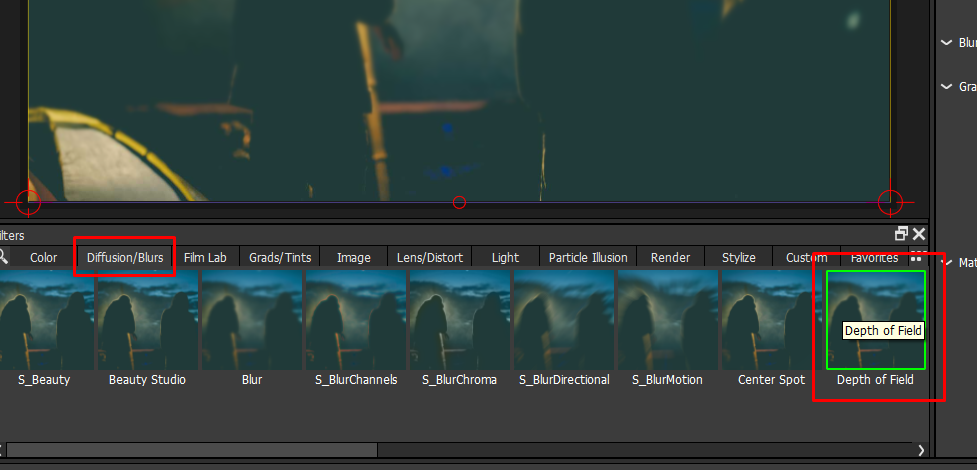
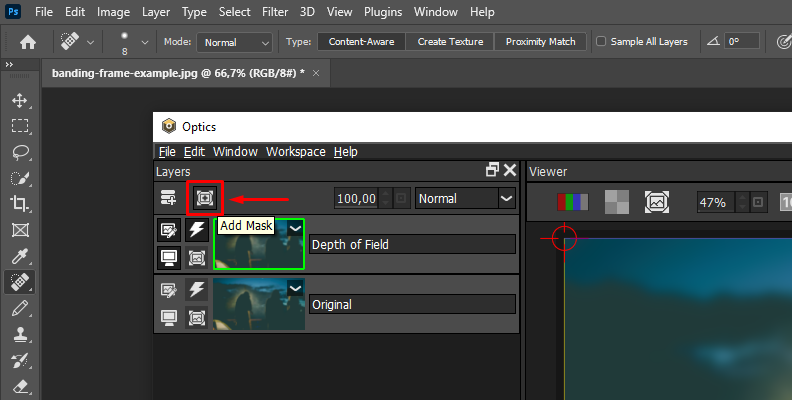
Select a blur filter from the Diffusion/Blurs category and choose a preset. Blur and Depth of Field filters work great. Depth of Field has some presets for adding a gradient blur in a specific direction, but you can narrow the filter with a layer mask.
To create a mask, click on the Add Mask icon above the Layers panel and choose a type of mask, then draw your mask around the banding area.
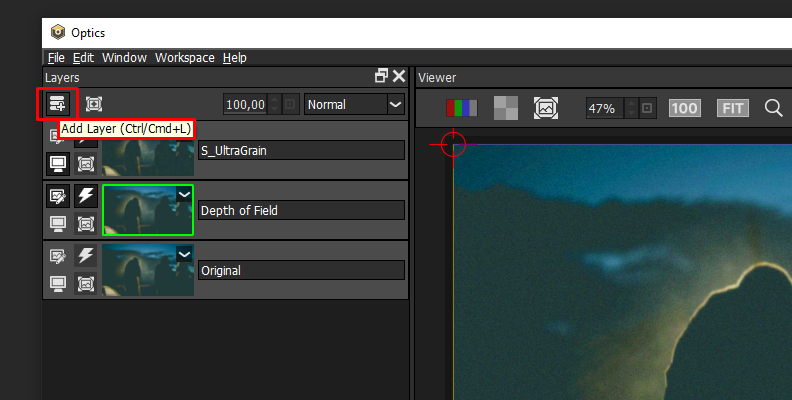
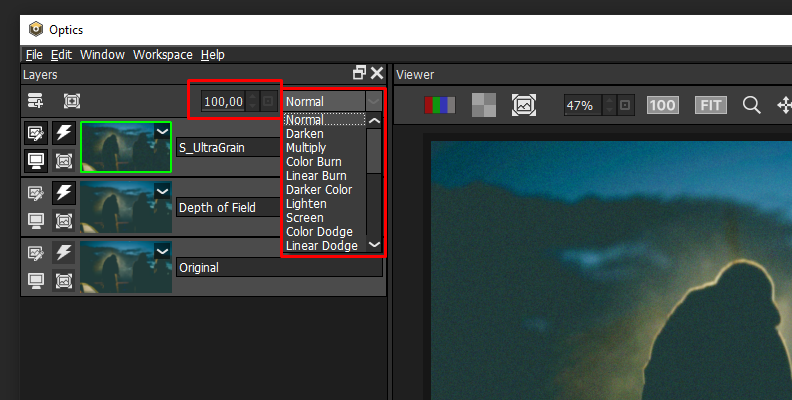
Adding noise and film grain can reduce color banding in your image while giving a cinematic look. Create a new layer with CTRL/CMD + L and add grain filters from the Film Lab category. Grain and UltraGrain filters have many presets to simulate a camera film grain.
To make all the filters blend together, you can change the Layer Blend Mode and Opacity to your liking.
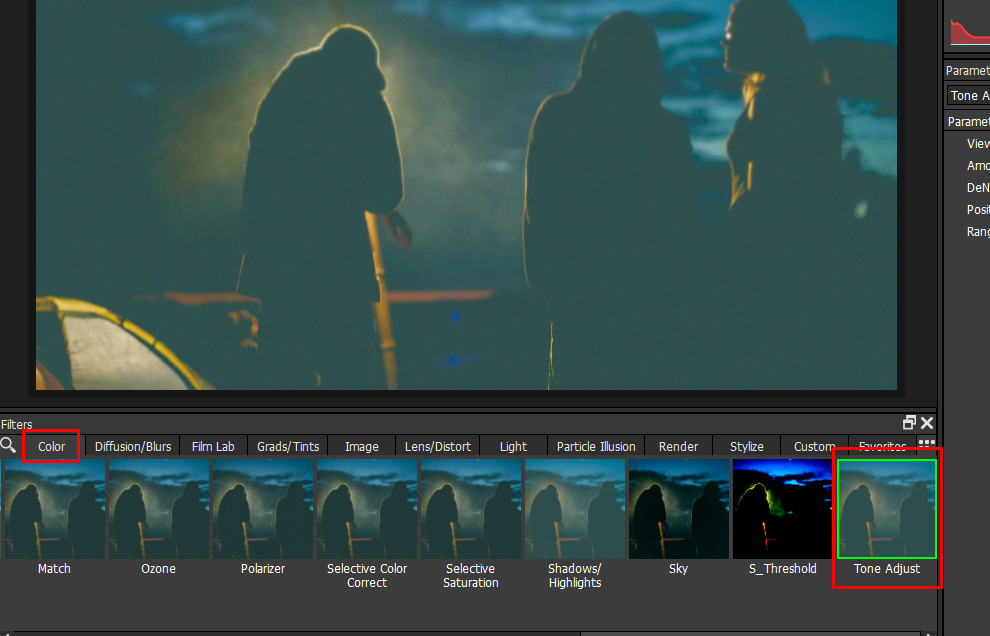
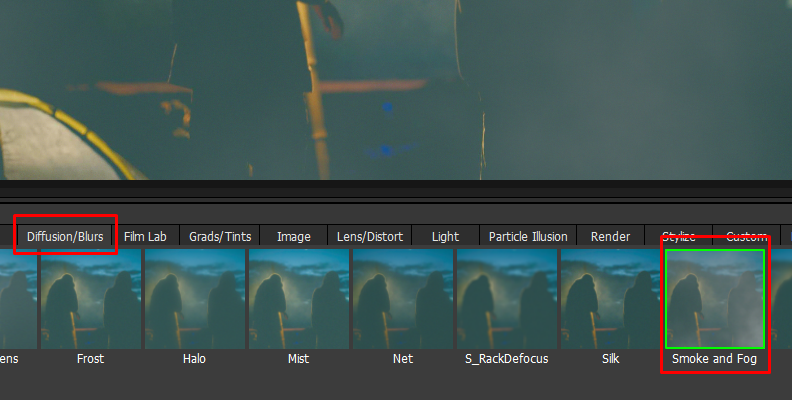
Optics offers many filters to explore and experiment with. Some filters I have tried are Tone Adjust from the Color category for banding in large areas like a blue sky or the ocean and Smoke and Fog from Diffusion/Blurs.
Smoke and Fog can hide color banding and create a cinematic look if it fits the aesthetics of your image.
Textures can also reduce banding considerably. You can find many textures in the Stylize category and change the blending mode to achieve different effects.
Export in High Quality
Export your images in the highest quality possible to avoid compression. If you compress the image and upload it to social media, it will compress again and lose quality. Click File > Save to save your image in the standalone application.
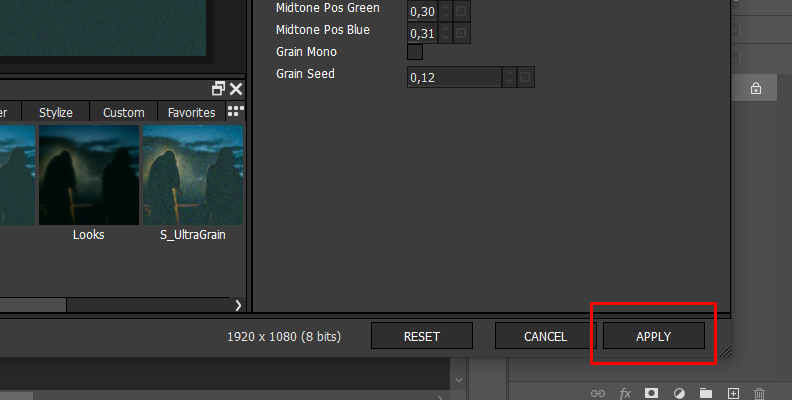
Select Apply in the bottom right corner if you are in the plug-in version to return to Photoshop or Lightroom and continue editing.
Reduce Banding with Photoshop
If you don't have Optics, Photoshop has tools to help you reduce banding with built-in filters like blur and noise. If you're working with an image in 8-bit depth, the first step is to change to a 16-bit depth mode. It will not alter your image but allow you to add more color depth, edit it, and fix color banding.
Import your image to Photoshop. Go to Image > Mode and select 16 bits if you have an 8-bit file.
Duplicate your layer, select it, and go to Filter > Convert for Smart Filters. It’ll allow you to edit the filter later.
Add a Blur filter. Gaussian Blur and Surface Blur are excellent because you can adjust them to leave the areas with important details untouched. Go to Filter > Blur > Surface Blur. Adjust the Surface Blur settings with the Radius and Threshold sliders. Radius will increase the blur area, and the threshold level will determine how much of the detail in the image is to be preserved.
The next step is to add a noise layer. Add a new layer with CTRL/CMD + Shift + N. Change the mode to overlay, check the box for Fill with Overlay Neutral Color, and click OK.
Convert the layer for smart filters by going to Filter > Convert for Smart Filters.
Go to Filter > Noise > Add Noise. In this window, adjust the amount of noise you want to apply and the distribution. Start with a lower number and preview different sections of the image to see how it affects it.
Create a mask layer to remove the noise effect from other subjects.
Export at a higher bit depth.
TIP: How to Avoid Color Banding
We’ve seen how to reduce color banding through different methods, but how about avoiding color banding in the first place? Follow these tips to prevent color banding from appearing in your images.
Avoid Low-Contrast Scenarios
You can control the lighting in a studio to avoid banding, but if you shoot outdoors, you might have to accept that banding will appear and fix it in Photoshop.
Use RAW Files
Change your camera settings to shoot in RAW uncompressed format. It will require more space in your storage, but it means more color information and less possibility of banding happening. Edit in uncompressed RAW and avoid compressing your files until you finish editing.
Minimize Color Grading
Pushing color grading and correction tools too far will cause banding unless you edit a RAW file with more color depth. If it’s necessary to color grade your image, you must balance the color banding and grading process. Some photographers accept a little banding in their photos to push color correction tools.
Final Thoughts
When it comes to color banding in your images, it's important to assess whether it's intentional or not. If it's not part of your creative vision and is negatively impacting the quality of your image, then it's time to take action.
Fortunately, photo editing software like Optics offer a variety of filters and presets to help correct or conceal color banding, which can elevate your portraits with cinematic looks and professional, smooth gradients. Plus, you can seamlessly integrate it into your existing workflow within Photoshop or Lightroom.
Get a 14-day FREE trial of Optics 2024 today and upgrade your photography skills!


