


Old photos can carry a wealth of memory and meaning. Whether they are personal family treasures, moments from the past, or just quick snaps, old photos really matter.
Digital technology means your snaps can be kept safe, secure, and backed up. Old paper-based photography doesn’t have this advantage.
However, thanks to modern technology, old photos can be saved from being lost forever. Photo restoration can save the day!
What Causes Old Photos to Fade?
The main reason you can end up with a faded photo is simple — light. Ink fades over time when exposed to light, and it’s the primary cause of old photos fading. This is true of both color and black and white photos. UV (ultraviolet) light is particularly bad for this, but any kind of extended light exposure can cause photos to fade.
The quality of ink matters too. Cheap, poorly-printed photos are much more likely to fade than more expensively-printed ones. And the quality of the photo paper, if it's not high, can also result in faded photos.
Smoke and Dust
Other elements can also take their toll. Smoke and dust are especially bad for photos when they are left exposed and can speed up the fading process.
Of course, physical damage can have a bad effect as well. If a photo has been folded or creased, had something spilled on it, or simply not been treated carefully, these can all cause degradation in the quality of the photo.
How to Restore Old Photos with Boris FX Optics

As part of the Boris FX Suite, Optics is the perfect tool for both Photoshop and Lightroom.
As one of the most powerful tools on the market, Optics will transform the work you do in either photo editing app to levels previously unimagined.
With industry-leading tech, there is no tool better suited to your restoration needs. There are a number of tools available, including color correction, which can be effective not just on color but also on black and white photos.
Whether you need to make small, subtle changes to your images, remove noise and other artefacts from images, or want to go deeper into more specific looks and different approaches, Optics will cover it all.
Powerful AI-powered masking means the time to mask individual elements you want to work on is reduced to almost nothing, and it couldn't be simpler to use. Additionally, paint tools can be used to apply dynamic lighting effects and textures onto your images, with particle brushes, cloning, and blurring, meaning you can do anything you want to your photos.
You can also add professional-grade, cinematic qualities to your photos if you want, but whatever you want to do with them, you can be guaranteed that Optics will have you covered.
Whether you're a seasoned pro or just want to touch up a few family snaps, Optics is powerful enough for everyone and easy enough to use by anyone.
Beauty Studio
Beauty Studio will help automate the process of getting rid of any blemishes or imperfections on someone’s face. You can adjust everything from wrinkles to skin tones, and skin tones can be expertly smoothed and color corrected either for a natural look or for something very specific. Hue, saturation, and brightness can all be adjusted for optimal results.
The Pixel Fixer can repair and fix bad pixels that might have been caused by imperfections on the sensor of the camera used to take the image, so photo restoration isn’t something that is just restricted to old photos — a digital image can benefit from the Continuum suite’s image restoration tools as well.
Because everything is so expertly written, GPU use won’t get maxed out, and performance will always remain optimal.
So, whatever your restoration needs are and however many damaged photos you need to fix, Boris FX will be able to help you out.
How to Restore Old Photos with Adobe Photoshop

If you need to know how to restore old photos, Adobe Photoshop has plenty of tools to help restore photos and bring them back to life. Old photo restoration is now something everyone can do for themselves.
When you scan old photographs, it's important to consider the image file format. The higher the quality of the scan, the better the results will be. JPEG is a common format, but the quality is low because it is compressed to save space. The other image file format that works best is RAW. It is much higher quality and provides much more detail, but even a BMP would be better than JPEG.
First, find your scanned image and import the old photograph into Photoshop. When you do this, the layer will become a background layer by default. Lock the layer and make no changes to it at this point.
You can lock a layer by selecting the layer in the Layers panel on the right-hand side and choosing the Lock All option. The layer will then be grayed out.
Once this has been done, you need to create a new layer. Go to the Layer menu and select New.
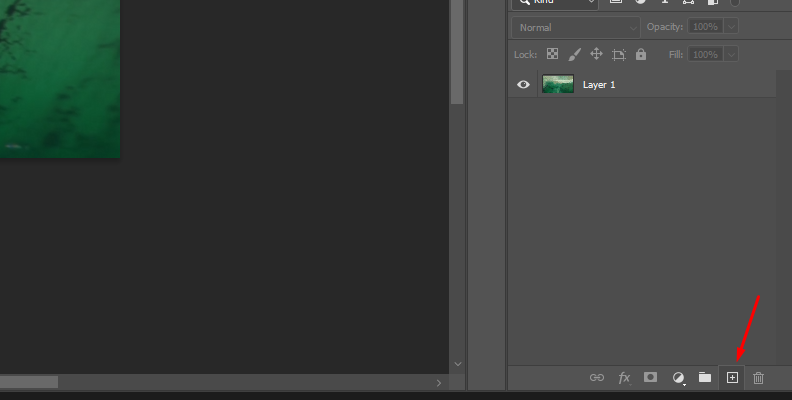
Layers
This new layer is where the changes to the photo will be made. Doing things this way means that any changes you make will be on a different layer, which allows your editing to be non-destructive. That means you can step back and revert any change you have made at any point in the process because the original image is not being changed. The only changes are on the new layer, which is then placed on top of the original image.
Go to the Filter menu, then Neural Filters.
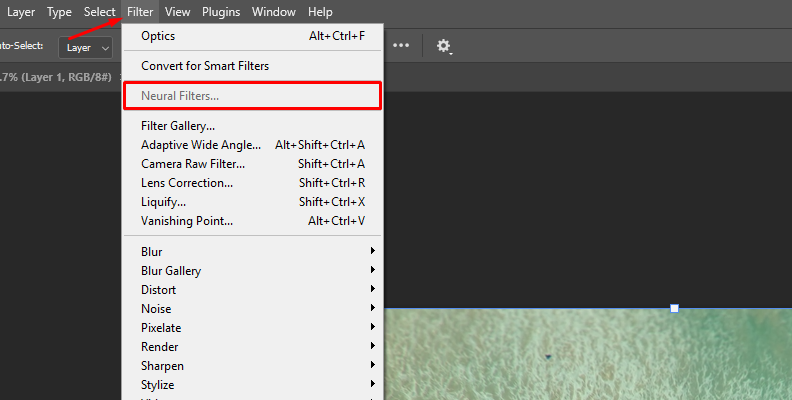
You can then choose Photo Restoration. There are three different settings here that can be adjusted.
Photo Enhancement
Enhances the overall image of the photograph. Adjust the slider until you get a good balance between improvements in the image without losing sharpness or clarity.
Enhance Face
This improves detail on faces. Photoshop’s AI can identify faces from other objects in a photo, and this helps clear up detail and definition.
Scratch Reduction
Helps to restore areas of the photo that have been damaged, scratched, or otherwise don’t look as good as they should.
These settings will help greatly restore the quality of old photos. However, there are other steps you can take to make more improvements beyond the Neural Filter.
Spot Healing Brush
If you want to fix any further damage to your photos, then the spot healing brush can help.
First, select the Spot Healing Brush.

Then, in the tool option bar, select the brush options. You can then adjust different settings in the pop-up panel: Mode, Source, Aligned, Sample, and Diffusion.
Once you have made any adjustments you need to, you need to set the source sampling area. To do this, position the pointer at an area on the photo and then Alt + CLICK (Windows) or Option-click (Mac).
Then go to the Clone Source panel.
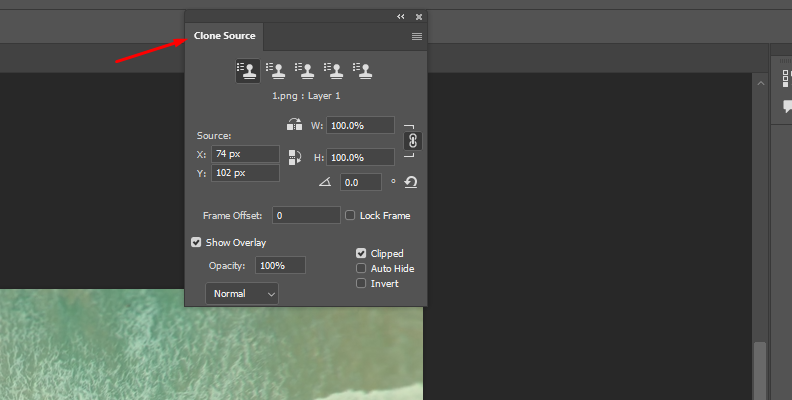
Click the clone source button to choose the source you have sampled.
You can then drag anywhere in the photo that you want to repair. The sampled pixels from the clone will be mixed with the existing pixels within the photo whenever you release the mouse button. Continue this until you are satisfied with the results.
Clone Stamp Tool
The clone stamp tool can also help you when it comes to restoring old photos. The clone stamp tool can help you remove objects from your photos that you don’t want to be there, but it can also help you get rid of scratches, scrapes, stains, or other physical defects on the original photo.
The clone stamp tool works by copying, or “cloning”, another part of the photo to cover up the part you want to correct. It can require a lot of patience and an accurate eye, but it can make a big difference to how the finished result looks.
Using Clone Stamp
First, click on the Clone Stamp tool in the toolbox.
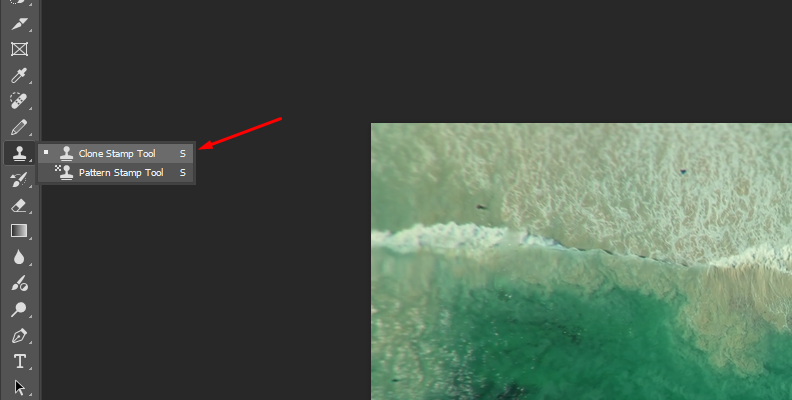
You then need to select the brush size you are working with. This is important because you want to choose a brush size that will allow you to select another part of the picture that is big enough to be usable, but not so big that the cloning is obvious.
Patterns
Cloning anything with a repeated pattern (cobbles on a street, for example) can be done with a reasonably large brush, but anything with a lot of fine detail, such as hair, will require a much smaller brush. Otherwise, the cloned pattern is obvious and doesn’t look right. However, the smaller a brush is, the more time it will take you to complete the clone.
Every photo will have its own requirements, and a little experimentation will help you choose the brush size you want to work with.
Once you have decided, you can then adjust the following settings.
Blending mode
This allows you to adjust how the cloned part of the image blends with the new part.
Opacity
How much of the clone is visible? An opacity of zero means the clone is completely invisible, and an opacity of 100 means it will completely cover whatever is beneath it.
Flow
Allows you to build up layers. It’s a bit like going over something on paper with a pencil. The more you go over something, the more you build up the image.
Clone
You then need to select the area you are going to clone. This is also an important decision, as you want to choose something that will cover any defect on the original photo, but which doesn’t look like it’s just been dropped in from nowhere. Place the cursor over the area you want to clone, then ALT + CLICK (Windows) or OPTION + CLICK (Mac).
You can then click and drag the cursor over the area that you want to repair with the clone. Photoshop will copy from the selected area.
It’s a good idea to use a gentle touch when doing this. Big sweeps tend to stand out and can sometimes make the cloning look artificial. Smaller, more incremental changes will help you discreetly use the clone tool and keep the integrity of the original photo. You can also use Photoshop's burn tool to make areas lighter or darker and help disguise where cloning has taken place.
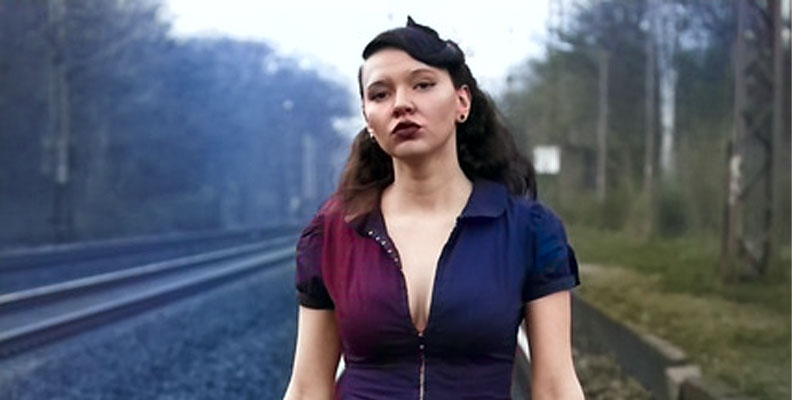
Colorizing Photos
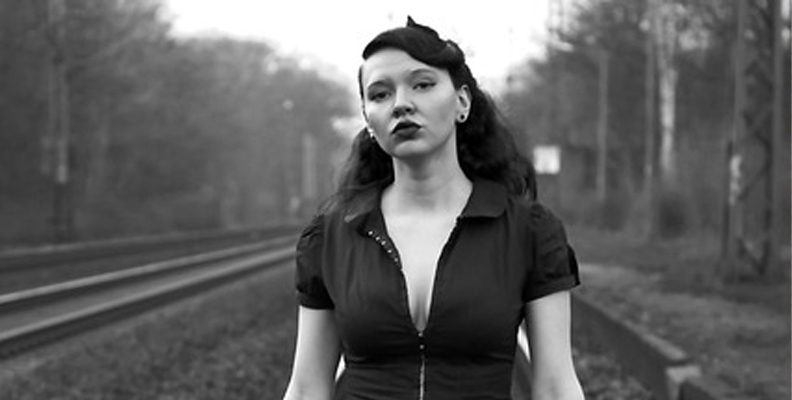
One final photo restoration tool that Photoshop has is the ability to colorize old photos. If you have black and white photos or ones that are sepia, then Photoshop can add color and make them look much more contemporary.
Create a new layer that will contain all the previous layers you have created during the repair process. You can do this by CTRL + ALT + SHIFT + E (Windows) or COMMAND + OPTION + SHIFT + E (Mac).
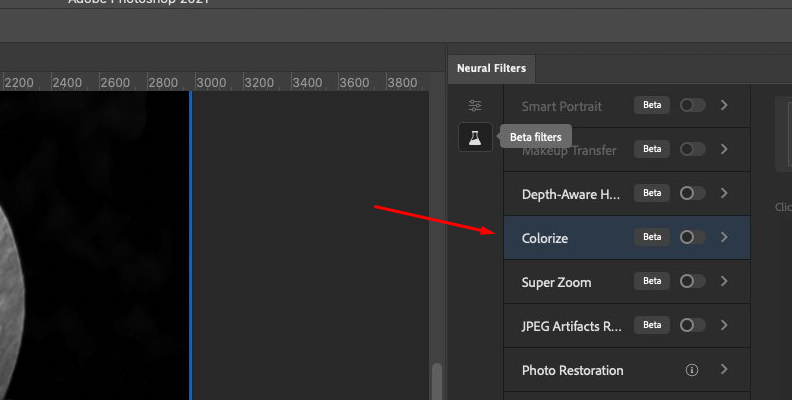
Once the layer has been created, go to the Filter menu, select Neural Filters, then Colorize.
Color Levels
You can adjust individual color levels until you get a satisfactory blend that looks natural and gets away from the “artificial” look some colorization processes can add. However, there is also an auto color option that allows you to check a box and let Photoshop make the changes for you, so your photos instantly have color applied to them.
The results of either type of change are displayed in an image preview box — if you are happy with them, simply click OK, and you are done. Then save your newly restored color photo with the black and white image still available for comparison.
Conclusion
Adobe Photoshop is a powerful piece of software. When it comes to restoring an old photo, there are plenty of tools available to help you bring treasured memories back to life.
A restored photo can mean the world to someone, and whether it's one old photo or dozens of photo albums, photo restoration can really save the day.
But whether you use Photoshop’s own tools or the powerful Optics plug-in from Boris FX, you can be sure that your old photos will be able to survive in digital form and have new life breathed into them again. Nothing need ever be lost to time again!


