


Grain is a form of noise that appears in your video footage as a granular pattern on areas of your screen resembling small grains or particles, which makes your videos look gritty and low-quality. The main cause of grain is setting a high ISO on your camera when you shoot in dark locations with low lighting, and if you can’t re-shoot your video, the only way to fix the issue is in post-production.
In today's article, you'll learn how to remove background noise in Sony Vegas Pro (now known as Magix VEGAS Pro). For more professional results, I’ll also explain how to make the most of BorisF X plug-ins and other high-quality effects.
Let’s dive in!
How to Remove Background Noise from Video Sony Vegas (Now Magix VEGAS)
VEGAS Pro includes some video effects that can help you remove background noise from your videos. We'll look into two methods to remove video noise: with the Denoise FX plug-in and with color grading techniques.
Method 1: Denoise Effect
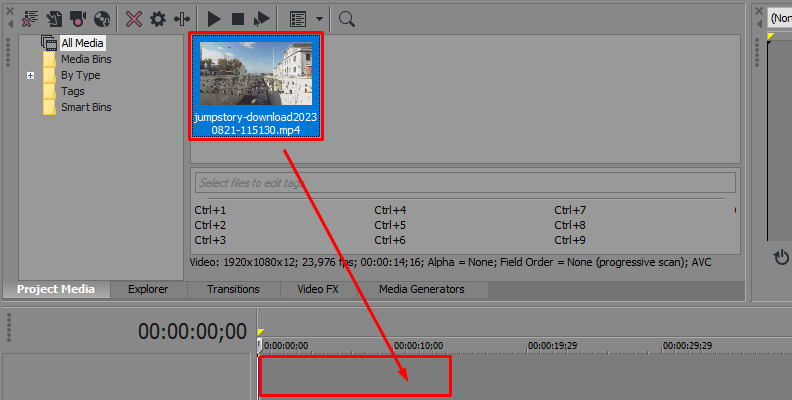
The Denoise effect comes built-in in your copy of VEGAS Pro. Import your video files with background noise into VEGAS and drag the video clip to the timeline to remove the grain.
![how to get rid of grain in sony vegas]()
Step 1: Add Denoise Effect
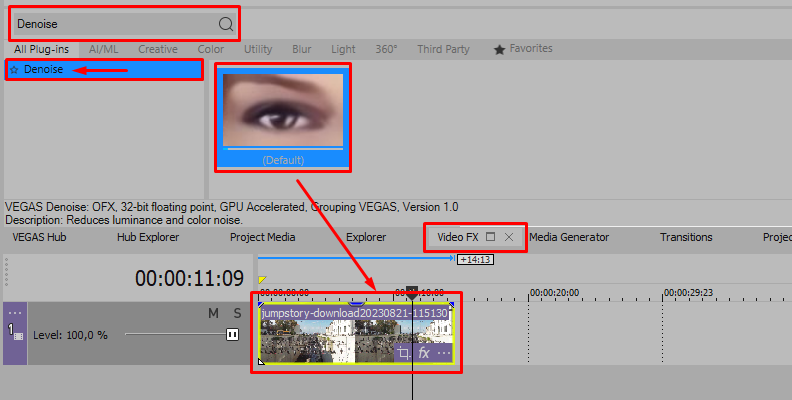
Select the video clip in the timeline and go to the Video FX tab. Use the search box to type Denoise. Select the default settings for Denoise and drag it to the video event with noise in the timeline.
![]()
Step 2: VEGAS Denoise Settings
The Denoise effect has only two main parameters: Noise Reduction and Sharpening. Under Noise Reduction, move the Luminance and Chrominance sliders and replay the video, adjusting the sliders until the background noise vanishes.
![]()
You can apply both Luminance and Chrominance to adjust different frames in the video independently. To add keyframes, click the stopwatch icon on the right side of the slider, which will open a timeline where you can create keyframes.
For a better preview, create a loop region by selecting the video event in the timeline and then clicking the loop playback icon. This will replay the video in a loop so you can see your settings in action and adjust keyframes if needed.
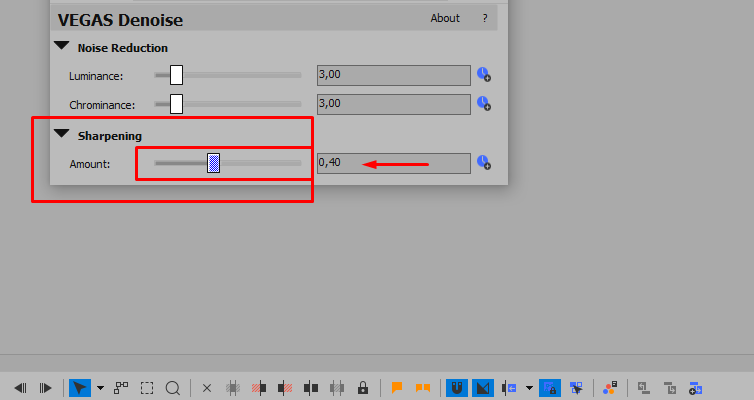
Step 3: Adjusting Sharpness
Most denoiser effects add blur to the image to reduce background noise. In turn, this can occasionally make your video blurry and lose sharpness and detail if you try to remove too much background noise. You can maintain the original quality by adjusting the Sharpness parameter.
![]()
Adjust the Amount slider to recover sharpness. This process might bring some unwanted noise back, so you'll need to find a balance between background noise and video quality. You can also adjust the amount of sharpness in the video by clicking the stopwatch on the slider and adding keyframes.
Method 2: Denoise with Color Grade
Video noise and grain are caused by poor lighting while filming, so another method to reduce or hide background noise is by color grading the darker areas of the video. To remove background noise with this technique, you'll have to darken the shadows on your video to hide the noise.
Start by importing your video footage with noise to VEGAS Pro and creating a new timeline.
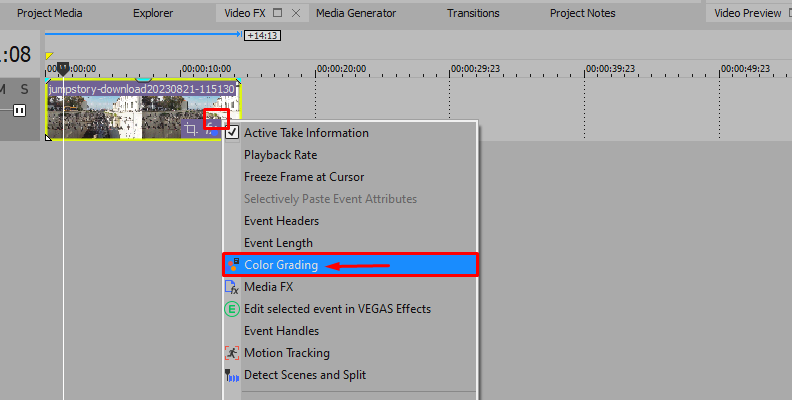
Step 1: Open the Color Grading Tools
Select your video clip and the color grading effect in the timeline. It's an icon with red, blue, and green circles. Or you can use the shortcut ALT+G to open the Color Grading workspace.
![]()
If this is your first time using the color grading panel, I’d recommend doing simple color grading using the RGB graph at the bottom right of your screen. Select the Color Curves tab if you don't see it.
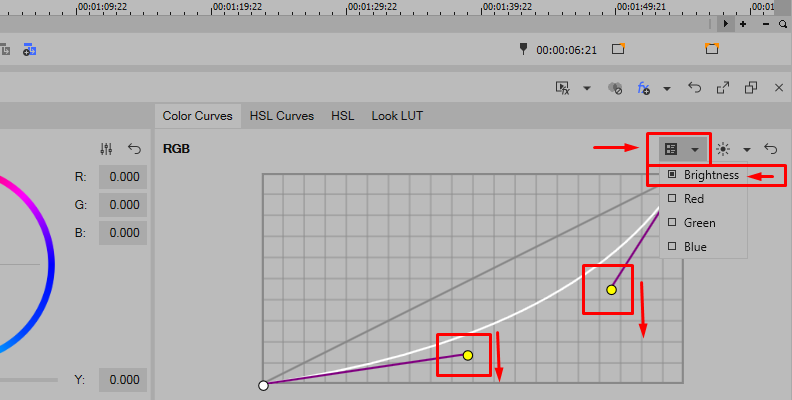
Step 2: Color Curve Tab
Click the Select Curves button and enable Brightness. Leave Red, Green, and Blue disabled. On the graph, you should have only a white line. Click on the dot handle and drag it down; you'll notice the light from the image will lower or increase as you move it.
![]()
Find a sweet spot where the areas get so dark that noise is not visible but that you don't lose detail on your image. Preview the video to see how it affects other frames in the video and adjust the curve.

Alternative Methods to Remove Background Noise from Video
There are many other solutions to reduce background noise video, so here are some alternative methods, including external plug-ins and other video editing software.
Removing Background Noise with Boris FX
Boris FX offers plenty of tools and plug-ins for all the needs of a video editor. I'll show you how to use two powerful and easy-to-use plug-ins from Boris FX Continuum and Sapphire to remove background noise. You can use Boris FX plug-ins in VEGAS Pro and other programs like Premiere Pro, After Effects, DaVinci Resolve, and Final Cut Pro.
Method 1: Boris FX Continuum Noise Reduction
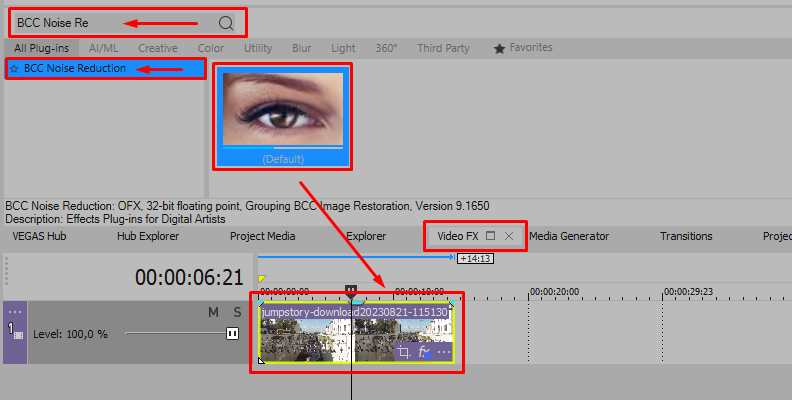
Step 1: Select the video clip with noise in the timeline and search for BCC Noise Reduction in the Video FX tab. Drag the BCC Noise Reduction effect to the video file clip.
![]()
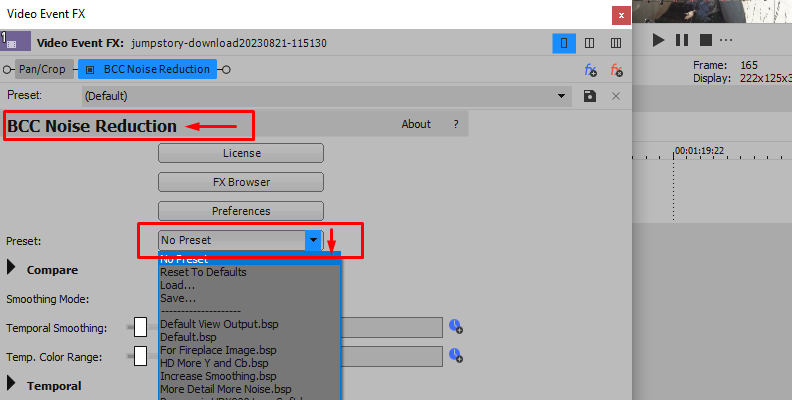
Step 2: In the Video Event FX window, there are a couple of settings to adjust to your liking. However, the best feature of Boris FX plug-ins are their presets. If you display the preset dropdown menu, you'll find several presets to preserve shadow detail, suppress noise only in darker areas, and even specific settings for some Panasonic and Sony cameras.
![]()
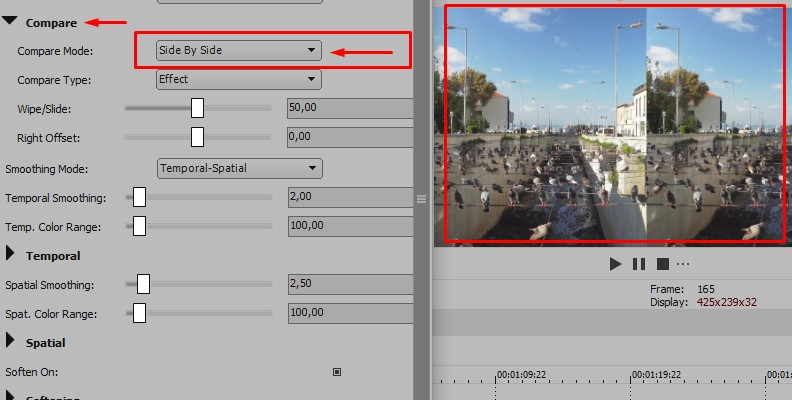
Step 3: BCC Noise Reduction comes with a compare feature. If you display the Compare tab, you can set a compare mode and preview the effect side by side.
![]()
Step 4: You can adjust the smoothing modes to fine-tune the effect depending on the type of noise you’re dealing with.
Step 5: Adjust the Softening and Sharpen settings to bring back detail to the image.
Method 2: Boris FX Sapphire GrainRemove
![]()
Step 1: Select the video clip with grain and go to the Video FX tab.
Step 2: Search for S_GrainRemove and apply it to the grainy video.
Step 3. You can adjust the general smoothness, luma, and chroma. Then tweak the Edge's width, scale, and threshold to add sharpness to the image.
Step 4: Preview the footage in different sections of the video to adjust the effect. GrainRemove lacks the customization offered by other Boris FX plug-ins, but it’s an intuitive and effective way to solve background noise, making it ideal for beginners.
Removing Background Noise with Adobe Premiere Pro
Adobe Premiere Pro includes a built-in effect that provides a quick solution for noisy footage. The effect I'll tell you about today is called Median.
Step 1: With your imported video files into Premiere Pro, go to the Effects panel and search for Median. Drag Median to the clip with noise in the timeline.
Step 2: Go to the Effects Control panel and display the Median settings.
Step 3: Use a mask to target specific areas of the video with noise. Otherwise, Median will be applied to the entire frame. Select the mask shape that fits your image in the Effects Control panel or draw it using the Pen tool.
Step 4: Adjust Mask Feather to blend the effect in the mask with the rest of the frame so it won't look half done.
Step 5: Adjust the Radius to apply Median to your footage. Find a balance where you reduce noise but preserve the quality of your content.
You may also like: How to Reduce Grain and Noise in Premiere Pro Complete Tutotial
Removing Background Noise with DaVinci Resolve
On the Color page of DaVinci Resolve, there is a simple method for applying background noise removal to your video. Follow these steps to get rid of the unwanted grain.
Step 1: Import video with noise to DaVinci Resolve and add it to the timeline.
Step 2: Switch to the Color page on Workspace > Switch to Page > Color. Or by clicking on the Color tab at the bottom of the screen if you have the page navigation enabled.
Step 3: Right-click the node and choose Add Node > Add Serial Before.
Step 4: Select the first node and switch to the Motion Effects panel. Adjust the Temporal Noise Reduction. A higher number of frames will provide better quality but requires more GPU processing. Change the Motion Estimated Time to Better for best results, and adjust the Motion Range according to how much camera movement you have in your video.
Step 5: Adjust the Temporal Threshold to maintain definition and texture in your image. If you have dark footage, increase the Luma and Chroma values.
Step 6: Now move to Spatial Noise Reduction. You can create a new node to adjust Spatial NR or do it in the node you’re already working on. Spatial NR reduces chromatic noise (or color noise) from your video. That's when you have color specks in zones with noise. Select the Mode and Radius depending on your chromatic noise zone.
Step 7: On the Spatial Threshold, click the chain icon to unlink Luma and Chroma. Increase Chroma values until you see the color specks disappear.
Step 8: If you lose too much detail in your image, you can apply sharpening effects to fix it. Create a new serial node, switch to the Blur panel, and click the Sharpen icon to see the Blur-Sharpen parameters. Lower the radius sliders to add detail to your image.

Final Words
The Denoise effect from Sony Vegas Pro (now known as Magix VEGAS Pro) is a quick and effective method to remove background noise from your videos. However, Boris FX provides both seasoned and beginner filmmakers with professional presets that can take the quality of videos to the next level, allowing you to adjust every parameter in the plug-in and create your own presets for future projects.
Good luck!


