


Recording a video comes with a few risks, one being the possibility of getting a "grainy" or "noisy" result that looks unpleasant and unprofessional.
Video noise, or video grain, are terms to describe the visible "texture" in a video, and although they are not the same thing, it's commonly accepted that both refer to visible, unplanned "artifacts" in the final result.

Most would agree that unless done on purpose in some specific cases, having grain or noise in your product is a negative consequence that lowers video quality and should be avoided, as it's simply a sign of multiple mistakes throughout the filming process.
Getting grain or video noise, most of the time, results from recording with the wrong camera settings. However, it can also happen due to using lower-quality equipment, excessively zooming in the footage, or compressing files due to ease of transfer and size-reduction purposes.
As a videographer or an editor, chances are you'll often have to work with grainy footage, as this is one of the most common mistakes made when recording.
Sometimes, the task may even be to specifically remove grain and do noise reduction within a video editing software, which can be tricky if you're unfamiliar with this concept, but also crucial to ensure optimal video quality.

Fortunately, this tutorial will cover everything about fixing grainy video clips and teach you how to remove grain from video material you work with or any other video file. So, without further ado, let's get straight into it.
The Nature of Grain in Videos
Grainy footage has existed since the very start of the filmmaking industry. When they first started shooting films only analog cameras were available, so grain was a perfectly normal thing due to the use of a film tape.
Film grain is the texture caused by silver particles that you can see in processed analog film footage. This is why it's considered so authentic and in the eyes of many passionate filmmakers, cannot be replaced by digital video noise by any means.

Nowadays, digital cameras are miles ahead compared to what filmmakers had back in the day, and they're able to create crystal-clear footage at ultra-high resolutions without any issues, and with minimal grain.
But, is this as good as it sounds when it comes to the artistic charm and immersion of film?
If modern technology is so much better, why do all top-tier productions artificially add film grain within their video editing software once the product reaches the post-production phase?
Well, the truth is, there are both good and bad sides to having grainy footage.
Film grain is great for immersion. Viewing crystal-clear footage is simply too realistic for most eyes. That's the same reason we don't have films at 60fps because it makes the viewers feel as if they're watching a soccer match on television.
Films are supposed to fully immerse the viewer in the story, and grain plays a significant role in that. It gives that dream-like feeling as if you are witnessing something happen in a whole different world. From an artistic standpoint, it's a wonderful aesthetic touch, but only when it's applied with a purpose and when you have full control over it.
Some filmmakers add grain to their footage to preserve that old film look many viewers are nostalgic for.

On the other hand, corporate videos, real-estate promo material, talk shows, and anything that's supposed to look and feel as real and authentic as possible to the viewer, should not have grain. In such cases, having grain is not aesthetic or artistic, it's simply considered a flaw.
With that said, you should know how to control film grain and video noise depending on what type of content you're recording. The next section will provide more insight on how to avoid video noise in your projects.
How to Avoid Video Noise and Improve Video Quality
If you're willing to learn how to remove grain from video or "tone down" the noise in it, the most important thing is to acknowledge that it's best to avoid getting it in the first place, or in other words, prevent it.
Paying attention throughout the filming process and correctly applying some of the tips listed below will save you a lot of time in the long run, as removing video noise and grain is slow, and in most cases, costly process as well (acquiring access to top-level tools such as Continuum, Neat Video or Topaz).
Record With the Adequate Camera Settings
![]()
It's best if you know your camera's settings and have at least some experience with it before attempting to record slightly more difficult material, like nighttime scenes and locations that aren't lit too well.
However, what most people do when trying to avoid grain while recording is either keep the base ISO setting for their camera or lower the ISO setting on their camera. Make sure to not allow your video camera to automatically set the ISO for you. It may "bump" it up too high and you'll get an unnecessarily grainy video.
Though it takes some time and not everyone wants to go through that process, getting familiar with your camera is very important, and experimenting with different ISO values in different scene types and lightning will really help you understand what settings to use when.
It's a bit more technical, but generally, a lower ISO means less noise in your final result. However, lowering your ISO to the bare minimum comes at a trade-off. You'll require much more well-planned lightning and light sources on your scene, which takes us right to our second tip.
Ensure There's Enough Light on Your Set
![]()
If you ensure that your scene is well-lit and has the required light sources pointing where they should, you can allow yourself to "drop" your camera's ISO to a number as low as 100 and get a really good-looking image without any noise or grain.
In the opposite scenario, if your scene is not well-lit at all and you have to rely on increasing the ISO to a number like 61,200, you'll more than likely end up with a grainy video that even after a denoising attempt may remain unusable.
Use the Sun as a Light Source (if Possible)
Not every videographer is a professional, and that's perfectly understandable. Equipment like fancy lights can cost a lot of money, and for school projects or amateur work, that's almost always out of reach.
If possible, plan your scenes around the most powerful natural light source, the sun. If you record something outdoors and its lit directly by sun rays, chances of getting noise or grain are close to zero.
In cases where you must record indoors, try arranging your scene around windows and other places where daylight can reach the actors or objects. This way you won't have to invest in lights too much or not have a properly-lit scene and end up with a grainy video.
![]()


How to Remove Grain from Video File
If despite applying all these tips you still ended up with a grainy or noisy result, you'll need to put in some effort and do a proper noise reduction phase, which this guide can help you with as well.
Thanks to technology advancements, especially in the AI field, you're able to reduce noise using noise reduction video plug-ins and tools like Neat Video, Topaz AI, Continuum by Boris FX, and more.
Should you decide to not use third-party services and tools, and remove video noise within your video editing software, you can do that as well as most programs like Premiere Pro, After Effects, and others, have built-in, free noise reduction plug-ins available.
Most of the time, you can find these plug-ins in the effects panel within your editing software marked as filters or effects. Apply them to your video and then tweak the settings until you get the best possible result. This may look slightly different in each video editing software, but that's the general workflow for all of them.
The noise reduction process is also different for each professional video repair software, so we cannot provide the exact steps, but some of the most popular ones like Continuum, Neat Video and Topaz AI are quite easy and straightforward to use. Continuum and Neat Video, for example, can be installed as plug-ins for all popular video editors. Topaz AI, on the other hand, is a standalone app.
If you want to fix video noise and fix grainy videos, the first step is to purchase a license, then download and install the software. To remove noise, add your video and process it, then play around with the noise reduction settings until you get the best result.
How to Remove Grain from Video with Boris FX Continuum
Boris FX's plug-ins are known to every experienced editor and for a good reason. Used by top-tier productions, filters such as BCC Noise Reduction can help you reduce noise in all your video clips within your preferred software.
The following step-by-step tutorial will be for Premiere Pro specifically, but keep in mind that any filters and effects found in Continuum can be used in Avid, After Effects, and many other programs too. A free trial version of Continuum is available for download on the Boris FX website.

Here's how to remove grain from video with the Continuum pack within Premiere Pro.
Import Your Video Within Premiere Pro and Create a Sequence
Open Premiere Pro, import a video by double-clicking anywhere on the empty area within the "Project" panel on the left, then drag and drop the video on your timeline to create a sequence from it.
![]()
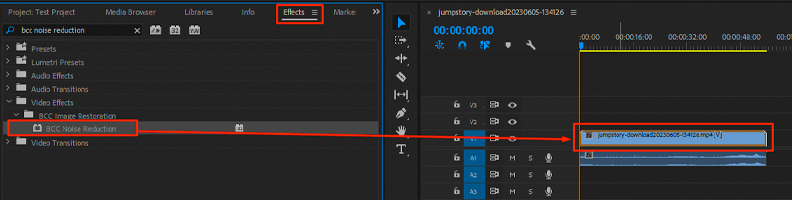
Find and Apply the BCC Noise Reduction Filter to Your Video
Click on the "Effects" panel to open it, then find the filter using the search bar. It is located within the BCC Image Restoration folder. Drag and drop the filter over the video on your timeline, as shown in the image below.
![]()
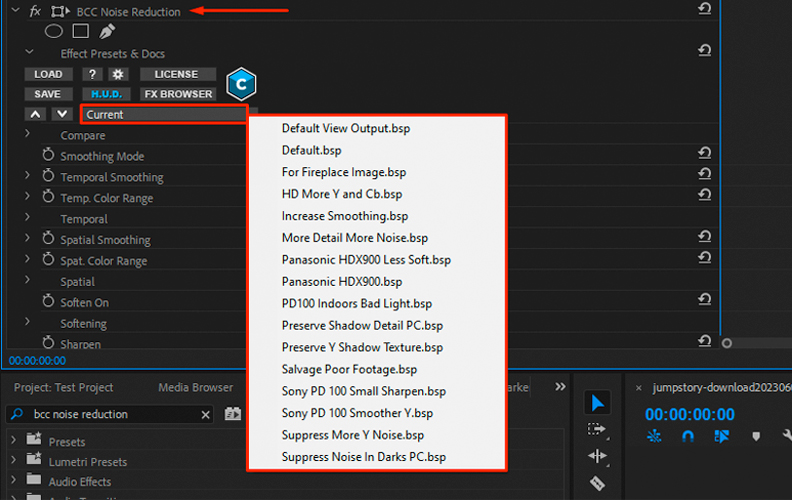
Try Some Presets, Adjust the Settings, and Export
Like many other Boris FX filters, you have the options to choose from some of the already-available presets. This makes your job much easier and gives you a great starting point.
To do so, click on the video on your timeline and open the "Effects Control" panel, then expand the presets section and pick one. Manually adjust the other settings if you need to, and when done, save and export the video. That's all there's to it!
![]()

Final Words
That covers everything you should know about video noise, video grain, and improving video quality when dealing with noisy or grainy material, as well as a few other tips on how to avoid these issues while recording.
Thanks to modern video editing software and renowned plug-ins and tools like the one mentioned above, dealing with these issues is easier than ever, but it would still be best to avoid them rather than having to deal with them later on during post-production.


