


Are you bored of always shooting your video content in the same spot? Incorporating a green screen into your filming practices can help you bring to life any setting you desire for your visual project.
Luckily, almost all video editing software offer a Chroma Key feature that allows you to edit green screen footage. In this tutorial, you’ll discover how to eliminate a green screen video in DaVinci Resolve by using three built-in features and identifying which one best suits your project.
Let’s dive in!
What is a Green Screen, Keying, and Chroma Key?
Green screens are widely used in movies and television production to film the actors in front and replace the background with a different one in post-production. Green screens can be made of fabric such as polyester, use a wall painted green, LED screens displaying a green background, or even just green paper for budget productions.
When filmmakers and editors talk about keying, they refer to a post-production process where they choose a part of the video, like a green screen, and make it transparent and replace it with another video in the composition. When you base the keying process on a color like green or blue, the technique is called chroma keying.
Chroma key lets you choose a color from your video and make it transparent. Applying the chroma key to video footage with a green screen allows you to remove the green screen and replace it with new and, often, imaginary settings: space, underwater, or other places like a different city or buildings.
How to Use a Green Screen in DaVinci Resolve
There is no doubt that DaVinci Resolve is an all-rounder video editing software for all levels. It features both advanced and beginner tools for keying green screens from any video and replacing them with new landscapes.
There are three ways to replace a green screen in DaVinci Resolve:
With the 3D Keyer effect.
On the Fusion page with Delta Keyer and Chroma Keyer.
With the Qualifier tool on the Color page.
These three methods offer different ways to replace a green screen with DaVinci Resolve chroma key tools, but they all provide similar results. Depending on your editing skills, your familiarity with DaVinci Resolve, the green screen on your video, and your project's needs, you may prefer one over the other.
I'll explain every step for each method in detail so you won't get lost, even if this is your first time removing a green screen.
For each method, you will need to have a video with a green screen and the background video footage that will replace the green screen in the final version of your clip.
Method 1: Green Screen Removal with the 3D Keyer Effect
The 3D Keyer effect is the easiest way to apply green screen removal. The main strength of 3D Keyer is how quick and straightforward it is when used for green screen removal, making it the perfect method to use if this is your first time removing a green screen. However, it has limitations: you cannot tweak it as much as the other methods. Removing the green screen in some situations might be difficult, but as a quick green screen removal tool, it works magnificently.
Step 1: Set Up the Project
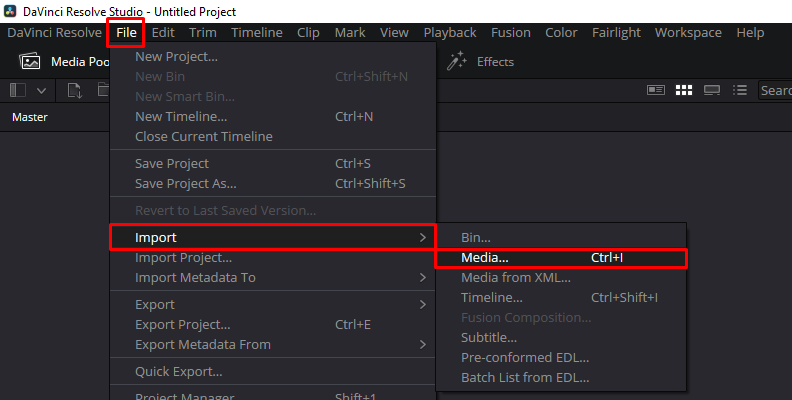
Start by importing your two video clips to DaVinci Resolve by going to File > Import > Media and browsing the files on your computer. DaVinci Resolve will automatically adjust the project to the characteristics of your video files.
![davinci resolve chroma key]()
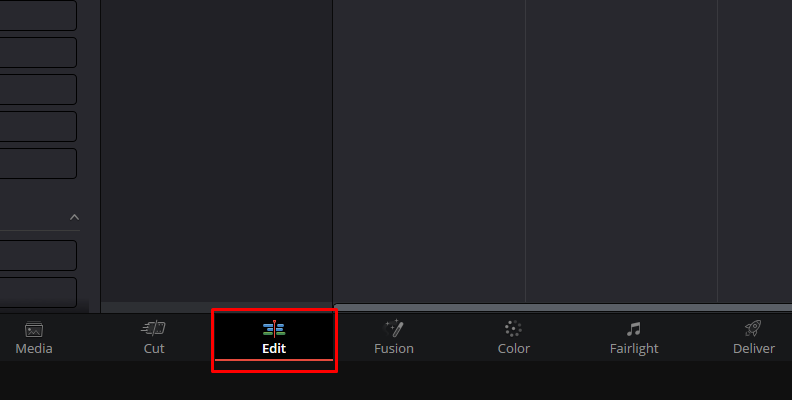
Move to the Edit page and drag the video clips to the timeline. If you can't see the files in the Edit tab, select Media Pool in the top left corner.
![]()
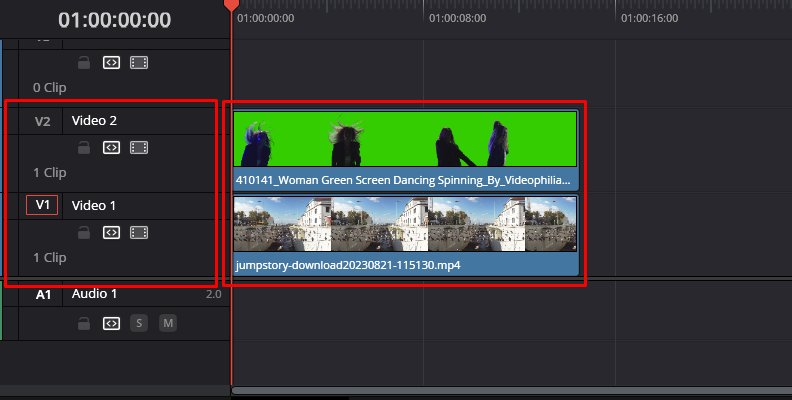
When you drag your clips, they’ll be placed next to each other on the same video track. Drag the video with the green screen footage above the background to create a second video track.
The video with the green screen should be on top and the video with the background you want to replace with below. Then, align both clips one above the other and adjust their length.
![]()
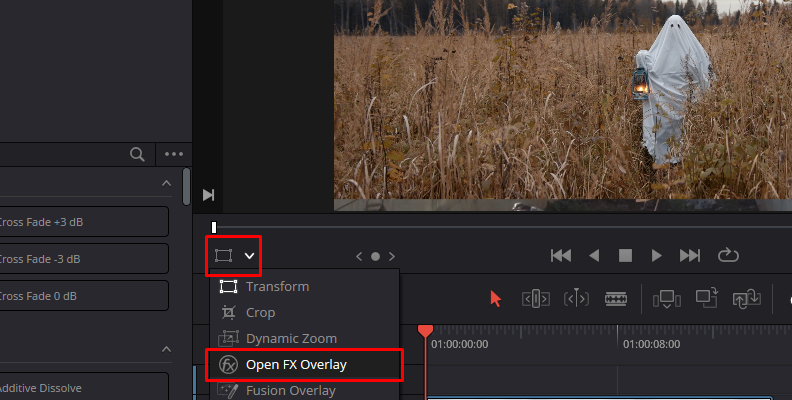
Step 2: Change the Transform Mode
You need to change the Transform mode to enable the 3D Keyer feature to pick a color from the timeline viewer. You'll find it on the lower left of the timeline viewer. Right now, it should be a square icon. Click the little arrow on the right to open the dropdown menu and select "Open FX Overlay."
![]()
Step 3: Apply the 3D Keyer Effect to your Video Track
![]()
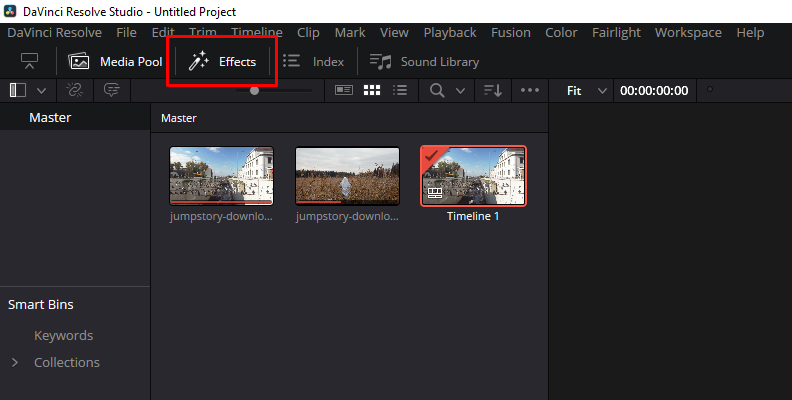
Open the Effects Library by clicking the Effects button next to Media Pool on the top left corner of your screen.
![]()
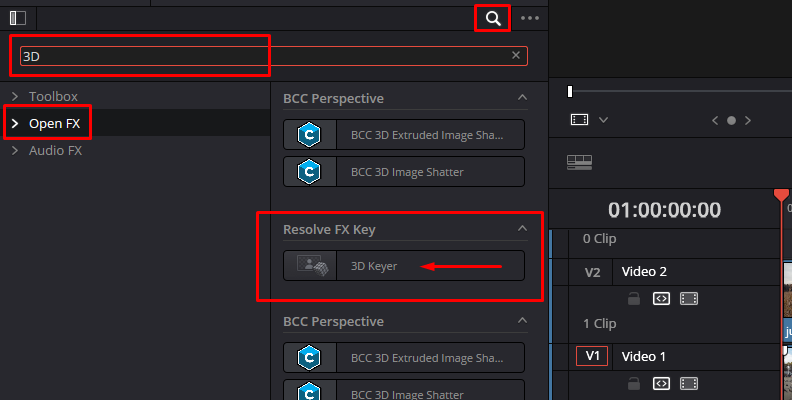
You’ll find the 3D Keyer effect under Open FX > Resolve FX Key > 3D Keyer. If you have many effects installed, you can use the search box and type 3D Keyer to find it more quickly. Drag it to your green screen clip to apply it.
![]()
Step 4: Adjust the 3D Keyer Effects Settings
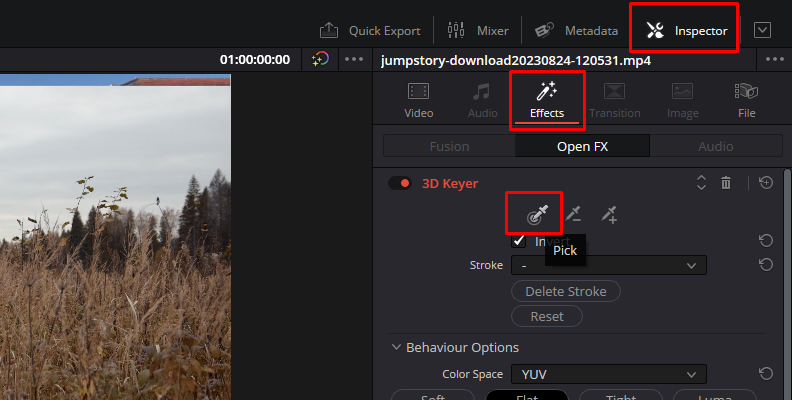
Open the Inspector on the top right corner and switch to the Effects tab. You'll first see the Pick, Add, and Subtract eye dropper tool. Select the Pick Dropper tool and click on the green screen in your video footage. When you click it, your background video should replace the green screen.
![]()
Step 5: Fine Tuning the 3D Key Effect
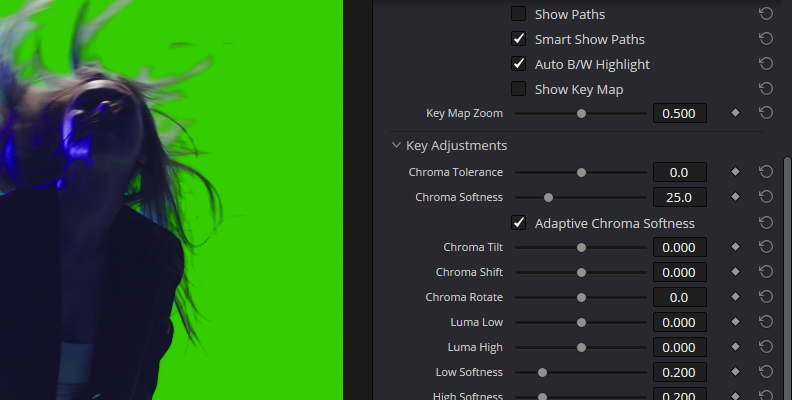
Scrolling down the effects tab on the Inspector, you’ll see more options to adjust the effects, such as Despill, key adjustments, matte finesse, garbage matte, and output options. Make adjustments to these settings to change the color selection, adjust the matte's shape, and correct the green screen's edges.
![]()
Preview your clip and pay attention to different frames in the video to find parts that require correction, and go back to the inspector window to finetune your footage.
Method 2: Green Screen Removal with Delta Keyer and Chroma Keyer in Fusion
Fusion allows you to add tools and effects to create more complex compositions. The Delta Keyer and Chroma Keyer are two easy ways to isolate colors to remove green or blue screens.
Ensure you import your video clips and place the green screen footage above the background video in a separate video track on the Edit page.
Delta Keyer
![]()
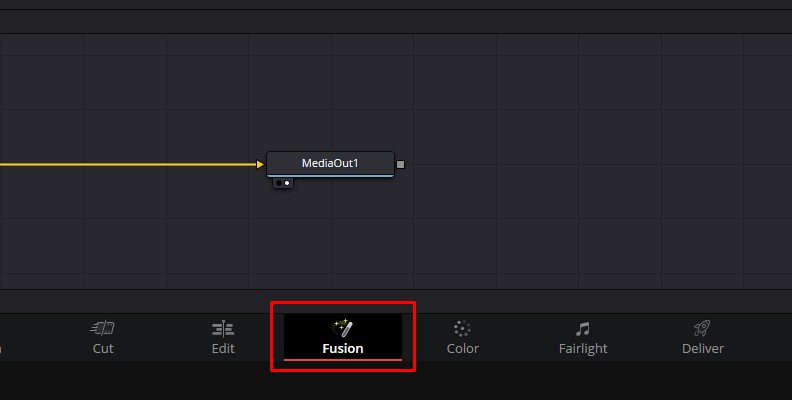
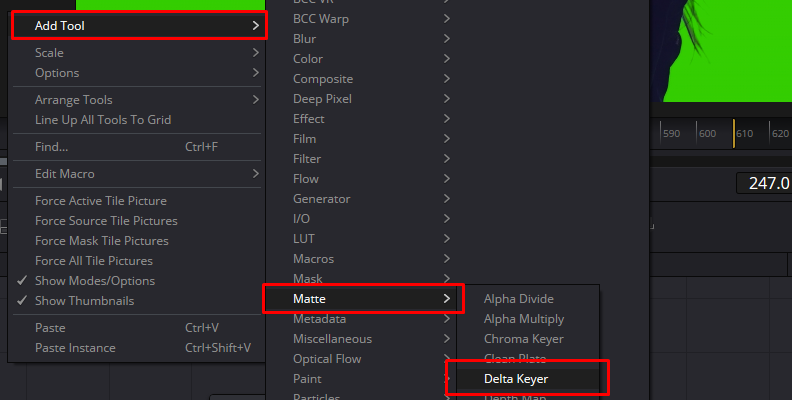
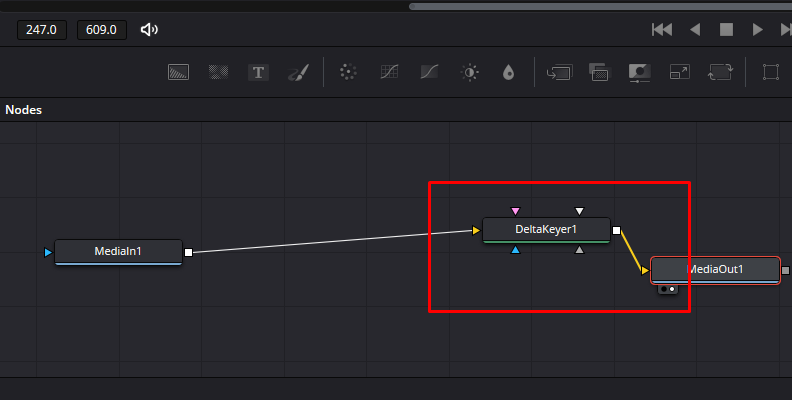
Switch to the Fusion tab by clicking the mag wand icon at the bottom of the screen. Right-click on a black space in the node grill and choose Add Tool > Matte > Delta Keyer. Join the MediaIn node with the DeltaKeyer node and the DeltaKeyer node with the MediaOut node.
![]()
![]()
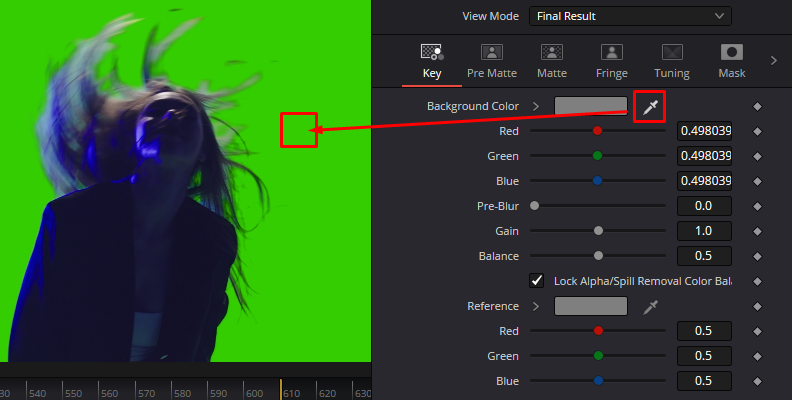
Select the DeltaKeyer node to see its settings. Click the Inspector icon on the top right corner if they don't appear. On the Key tab, click and draw the dropper to the green screen to select the color to be removed.
![]()
Go back to the Edit page, and if you have previously placed your video clips in the correct order, you should see the background video replacing the green screen in the foreground clip.
![]()
Chroma Keyer
The Chroma Keyer gives you more control than the Delta Keyer by allowing you to select a wider color and luminance range from your green screen footage.
Add a Chroma Keyer node between the MediaIn and MediaOut nodes on the Fusion page by right-clicking and selecting Add Tool > Matte > Chroma Keyer and joining the nodes.
On the settings, select the color range using the sliders or click on the green screen on the preview window to choose the range color. You can click multiple green areas and zoom in and out to select the green edges.
Control color spills from the Image tab. Select between green and blue, according to the color of your screen, and keep an eye on spill issues.
Return to the Edit page, and you should see your green screen replaced by the background video.
Method 3: Green Screen Removal with the Qualifier Tool
The last method is using the Qualifier Tools on the Color page. It's the most comprehensive technique, as you can also apply some color correction in the process. Working on the Color page might seem complicated at first, but it’s quite straightforward once you get to know the process and familiarize yourself with working with nodes.
Step 1: Importing and Creating a Timeline
Import your two media files with the green screen and background footage. Use CTRL + I or CMD + I to open the import media window. Browse for your files and click Open.
Switch to the edit tab to create the timeline. Open the media pool, select the clips, and right-click one to display the dropdown menu. Select "Create New Timeline Using Selected Clips."
Step 2: Organize Your Video Tracks
After creating the timeline, you must organize the video clips to create the composition. Place the green screen footage above the other to create a second video track. Then, trimming or cutting the longer video to adjust them to the same length.
Step 3: Chroma Keying in the Color Page
Switch to the Color page by clicking on the Color icon at the bottom. Select the video clip with the green screen in the timeline above to make sure you work on that one and not the other. If you can’t see the clips, click on the clip icon in the top right corner.
Select the Qualifier Tool with the dropper icon and click on the green screen on your viewer to tell DaVinci Resolve which color you want to isolate. To ensure your selection is correct, click the Highlight magic wand icon above the viewer to see the selection.
Now, you have isolated the green color, turning the rest into a transparent area; however, what you want is the other way around. To invert the selection, click on the Invert icon to the far right after the dropper icons. It's the icon that looks like a circle, with two points and two arrows. If you click the Highlight icon again, you will see only the green screen as a gray area.
Step 4: Blending the Two Video Tracks with Alpha Output
With the green screen isolated, the next step is to blend the two video clips to replace the green screen with your background video. You’ll do this with nodes, so ensure you enable the nodes' view before you start. If you don’t see them, click the Nodes button on the top right corner of DaVinci Resolve.
Right-click on a black area and select Add Alpha Output from the dropdown menu. It will appear as a blue dot at the right of the node view. Join the blue square from your clip node to the blue dot to connect the clip to the Alpha Output. This will tell DaVinci Resolve that you want to blend both video tracks. Since you make the green screen transparent with the Qualifier Tool, you can see through the video track below.
Use the settings under Matte Finesse to adjust the blending and refine the edges of the green screen. It’s not that different from the settings used in the 3D Keyer effect.
Step 5: Adjusting Your Footage with Power Windows
Power windows in DaVinci Resolve are what you may know as masking. Power windows will allow you to crop objects, reposition or resize your videos to match the frame, and make a blending smoother and more realistic.
Click the Window icon (that's the circle with four dots). Select the shape form of your mask and adjust the edges of the power window by dragging the points. You can change your power window shape by using the Transform and Softness values.
Step 6: Remove Green Screen Spills
If you find color spill reflections on your footage, you can correct it by enabling the Despill feature. Go to the Qualifier Tool. By default, you are in the Qualifier – HSL tab. To your right, you should see four icons to change the tabs. Click on the dropper to switch to the 3D tab. Use the dropper to select the greens reflected and adjust the Despill slider.
Step 7: Color Correct for Blending
When you replace a green screen in DaVinci Resolve, the idea is to make it look as realistic as possible. The advanced color correction from DaVinci Resolve will allow you to smooth the blend to achieve the desired result.
Select a clip and use the color corrections tools on the Color Wheels. Switch to the Curves icon to adjust the highlights if you need it. Make adjustments to the color correction tools to give your composition a more natural look.

Final Words
I am constantly amazed by the things you can do with DaVinci Resolve, especially considering you can get the basic version for free!
By following the three techniques to remove green screens from footage outlined in this article, you'll be ready to add green screens to your productions and seamlessly replace them after filming. Start by practicing the method that feels most intuitive to you, and gradually work your way towards mastering the others. With some practice under your belt, you can start experimenting with different settings to develop your own approach to removing green screens.
Good luck, and stay creative!


