


When it comes to producing audio content, there are a variety of techniques that a producer can use to help improve the quality of the audio signal or sound. If there are multiple audio sources then it is important to be able to balance those sources so that everything remains clear and easy to listen to.
After all, content creators want to ensure that what they have recorded sounds great. It could be music, spoken word, training videos, ambient sound, or anything else. You want it to come across in the best way possible.
While there are a number of techniques producers can use to keep audio clear and everything sounding as it should, audio ducking is a valuable one to learn.
What is Audio Ducking?
Audio ducking is a process whereby the audio signal is “ducked” down when another sound goes beyond a particular threshold. The volume of the background track is temporarily lowered to allow the main track to take prominence. So, the process is used to lower the volume of one track automatically so you can better hear another track.
Audio ducking is sometimes done by using compression, though it can also be done by a simple volume adjustment. Whichever method is used, though, the result is the same, which is that the audio signal on one track is made more distinct and clearer than the other.
Applying either a reduction in volume or compression can be done automatically or manually, but most digital audio workstations (DAWs) will allow you to do it automatically, and it greatly simplifies the process.
When to Use Audio Ducking
Whenever you have two (or more) audio sources that are on the same production, audio ducking can be used to improve clarity.
For example, if you have a documentary that has music in the background and dialogue in the foreground, you might want to use audio ducking to reduce the volume of the background music so that the background music doesn’t run the risk of drowning out the narration.
It doesn’t have to be music and speech, any audio source will do. So you could have the background sounds of a forest on a nature documentary ducked down while the presenter speaks. Or, if you have a cooking vlog, you might want to duck the sound of food cooking while the presenter talks about the food.
It doesn't have to be background music or music production - it can be speech, ambient sound, or anything else - it can be all of these or none. The important thing is that one of the audio sources is ducked to allow the other to remain clear and unimpeded.
How to Use Audio Ducking
Most DAWs or music production software will have some kind of facility for audio ducking. Though the specifics of the audio ducking will vary from software to software, the essence of using audio ducking remains the same.
Firstly, load the audio samples you want to apply audio ducking to. The example below is from Adobe Audition.
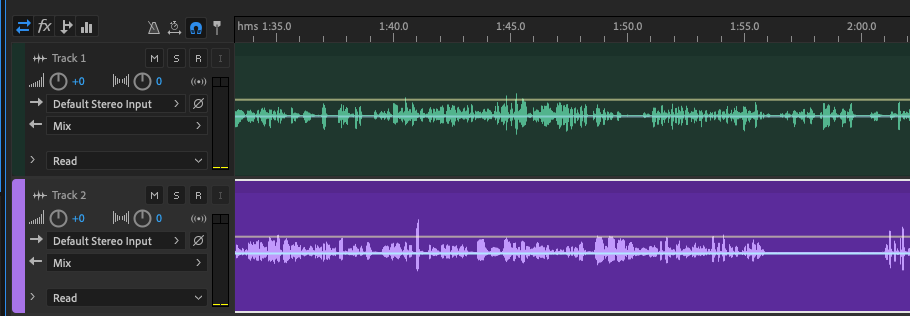
When two tracks have been loaded, you can select the part of the track you want to apply audio ducking to or select all of both tracks (CTRL + A for Windows or CMD + A on Mac) to apply to the whole of the project.
Audio Ducking Dialog Box
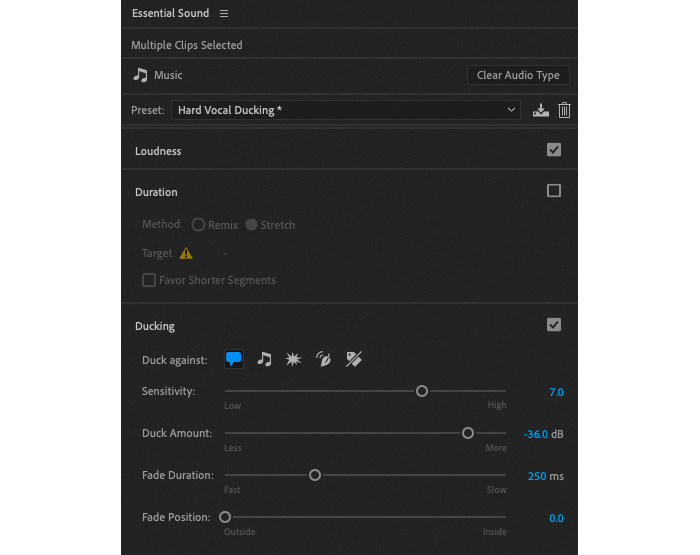
You can then open the Audio Ducking control panel which will give you access to the settings you need to adjust. Again, the above example is from Adobe Audition, but the settings will be similar on most DAWs and video software, so this applies whether you are doing music production or editing videos.
The audio options are as follows:
- Loudness
- Duration
- Ducking
- Ducking Against
- Sensitivity
- Duck Amount
- Fade Duration
- Fade Position
Loudness
Lets you select whether the audio ducking should be based on how loud the signal is and whether this can be auto-matched. This will almost always be selected.
Duration
Can be either remixed or stretched.
Ducking
You want this selected to apply the ducking and access the parameters.
Ducking Against
Allows you to choose the type of sound you are ducking against. The icons represent speech, sound effects, ambiance, music, or to have untagged clips. You can choose either one type of content or as many as are relevant to the project you are working on.
Sensitivity
This is a very important setting as this is where you choose the threshold of the ducking that will be applied to the background track. The greater the sensitivity, the greater the adjustments will be.
It’s worth taking some time to experiment with the Sensitivity setting, as this lies at the heart of getting audio ducking to perform the way you want it to. Every project will be different, so there isn’t a single correct setting for this. However, the more you use it, the more attuned you will become to what will work.
For example, if you select a middle-range setting on sensitivity, it will work well for having someone speak while reducing music volume, whereas a lower setting might be more appropriate for dealing with ambient sounds behind a presenter, and so on. You will learn how to do the volume decrease and return to the regular clip volume with practice.
Duck Amount
Another very important setting, this sets the volume level in decibels (dB) of how much the volume of your clip will be reduced. It is the ducking level setting, in essence. The greater the volume amount, the quieter the clip will become. However, this is another setting you need to be careful with. If the volume duck is too high, it will create really obvious peaks and troughs, which could make your sound unpleasant to listen to. You want to find a balance between reducing the volume enough that the other audio track is clear but not so much that it draws attention. A little practice will make this obvious.
Fade Duration
Controls how quickly the volume change happens when it is triggered. Slower fades are more appropriate when reducing the audio signal of music behind a presenter speaking, whereas a faster fade will work well if you have music and a quick vocal.
Different projects will require different durations, but generally, the duration will be consistent between projects. This means if you have music being ducked under dialogue, the duration will tend to be broadly the same between projects because you are trying to achieve the same effect.
Fade Position
This lets you select where you want audio to fade out in relation to your primary track. So, if you have music on one track and dialogue on another, the fade position lets you choose whether it kicks in outside the dialogue, in the middle, or inside.
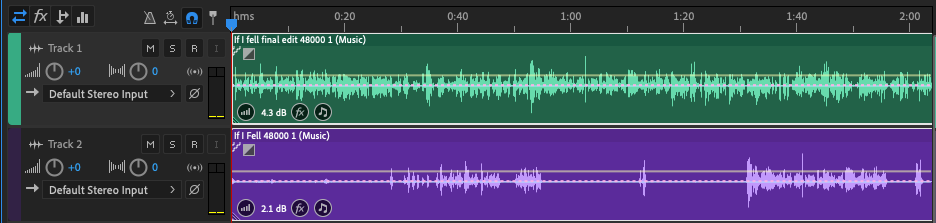
By learning all these parameters, you will be able to set up and control your ducking in whatever software you are using. Once finished, you can see the control channel running through the track. You can see the control channel below. Your work is now done!
Conclusion

Audio ducking might seem complex to begin with, but it takes only a little practice to get the hang of it. It’s a great technique to easily improve the quality of any project, from music production to video editors, podcasts, drama... the list is endless. Whether simple YouTube videos, TV specials, or Hollywood blockbusters, all can benefit from audio ducking.
Once you’ve mastered it, everything will sound clearer, better, and more professional!


