


With the rise of social media and the myriad of digital content generated on a daily basis, creators are constantly trying to find ways to make their content more attractive to their viewers' eyes, so questions like "What is rotoscoping?" are trending more than ever.
There are many ways to make a video extraordinary. If you've watched any music videos or highlight edits of various sports or activities, you've most likely noticed that editing technique is far from just well-placed cuts.
One of the most popular techniques, which has been used for a very long time, is rotoscoping, and in this guide, you'll learn everything you need to know about Rotoscoping in Premiere Pro.
So, without further ado, let's get straight into it.
What is Rotoscoping? - A Cool Video Editing Technique
Rotoscoping is an animation and filmmaking technique that involves tracing over live-action footage frame by frame.
This meticulous process entails drawing or painting over each frame of a video or film to create a new layer of animation. The end result is a polished and precise animation that closely matches the original footage, resulting in a more realistic and smooth animation.
Rotoscoping also helps artists create amazing visual effects by separating the subject from the background and applying things such as glows and halos, or simply inserting them in a different shot through fancy-looking transitions. A good example of the many possibilities rotoscoping allows for is when the band is playing on stage in the music video for "Money For Nothing", a popular song by an even more popular band Dire Straits.
Another very popular example of rotoscoping is the music video for "Take On Me" by A-Ha.
Although time-consuming, rotoscoping can deliver visually stunning effects and is often utilized in high-budget productions. Thankfully, there are companies that create tools specifically for this purpose, making the process a lot quicker, easier, and beginner-friendly as possible.
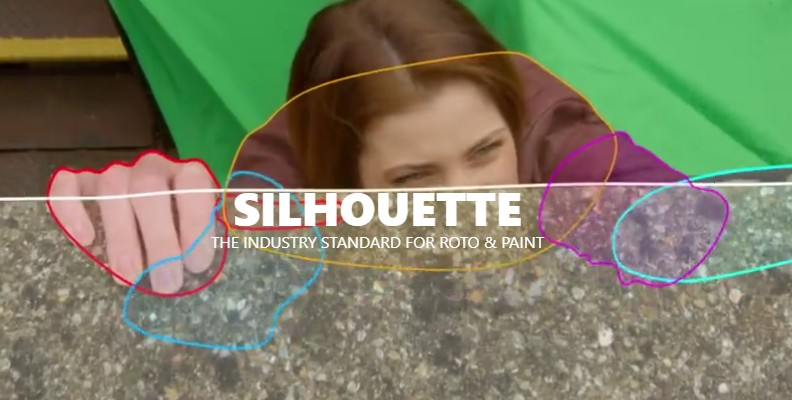
Boris FX has industry-leading software specialized for rotoscoping called Silhouette, and you can find a free version of it on the official website. Silhouette is available for all editing programs by Adobe, and it also comes in a standalone version.
If you're willing to give Silhouette by Boris FX a try, here's a super helpful tutorial that should get you started.
Furthermore, if you're looking for Premiere Pro tutorial video material regarding rotoscoping and everything about it, feel free to take a look at the following section below.
In it, we're covering rotoscoping in Adobe Premiere Pro in full detail in a step-by-step manner.
How to Rotoscope in Premiere Pro
Adobe Premiere Pro is one of the most beginner-friendly editing programs you can learn, but that doesn't mean it cannot be used to produce cool videos.
Like many other techniques, rotoscoping is possible in this software, and below you'll find an Adobe Premiere Pro tutorial that will show you how to rotoscope with ease in this well-known editing workspace.
Import Media and Create a Project
To initiate the rotoscoping process in Premiere Pro, the first thing you need to do is create a new project and import the video clip you wish to work with into your project.
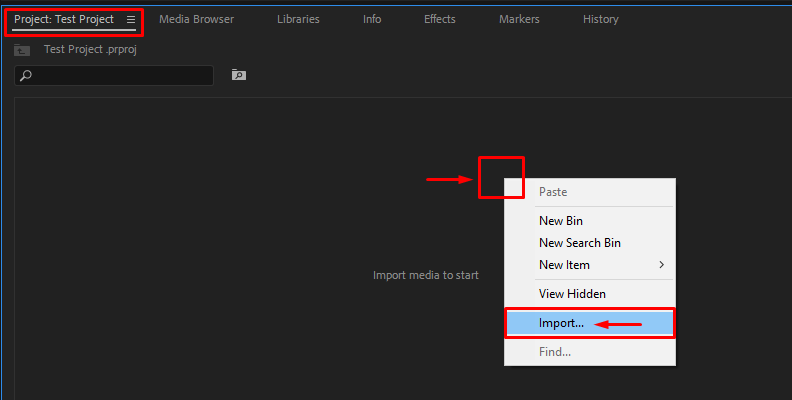
To do this, launch the software, choose "New Project" and rename it accordingly. Then, when the workspace loads, click on the "Project" section in the bottom-left corner of the screen, then right-click an empty area and choose "Import" as shown in the image below.
![]()
Create a Sequence by Dragging Media to the Timeline
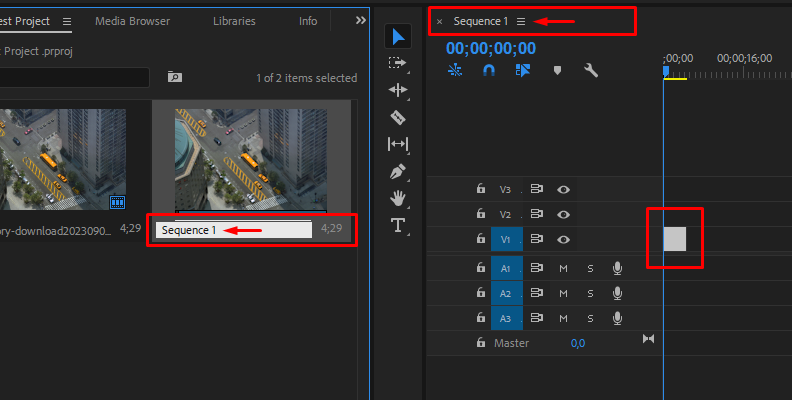
Now, to work with your media, you need to create a sequence. You do that by dragging the video file you just imported onto your timeline.
![]()
(Optional) Give the sequence a proper name so you can easily find it in the project files. Naming your files properly only takes a few seconds but can save you a lot of time later on.
![]()
Create a Plate and Nest the Clip
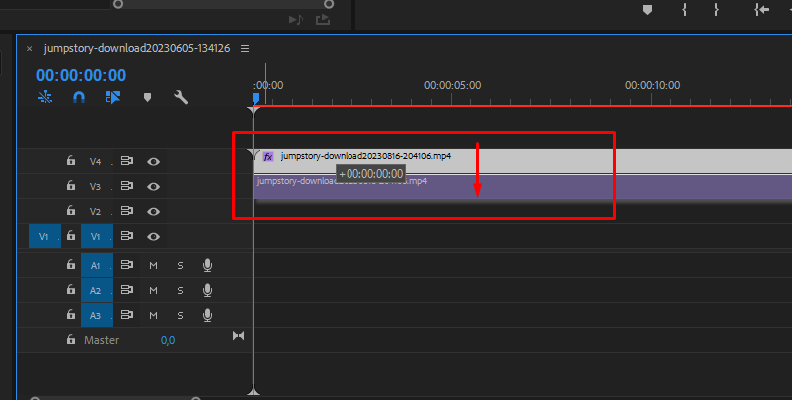
Now you need to create a "plate" which is essentially a background for the shot. To do this, select the video on your timeline, then hold the "ALT" key on your keyboard and drag the video one track below on the video track list. This will duplicate it and place the copy one video track below, as it should be.
![]()
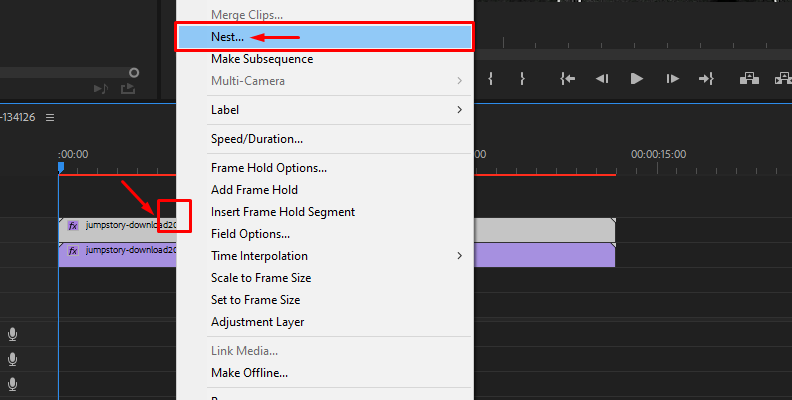
Now you need to select the original clip and right-click it, then choose the "Nest" option, as shown in the image below.
![]()
Replace with After Effects Composition & Use Roto Brush
Right-click the nested sequence you created and choose the "Replace With After Effects Composition" option. If this is "greyed out" for you and you cannot click it, manually export the sequence into After Effects.
Now, access the Roto Brush Tool in After Effects by clicking the Stick Figure & Brush icon located in the topbar menu.
![]()
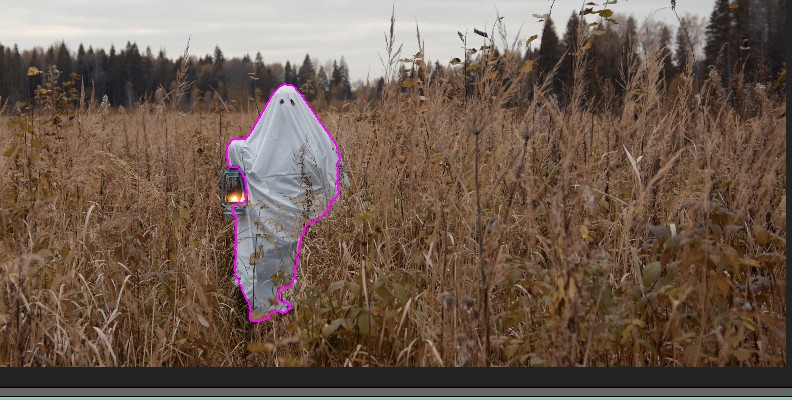
Use the Roto Brush to carefully track the person or object from your footage.
Note: Make sure to create a new layer of the original footage and work on it, not directly over the original clip. So, after selecting the Roto Brush, simply double-click on your footage, and After Effects will create a layer and immediately move you to that working screen where you can keep using the tool.Using the Roto Brush is easy. Use the left mouse button to draw around the subject and hold the ALT key when you wish to remove an area from the paint.
![]()
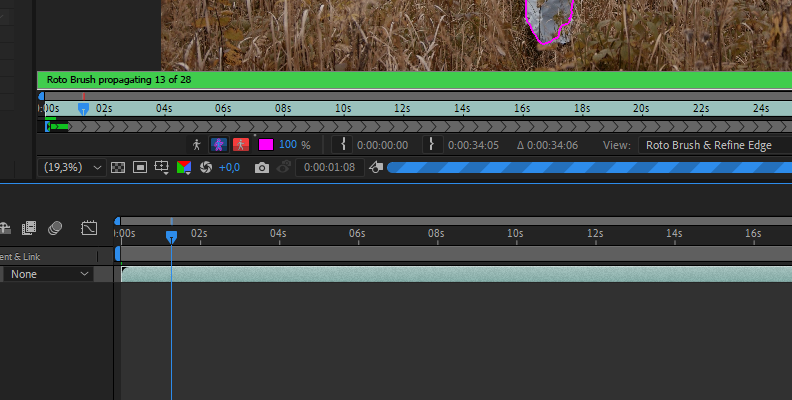
Doing this in After Effects will allow you to not go one frame at a time like you would with a pen tool in Premiere Pro, but instead let the tool automatically track the subject throughout the entire clip for you.
Once you paint an approximate area (make sure to do it as precisely as you can though) around your subject, After Effects will try to track it automatically for the rest of the clip. This may take a few seconds depending on your computer's processing power.
![]()
Adding Effects in Premiere Pro
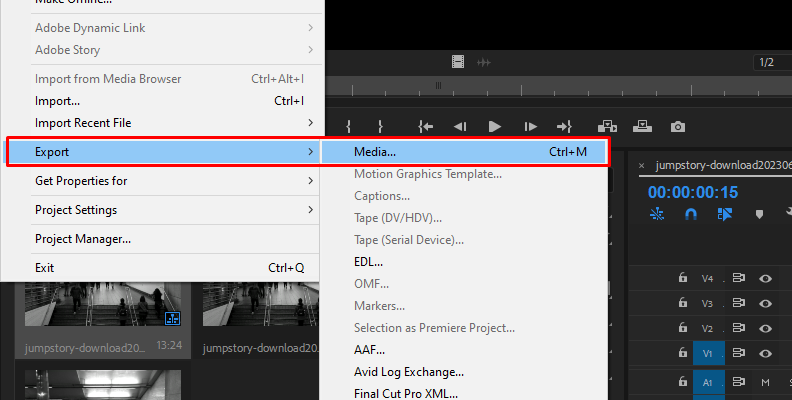
Now that you have the cutout created by After Effects, go back to Premiere Pro and set your creativity free. You can play around with a green screen, completely change the subject's background, add various VFX, and a lot more.
When done, simply use the "Export Media" option in Premiere Pro to save the video on your computer.
![]()


Final Words
With that said, you now know how to use the superior After Effects Roto Brush tool and Adobe Premiere Pro's simplicity for editing and organizing to create a successful rotoscope project.
You can fully do this within Adobe Premiere Pro but it will take a lot more time as you have to manually go one frame at a time which After Effects does automatically and much better for you instead.


