


In post-production, many wonderful things can be accomplished, such as impossible objects appearing out of nowhere, animations flying around characters, useful captions, special effects, and much more.
If you have ever wondered how these things are made in movies, the answer is simple: motion tracking, something that any video editor should know how to use to expand their abilities and provide clients with visuals of the highest quality.
Most video editing software includes built-in plug-ins for motion tracking. However, Adobe After Effects is one of the most popular among video editors and motion graphic designers: its built-in tracking motion tools are excellent for beginners. Additionally, After Effects comes with Mocha AE, a lite version of Boris FX Mocha Pro planar tracking, for more advanced users.
In today's article, you'll learn what motion tracking is, how to use motion tracking in After Effects, and how Mocha AE can improve your motion-tracking workflow for more advanced projects.
Let’s dive in!
What is Motion Tracking?
With motion tracking, you can make any graphic, object, or text follow another object in your footage. For example, you can have a logo following the movement of a car or train, place text like names to follow each character or add an object that was not in the footage.
The motion tracking process consists of analyzing the movement of one object frame by frame in your footage and saving that tracking data to use in a different object on a separate layer. By doing this, you can create an imaginary fairy who follows the movement of your head as it flies by your side. Imagine recreating Peter Pan's Tinkerbell or Navi from the Legend of Zelda!
Motion tracking is not limited to professionals. Many content creators, beginners, and hobbyists alike are learning to use motion tracking to give a unique style to their videos, and you can do it too with tools like After Effects that make the process simpler than ever.
Motion Tracking in After Effects
After Effects gives you two excellent motion tracking plug-ins: After Effects native motion tracking plug-in and Mocha AE by Boris FX, so let's take a look at how we can use both to upgrade our video content.
One-point Tracking
One-point tracking or single-point tracker is the most basic form of motion tracking. You can track a single pattern in a small area from your video footage to record tracking data for another layer. It's your go-to when you have a small space you want to track, for example, to track the movement of a hand to add a graphic.
Two-Point Tracking
With two-point tracking data, you can track two elements from your video to record movement. After Effects will take into account these two elements and track their position, rotation, and scale.
Four-point Tracking
Four-point tracking, called corner pin tracking, captures an object's position, scale, and rotation data. It analyzes four track points, such as frames or screens. The four-point tracking helps replace screens or track flat surface-like backgrounds.
Multiple-point Tracking
Multi-point tracking allows you to track as many track points as you need to gather more information for tracking accuracy. For example, to track complex shapes such as a human body.
How to Apply Motion Tracking in After Effects
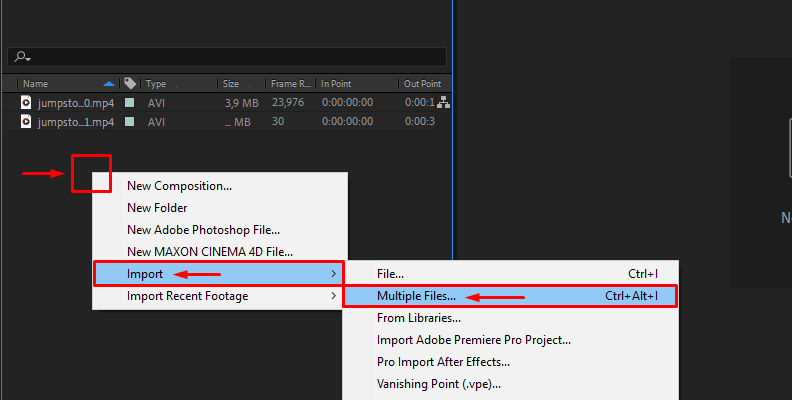
Step 1: Import the Video Footage and Media
Start by adding all the media files you will use to the project panel: your video footage to track, other videos for screen replacement, logos, and texts you want to add to the original footage.
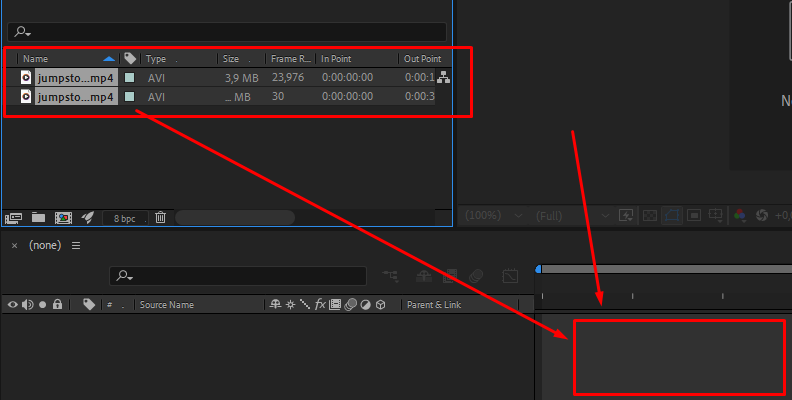
Step 2: Create a New Composition
Create a new composition with your video footage by dragging it to the timeline. Then add the other asset that you will be inserting into your video. If you add text or a logo, organize them on each layer.
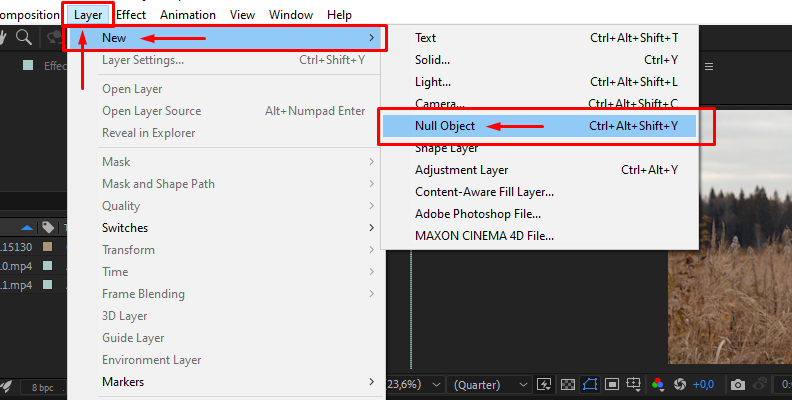
Step 3: Create a Null Object Layer
A null object will create an invisible layer where you can insert the motion-tracking data captured for your video. To create a null object, go to the menu bar and click on Layer > New > Null Object or right-click on the timeline and select New > Null Object.
The new layer will appear on your composition timeline. You can also rename it for clarity.
Step 4: Tracking Points
Select the video clip, go to the menu bar Window, and ensure the track point is ready. If not, click to enable the Tracker panel on your workspace. Select your video clip and adjust the playhead from where you want to start tracking.
From the tracker panel, you can choose the type of tracking you require: Warp Stabilizer, Stabilize Motion, and Track Motion. Click Track Motion. If you're experienced and want full control over tracking motion, you can choose Perspective Corner Pin under Track Type.
There are essential aspects to check on the Tracker window. First, your Motion source should be your footage layer. Then you can select your tracking position, rotation, and scale. After Effects will automatically add track points on the layer view.
Move the track point or points to adjust your tracking area. Place them on high-contrast spots to make accurate tracking and ensure the points are visible on the entire frame of your video.
You can adjust the size of the feature region (the inner square), which determines the area to track. Make it as tight as possible to the object you're following. The outer square is the search region where After Effects will search for the feature region. If your video has a lot of movement, you may increase the size of the search region so that the effect can track it efficiently.
Step 5: Analyze Tracking
Once you have placed all your tracking points, it's time to start tracking. At the bottom of the Tracker panel, you'll see Analyze at the bottom with player buttons. You can select to track forward or backward and frame by frame.
Place the playhead at a starting point and hit the Analyze Forward button to start tracking. You will see the video playing and the tracker following your feature region. However, the tracker might go off while analyzing: if that happens, stop the tracking and adjust the trackers. You can track frame by frame for the subsequent frames to ensure the tracker is in the correct position, then click on track forward to let After Effects continue the process.
Step 6: Apply Tracking Data
On the Tracker window, click Edit Target, select your null layer, and click OK. Now click Apply on the Tracker panel. A pop-up window will ask the size of the area you want to apply motion tracking to. Select an option and click OK to apply the tracking data to your null object.
Now pick up your text, logo, or graphic layer, adjust it to the tracked object position, and link it to the null object to get the tracking data. To connect layers, enable the Parent & Link options by right-clicking in a column and selecting Columns > Parent & Link. Then click on the parent pick whip icon and drag it to the null layer.
Preview your video, and you will see your graphic following the movement of your tracked object.
How to Apply Mocha in After Effects for Motion Tracking
After Effects includes Mocha AE, a powerful planar motion tracking plugin for motion tracking by Boris FX. Mocha can help you create more advanced and complex tracking for your video projects.
You can use Mocha Pro to take full advantage of all the features of Mocha, but for now, Mocha AE will be more than enough for motion tracking and rotoscoping to streamline your tracking process.
Step 1: Set Up Your Project
Import the video footage to track and the elements you want to add to your video into After Effects. You can add text, graphics, images, replacement videos, and more.
Then create a new composition with your video clip. You can drag to the timeline the other elements or do it after tracking.
Create a Null Object layer to import the tracking data from Mocha. Right-click on the composition timeline and select New, then Null Object.
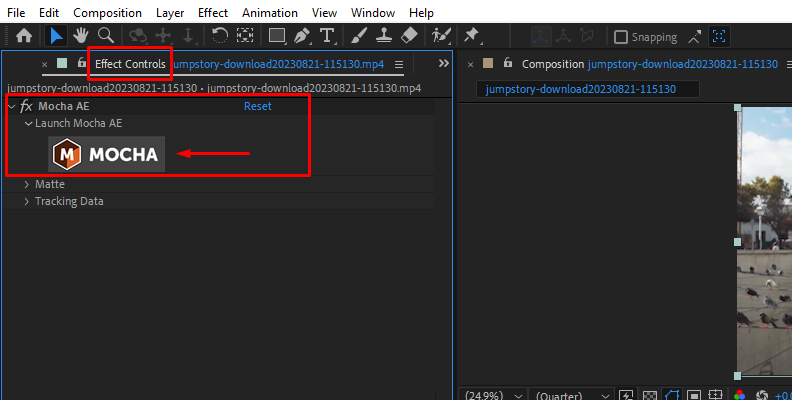
Step 2: Add Mocha AE Effect
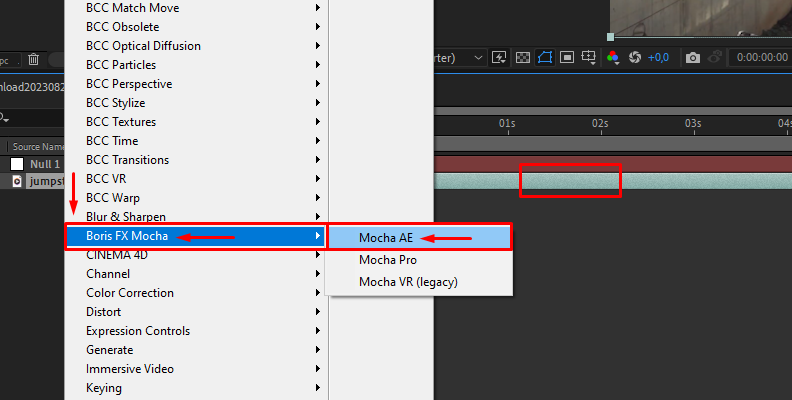
Select your video clip to track and go to the Effects window. Search for Mocha AE and drag the effect to the clip to apply it. In the Effect Controls panel, click the Mocha logo to launch the Mocha AE interface, where you’ll be doing all the tracking.
When Mocha launches, it will immediately import your video clip from your composition timeline. You're ready to start tracking as soon as Mocha starts up.
Step 3: Tracking with Mocha
Tracking with Mocha is incredibly straightforward. First, make sure the object you're tracking is in the frame by choosing any frame in your video. Select the Spline tool to create a layer by drawing a mask around the object. Click to create a new track point and start creating a motion tracker around the object and close the spline with a right click when you finish.
If you're using the Essential workspace, you will have the track motion options and the tracking buttons below the layers. That's all you need for tracking. Select your options and click Track Forward to begin tracking frame by frame. You can stop the tracking process to adjust the spline and resume the tracking.
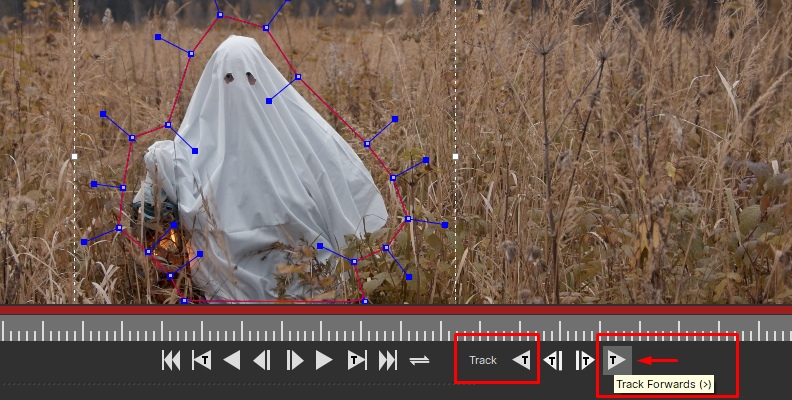
Create as many splines as you need and label them accordingly.
Step 4: Apply Mocha Data in After Effects
Once everything is tracked, save the tracking data on File > Save Project and close Mocha to return to After Effects.
Select your footage layer and go to the Effects Control panel.
Under Tracking Data, click Create Track Data, select the Mocha layer with the tracking data, and click OK. Then choose the export option Corner Pin or Transform.
Select the null layer as the target layer to export and click Apply Export.
An easier way to do this is by copying the tracking data from Mocha.
In Mocha, go to File > Export Tracking Data.
Select your format. You can choose Corner Pin or Transform from Mocha, click Copy to Clipboard, and close Mocha.
Select the null layer, move the play head to the beginning, and press CTRL + V to paste the tracking data from Mocha.
How Can You Use Motion Tracking?
These are some of the most common ways to add motion track to your videos, but you can get creative and find endless ways to make engaging content with After Effects and Mocha AE.
Replace screens such as TV, monitors, or mobile devices.
Stabilize motion from shaky footage.
Add elements that were not filmed.
Add 3D elements.
Make a still graphic follow the movement of an object or character.
Animating effects.
Color grading.
Blur faces or objects.
Add visual effects to your films.
Final Words
Learning how to use motion tracking will open up plenty of opportunities for your career as a graphic designer, visual effects artist, or content creator. Once you start learning and experimenting with it, you'll realize how easy it is to expand your visual palette with motion graphics.
The two intuitive motion-tracking plug-ins in After Effects can help you discover this excellent effect, and you can always upgrade to Mocha Pro once you are proficient with the motion-tracking techniques and need more advanced features.
Good luck!


