


Modern recording equipment and video editing software allow creators to create breathtaking compositions.
One of the most fascinating effects in videography and filmography is slow motion, a technique that has revolutionized everything we see on our screens ever since it was introduced.
In this guide, we'll help you learn more about how to use Optical Flow in Premiere Pro to ensure that your slow-motion sequences/scenes look and feel as good as possible.
So, without further ado, let's get straight into it.
What is Optical Flow in Premiere Pro?
Before we get into the details about what Optical Flow is and how it works to smooth slow-motion effects for your Premiere Pro video clips, it's important to understand slow motion as a whole.
Slow motion is an effect in filmography and videography where the content you see on the screen suddenly becomes "slower" than what would realistically be like in the real world and in real-time.
One example is the famous rooftop shootout scene from the legendary movie "The Matrix," where Neo dodges bullets. You can take a look at the scene here.
Now, for a producer to be able to create slow-motion movement in their film or video, they need two things: a camera that can record in a framerate higher than the planned playback framerate and video editing software, such as Adobe Premiere Pro, that offers the options to change the settings for some shots, playing them at a lower frame rate.
The slow motion effect essentially happens due to the camera taking so many still shots per second (as its recording abilities are much higher than the recommended frame rate at which we watch movies, which is usually 24 and 30), so when you play back the clip at lower framerate, it appears as if time is moving slowly.
"Okay, so now that we know how slow motion works and what we need to create it, why do we need Optical Flow?"
Well, the real use of the Optical Flow feature to create slow motion comes when you're forced to work with stock videos or any video material that you're required to make slow motion of, but it isn't recorded using a high frame rate camera.
In such cases, Optical Flow will be used to analyze the frames of your footage, then artificially generate new frames to fill in the gaps, as if the content was recorded at a higher frame rate originally.
As you may already guess, nothing that's artificially generated based on approximations and guesswork is perfect, and so you can often see that with Optical Flow. You may run into issues like "warping" and "ghosting."
However, in most cases, it can save entire projects.
A simplified explanation of Optical Flow would be to imagine that you have a flipbook with only thirty pages, in which the drawings showcase a person walking from point A to point B. Optical Flow would be your professional artist friend who can draw additional pages with additional movements in between your already-existing ones, making the whole flipbook seem much smoother, which is basically the same as recording with a high frame rate camera - the movement is much smoother-looking.
Although Optical Flow can be very helpful, as mentioned above, it can sometimes cause artifacts, warping, and ghosting. For this reason, if you are willing to try out this feature and you are unable to record with a high frame rate camera, it is recommended you shoot on a static background and keep the movements within the shot as simple as possible.
The more complex the movement and the more elements and subjects moving into the shot, the higher the chances that Optical Flow will make a mistake.
How to Use Optical Flow in Premiere Pro
Should you decide to use Optical Flow in Adobe Premiere, this section covers the right steps to set it up properly for your project.
Here's what you need to do:
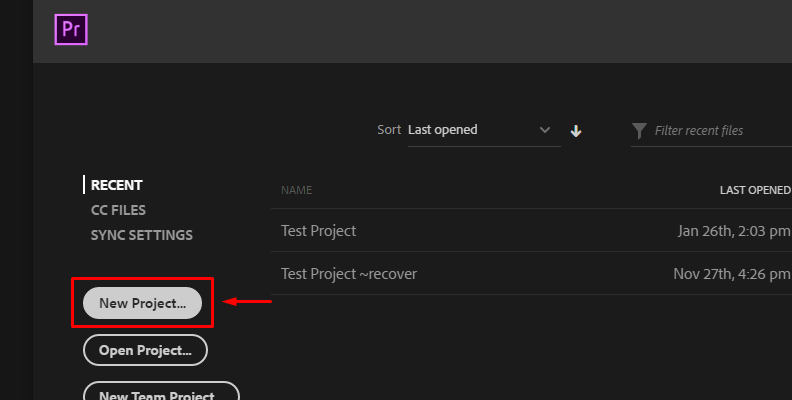
Step 1: Launch Premiere Pro and Create a New Project
Before you start using Optical Flow in Adobe Premiere, you first need to set up a new project. We recommend creating a new project over working on one that you've already started so that you don't make any unwanted changes while still learning.
Once you get the workflow memorized, feel free to move on to your real projects.
So, when you launch Adobe Premiere Pro, and it fully loads on your PC, click "New Project" as shown in the image below.
Step 2: Import Media Within Adobe Premiere Pro
During this step, you need to import the videos that you wish to use the Optical Flow feature on.
To import videos, navigate to the "Project" section, right-click an empty area, and choose "Import" from the list of available options.
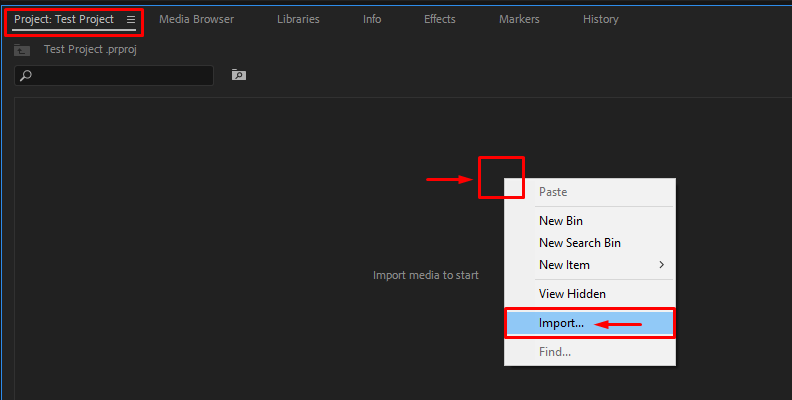
Select your files and import them within the software.
Step 3: Create A Sequence
Before you can start modifying and working on the videos you've imported during Step #2, you first need to create a sequence.
To create a sequence out of a video, simply drag the video from your "Project" section onto the timeline, as shown in the image below.
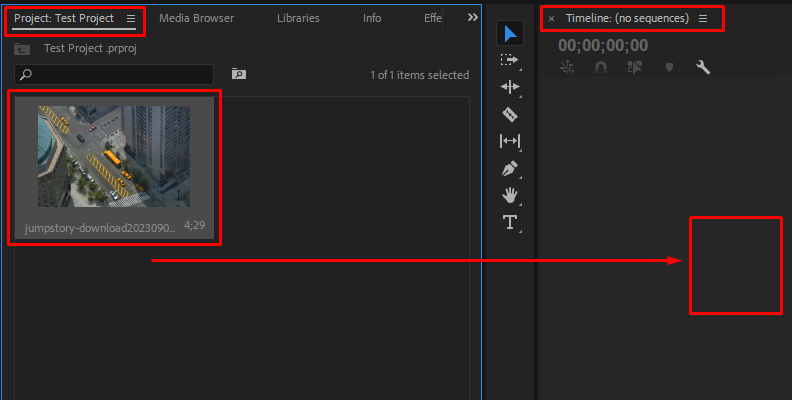
We also recommend renaming your sequence for better project organization, especially if you want to work on multiple videos with different effects and parameters for each, all within the same project.
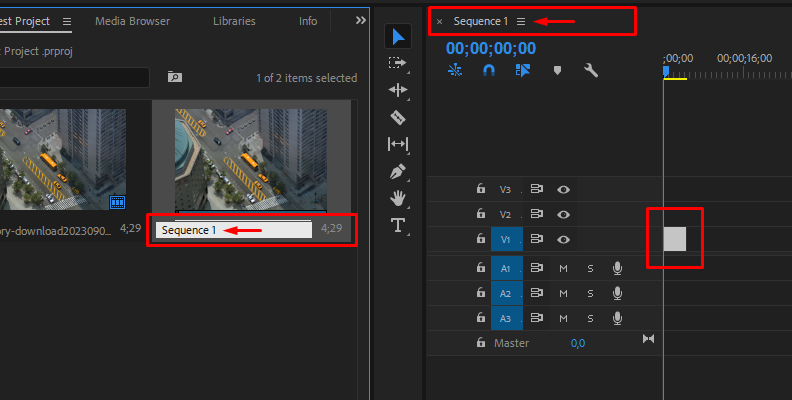
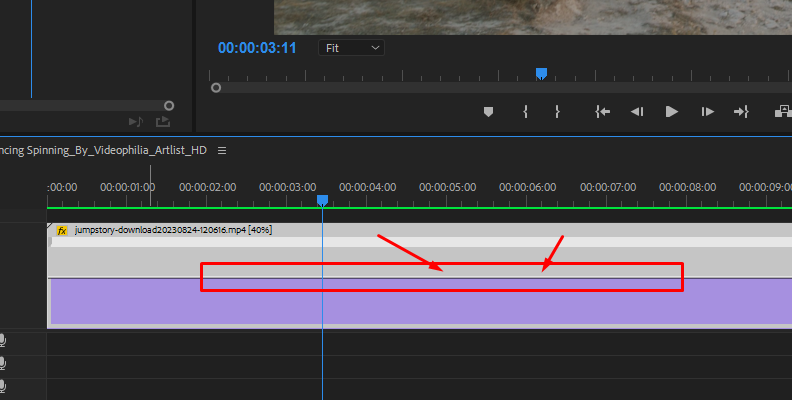
Step 4: Activating/Applying Optical Flow to Your Video Clip
Now that the video is on your timeline, you can apply Optical Flow to it.
To do this, right-click the video on your timeline, then choose the "Speed/Duration" option from the list of available options.
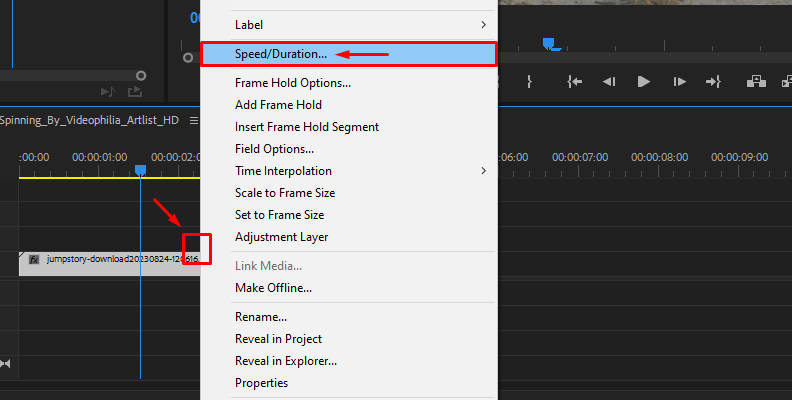
Then, a menu will open.
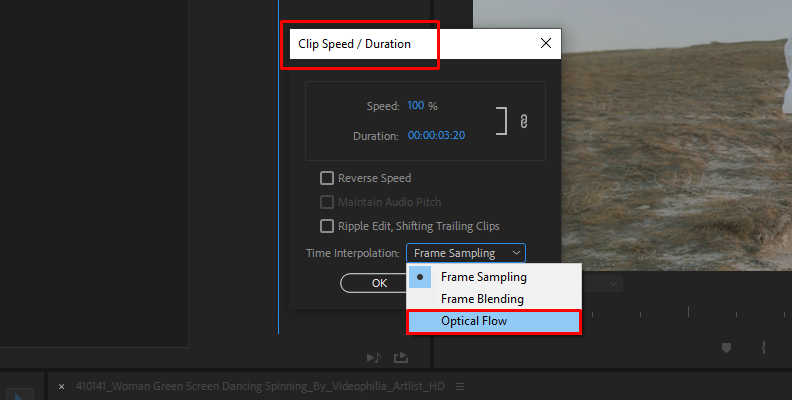
At the bottom of the window, you'll see the "Time Interpolation" section with a dropdown menu available.
Expand the menu and choose Optical Flow from the list of options under the Time Interpolation category, as shown in the image below.
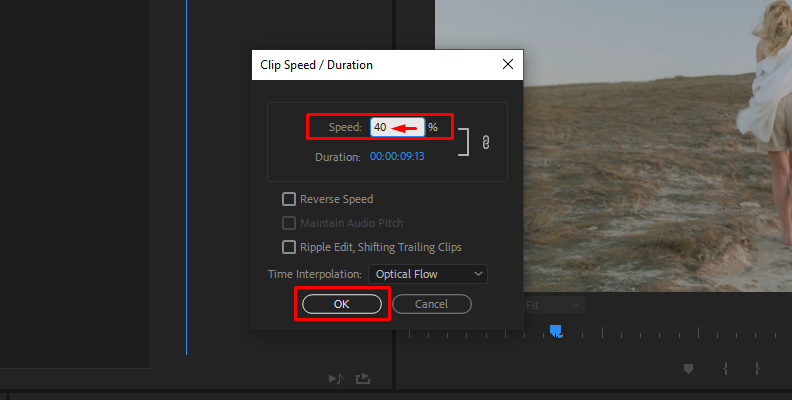
In the "Speed" category, make sure to set the speed percentage value at which you want the video to playback.
When done, press the "OK" button at the bottom.
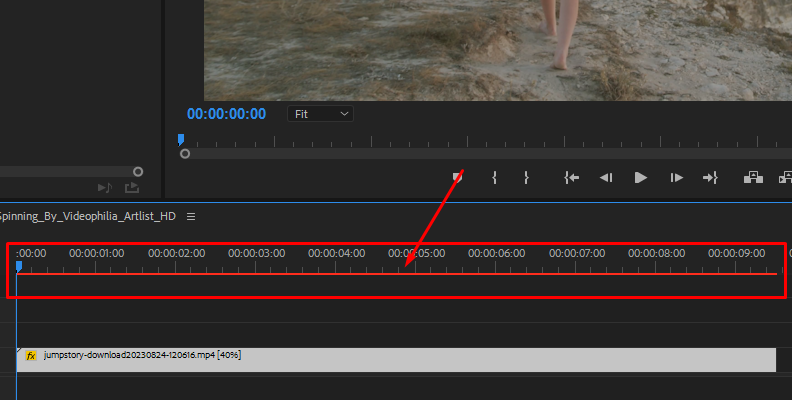
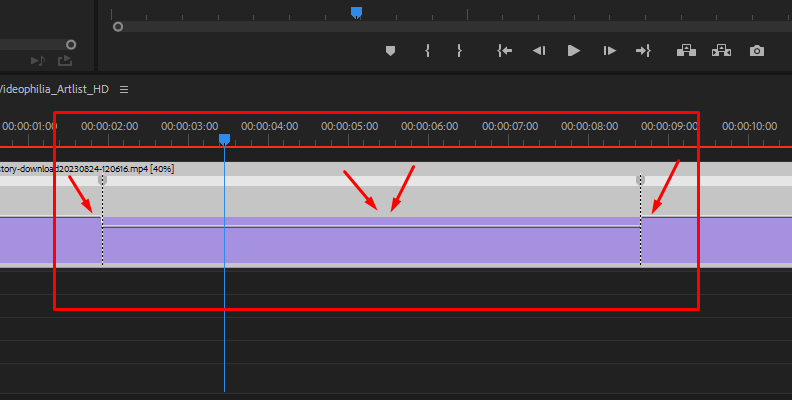
You will now see that the clip in its video track is longer than it used to be. That's because it's now in slow motion, and it takes more time for it to play back fully. You may also notice that the result is now a bit choppy, but that's because we haven't rendered the effect yet.
Step 5: Rendering the Sequence for Smoother Playback
Whenever applying any effects in Premiere Pro, you need to render either the whole sequence or just the part of it where the newly-applied effect is. This is if you want to view it in its best light, smooth, and without any stuttering.
You'll know when an effect needs rendering when you see the red line above your video clip, as shown in the image below.
So, your next step now is to go to "Sequence" and choose the "Render In to Out" option, or if you've made a manual selection already using the "I" and "O" keyboard shortcuts for putting In and Out markers, you can use the "Render Selection" option.
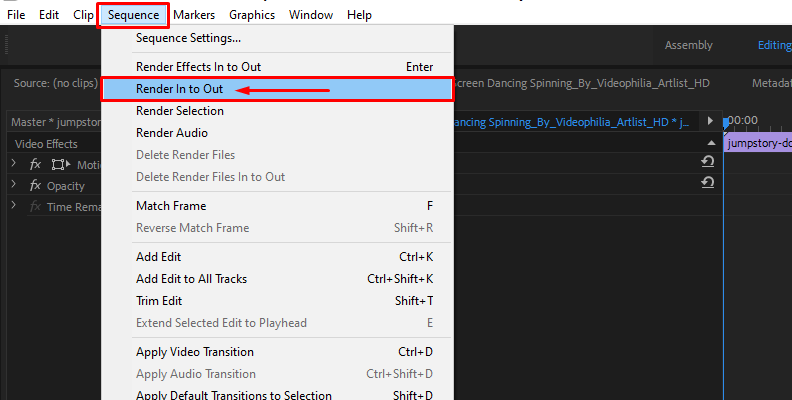
When the rendering process is complete, the red line will turn green.
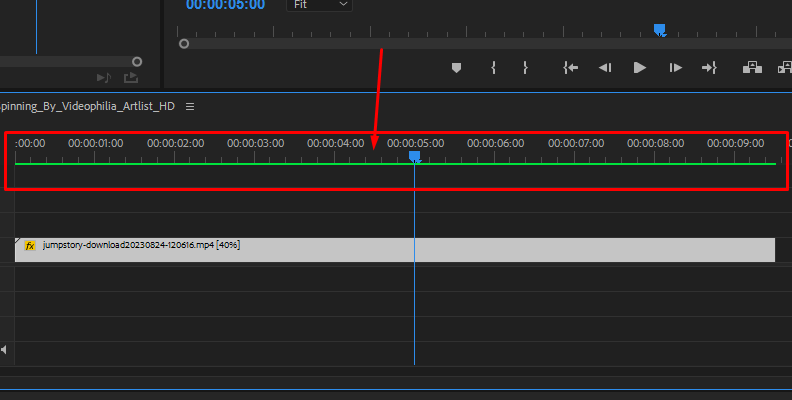
Now you can smoothly preview the results of Optical Flow and decide whether you need to make any adjustments.
Creating a Speed Ramp Using Time Remapping in Premiere Pro
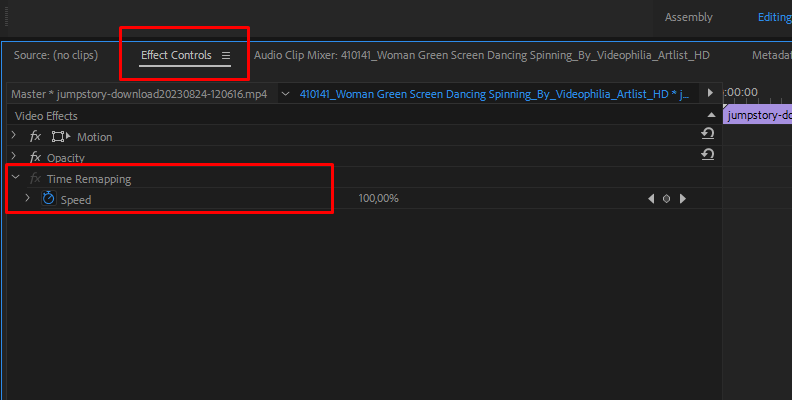
The "Time Remapping" effect is a fixed effect for all videos in Premiere Pro. This means that any video you import and add to your timeline in Adobe Premiere will have the Time Remapping effect available within the Effect Controls panel.
Click the video on your timeline, then open the "Effect Controls" panel as shown in the image below.
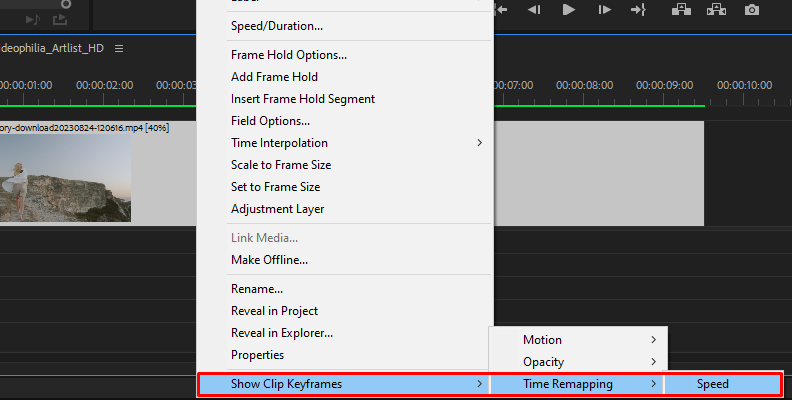
Please note that you previously must have Clip Keyframes enabled. To do this, right-click the video on your timeline, then choose "Show Clip Keyframes" -> "Time Remapping" -> "Speed" as shown in the image below.
Now you'll see that a horizontal band appeared in the middle of your video clip on your timeline.
If you move this band up or down (you can do so by clicking on it, then holding the left mouse button and dragging in either direction) you will speed up or slow down the video. But, if we don't want to speed up or slow down the entire video, we need to use keyframes to apply this change only to parts of the video and create what's essentially known as a "Speed Ramp".
So, hold the "CTRL" button on your keyboard and click on the horizontal band on your video. This will add a keyframe. Do the same to add another keyframe where you want the speed change to end. The part in between both keyframes is the part that you can now independently slow down or speed up. You'll notice that if you drag the band in that part of the video up or down, it will only move in the area between the two keyframes.
Now you've successfully created a speed ramp, but the speed change is way too abrupt. This may look a bit "rough" to the viewers.
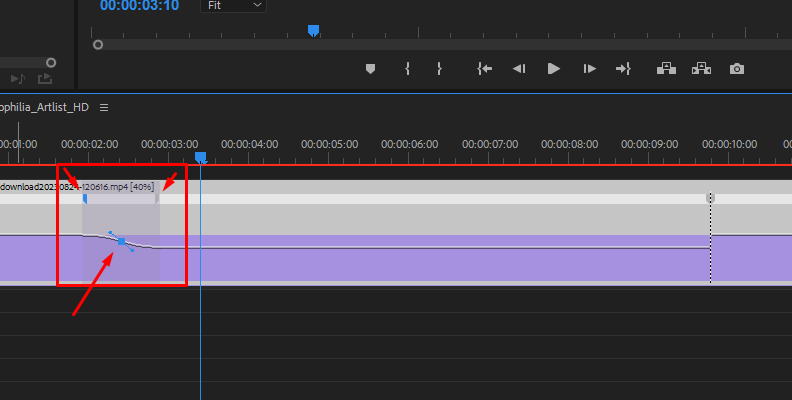
The solution is to split your keyframe by clicking it and dragging it with your mouse. When you do this, you get an additional separate area between the two keyframe halves, where you can use a Bezier handle to smooth out the movement curve, as shown in the image below.
And that's all there's to it!
You've now successfully created a smooth speed ramp using the time interpolation effect in Premiere Pro, and you can use it to either create smooth slow-motion effects or speed up movement when needed.
How to Use BCC Optical Flow in Adobe Premiere
Third-party plug-ins and tools are not always necessary, but they do always make your work easier and quicker.
When it comes to Optical Flow, Boris FX's Continuum pack has a tool called "BCC Optical Flow" that you can apply to your videos in Premiere Pro for the same smooth slow-motion effects that we talked about in the previous sections.
You can read everything about BCC Optical Flow here.
If you're willing to use BCC Optical Flow instead of the built-in Optical Flow in Premiere, and you already have the Continuum pack installed, here's what you need to do:
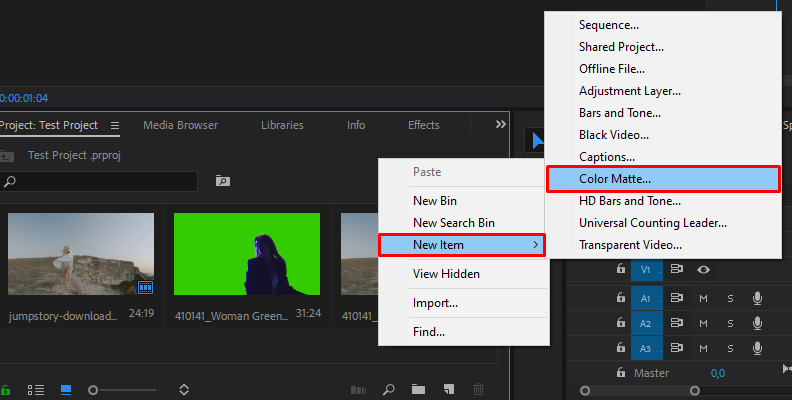
Create a solid by right-clicking an empty area in the "Project" section then select "New Item" -> "Color Matte" as shown in the image below.
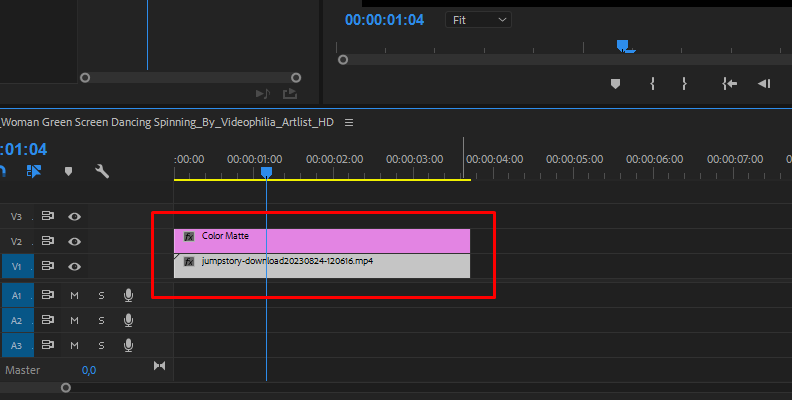
Then, drag the solid on video track above the video on your timeline and trim it so that they're the exact same length.
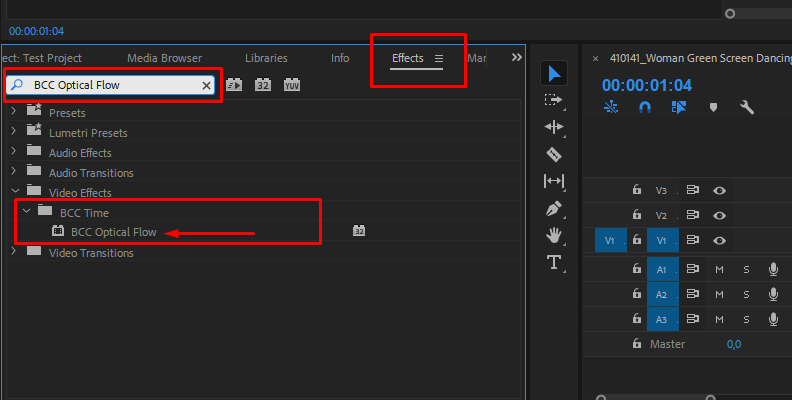
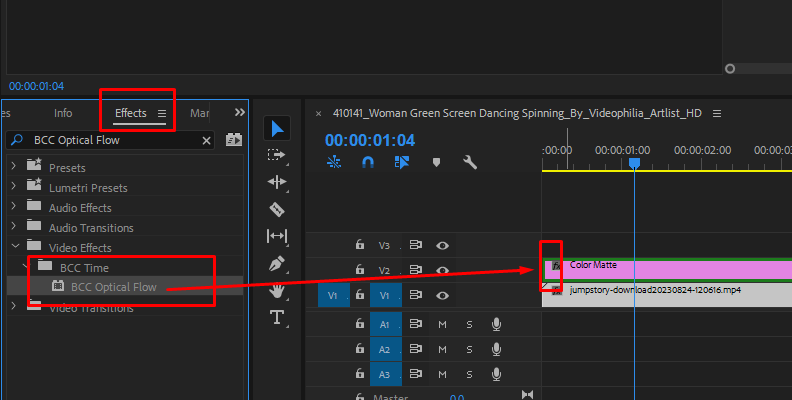
Navigate to the "Effects" panel, then use the search bar to find the BCC Optical Flow effect. Drag and drop it over the solid matte you created. Do not apply it directly to the video, but to the solid above it instead.
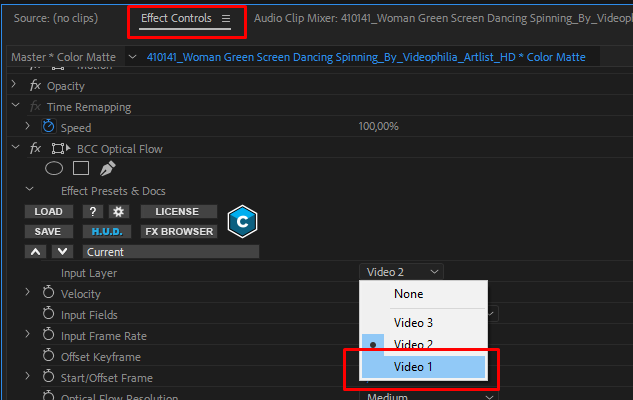
Now, open the Effect Control panel, and in the "Input Layer" section, choose the video track on which your video is on your timeline, which in our case is V1 (Video Track 1).
From here, all you need to do is set the velocity and let the effect do its thing.
You can explore and experiment with the other parameters too. Once again, full explanation of each and every feature offered by this effect here.
Difference Between Optical Flow And Frame Blending
As we already mentioned above, Optical Flow is not always the best option for every video out there. Sometimes, you may be unsatisfied with the result it provided you with.
Luckily, there are more features you can try within Adobe Premiere Pro, such as frame sampling and frame blending.
Frame sampling repeats existing frames (or removes them) to reach the desired playback speed of your video.
Frame blending will repeat frames and also blend them in to help you achieve a smoother motion.
Which option is best for your project depends on the complexity of the scene and the movements within the shot. It's best to try them all and see which yields the best results with the least screen anomalies.
Final Words
That is everything you need to know about Optical Flow in Premiere Pro, how you can use it to create slow motion effects when the original recorded material isn't in the desired framerate, as well as how to use the time interpolation fixed effect to create a smooth speed change effect whenever required.
Suppose this is your first time learning about frame blending, time remapping, and Optical Flow. In that case, you'll have some practicing to do before you master implementing these elements in your work like a pro, but as soon as you get comfortable, taking your videography to the next level is just a matter of when.


