


There are plenty of reasons someone might want to learn how to upscale video. Perhaps they were taken with old technology and need to be improved so the content can be viewed optimally on new display technology. Or perhaps the original recording just wasn’t quite right and it needs some qualitative improvement. Footage that was optimal for one display might not be ideal for another.
Whatever the reason for upscaling the original video, upscaling is a valuable video editing skill to be able to have. Fortunately, a non-linear editor (NLE) like Adobe After Effects makes the process manageable and produces great results.
How to Upscale Video in After Effects

When we upscale video, we are looking to increase the size of the video without losing quality. Basically, we are trying to get a small video to fit on a bigger screen and still look good. Whether that means taking a standard resolution video to 4K or making smaller adjustments, the aim is the same.
There are two methods for upscaling video available. Firstly, you can take the footage you have and scale a layer to a canvas, which will upscale the video. However, the results of this approach don’t produce the best-quality final footage.
Detail Preserving Upscale
The second method of upscaling video is Detail Preserving Upscale and it’s done in After Effects. The Detail Preserving Upscale effect will produce better results and give you more control over what the final footage looks like. It will also give you better detail over the fine details of your upscaling, such as the detail and noise in the final footage. This will be the method discussed here.
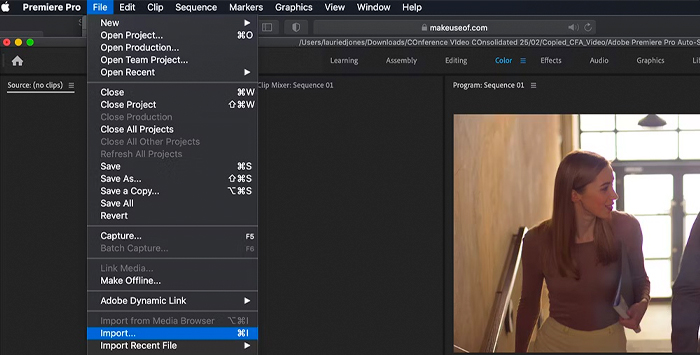
Firstly, you need to add the clip you want to upscale into Premiere Pro. Import the clip by going to File, Import.
![]() KEYBOARD SHORTCUT: CTRL+I (Windows) COMMAND+I (Mac)
KEYBOARD SHORTCUT: CTRL+I (Windows) COMMAND+I (Mac)Once the clip has been loaded, drag and drop it into your timeline so that you can work with it.
When the footage has been imported into the timeline it then needs to be sent to After Effects for the upscaling process.
After Effects
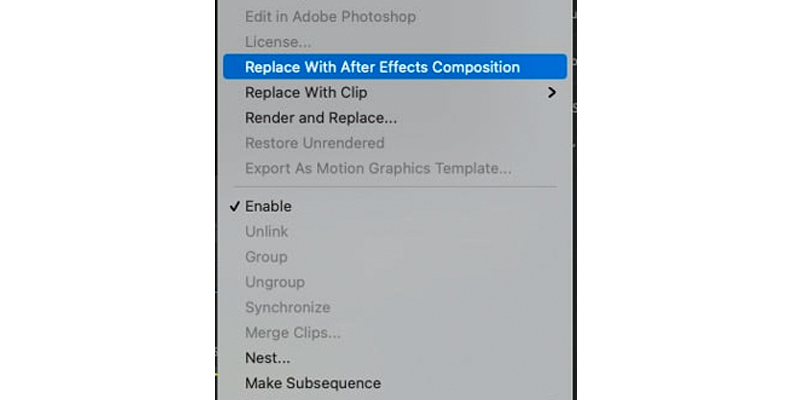
You don’t need to export the file and then re-import it, this can be done from within Premiere Pro.
Right-click on the footage that you imported and choose the option Replace With After Effects Composition. This will send your footage directly to After Effects so that upscaling can be applied to it.
![]()
Once this has been done, you will be prompted to save the file. Choose the location on your computer you want it saved to, give it a name, and click the Save button.
From now on, you will be working in After Effects rather than Premiere Pro and your clip will be visible in the After Effects canvas. This is where the detail preserving upscale will be done.
After Effects Canvas Setting
Before going any further, it is important to ensure that the canvas has been set to the video resolution you want your video upscaled to in After Effects. If you don’t, the upscaling will not work properly or you will end up with an upscaled video that’s at the wrong resolution.
To do this, you need to adjust the composition settings in After Effects before you import the footage.
Go to the Composition menu and choose Composition Settings
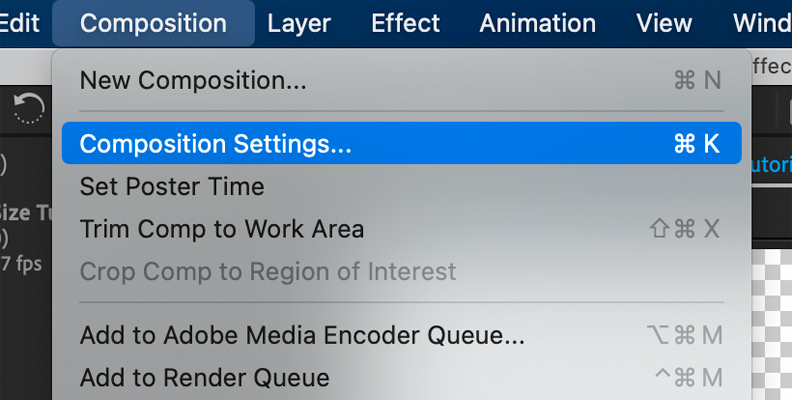
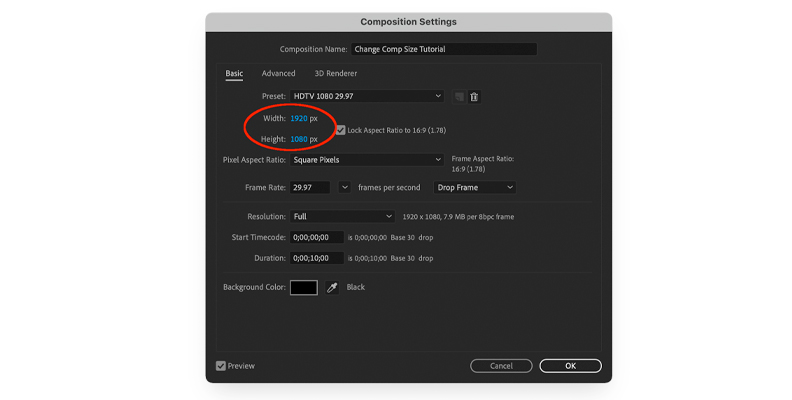
This will open the Composition Settings window. Under the Basic menu, you have the Preset dropdown.
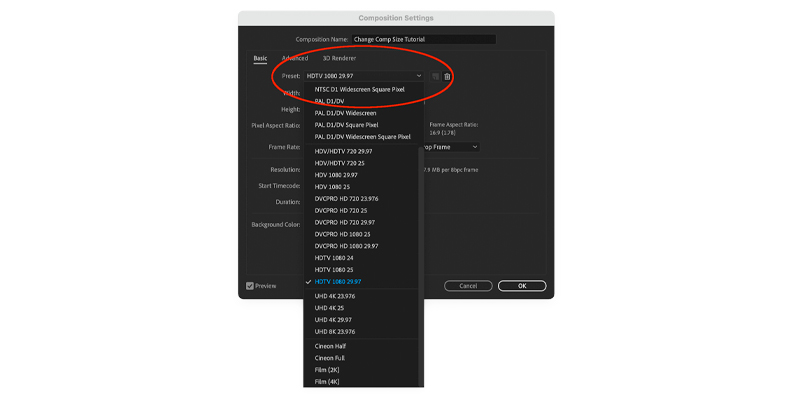
This will let you choose what video resolution you want your canvas to be from the default options available. This will be the resolution that you want the video you import to be upscaled to.
There are a large number of settings here but if you know the resolution you want your video to be upscaled to, you can also enter it as a numerical value in the Width and Height boxes beneath the preset.
Imported Footage
Once you have set your canvas size and have clicked Save in Premiere Pro your footage will be available in After Effects.
In After Effects, go to the Effects & Presets panel. Once there, find the option Detail-Preserving Upscale. Double-click on it and it will add this to your active clip.
Effects Control Panel
When you have done this, go to the Effect Controls panel and choose the Fit to Comp Width option. This will upscale your footage so that it covers the width of the canvas your footage was imported to.
You can also adjust the scale amount if you want your video clips to go larger but ensuring the canvas resolution is set correctly is the best way to proceed.
Once this has been done, you can adjust the Detail slider too. The default scale is 50% but the more you move it the more detail Premiere Pro will attempt to fill in.
Missing Pixels
It’s worth remembering at this stage that upscaling resolution means that the software has to make certain “guesses” as to the missing pixels in your footage. It cannot recreate pixels that were never actually there.
This means that the Detail slider is something that needs to be experimented with to ensure you get the correct results. The more detail you want to include the sharper the end result should be.
However, there is no “correct” level as the amount required will vary depending on both the original footage and how much you are trying to upscale it by.
Detail Slider
If the difference between the original footage and the upscaled videos isn’t all that much then your Detail will need to be set differently than if the footage comes from a poor recording source you are trying to update by a lot.
Experimenting with the Detail slider will ensure you gain the skills to judge by how much it needs to be adjusted. The more experience you have, the easier it will be to know how much to add during the process.
Once you have successfully adjusted the detail so that the footage looks as good as it can, you need to send it back to Adobe Premiere Pro.
Save the After Effects project, then return to Adobe Premiere Pro. The clip will then have updated with the changes you made to it in After Effects.
How to Upscale Video in After Effects with BorisFX Continuum
While After Effects is an efficient tool when it comes to upscaling video, third-party solutions such as BorisFX Continuum's UpRez plug-in for Premiere Pro provide even higher-quality alternatives.
UpRez
Whatever desired resolution you want to shift to, UpRez will be able to support it, from SD upwards. The plug-in uses sophisticated video enhance technology to ensure the very best quality is maintained during the upscale process and that the results are pin-sharp.
Beginners are supported thanks to the number of presets that are available within the plug-in, so even newcomers to upscaling can get impressive results right out of the box. But if you’re more experienced then there are plenty of settings that can be adjusted so you can ensure you get the absolute best results possible.
Reframer
Alongside the UpRez plug-in is Reframer, an ideal solution for anyone who needs to rescale existing footage or adjust the aspect ratio. Simply set what you need, click OK and your footage will be rescaled in next to no time at all. It’s a quick, convenient, and powerful way to change the resolution of any footage.
So whether you need to you upscale footage or adjust its ratio, BorisFX Continuum has a perfect solution for you.
Conclusion
Video upscaling can make even the murkiest footage look clear and watchable again. Whether it’s old home movies or the latest content, upscaling can make the video come alive.
And with Premiere Pro and After Effects, upscaling video is something that’s available to everyone, not just specialists. So get your old footage out and make it look brand new once again!


