


As technology advances, the quality standard for video material slowly breaks new heights. In the early years of YouTube, 360p and 480p videos were considered the peak. Then came 720p, and not much later afterward, the golden standard - Full HD 1080p.
However, even Full HD slowly got put in the shadow of larger resolutions, such as 2K and 4K, and with so many modern devices being capable of showing all that high resolution information on the screen, people often feel the need to upscale their content so that it doesn't feel outdated.
In this guide, we'll talk about upscaling from 1080p to 4K, while also helping you learn more about upscaling in general, what it is, when to do it, how to do it, and everything else you need to know on the subject.
We've got plenty to cover, so without further ado, let's get straight into it.
What is Upscaling?
The term "upscaling" or "video upscaling" is used to describe the process of artificially increasing the "native" resolution of a video file in order to get a higher output resolution. A few examples of upscaling would be going from 1080p to 2K or 2K to 4K.
Now, why would someone upscale their video files, and what is the main reason behind doing so?
For example, if you use a relatively large 4K display and play a 1080p video on it, the viewer's experience will simply not be great. Two things can happen: either you'll see the video in its original resolution with quite a bit of black screen surrounding it since it cannot fit the whole 4K screen, or the video will "stretch" across the 4K screen. It won't look its best nor take advantage of the display's higher resolutions.
That is if we don't use upscaling.
If we do upscale the video, though, you'll be able to watch it on a screen with a higher resolution than the video's original resolution.
To upscale video files, modern TVs use an algorithm to upscale videos without losing quality. Of course, the results are not always perfect, and they largely depend on the method used.
It's also worth noting that upscaling doesn't add any new, extra detail to the picture, and a video file natively recorded in 4K will always look better than 1080p to 4K upscaled footage.
Depending on the method used for upscaling, mostly based on whether it uses artificial intelligence or not, the final result may look smoother, or it may have visible "mistakes" that show the video went through an upscaling process. This is because "regular" methods will simply duplicate pixels and fill up the blanks, while a process that uses an AI model will analyze the nearest neighbor pixels and correctly "guess" what pixels are missing for the smoothest result.
All in all, upscaling is not always perfect, but as technology advances, we manage to achieve some impressive super-resolution upscalings that were once deemed impossible, while preserving image detail.
How to Upscale 1080p to 4K With BCC UpRez
Upscaling videos in popular video editing programs is not that difficult but requires some effort and technical know-how. In this section, we'll show you how to upscale from 1080p to 4K using BCC UpRez, a tool featured in the popular Boris FX Continuum pack. UpRez uses an advanced AI model to upscale your image without losing any quality.

Please note that Continuum and the tools within can be used with almost all popular video editing programs, like After Effects, Avid, DaVinci Resolve, Vegas Pro, Final Cut, and of course, Adobe Premiere Pro, which we'll use for this specific example.
So, once you've downloaded and installed Continuum for your host software of choice, follow the steps below to upscale your videos without any quality loss or artifacts using BCC UpRez.
Step 1: Launch Premiere Pro and Create a New Project
As always, when working in Premiere Pro, the first step is to launch the software and create a new project. We recommend working on a fresh project when trying out new methods so that you don't make any unwanted changes to a complex project that's already in progress.
So, once Premiere Pro launches, click on the "New Project" button shown on the home screen.
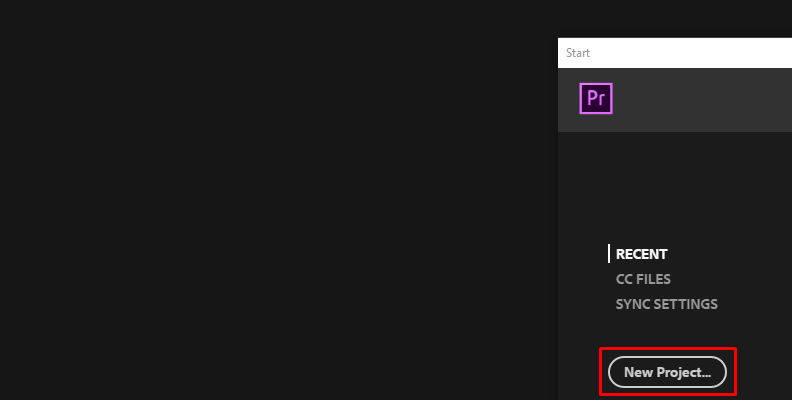
Choose your desired settings and finalize the creation of the project.
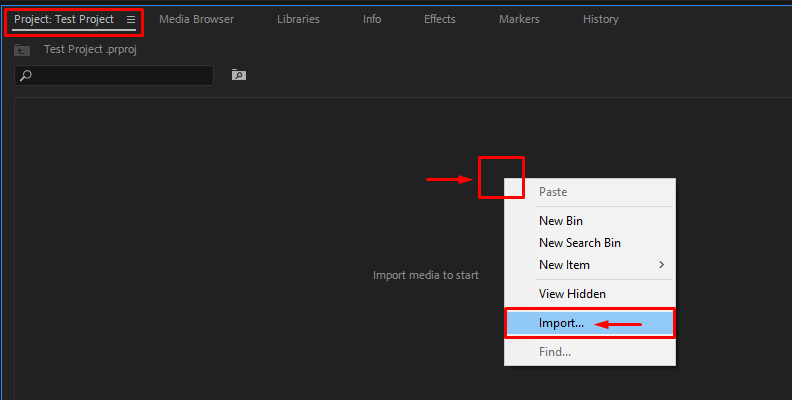
Step 2: Import Media and Create a Sequence
Once you're into the new project, navigate to the "Project" tab and right-click an empty area to open the menu. From the menu, choose "Import" as shown in the image below.
Use your operating system's file explorer to locate the file(s) you want to import on your hard drive/SSD and finalize the step.
Now, you can see your imported files, in this case, a video you want to upscale, within the "Project" tab.
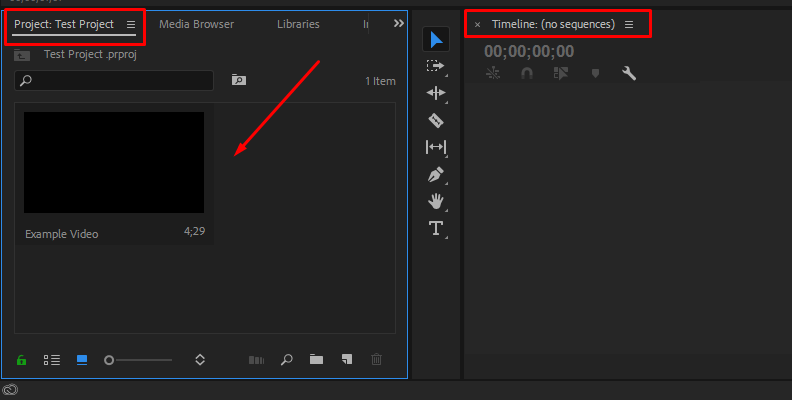
However, before we are able to start working on it, we need to create a sequence. As you can see, the Timeline area shows "no sequences".
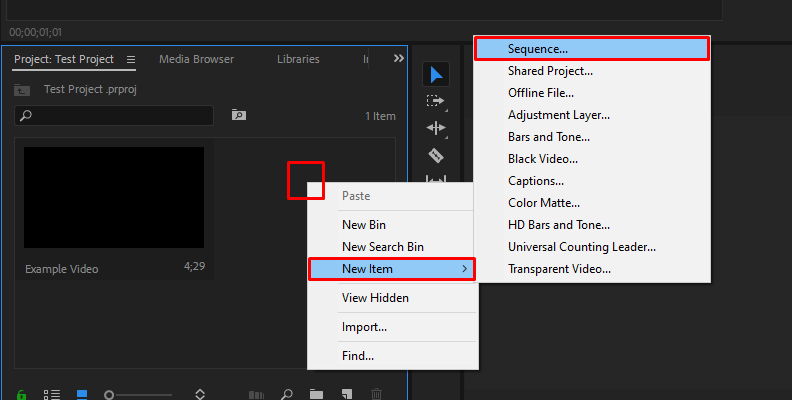
To do this, we would usually drag and drop the "Example Video" in the "Project" tab over to the timeline area, but in this case, we want to make sure that our sequence has the custom resolution we want to upscale our video to.
So, if we're upscaling from 1080p to 4K, we want to make sure that our sequence is 4K.
To do this, click anywhere on an empty area within the "Project" tab, just as you did a few moments ago when we were importing media, but instead of "Import" choose "New Item" -> "Sequence" from the list of options.
Then, in the "Settings" tab, find the "Frame Size" parameter and set the resolution to 3840x2160, as that is 4K.

Finalize the creation of the sequence.
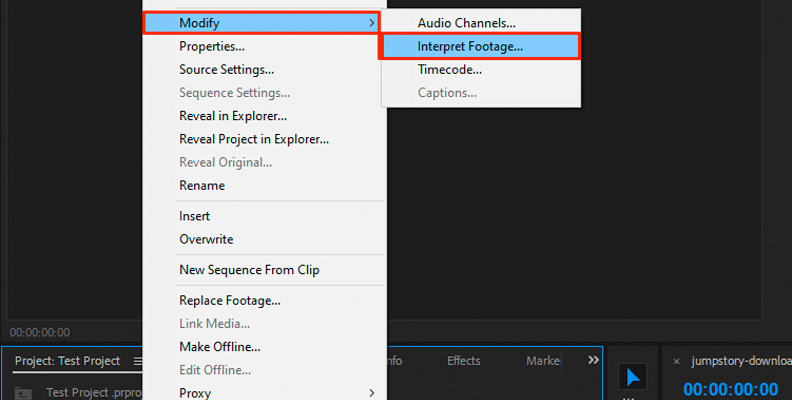
Now, before moving on to the next step, we need to use the "Interpret Footage" option to ensure that our video has the same aspect ratio as the sequence we just created. So, find the clip in the "Project" tab, then click on it and choose "Modify" -> "Interpret Footage" as shown in the image below.
In the "Pixel Aspect Ratio" category, choose the aspect ratio that matches your sequence's aspect ratio, which in our case is 16:9.
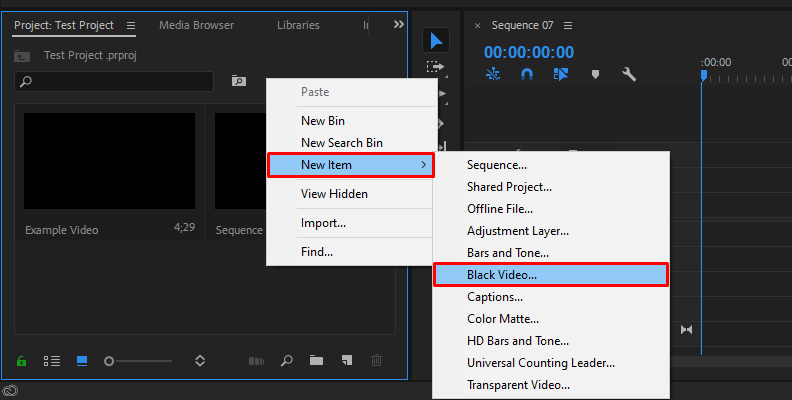
Step 3: Create a Black Video Slug
Now, we need to create a black video slug, as that is the workflow method for BCC UpRez in Premiere Pro.
To do this, right-click an empty area within the "Project" panel again, then choose "New Item" -> "Black Video" as shown in the image below.
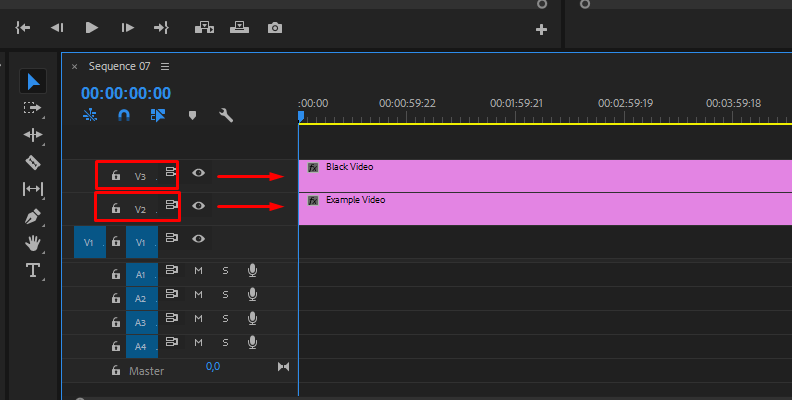
Place the black video you just created on one video track above the video track where your main video (that you want to upscale) will be. So, for example, if your video is on V2, place the black slug on V3.
Step 4: Apply the BCC UpRez Effect/Filter
Now, it's finally time to apply the BCC UpRez filter. Click on the "Effects" tab to open it, then use the search bar to easily find the effect without having to scroll through the hundreds of Continuum filters and transitions.
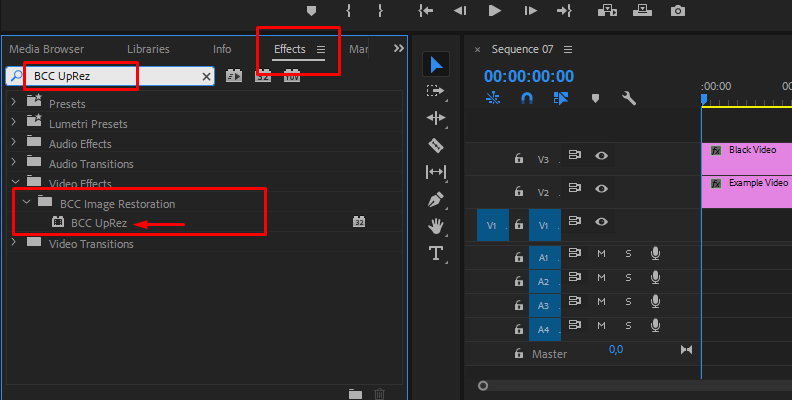
Once you find the effect, which is located under the "BCC Image Restoration" folder, drag and drop it over the black video, not your original clip.

Step 5: Adjust Settings to Match Project Needs
Now that the effect is applied to your black video slug, it's time to modify a few settings and parameters to achieve the desired results.
So, open the effect controls panel located in the top-left corner of your screen, but make sure the black video slug is selected. Otherwise, you'll get a blank screen.

Then, you'll be able to see all effects added to it, which in this case, should only be the default Premiere effects and the BCC UpRez effect we just added.

Set the source layer to VIDEO 2, as that's the video track our original clip is assigned to.

Set the "Source Pixel Ratio" to a value matching the ratio of your original clip.
Set the "Frame Size" to "Layer Size" in the Transform group/category.

Upscale 1080p to 4K in Premiere Pro
You can upscale videos in Premiere Pro without using any plug-ins, though plug-ins do make the work much easier and quicker, especially if you have no previous experience.
However, if you prefer to do this on a "stock" Premiere Pro without any external help, here are the steps you need to follow to upscale from 1080p to 4K in this software.
Step 1: Create a New Project and Import Media
Launch Premiere Pro and click the "New Project" button on the home screen. Choose your preferred settings and finalize the process.
Open the "Project" tab. Then right-click on the empty area and choose "Import" and select the video you want to upscale to import it into Premiere Pro.
Step 2: Create Sequence With Desired Output Resolution
In the "Project" tab, right-click an empty area and choose "New Item" -> "Sequence" from the list of options.
Then, in the "Settings" tab, in the "Editing Mode" field, choose "Custom", and set 3840x2160 in the "Frame Size" field.
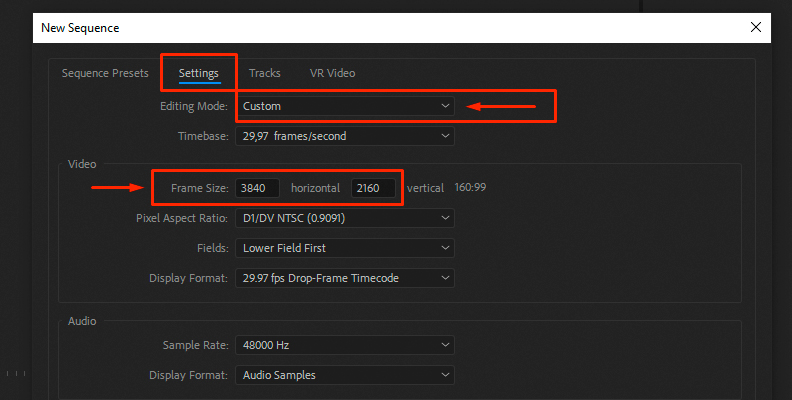
Click the "OK" button at the bottom and finalize the sequence creation.
Step 3: Add Clip to Sequence and Use "Set to Frame Size" Option
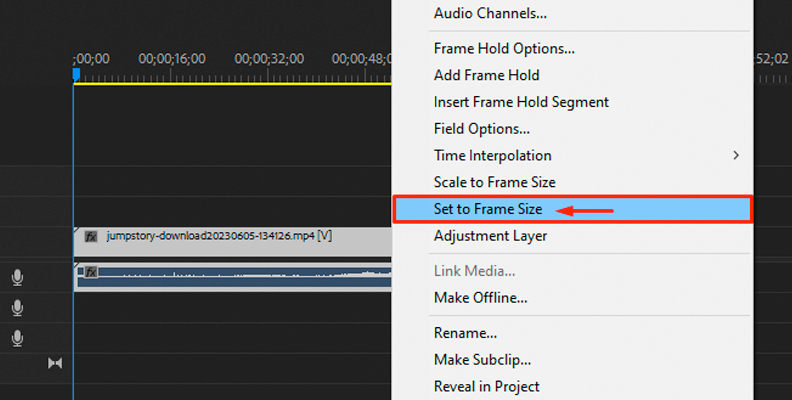
Now that you've created the sequence, you need to add your video clip to it. To do this, simply drag and drop the 1080p video you imported from the "Project" tab onto the timeline area and into the 4K sequence we just created.
Then, right-click the video and choose the "Set to Frame Size" option.
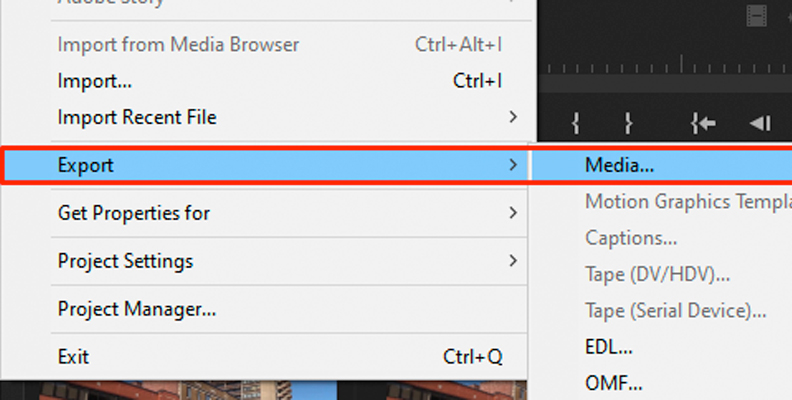
Step 4: Export and Save
The last step is to simply export your video in 4K.
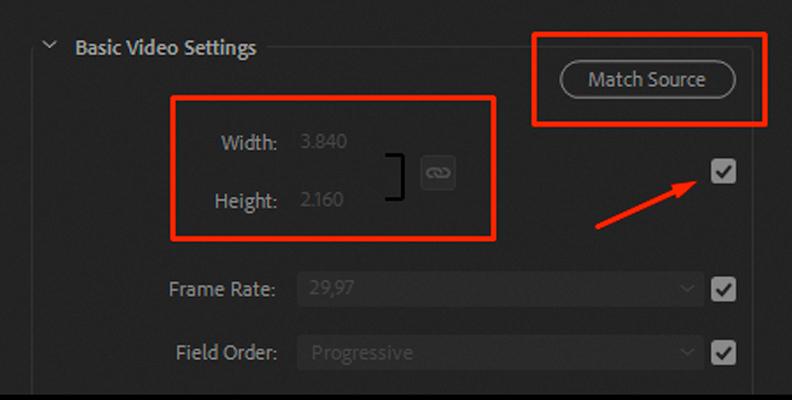
In the export settings, either use the "Match Source" button, which should automatically match the resolution with the sequence we created, as the sequence is in 4K. However, if that doesn't work, or you want to set a custom resolution, untick the box shown in the image below (with the arrow pointing to it) which will, in turn, unlock the Width and Height parameters so you can manually change the numbers.
That's all there's to it!
Final Words
That's everything you need to know about upscaling, what it is, and how to do it in Premiere Pro, using both the software's built-in "regular" features or a renowned pack of plug-ins and tools like Continuum by Boris FX.
Hopefully, this was helpful to you and will help you with your future work.
Thank you for reading, and best of luck!
FAQ
This section contains frequently asked questions and answers on this topic.
Can you upscale 1080p to 4K?
You can upscale a 1080p video to 4K using the UpRez method shown in the sections above. However, you should know that the larger the "jump" in resolutions when upscaling, the more room for error and less perfect results. For example, upscaling 360p to 480p is possible, and even to 720p, but jumping to 1080p or 2K and staying high quality is close to impossible, even with professional software.
Can you upscale 1080p to 4K Nvidia?
You can use Nvidia's RTX Video Super Resolution feature if you have a 30 or 40 series Graphics Card installed on your computer. For more information, check the official webpage.


