


The question of how to unblur a video or an image continues to be frequently searched, as everyone has a camera at their disposal within their pocket.
There are several important reasons why you may want to unblur an image, whether it's static or a video.
For starters, a blurry image can be frustrating and challenging to view, making it hard to discern essential details. Additionally, blurry pictures can be misleading, as they may distort objects or people in the photo.
If you're trying to use an image for a project or presentation, unblurring it can make it much more visually appealing and professional-looking. Finally, when you unblur images you can preserve important memories and moments that may have been obscured by poor image quality, which can sometimes be of great sentimental value.
All in all, there are many compelling reasons to try and unblur blurry images, and doing so can significantly enhance your experience with the photo in question.
This guide contains everything you should know to successfully fix blurry photos in various popular software and through multiple methods, so without further ado, let's get right into it.
How to Unblur an Image with Optics
Optics by Boris FX is an industry-leading product for cinematic effects, available as standalone software and compatible both with Photoshop and Lightroom as a plug-in. As with every other Boris FX software, there's a free trial version available on the official website that you can try.
In this section, you'll learn how to unblur any number of blurry photos using the Magic Sharp tool available in Optics. We'll be using the Photoshop approach, but you can use Lightroom or Optics as a standalone program too.
Launch Photoshop & Set Up a New Project
The first step is to launch Photoshop on your PC and create a new or choose an existing project to work on.
If it's an empty project without any media imported into it, use the "CTRL + O" shortcut on your keyboard to choose an image and import it.
![how to unblur an image]()
You can also do this by clicking "File" -> "Open" and choosing an image using the Windows File Explorer.
Now, create a new layer of the image you just imported so that you don't work on the original. This should always be common practice when using Photoshop.
To do this, click on your image on the right and use the "CTRL + J" shortcut to create a new layer. You can also right-click the original image and choose "Duplicate Layer" from the list of options, as shown in the image below.
![]()
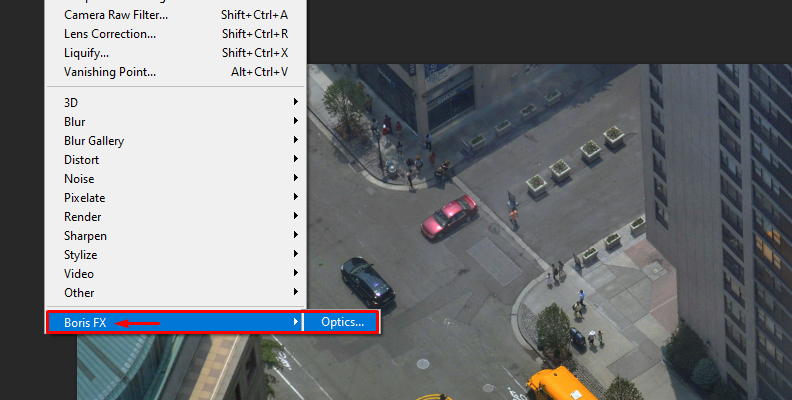
Open Optics within Photoshop
Now that you have the image open within Photoshop and a layer of it, it's time to load up Optics.
Choose "Filter" from the topbar menu in Photoshop, then hover over the "Boris FX" category with your cursor. You should see the "Optics" option show up. Click on it to launch Optics.
![]()
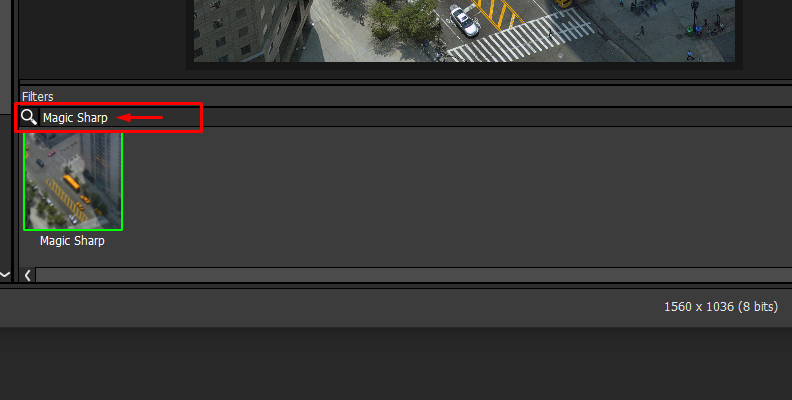
Apply Magic Sharp Through the Optics Interface
Now that Optics has fully loaded on your PC, use the search bar to look for the Magic Sharp effect amongst the many other features offered in this plug-in.
![]()
Once "Magic Sharp" comes up in the results under the "Filters" menu, click on it and you'll see various options show up on your screen.
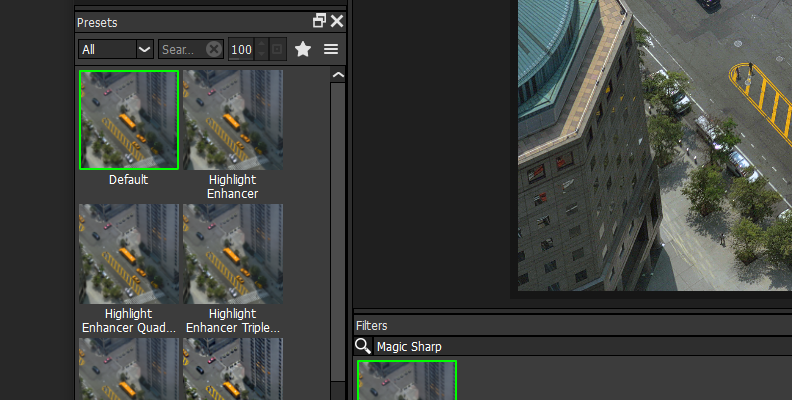
The first thing you'll notice are the many available presets that you can use to quickly shape the image in your desired direction.
![]()
The names of the presets are descriptive and will help you understand better what the specific preset you have selected is going to do regarding modifying the image.
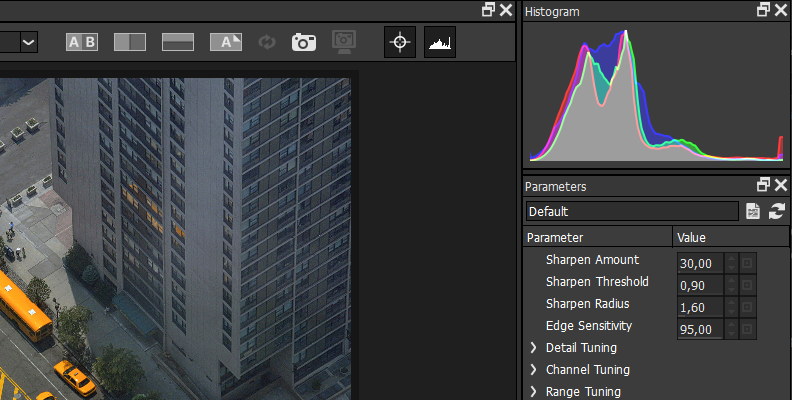
If you wish to get more technical and do the changes yourself, which could be a good option for more experienced users, you can find a panel on the right side with various settings and parameters that you can change.
![]()
When done, all you need to do is click the "Apply" button at the bottom.
Last but not least, if you wish to see how this all works in a video, here's a super helpful tutorial by Boris FX on how to use all the new features in Optics, with a separate section specifically focusing on the Magic Sharp filter.


How to Unblur an Image with Continuum
Video editing software like Adobe Premiere Pro can be used for applying some changes to an image, and although they may not offer the same rich toolset as Photoshop or Lightroom, in some specific situations they can get the job done when you don't have access or the required skill to take your work elsewhere.
Continuum, a renowned plug-in pack by Boris FX compatible with a variety of video editing programs, offers a tool called Magic Sharp which can quickly and easily help you fix blurry images within a video editing software.
By following the steps below, you'll learn how to fix a blurry picture using Magic Sharp by Boris FX in Adobe Premiere Pro.
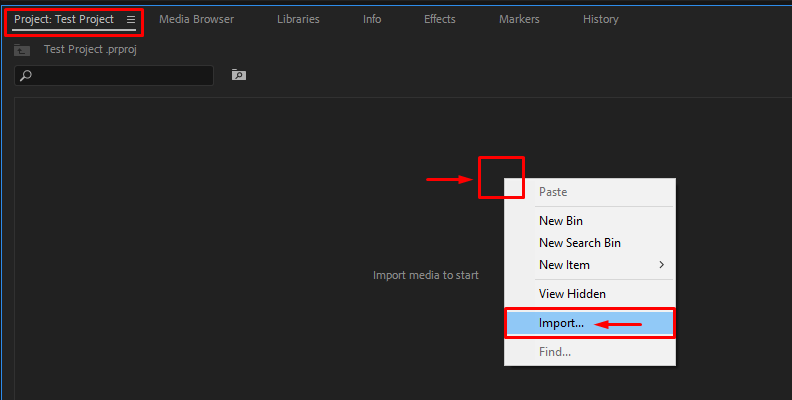
Import the Blurry Image within Premiere Pro
Begin by launching Premiere Pro on your PC and creating a new project. Then, import the blurry photo that you wish to fix. You can do this by accessing the "Project" section in the bottom-left corner, as shown in the image below.
![]()
Drag the Imported Media to Your Timeline (Create a Sequence)
Apply the Magic Sharp Filter from the Effects Panel
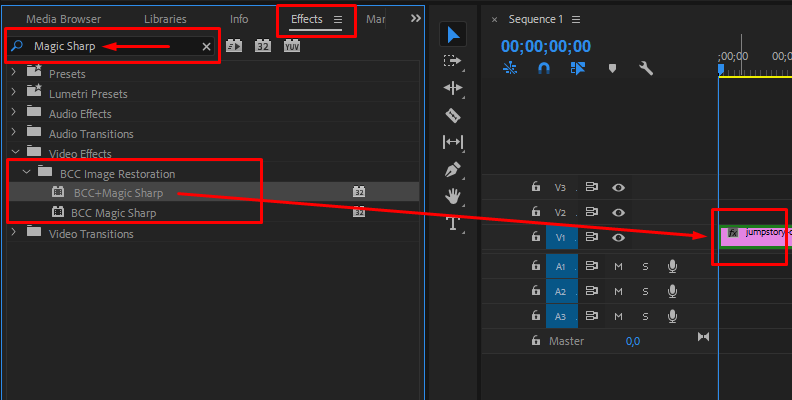
Now that your media is laid out on the timeline, it's time to apply the Magic Sharp filter. To do this, click on the "Effects" tab, then use the search bar to look for Magic Sharp.
You'll find it under the "Video Effects" folder and inside the "BCC Image Restoration" category.
![]()
Once you locate it, drag BCC+Magic Sharp to the media on your timeline to apply it, as shown in the image above.
Modify Magic Sharp's Parameters
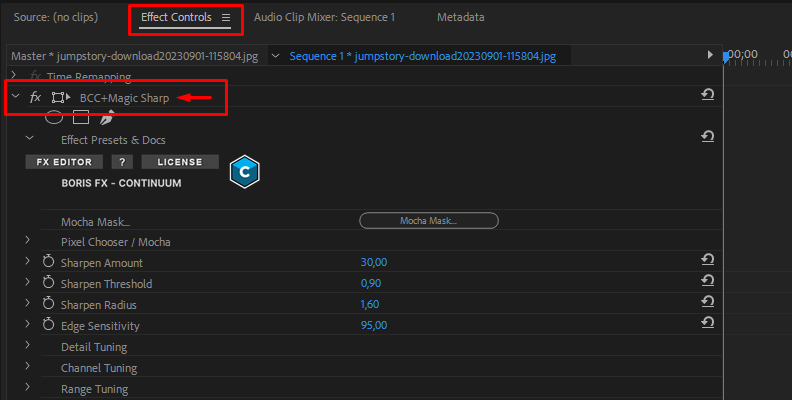
Now that the effect is applied to your media successfully, it's time to modify the parameters to get actual results.
To do this, click on the video (or image) that you just applied Magic Sharp to, then click on the "Effect Controls" panel.
![]()
Start by changing the "Sharpen Amount" parameter, then preview the results and try the other settings. We cannot provide the exact instructions as every image will be different, but you should experiment and eventually find what works best.
You can use this method to fix blurry pictures within Premiere Pro as often as you need, and it's a great alternative for when you don't have access to unblur image(s) within Photoshop or Lightroom.
How to Unblur an Image in Photoshop
You can improve photo quality and fix blurry or out of focus photos in Photoshop without having to rely on plug-ins and other additional software. Although plug-ins make it much easier to fix blurred images in any photo editing software, this specific method will show you how to do it without one, so just follow the steps below.
Import an Image within Photoshop
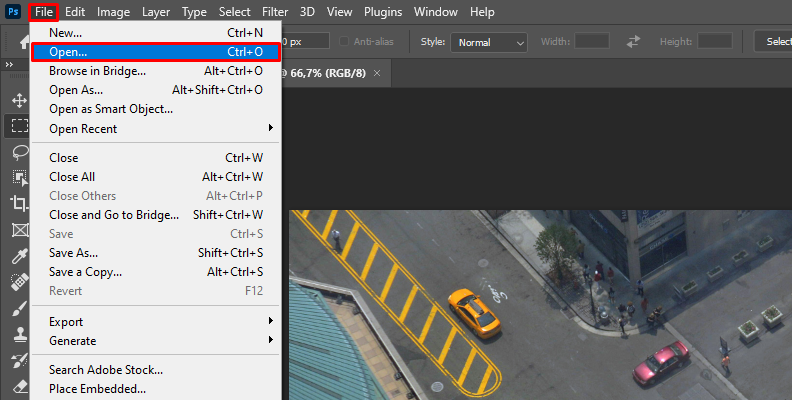
Launch Photoshop on your PC, then drag and drop an image file to import it and create a new project simultaneously.
If you open an already-existing project, you can use the top bar menu to click on "File" and then choose "Open..." from the list of options.
![]()
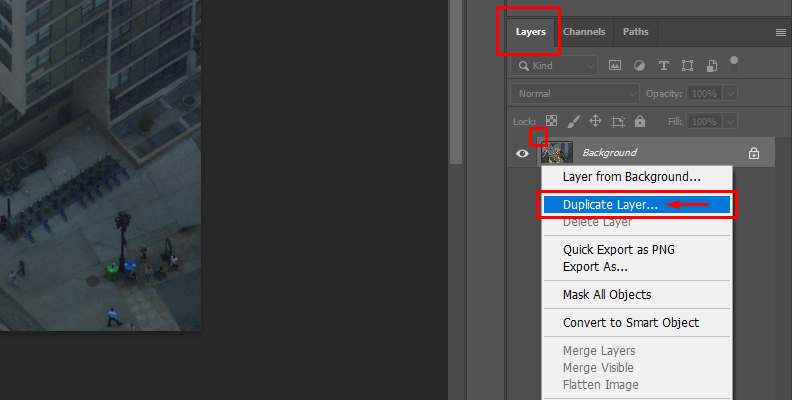
Duplicate the Main Layer
Your second step is to duplicate the main layer. You can do this by clicking on the "Layers" section in the right-side window, then right-click the main layer and choose the Duplicate Layer option, as shown in the image below.
You can also select the layer and use the "Control + J" keyboard shortcut to perform the same action but quickly, which is useful to know if you want to unblur photos regularly using this method.
![]()
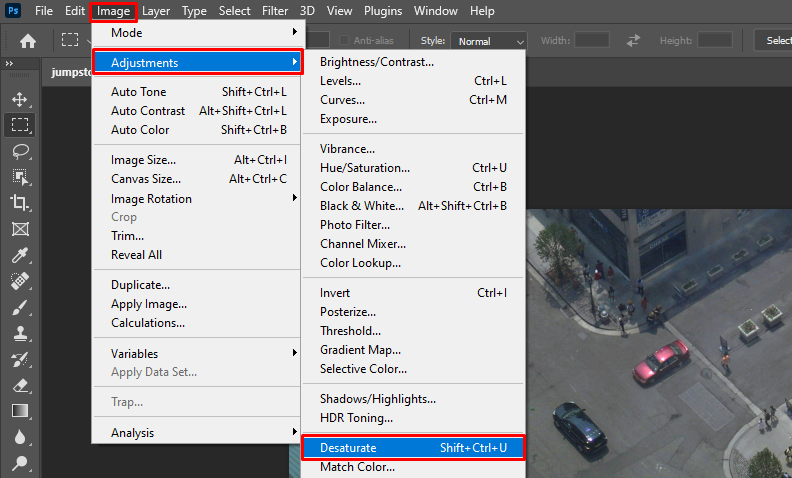
Add "Desaturate" and "High Pass" to the Image
Select the duplicated layer (if it's not automatically selected), then use your cursor to hover over the "Image" category in the top bar menu, and select "Desaturate" from the list of options.
![]()
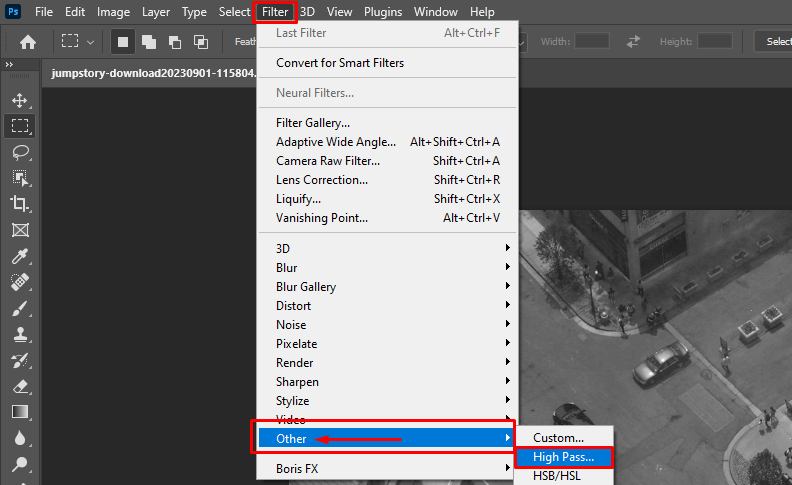
Next, select "Filter" and then hover over the "Other" category and choose "High Pass" from the list of options.
![]()
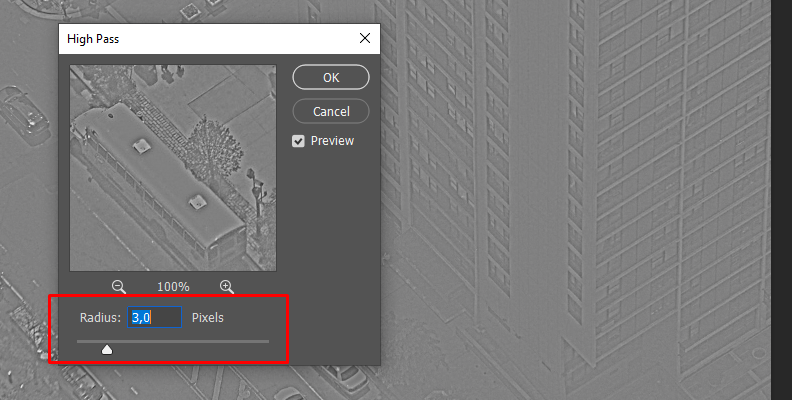
In the panel that shows up as soon as you apply the High Pass filter, insert a value of three (3) pixels within the "Radius" field.
![]()
Change the Blend Mode and Apply Layer Mask
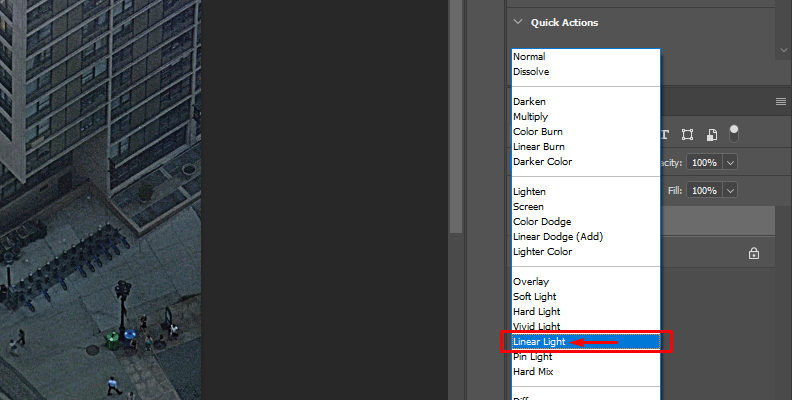
Click on the "Blend Mode" category to expand the menu, then choose "Linear Light" from the list of options.
![]()
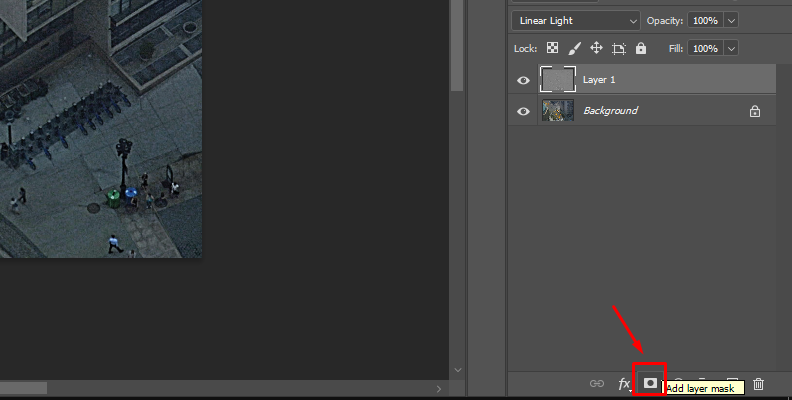
Then, apply a layer mask by clicking the "Add layer mask" at the bottom, as shown in the image below.
![]()
Use the Brush Tool to Paint Over Blurry Areas
The last step towards getting a sharper image with this method is to select the "Brush Tool" and paint the areas that are blurry. Doing so will make them sharper.
Change the size of the brush to a smaller one if you wish to cover just a few lines of the photo, or use a larger brush to speed things up if there's not much need for attention to detail.
If you wish to enhance this even further, duplicate the layer and the effect will double. This might be too much in some cases, but try and see what works best.
Take your time to cover all details, and when done, simply save and export the final result. That's how you sharpen image in Photoshop for free.
How to Unblur an Image on iPhone
If you have an iPhone and want to unblur a photo on it, there are several viable approaches for it. You can use the "Photos" app which is built-in, or download a third-party app, an iPhone version of one of the more popular photo editing apps, such as Lightroom.
Lightroom is simple yet professional, so we recommend it for this specific task.
To unblur an image on your iPhone using Lightroom, you first need to download and install the app. Once that's done, import your image by clicking on the "Gallery" icon within Lightroom.
Once the blurry image is imported and fully loaded within the Lightroom app, slide the toolbar to the right and tap the "Detail" option.
Here, you'll gain access to various parameters, like "Sharpness," "Radius," "Detail," and "Masking" that you can use to fix your blurry image.
Experiment with the settings by increasing and modifying their values. Once you get the result you want, tap the "Upload" button to export and save your image.
Keep in mind that different images will benefit from different values, and some will require unblurring in only a specific area.
How to Unblur an Image on Android
To unblur, edit, or enhance a photo on Android, most of the time users rely on third-party apps, like Instagram or a phone version of some popular photo editing app.
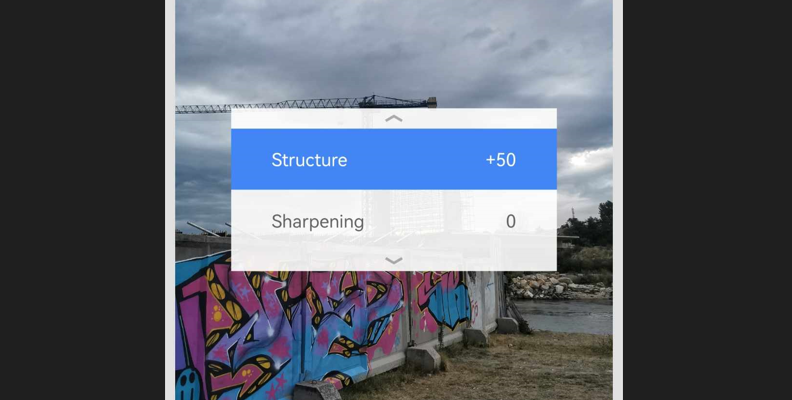
If you don't have Instagram, which does offer some really simple yet effective ways to edit photos, including "Sharpness" and "Structure" tools that you can use to enhance photo quality and unblur images, you can use Snapseed, a professional photo editing app by Google.

The process is relatively straightforward, all you need to do is download and install the app, import a photo, and access the various tools. Experiment by changing parameters and values for different settings, such as "Sharpness," "Clarity," "Structure," and others, then preview the changes and export when done.
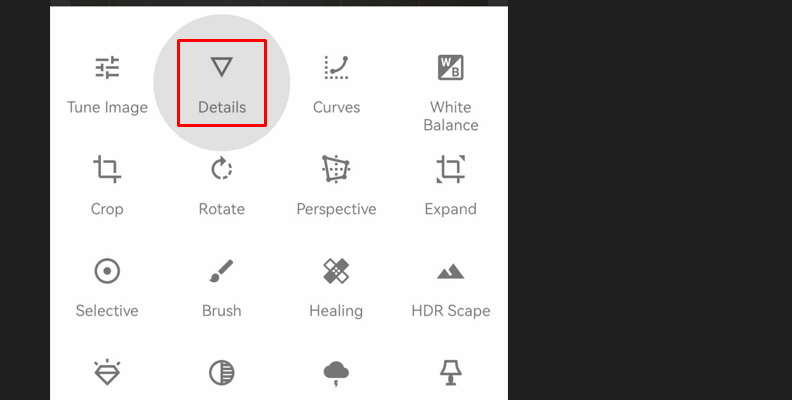
For Snapseed specifically, the "Structure" and "Sharpening" tools are under the "Details" option in the menu.
How to Unblur an Image in Lightroom
Like Photoshop, Lightroom is known for its powerful tools you can use to work on various images, and most importantly for your specific case, use to unblur photos. Out of the many photo editing tools offered in Lightroom, we'll be using the ones listed under the "Detail" panel.
So, to fix your blurred photos in Lightroom, follow the steps below.
Import an Image within Lightroom
The first step is to import your image within Adobe Lightroom and create a project.
Once the image loads and you can clearly see it on your workspace, move on to the next step.
Access the "Detail" Panel in Lightroom
Now, click on the "Develop" tab in the top horizontal menu, then move your cursor to the right sidebar menu and click on the "Detail" section.
This will expand the section, granting access to all the tools we'll need to unblur the image.
Adjust the Parameters
The final step is to adjust the parameters, but as every image is different, we cannot provide the exact values you should use for your photos.
Begin by increasing the "Amount" parameter under the "Sharpening" section and keep a close eye on the changes.
The "Radius" and "Detail" parameters will also make an impactful change, so after defining the right amount of sharpness for your image, make sure to experiment with those as well.
Final Words
Portrait photos, landscapes, selfies, and even videos, can all come out as blurry every once in a while.
Luckily, there are ways to fix such issues thanks to modern editing software, plug-ins, and the knowledge and skill provided by the community.
Hopefully, this tutorial was enough to help you deal with all sorts of blurry media in the future. Happy editing!


