


Amongst the hardships video editors deal with is receiving a blurry video and having to include it in their project, which is often bad for both their reputation and the final product.
Fortunately, modern tools and plug-ins, like Magic Sharp by Boris FX, allow us to unblur a video in just a few clicks, essentially preventing poor final results.
If you're eager to learn how to fix a blurry video in Premiere Pro, keep on reading, as this guide covers everything you need to know on this topic.
How to Fix a Blurry Video - Fix Blurry Videos in Premiere Pro
Like many other Adobe products, Premiere Pro is an industry-leading software, and if you're a video editor, you've likely heard about it or are already using it.
Premiere Pro is packed with many features, and due to its popularity, many companies that create plug-ins and video editing tools make sure that their product is compatible with this software.
In this section, you will find different methods to unblur a blurry video in Adobe Premiere, so let's begin with the first one.
Method 1: Fix Blur and Improve Video Quality with Magic Sharp
Magic Sharp is a tool that's part of the Continuum by Boris FX. Once you download and install the software (a free trial is available), it's automatically integrated into Premiere Pro, and you can use it to fix blurry video clips easily.
Follow these steps to fix your blurry video clip using Magic Sharp:
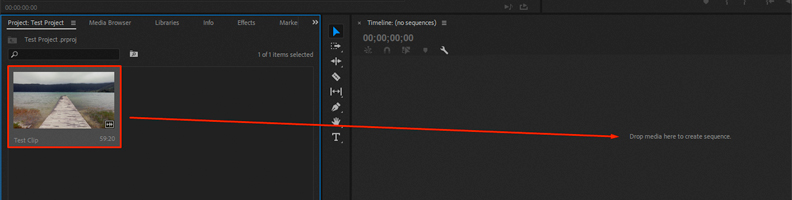
Step 1: Open Premiere Pro, click the "New Project" button, and add any video clip (that's blurry) to your timeline. This will automatically create a sequence.
![how to unblur a video in premiere pro]()
Step 2: Access the "Effects" panel by clicking on it, type in "BCC Magic Sharp" in the search box, then click on the effect and "drag and drop" it over the clip on your timeline.
![Finding BCC Magic Sharp within the "Effects" panel and applying it to a clip]()
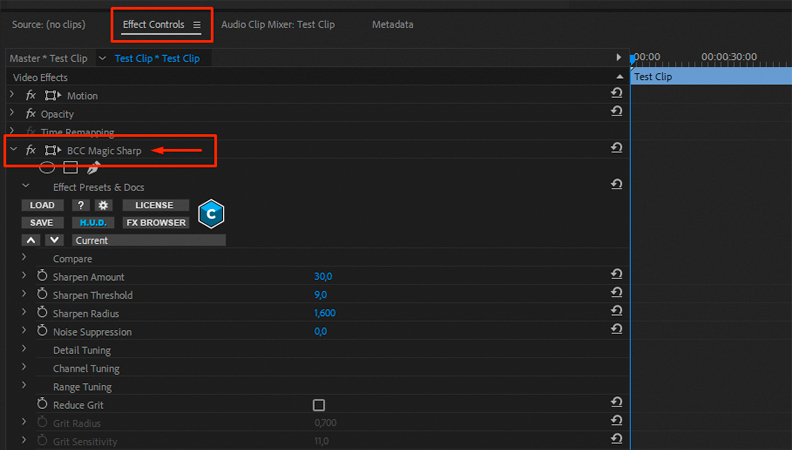
Step 3: Now that the effect is applied, it's time to modify some parameters and see the results. For this, you need to navigate to your timeline and click on the clip you just applied the effect to, then choose "Effect Controls" at the top.
![Accessing the "Effect Controls" panel to modify the effect's values]()
Step 4: The default settings will already make video clips sharper upon applying the filter, but if you wish to experiment further and create a custom preset to fix blurry video files your way, play around with the parameters and see what works best for your specific video editing needs.
That's all you need to know to sharpen blurry video clips in Premiere using Magic Sharp. This helpful Magic Sharp tutorial on Boris FX's YouTube channel further explains each of the parameter settings visually, and we recommend checking it out.
Method 2: Fix Blurry Video Files for Free Using Built-In Premiere Features
Although it's much simpler and more efficient to fix a blurred video in Premiere Pro using a plug-in like Magic Sharp, not everyone wants or can afford to take the paid route.
Thankfully, this software is packed with features that can help you unblur a video quickly using no more than the built-in features, and we're about to show you how.
Step 1: Open Premiere and lay down any number of videos to your timeline to create a sequence.
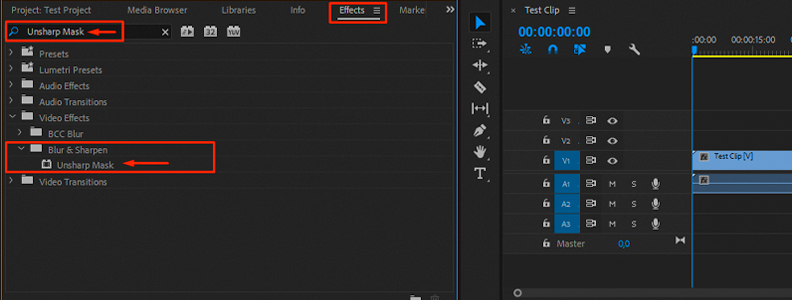
Step 2: Click on the "Effects" panel to open it, then find the "Unsharp Mask Effect" using the search box. Drag and drop the effect over the videos to apply it.
![Finding the "Unsharp Mask" video effect]()
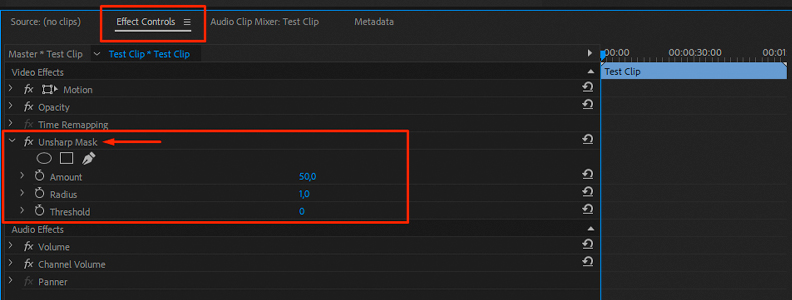
Step 3: Now that Unsharp Mask is applied to your video, click on Effect Controls to access the panel where you can adjust the values of this sharpen effect. Note: You can also create and use an adjustment layer and apply the effect to it instead of the original video.
![Accessing the "Effect Controls" panel to adjust values of the Unsharp Mask filter]()
Step 4: Play around with the "Amount," "Radius," and "Threshold" features and preview your videos to see what works best for the type of project you're working on. Note that "bumping" the numbers to the absolute max can make your videos look artificial and worse, so balance is key.
Using Unsharp Mask in Only One Part of the Video
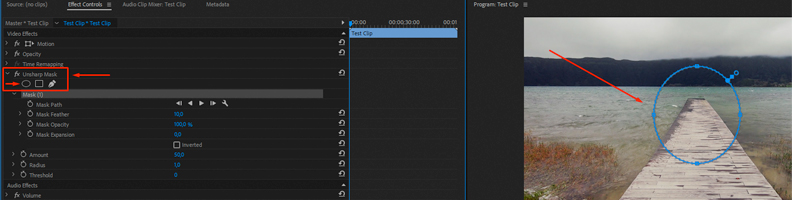
If you only need to remove blur in just one part of your video and not the whole shot, you can still use the Unsharp Mask feature, but create an adjustable mask and position it where you think it will have the most impact.
![Creating a mask and positioning it to only affect one part of the video]()
For still shots without much movement and action, a "static" mask that you only position once upon creation will do the job. For other, more complicated, moving shots, you'll need to use tracking.
Applying Tracking to the Unsharp Mask
Once you created the mask, you can move the "playhead" and keep repositioning it to follow a specific part of your video, which will, in turn, create a new keyframe each time you do it. This is often used if you're trying to "track" a person's face or an object within your video.
There's also an automatic tracking feature that you can use to avoid manually moving the mask every frame and creating keyframes yourself. Click on the "Track selected mask forward" button upon creating and positioning the mask, and the software will automatically complete this task for you.
Note that this will not always yield perfect results and can be a "hit or miss," so you may need to edit and make some adjustments before you "hit" that export button and deliver the content.

Why is My Video Blurry?
The video you work with could be blurry and require sharpening effects, but that's not uncommon at all. However, it's best if you know the most common causes so you can potentially avoid them in the future.
Common Causes of Blurry Footage
- recording without adjusting focus
- not working with original files or downloading a compressed version of the video
- recording in a lower resolution but trying to upscale the material in editing software
- recording with a dirty camera lens
- missing the warp stabilizer effect
- and others
No matter the cause, depending on how severely blurry the footage is, sharpening effects can save the day, or at least make a noticeable improvement. In this tutorial, we've shown you how to add a sharpen effect through an industry-grade plug-in, as well as how to use the free, built-in one that Premiere offers.
Final Words
Whether you edit videos on your Mac, Windows computer, or even an Android device, blurry content will always be an issue. Thankfully, we as editors have many more options today compared to what was available in the past, so dealing with such issues isn't impossible.
Still, we recommend trying to avoid ending up with blurry footage by being extra careful throughout your project's recording phase.
Hopefully, these tips were useful and will help you enhance both images and video footage while editing content in the future.


