


In today's world, smartphone cameras have advanced to the point where they can capture high-quality videos, and the popularity of social media has made it common and even further encouraged people to record daily events. In some cases, it has even become necessary to do so.
With that said, it's very likely you'll capture someone else in one of your videos, as recording in public is very common but rarely a private experience.
If you plan on sharing your recorded content on the internet, it is essential to protect people's privacy. One effective way to do this is by learning how to remove unwanted objects (like car license plates) and individuals from your videos.
Besides privacy, you may want to remove people from your videos due to aesthetic or other reasons as well.
Luckily, this tutorial provides comprehensive guidance on this topic. So, without further delay, let's get started.
How to Remove People from Video with Mocha Pro from Boris FX
For removing unwanted objects or people from a video, it all comes down to tracking. With that said, it really helps to use a renowned, modern, and professional plugin like Mocha Pro to ensure you don't miss any details and finish the task as quickly and efficiently as possible.
Mocha Pro has a free trial available on the official BorisFX website, so you can test it out first. The plug-in is used by Hollywood productions and is nothing short of professional and efficient for anything tracking-related. You can use it to remove unwanted moving objects, static objects, unwanted elements, people, and anything else in just a few clicks.
For this specific tutorial, we'll be using Adobe Premiere Pro, but remember that all BorisFX plug-ins are available for all modern, industry-leading video editing software, like After Effects, DaVinci Resolve, VEGAS Pro, and others. Mocha Pro is also available as standalone software.
So, to begin with the first step, you'll need to launch Adobe Premiere Pro on your computer, and previously ensure that Mocha Pro is installed as a plug-in for this specific host.
Launch Premiere Pro, Import Media and Create a Sequence
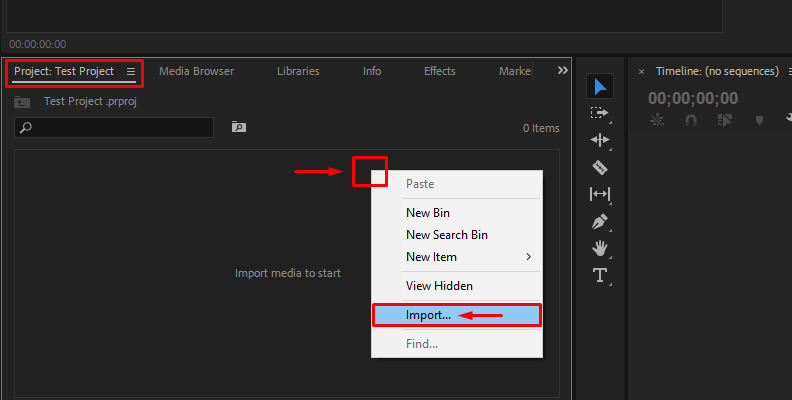
Once you launch Premiere Pro on your PC, navigate to the Project tab, then right-click an empty area to bring up the menu of options. Choose "Import" and pick the video(s) you wish to add within the software and remove objects from.
![how to remove people from video]()
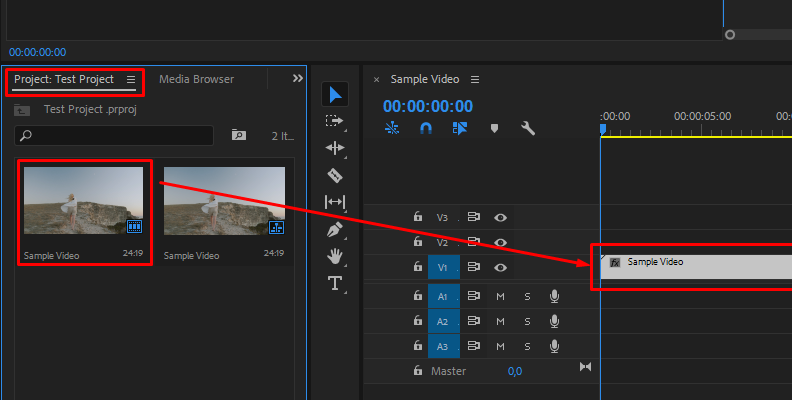
When done, you should see the videos within your Project tab. From here, all you need to do is create a sequence, which is quite simple. Click on one of the videos you imported and drag it over to the Timeline area, then drop it and Premiere will create the sequence for you.
![]()
Search for Mocha Pro in the "Effects" Tab and Apply It
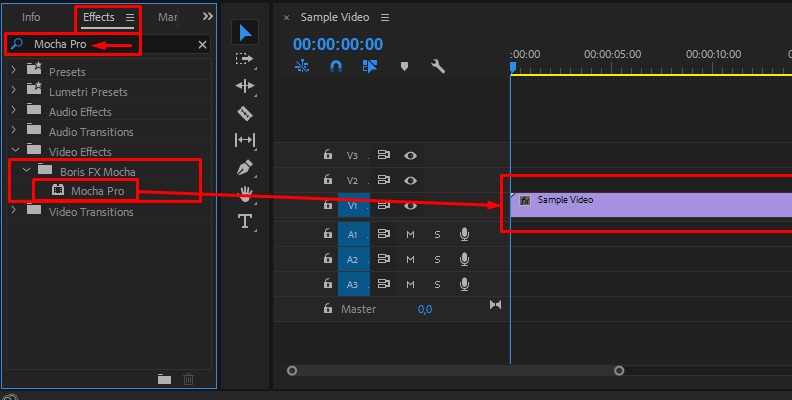
Within Premiere Pro, click on the "Effects" tab to access it. Then, use the search bar to type in "Mocha Pro" and find it quicker. You will find Mocha inside the "Boris FX Mocha" folder which is under the "Video Effects" folder, as shown in the image below.
![]()
After locating the effect, drag and drop it over the video on your timeline. This is how you apply Mocha to a video within Premiere Pro when you have the software installed as a plug-in for this specific host.
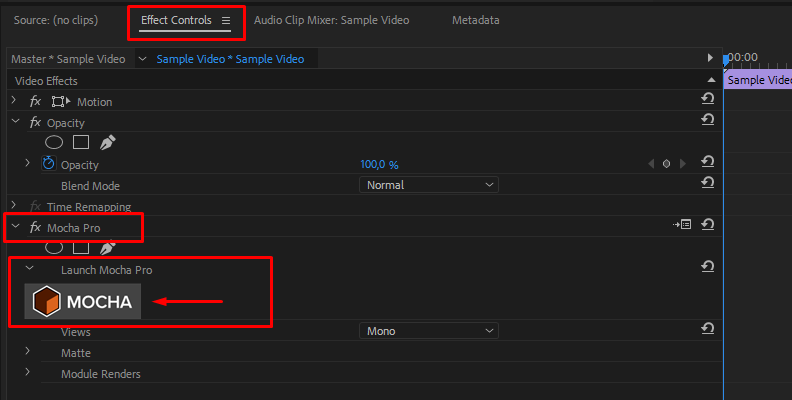
Launch Mocha from the "Effect Controls" Panel
The final step before you begin removing the unwanted object or person from your video is to launch Mocha.
We'll do that by selecting the video on your timeline, heading over to the "Effect Controls" panel, expanding the "Mocha Pro" effect, and clicking on the Mocha logo to launch the plug-in's workspace.
![]()
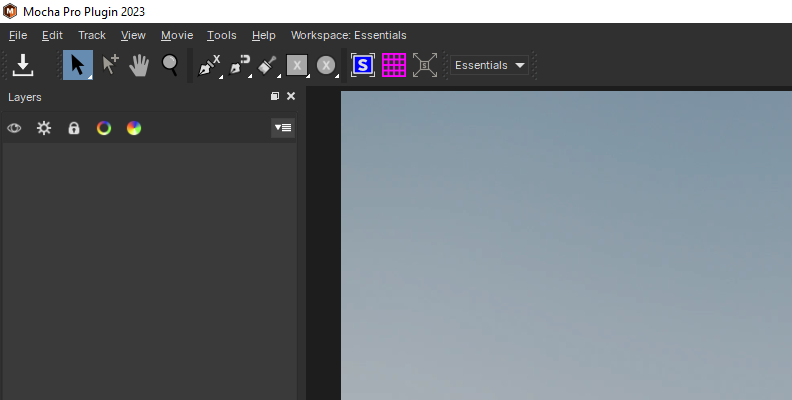
After a few moments, you'll see the Mocha Pro workspace on your screen with various tools available for your task.
![]()
Track Your Object (and Background) Within Mocha Pro
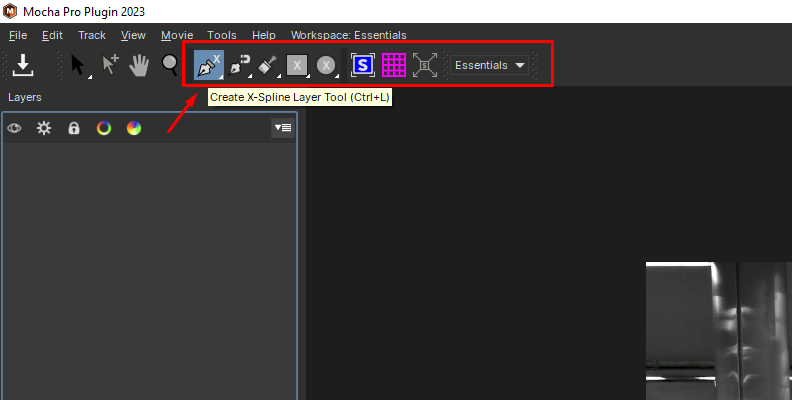
Once Mocha Pro launched, you can begin tracking your unwanted objects or a person that you wish to remove from your shot.
To do this, there are many tools you can use, but for this specific example we'll use the X-Spline Layer Tool which you can access by clicking the icon showing a pen and the letter "X" or by using the "CTRL+L" key combination shortcut.
![]()
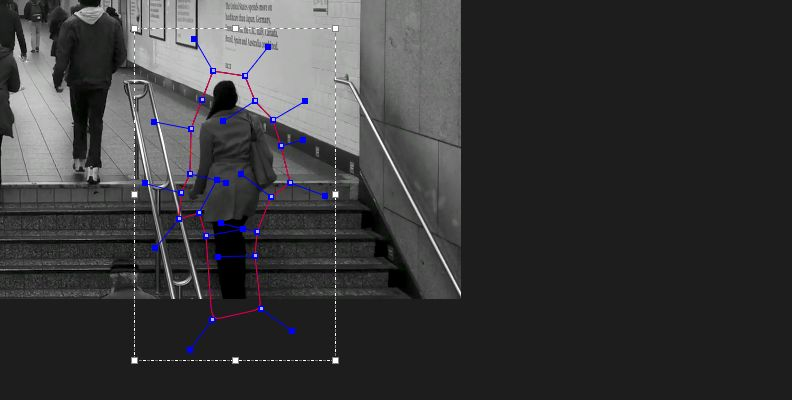
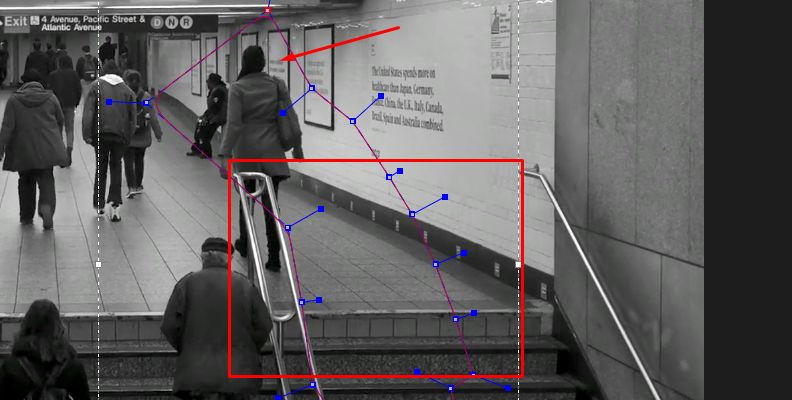
Once you select the tool, draw a mask around the person or object you wish to remove from the video.
![]()
This will automatically create a layer that you can see in the upper-left corner under the "Layers" section. Once you draw the mask, click "Track Forward" and then "Track Backwards" so that Mocha can apply the mask throughout the entire shot.
![]()
Since this doesn't always go perfectly on the first try, make sure to pause and re-adjust the mask whenever you notice that it "breaks" and the subject leaves its borders.
![]()
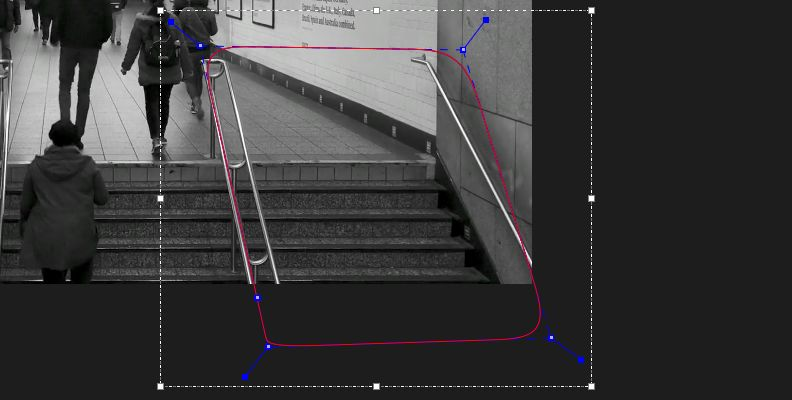
Next, you need to track the background, however, there are a few important points to make here.
First, you need to find a part of the shot where the background is exactly the same as in the frame where the unwanted person or object is, but without them in it. See an example in this next image.
![]()
This is so that Mocha can gather information about how the pixels making up the background look like and use that information to rebuild the shot later on when you use the remove module.
Make sure to also track the background layer you just created forward and backward (depending on which part of the shot you created the mask). Everything must be tracked closely to perfection for the best removal results later on.
Some shots may not be a good candidate for removing unwanted objects or people if there are way too many changes in the background, a constantly-appearing distracting object, or if there isn't a clear shot of the background because something constantly blocks it.
Using the Remove Module in Mocha Pro
Now that you've tracked both the background and the unwanted person or object you wish to remove from the video, it's time to head over to the Remove section and begin the process.
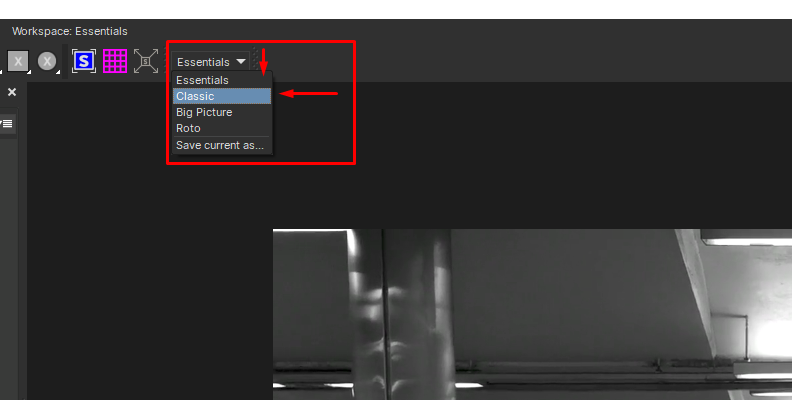
To do this, we first need to change our workspace view from "Essentials" to "Classic".
![]()
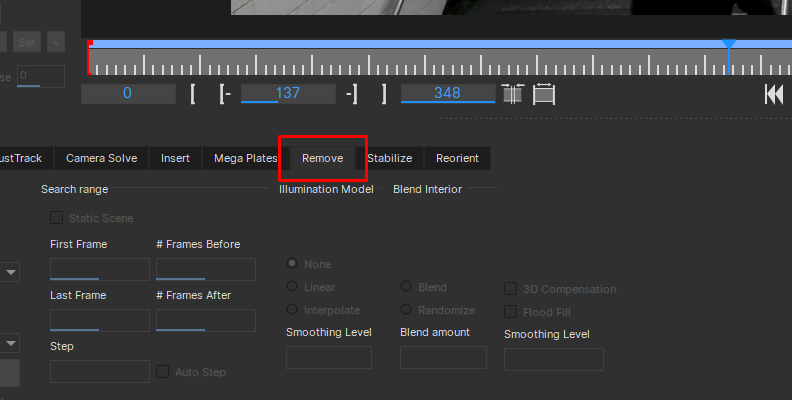
Now, you can click on the "Remove" tab in the bottom horizontal menu.
![]()
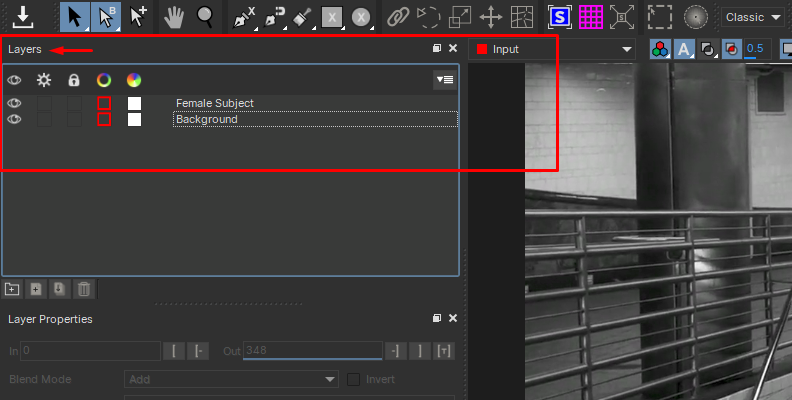
The final step before initiating the Remove command is placing the layers in the "Layers" section in the correct order. One very important thing to note when using Mocha Pro is that you should track the objects closer to the camera first.
So, in this specific example, we'll place the layer with the person on top of the layer where the floor is tracked.
![]()
Now, select the layer that you used to track the person or object you wish to remove, head over to the Remove tab if you haven't already, and click the "Render Forwards" or "Render Backward" buttons depending on which part of the shot you're currently viewing.
![]()
Wait for the process to complete and then preview the results.
If anything needs adjusting, Mocha Pro makes that an easy task with all the different tools and options it offers, including the "AdjustTrack" tab.
There are way more features available in this industry-leading software, allowing you to work on a lot more complex scenes and achieve pixel-perfect results. However, for a basic object or person removal, this should be enough.
For more detailed and advanced information, take a look at the Mocha Pro Learn Section over at BorisFX's website.


How to Remove People from Video for Free in After Effects
Premium tools and plug-ins, like Mocha Pro, allow editors and VFX creators to modify every pixel down to its core for perfect Hollywood-grade results.
However, for more basic editing and for those who simply want to remove a tiny distraction from their video so they can post it on social media, there are simpler, easier-to-learn, and most importantly, free alternatives.
In this specific section, we'll focus on Adobe's Content Aware Fill feature known for its superiority when it comes to removing people or objects from video. This feature was first introduced in Adobe's well-known Photoshop software, but as of 2019, it's available in After Effects too.
To remove object or person from your video with Content Aware Fill in Adobe After Effects, follow the steps below.
Import Media and Create a Timeline Within After Effects
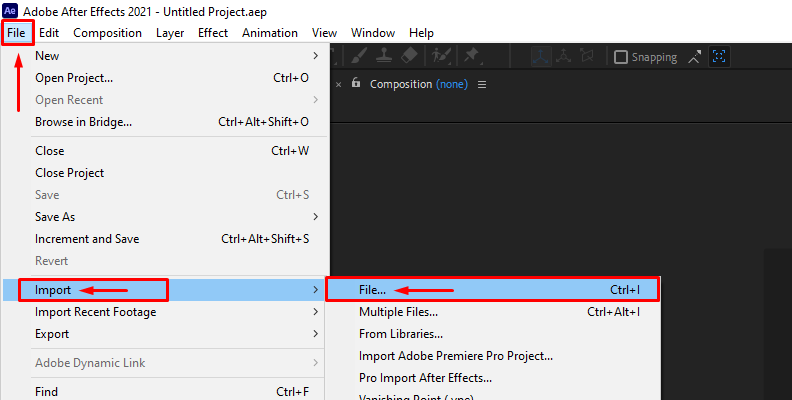
Once After Effects loads up, click "File" and then choose "Import" from the list of options to choose which video clips you wish to work on.
![]()
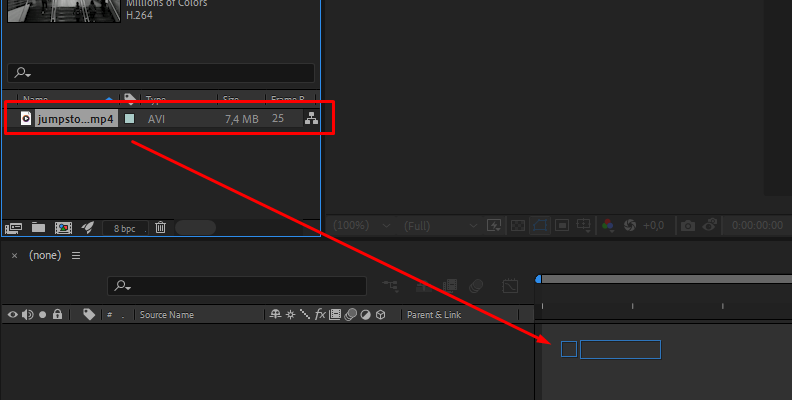
Upon importing the file(s), drag one or multiple to the timeline area and drop them to create a new composition (sequence).
![]()
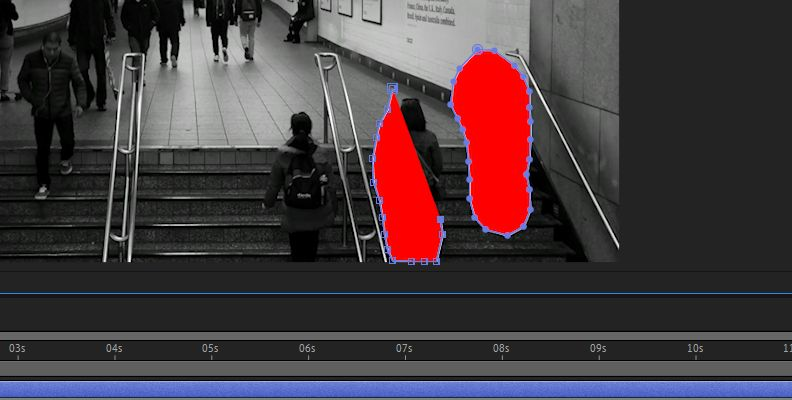
Mask Out the Portions of the Composition You Wish to Remove
![]()
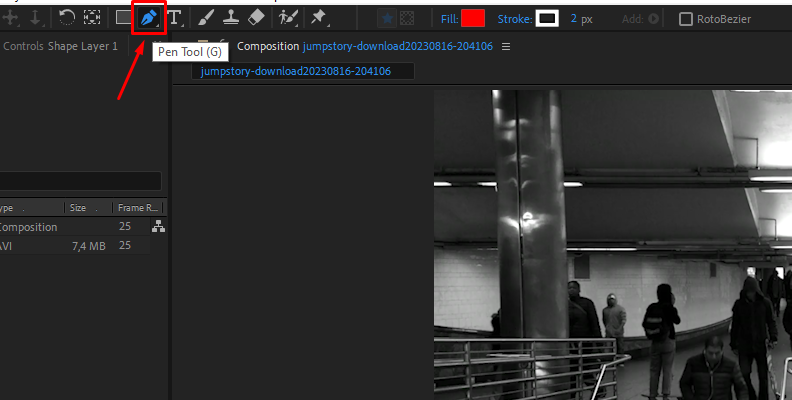
Use any of the tools available within After Effects to create transparency. The masking tool and the keying method are both viable options. You can also use rotobrush. Remember to first select the layer by clicking on it in the project view window (bottom left corner).
![]()
If there is movement in your shot, use keyframes to readjust the position of the mask throughout the entire sequence. This can be a bit time-consuming based on how much you want to remove and replace within the video.
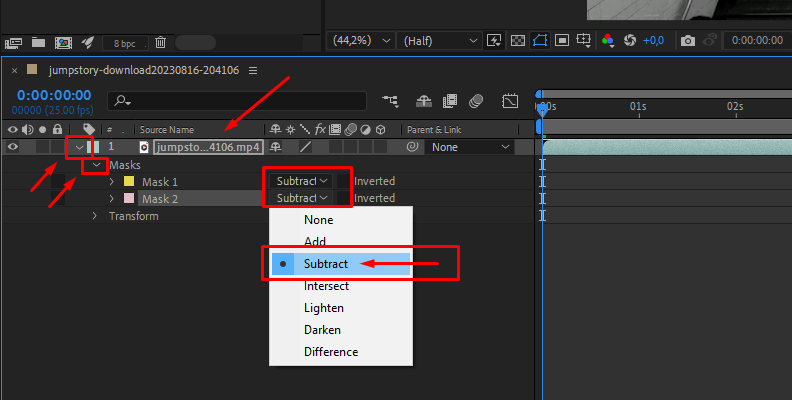
Once everything is masked out, expand the layer using the dropdown arrow, then expand "Masks" and set every mask you created to "Subtract" as shown in the image below.
![]()
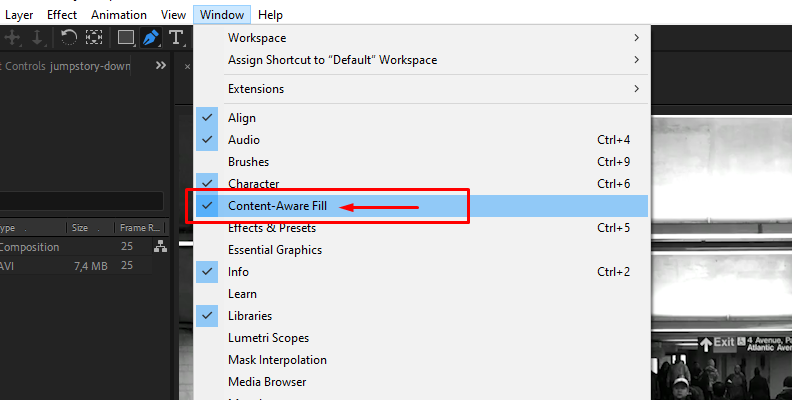
Initiate the Content Aware Fill Process
As mentioned earlier, the content aware fill feature is a powerful method that allows you to remove unwanted moving objects, static objects, people, shadows, artifacts, and a lot more from your videos.
The only step that's now left is to access the panel of this powerful tool and start the fill layer process to easily remove objects.
![]()
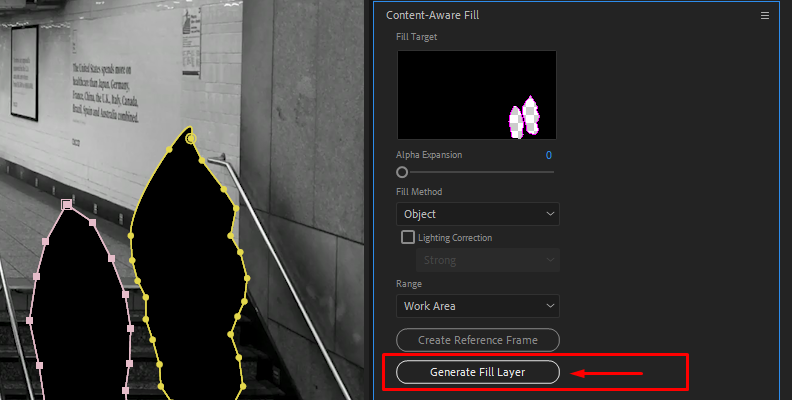
Adjust the settings based on your composition's type and the objects or people you wish to remove from the video and click the "Generate Fill Layer" button.
![]()
After some time, based on the video length and your computer's processing power, After Effects will remove and replace everything you've masked.
You can now watch the video to see if the erase process precisely removed everything you masked within the clip and replaced it with the correct pixels.
Final Words
If you were searching for how to remove something from a video online, hopefully, this tutorial cleared any confusion and provided you with the necessary know-how to easily overcome this seemingly difficult task some editors often face.
With artificial intelligence on the rise, and tools such as Content Aware Fill, Adobe Cloak, and many others, it's exciting to see where video production will get in the near future.


