


Echo is among the most challenging sonic imperfections you might come across, as it can turn a splendid video into a disaster due to bad sound quality.
Avoiding recording in a room with high reverberation should be your top priority, as well as using a professional microphone.
However, sometimes this is not possible, and so we need to do some audio editing to remove echo from our video in post-production using a professional Echo Remover.
Here’s a guide on how to remove echo in Premiere Pro for those who love learning how to do things themselves. All you need is a clip with echo and Adobe Premiere Pro installed on your computer. Removing echo on audio in Premiere Pro isn't complicated if you just follow the steps below.
Remove Echo With the DeReverb Effect on Adobe Premiere Pro
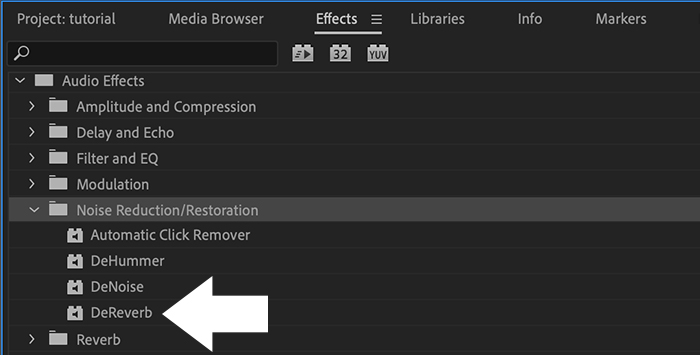
To get rid of echo in Premiere Pro, go to the Effects panel and look for DeReverb in Audio Effects > Noise Reduction/Restoration. Drag the effect onto your track, open the Effect Controls panel and hit “Edit” to bring up the settings. Use the amount slider to dial in the reduction—somewhere in the 10–25% range usually does the job, and will give you cleaner audio without making the voice sound unnatural.
Import the audio files with echo to Premiere Pro following these steps:
- Import the audio with echo to Premiere Pro.
- Simply drag the video clip into the timeline.
Add the DeReverb Effect
To begin cleaning your audio files with echo in Premiere Pro, follow these steps:
- Go to the Effects panel and type DeReverb in the search box. You can also follow the path Audio Effects > Noise Reduction/Restoration > DeReverb.
- Click on the effect and drag it into your audio on the timeline.
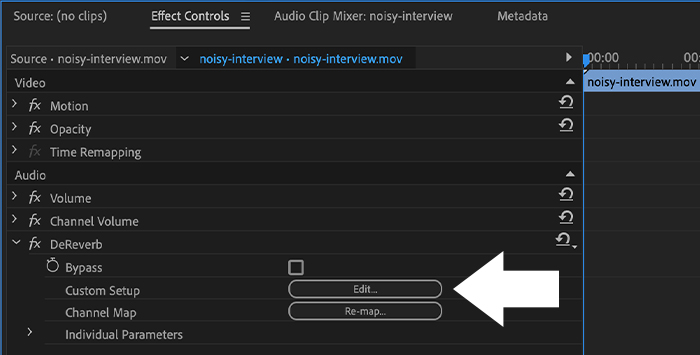
- Navigate to the DeReverb effect in the Effects Control panel.
- Click the little arrow > on the left to display more options.
- Click on Edit next to Custom Setup to open a new window.
Advanced Settings
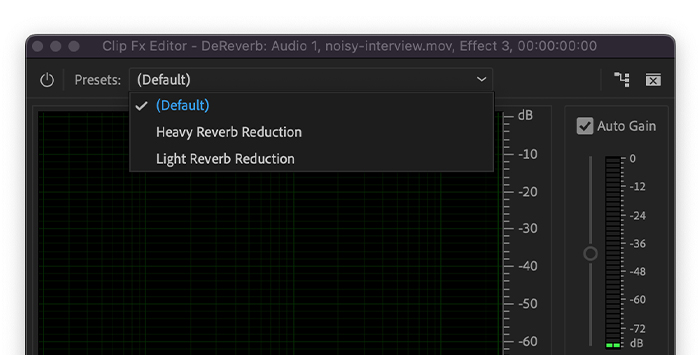
You can set up more advanced settings in the Premiere Pro Clip FX Editor window to get rid of echo. The first option on the top is the presets, where you can find a default, heavy, and light reverb reduction. You can choose one of these and preview it.
Then, follow the next steps:
- Use the slider on the bottom if you prefer to adjust the amount of DeReverb that you want to apply to the audio. With 0%, you'll be applying no effect, and with 100% you will fully apply the DeReverb to our audio clip. Your audio may lose clarity if you use too much DeReverb.
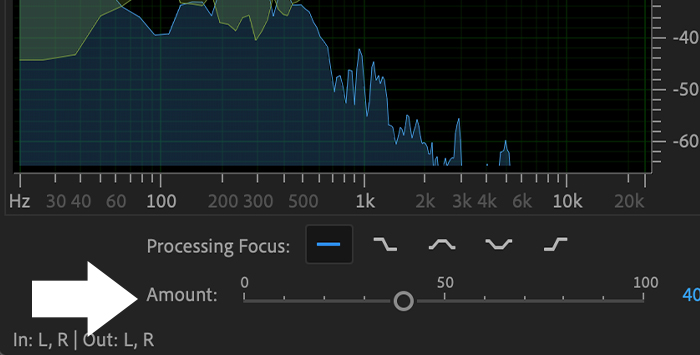
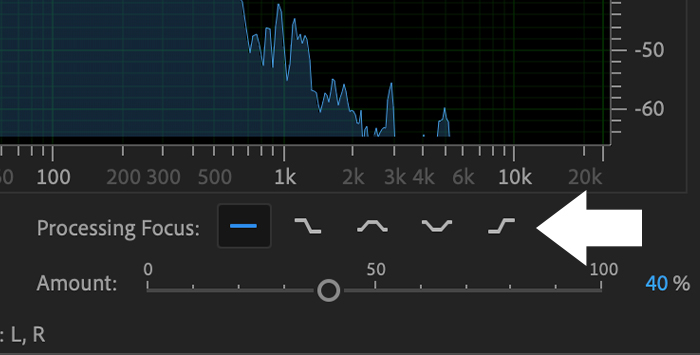
- Above the slider, you'll see the Processing Focus setting. We recommend using the flat line, which is the one Premiere Pro will default to. Unless you are familiar with frequencies, you can focus on low or high frequencies.
Auto Gain
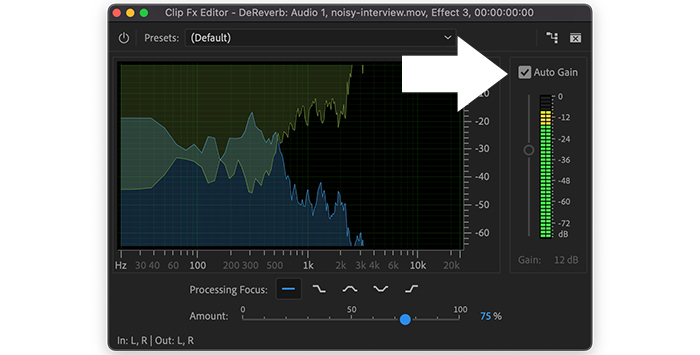
The slider on the right is for volume. What the DeReverb effect does is lower the volume to get rid of echo. Follow these steps to adjust the Auto Gain feature.
- Check the Auto Gain checkbox and it will automatically take care of the volume while applying the effect in order to not lose volume.
- Preview the audio with any slight change you make to avoid losing quality.
- Once you like the result, close the window.
EchoRemover
If you need a professional-level tool to remove echo in Premiere Pro, then CrumplePop has the solution. EchoRemover works like a miracle - echo on recording simply fades away, and you can reduce reverb instantly. Even recordings drenched in reverb can sound like they were recorded in a pristine and pure environment.
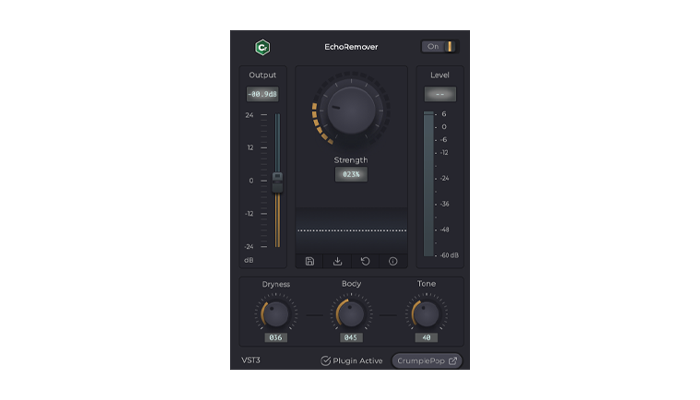
The custom-built AI-powered tool is simple and straightforward to use. Just follow these simple steps:
- Adjust the central dial to apply the amount of echo removal to your audio clip.
- You can also adjust the level of dryness, body, and tone to tweak your final results.
- Adjust the slider on the left-hand side to control your levels.
For the last word in professional echo removal, CrumplePop EchoRemover is simply a must-have.
Try Voice Enhance Now!
Instantly transform any voice recording into professional-quality sound with the power of AI. No internet access required- your audio stays private and secure. Toggle it on/off to hear the difference.
On-location Interview
Selfie-style Phone Audio
Zoom Call
Ridiculous Echo
Traffic Noise
Far from Mic
Untreated Room
Recording at Home
On-location Interview
Final Words
Using DeReverb in Adobe Premiere Pro is a simple way to reduce reverb on your YouTube videos or other video projects, and once you have mastered the technique, you'll never have an echoey room compromising your video again. Premiere Pro is a great tool for audio editing, and with these simple steps, echo will forever be a thing of the past.


