


Working as an editor on a complex project such as a film or a commercial recorded in multiple locations and with different cameras, all with varied lighting, requires great attention to detail, especially if color grading and color correction are part of your task.
One of the most common "problems" regarding material recorded with multiple cameras is the often easily noticeable color difference between same-scene shots. This difference can lead to reduced immersion and authenticity in the viewer's eyes and leave an impression that the project is not done professionally.
Thankfully, modern video editing software, such as Adobe Premiere Pro and others, offer various tools and options editors can use to address this problem, sometimes even completely automated.
That's exactly what we'll cover in the following guide, so if you're interested in learning more on this topic, let's jump straight into it without any further ado.
What Is "Color Matching" and Why Does it Matter?
As addressed in the introduction section above, color matching describes the process of ensuring the color tones in different video clips appear consistent and cohesive. When combining footage from different cameras, lighting conditions, or settings, the colors can vary significantly. Color matching helps to harmonize these differences, making the transitions between clips seamless.
This technique is often used to adjust the exposure, white balance, saturation, and hue of each clip so that they blend naturally. It’s an essential step in post-production, ensuring visual continuity, which enhances the viewer’s experience and maintains the desired mood or atmosphere of the video.
How to Color Match in Premiere Pro
Premiere Pro makes color matching quite simple. To color match in this well-recognized and user-friendly software, simply follow the steps below.

Step 1: Create a New Project and Import Media
The first step is to launch the software and create a new project. We recommend working on a freshly created project when trying and learning new methods so that you don't make any unwanted changes to work that's already in progress.
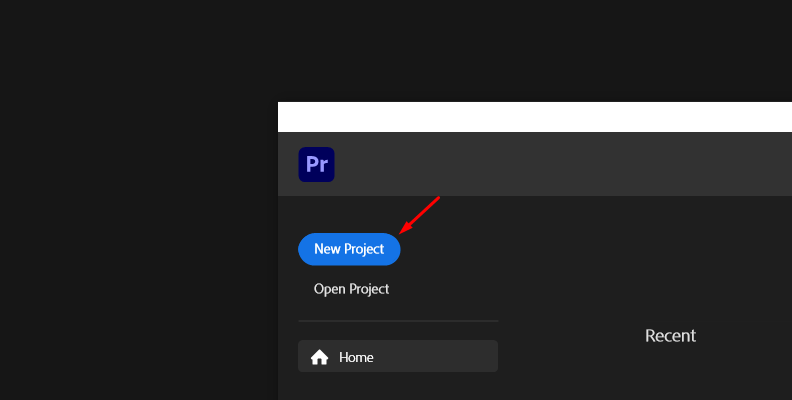
Once you create the new project, head over to the Project tab and click the Import media button.
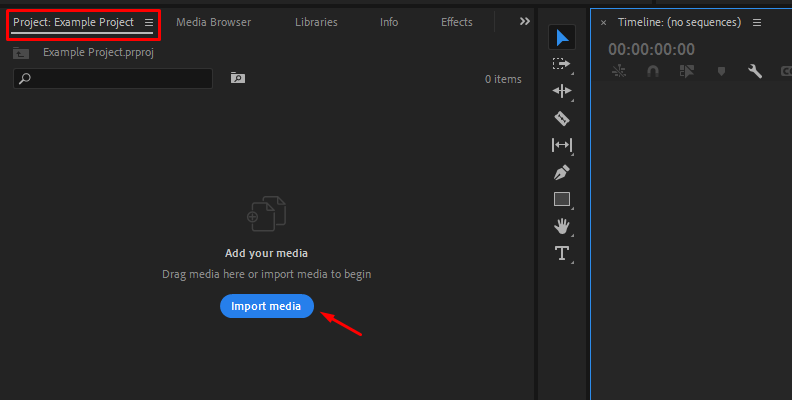
This will open your operating system's file explorer where you can find the video material you want to import on your storage disk. Choose which files to import and finalize the process.
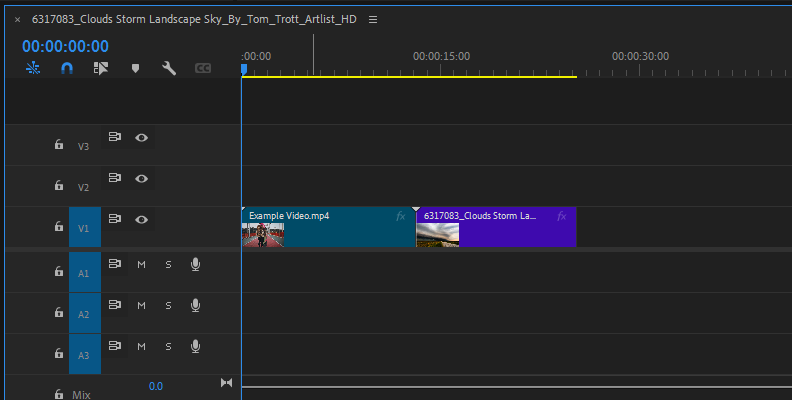
Step 2: Create a Sequence and Arrange the Timeline
Now that you've successfully created a new project and imported media, it's time to create a sequence so that you can start working on the clips.
To do this, you can simply select footage from the Project tab and drag it over to the timeline area.
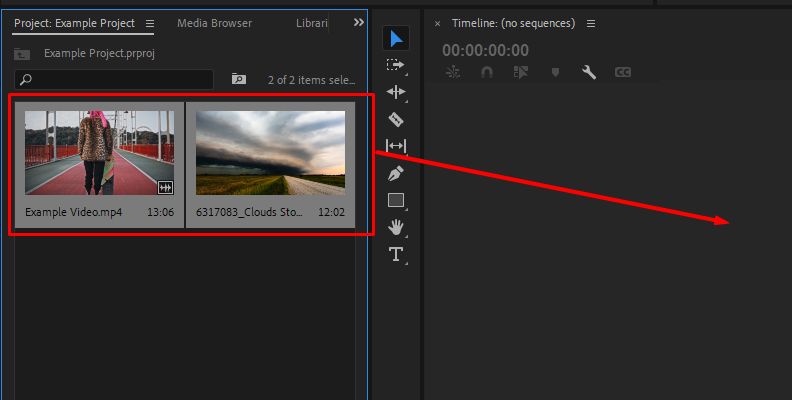
This will automatically create a sequence of the selected clips, which you can then proceed to edit.
Step 3: Access the Lumetri Color Panel
Now, you need to access the Lumetri Color Panel. This is required so that you can do any type of color match or grading for your videos. To do this, click on Window in the top menu and choose Lumetri Color from the list of available options.
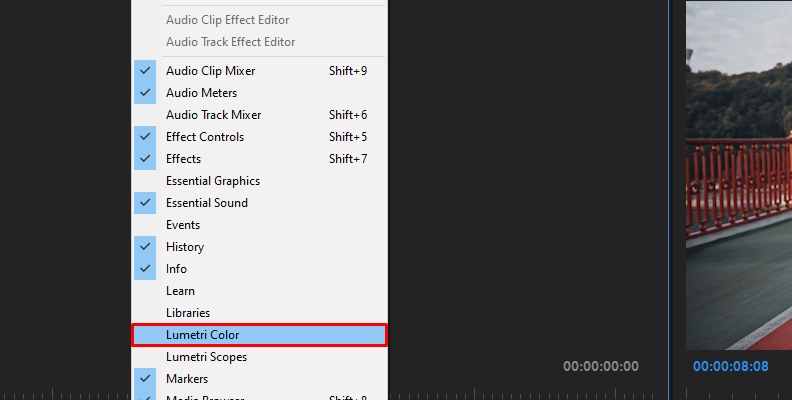
This will open the color panel on the right side in Premiere if you're using the default layout.
Step 4: Select the Reference Clip and Apply the Match
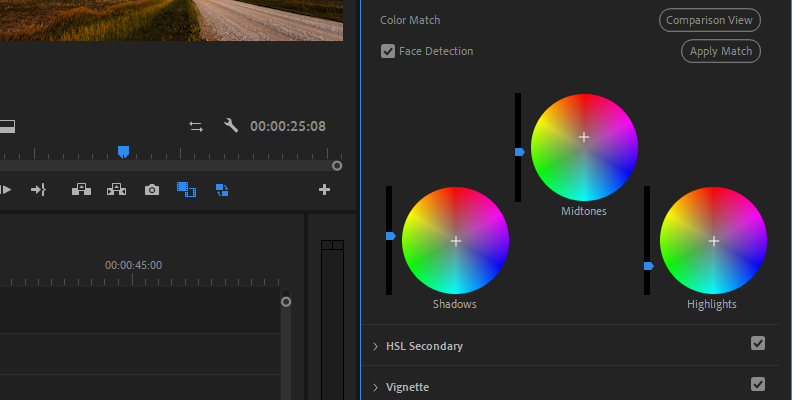
Click the clip on your timeline to select it, then in the Lumetri Color Panel, scroll down and find the Color Wheels & Match category.
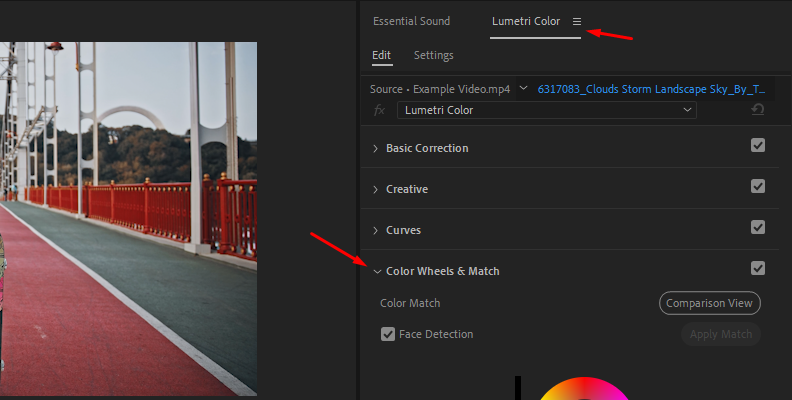
Click on it to expand it and reveal all the options, then click Comparison View so that you can view both clips side by side in the program monitor window.
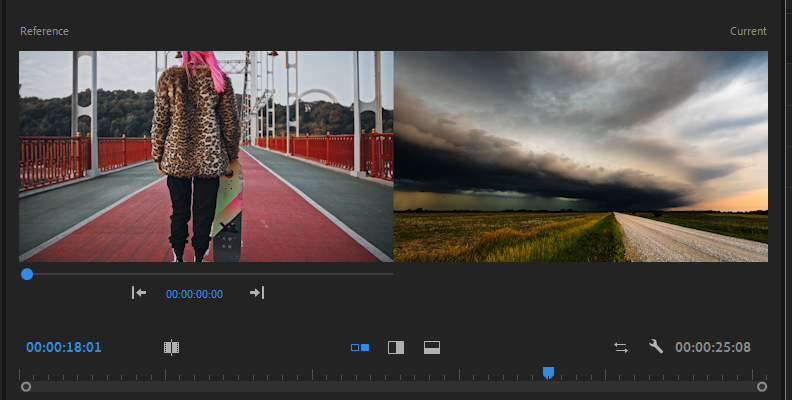
The last thing you need to do is to click the Apply Match button and you'll notice that the colors within your video clip changed.
You can also notice this change by looking at the color wheels themselves, as their parameters will change once you click Apply Match.
That's all you need to do!
Step 5: Fine Tune if Needed
To make further modifications and do a secondary color correction, you can continue editing manually within the same Lumetri Color panel.
You can expand different categories to access different settings, such as the Basic Correction tab, where you can find settings to color correct such as Temperature, Tint, Saturation, Exposure, Contrast, Highlights, and more.

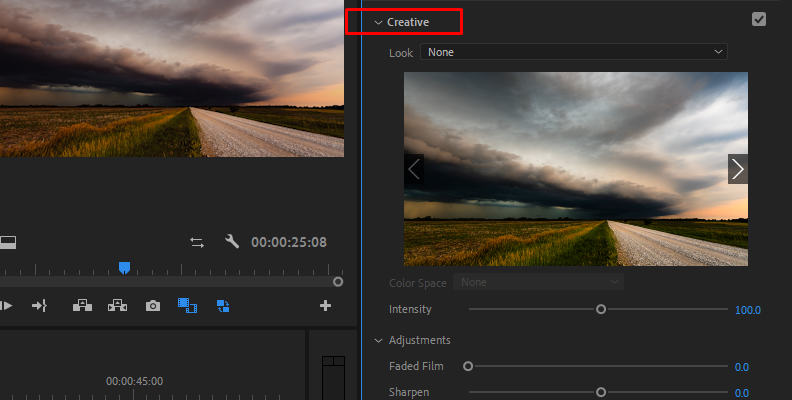
In the Creative tab, you can apply a LUT and modify parameters for manual adjustments such as Sharpen, Fade, Vibrance, Saturation, and more.
Furthermore, you can access the Curves tab where you can adjust the RGB curves for all the shots you work on, and so on.
All these color management settings will help you match shots by their color and look, improve them even further, and give them that film magic every creator seeks to achieve with their work.
Color Correction and Color Grading in Premiere Pro
Color correction and color grading in Premiere Pro is relatively easy due to its friendly user interface. However, there's quite a bit of depth regarding these two things, as there are professional colorists who dedicated their whole lives to mastering this craft and that's specifically their role in film and video projects.
Here's briefly what you need to know about what you can achieve in Premiere Pro regarding these two processes:
Color Correction
Color correction is the initial step, focusing on fixing any color imbalances or exposure issues in the footage. The goal is to make the video look natural and neutral. This involves:
- Adjusting white balance to correct any color tints.
- Balancing exposure to fix underexposed or overexposed areas.
- Adjusting contrast and saturation to ensure the colors look balanced and realistic.
- Tools used: Lumetri Color panel, Basic Correction section (exposure, highlights, shadows, etc.).
Color Grading
Color grading is the creative step where you enhance the mood and style of your footage through colors. It adds an artistic layer to your video, setting the tone and emotional impact.
- You can create warm, cool, or stylized looks.
- Adjust color wheels (adjust shadows, midtones, highlights), vignette, or use LUTs (Look-Up Tables) for a cinematic effect.
Color Match in Premiere Pro With BCC Color Match
Often, third-party plug-ins offer a lot more options and customizability, as well as user-friendliness and better results compared to built-in tools in most software.
In this section, we'll show you how to color match in Adobe Premiere using Continuum by Boris FX.
Continuum is a collection of helpful plug-ins, filters, transitions, effects, and much more, available for free (a trial version) and compatible with all popular video editing programs, such as Premiere Pro, After Effects, DaVinci Resolve, Avid, VEGAS Pro, and more.
Once you download and install Continuum for your software of choice, you can use all of its effects and tools within your work, one of which is BCC Color Match.
Here's how you can use BCC Color Match in Premiere to ensure all the clips within your project have the same look, despite half of them being recorded with one camera and under one light, while other clips under different circumstances and with a different recording device.
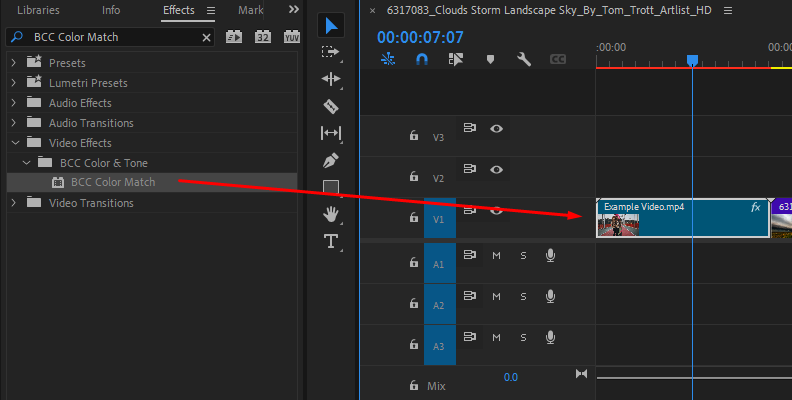
Step 1: Apply the BCC Color Match Effect to Your Clip
Once you have your clips imported and set on the timeline (check the second section in this guide for more information on how to do that) you need to access the Effects tab and find BCC Color Match on the list.
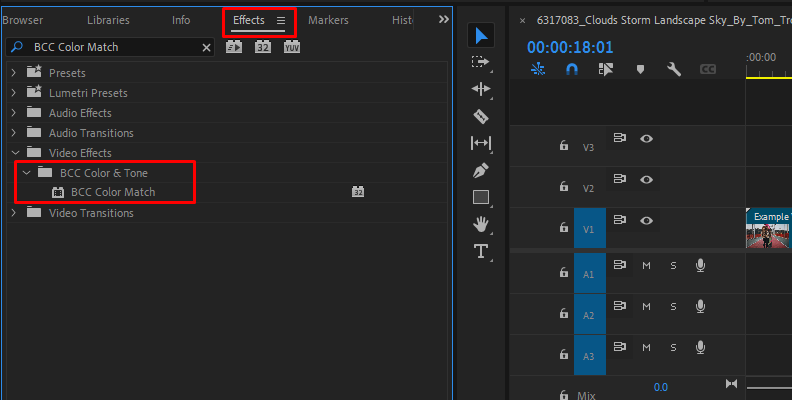
Then, drag and drop the effect over the clip you wish to change the color of.
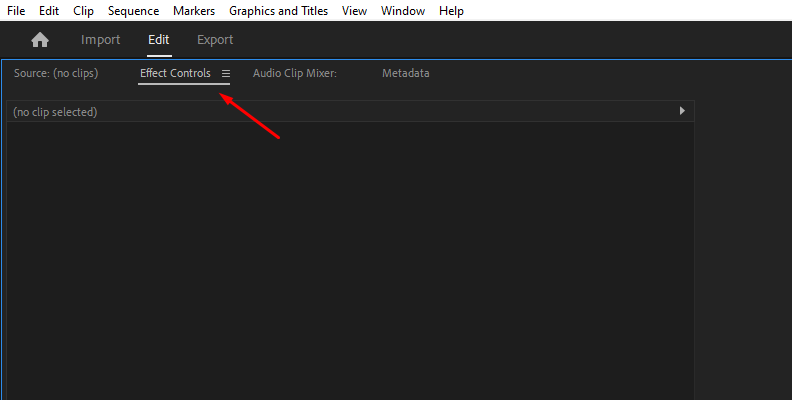
Step 2: Access the Effect Controls Panel
Now, the effect is applied to your clip. Access the effect controls panel in the top-left corner and scroll down until you find BCC Color Match on the list.
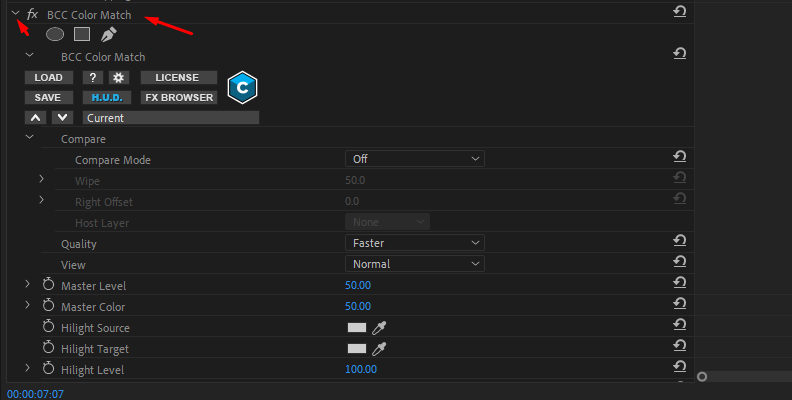
Step 3: Pick the Colors
Now you need to scroll down the BCC Color Match effect options within the Effect Controls panel and click the eyedropper icon for "Hilight Source". Then, pick the highlights in the clip in which you change them. Next, click the eyedropper icon for "Hilight Target" and pick a color from the clip you're sampling.
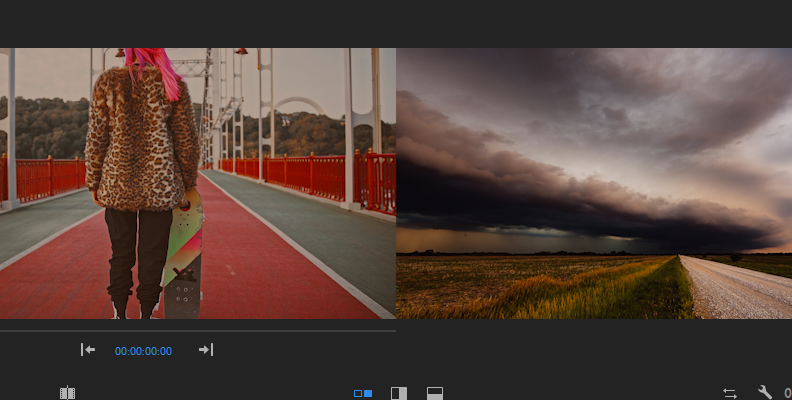
You can do the same for midtones and for shadows. Don't forget to enable comparison view mode so that you can do all this conveniently.
Once again, you can take a look at the official BCC Color Match page, where every setting available for this effect is explained separately.
Feel free to make as many adjustments as you need until you get the perfect match of colors between the clips.
Difference Between Color Match and Color Grade
Color matching is about ensuring consistency between multiple clips. When you're working with footage shot under different lighting conditions or using different cameras, the colors may not naturally align, which can be jarring to the viewer. The purpose of color matching is to make sure that all your clips look like they belong together. This process involves adjusting the colors of one clip to match another, usually with the goal of creating a seamless flow between shots. It doesn't necessarily enhance the artistic look of the footage but ensures that all clips maintain a uniform appearance in terms of color, exposure, and white balance.
In tools like Adobe Premiere Pro, color matching can be done using the Lumetri Color panel, where the software can automatically adjust one clip to resemble another through features like the Color Wheels & Match tool. Color matching is more of a corrective measure than a creative one, aiming for visual consistency across different scenes.
Color grading, on the other hand, is a creative process that focuses on enhancing or stylizing the overall appearance of your video. Once the colors are balanced and matched, you can move on to color grading, where you manipulate the colors to evoke specific emotions, create an atmosphere, or establish a particular mood. For example, adding cool tones to a scene can give it a more somber or dramatic feel, while warm tones can make a scene feel more welcoming or energetic.
Color grading allows for a wide range of creative expression, using color wheels to adjust shadows, midtones, and highlights, or by applying LUTs (Look-Up Tables) to create specific "looks" that enhance the visual storytelling. It's used to give your footage a more polished, cinematic feel.
In summary, color matching ensures uniformity and consistency between clips, making sure they appear cohesive, while color grading adds the artistic layer that defines the overall aesthetic and mood of the footage. Color matching is typically done before color grading as part of the foundational correction work, and both are essential to achieving professional-quality video.
Final Words
That's all regarding color matching in Adobe Premiere Pro that we have to tell you. We hope that you learned something new that will help with all future work, as this is a task that you will most likely face regularly in your journey as a video content creator.
We wish you the best of luck, and thank you for reading!


