


In modern video editing, transitions play an immensely important role. Whether we're talking about social media edits, gaming content, or even regular YouTube entertainment videos, it's difficult to disregard the impact a transition effect can have on the overall viewer experience.
There are many different video transitions, such as fades and crossfades, glitch effects, wipes, slides, and many more. However, in this specific guide, we'll focus on the zoom transition, one deemed by many editors as the most aesthetic and useful choice for various content types.
If you're willing to learn how to do a zoom transition in Adobe Premiere and become more informed about what this transition achieves and when it should be used, you've come to the right place. There's a lot to unfold, so without further ado, let's get straight into it.
What Are Zoom Transitions?
Zoom transitions are one of the many known ways of transitioning from one shot to another. It (almost always) uses the "Transform" component in your video editing software to "zoom" into the shot by changing the "Scale" value, all while timing it with the exact moment when your shot ends so that when the next one starts, it looks as if you "zoomed" into it or zoomed out of it.
Even if you are a complete beginner in video editing, you know that how you cut from one shot to another is very important for the viewer's eye, and sometimes, subtle (without any transitions) is better than everything else.
However, most modern content used for social media and entertainment requires flashiness and excitement to keep the viewer's attention. This is where the zoom transition that you can create in Adobe Premiere Pro, amongst other editing programs, shines the most.
The Zoom transition Premiere Pro effect is a versatile tool, and how it looks can vary based on the creator's (editor's) vision and goals for the project they're working on. If it's a more dynamic video, it can be quicker, for example.
Regarding the variables for the zoom transition effect, they are usually the amount of zoom that happens, almost always controlled by the "scale" component, and the speed at which all that happens, which is usually controlled by the keyframing done in the same "scale" component field.
If you using a zoom transitions pack with third-party effects built by someone else, you may find different parameters that allow for more detailed changes.
Additionally, the zoom transition is often accompanied by a sound effect, like a "whoosh" SFX or something similar based on the theme of the shot, the content shown, and the video project itself.
In the section below, you can find a few examples and use cases of the zoom transition effect.
Example Use Cases of Zoom Transitions
As mentioned earlier, the zoom transition is a versatile tool used in various scenarios. Here are some of the most popular examples.
Zooming into a Screen
One of the most common uses of the zoom transition is when the shot zooms into a TV or phone screen. Zooming into a mirror or a window is also frequently seen.
Fast-Paced Edits
Gaming edits or music videos often require flashy transitions, and the zoom transition is commonly found in such content. Rhythmical, consecutive zooms synced to the beat is one of the many examples video editors use to make the content more exciting.
Zooming into Something Already Shown Within the First Shot
Sometimes zoom transitions are used to "extend" the shot currently shown on the screen, but in a fancier and more engaging way. For example, you have a wider shot of a football stadium, and a closeup shot of the audience (which is also shown in the first, wider shot), a zoom transition can be used to "get the viewer closer" to the audience.
Or, a wide shot of a person standing, then a zoom transition into a closer shot of the same person, and then another zoom transition into a detailed shot of the person's eyes, as shown in this example here.
To Suggest a Change of Time
Zooming out or in of a shot can often suggest a change of time. It can be used to transition into a dream-like scene or into a shot showing something that happened in the past or future. This works especially well with an adequate sound effect and a change of screen color.
These types of edits are commonly found in travel videos.
How to Do a Zoom Transition in Adobe Premiere Pro
Zoom transitions are possible in almost every modern video editing software. Some offer whole, finished effects and presets, while others need you to manually create the transition yourself.
Here's how to do a zoom transition in Premiere Pro, step-by-step.
Step 1: Import Media, Create a Sequence, and Set the Clips in Order
Regardless of what software you'll be creating the transition effect in, you first need to import media as your first step.
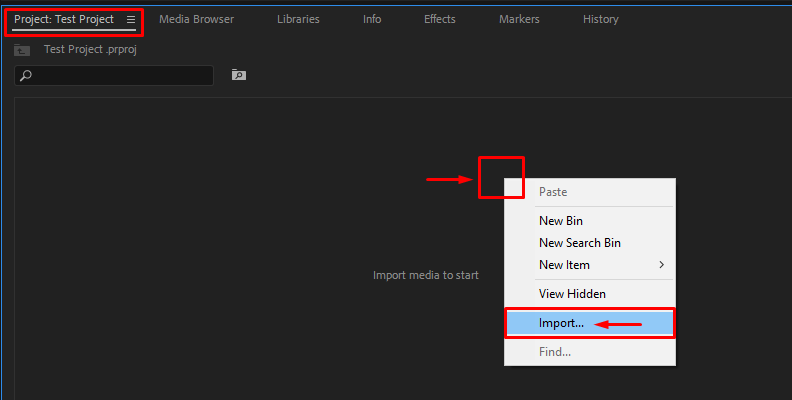
In Premiere Pro, the software we'll be using for this task, you can do this by clicking on the "Project" tab to open it, then right-clicking anywhere in the empty area in the project browser and choosing "Import" from the list of options that shows on your screen, as shown in the image below.
You will need at least two clips to create a transition.
Once you import two clips, you need to create a sequence. You can do this by dragging and dropping one or both of the clips in the timeline area.
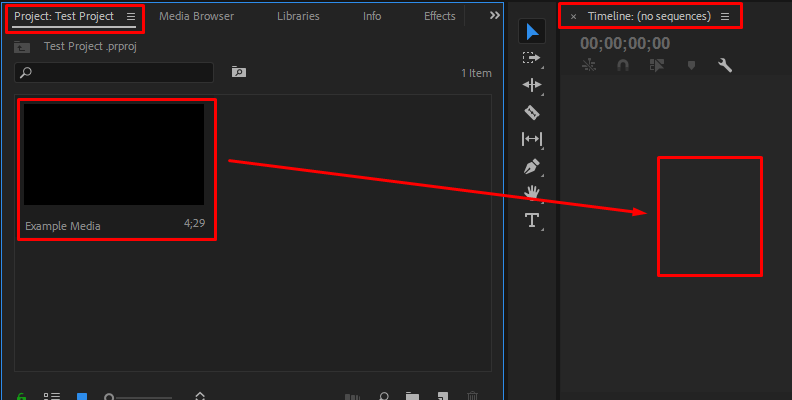
Once your sequence is created, you can now start working on the timeline.
Place the clips in order. The first clip is the one you'll be creating the transition on, and the second will be the one the viewer will see when the transition completes.

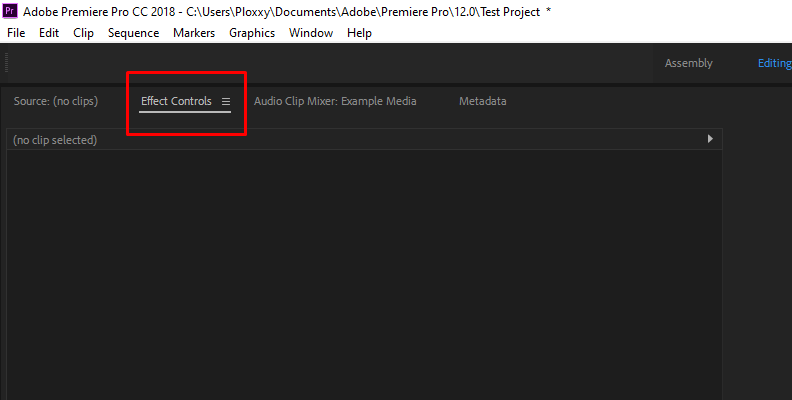
Step 2: Select the First Clip and Open the Effect Controls Panel
Once the clips are in order on your timeline, select the first clip, then head over to the "Effect Controls" panel by clicking it in the top-left corner of your screen.
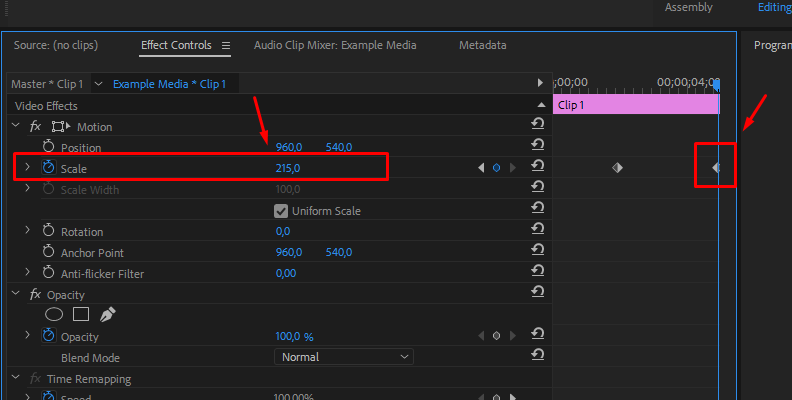
Step 3: Keyframe the "Scale" Component to Create the Zoom
Expand the "Motion" section to find the "Scale" component under it.
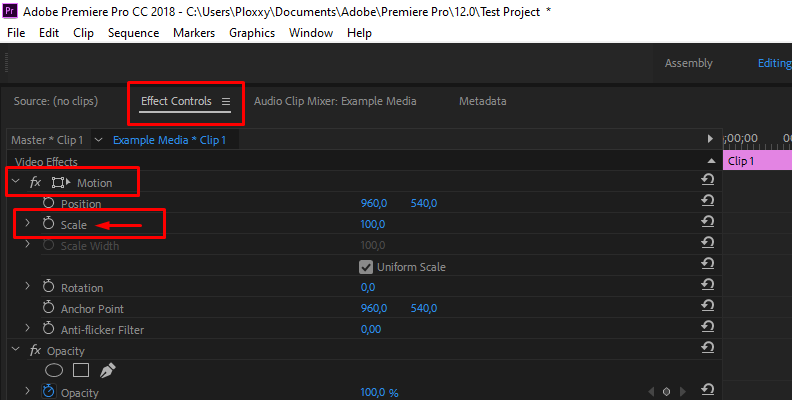
Move the playhead on the right to the point within the clip where you want the transition to start.

Once you're there, click on the "stopwatch" icon under the "Scale" component.

This will create a keyframe on the clip where your playhead is. This is the moment where your transition will start - your first edit point.
Now, move the playhead at the end of the clip and then adjust the value of the "Scale" component depending on how much you want the video to be "zoomed in" at the very end of its length. Adjusting the scale value will create another keyframe.
You already have your zoom effect, but you can do more to make it look better.
Step 4: Preview, Smooth out, and Adjust if Needed
Depending on your project, you may need a quicker or slower zoom, or perhaps a higher or lower value of zoom than what you've originally set. You can move the keyframes around or redo them with different values.
If you have only two keyframes, like in the example above, moving them closer together means the scale value will change quicker, and the zoom will happen faster. Spreading them apart means that the zoom effect will be "dragged out" across the whole clip, so it will be slower. Every next frame you create will give you the option to have a more controlled increase or decrease of a specific parameter.

A cool thing you can do to make the zoom look better is to right-click the first keyframe and choose "Ease Out" and right-click the second one and choose "Ease In". This will make your transition smoother.
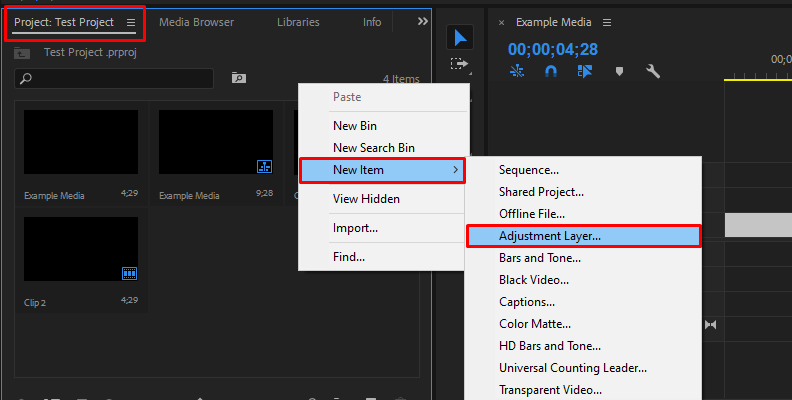
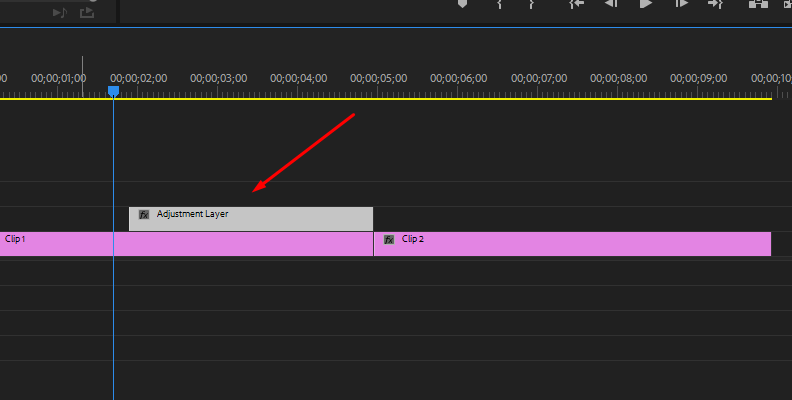
Another interesting thing you can do is create an adjustment layer and then drag it over the two clips on your timeline.
Then, you can go to the "Effects" tab and add a blur effect to the adjustment layer.

You can add any effects you want to adjustment layers, and even create a second adjustment layer, or more if needed, to add other effects without modifying your original clips and to only have those effects applied at specific moments.
Now, after adding the blur, your zoom transition will look better.
Feel free to experiment, change values, add different effects to your adjustment layers, and create the best zoom transitions that you can.
When satisfied, save and export. That's all there's to it!
Zoom Transition in Premiere Pro with Continuum
Everything is much quicker and easier to complete when using plug-ins. Continuum is a pack by Boris FX that you can download from the official website for free and try the various tools offered in it that will take your work to the next level.
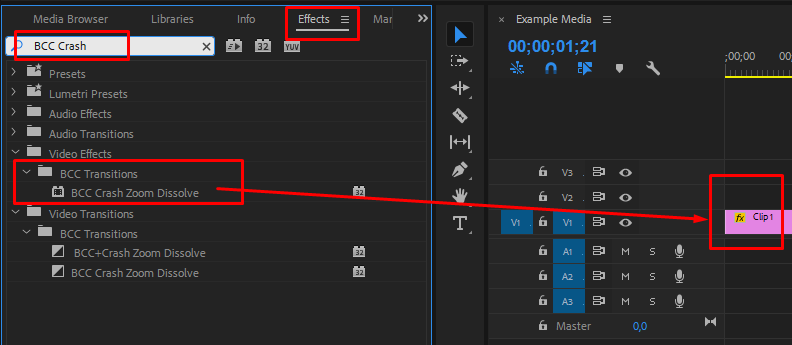
If you are wondering how much quicker and easier it is to add a professional-looking zoom transition effect in Premiere Pro using Continuum, just take a look at the images below.
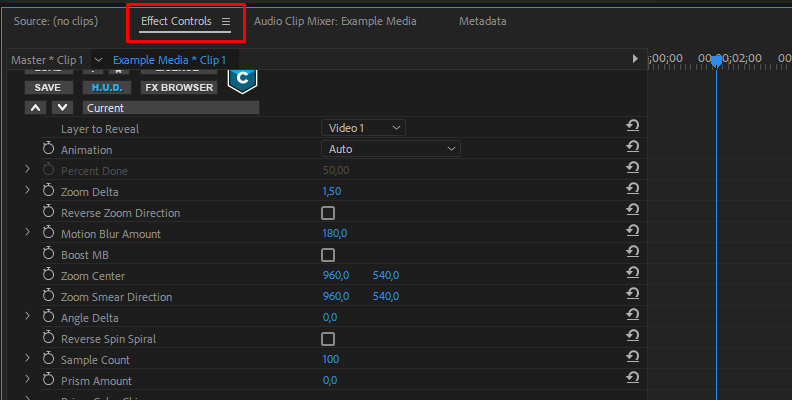
You simply look up the BCC Crash Zoom Dissolve effect from the myriad of effects offered in Continuum, then drag and drop it over your clip. That's all there's to it!
When you open the Effect Controls panel, you have tons of options to customize your transition according to your needs.
Feel free to take a look at the official BCC Crash Zoom Dissolve page for more information on every setting.
Final Words
Now you know more about zoom transitions, what they are, when they're used, and how to create one completely for free in Premiere Pro.
Hopefully, this information was useful to you and will help you take your work to a whole new level in the future.
Good luck!


