


Ever since smartphones became the most common piece of modern technology in everyone's pocket, we seem to be taking more photos than ever, whether for posting on social media or sharing everyday moments with our closest.
With that said, the more common taking photos becomes, the greater the need for making various edits. Whether applying a filter, doing a quick color grade, adding a sticker, or blurring the background, "retouching" a photo before posting or sending it is the go-to today.
Whether applying a filter, removing objects, adding a sticker, blurring the background, or grading to invert colors or enhance the atmosphere before posting, retouching in any form is almost a mandatory process today.
Out of all the options, in this guide, we'll focus specifically on blurring the background of a photo. There are multiple reasons to do this, and if you've ever had the need but didn't know how to do it, you've come to the right place.
Without further ado, here's how to blur the background of a photo and some of the reasons why you should.
What is Background Blur?
Before getting into the process of adding it, it's important to understand what background blur is and how it may benefit your image.
Unlike identity blurs, for example, that focus on hiding or "masking" someone's face, background blurs are broader and focus more on the elements that shouldn't be in focus.
Most often, this is "naturally" done by simply adjusting the depth of field while taking a photo, so the object or person in the front who is the main focus of our image will stand out from the rest of the elements or environment, and the background will be automatically blurred. However, when this isn't the case, you must digitally "retouch" the photo to make it so.
A background blur is caused by a shallow depth of field setting used while taking a photo or created digitally using photo editing tools, and it serves various purposes, both creative and technical.
At its core, it's just what the name suggests: a blurry background. However, in the section below, you will find out how it compliments an image and when you may benefit from adding it to your image.
Cases When You May Need to Blur the Background
So you likely already know when it is important to put an object or person in focus when taking a photo of them. Yet, when should the background be blurred?
Here are some situations.
When the Background Scenery/Environment is Not Ideal
Sometimes, you take a photo and love how you came up in it, wanting to post it on social media and share it with the public, but something's just not right. An unpleasant sight in the background that's just always there in your best photos, coming in different shapes and forms, like a stack of garbage bags you missed, an old crumbling building, or just a person rushing somewhere, and they appear blurred and smudgy in your shot.
No matter the reason, it often happens to have a less-than-ideal background or scenery when you or someone else takes a picture of you. If you want to use it, an easy solution would be to blur the background.
When You're Creating "Teaser" Material for Your Audience
Social media is more important than ever, and if you're someone creating content for your audience, a travel blogger, for example, having a blurred background in some of your posts is a good way to "prepare" your followers for an upcoming surprise.
In these cases, perhaps you want to create a post with a blurred background where your fans need to guess your location, or simply announce something while only revealing a bit of it as a teaser, like a brand new vehicle or real estate purchase.
When you Want to Achieve the "Dreamy" Look for Your Photo
Sometimes you just want a blurred background in your photo for the dreamy look that makes it look better overall and more professional. Most modern smartphones already have built-in tools, often called "portrait mode" or "focus mode" that you can simply toggle on and take a photo with it to get a dreamy look.
Of course, you can also do this digitally in post-production afterward, but if you can do it on the spot, it sure helps save a bit of time. The iPhone camera app, as well as the camera and photos app on most of the newer Android phones, already have options to take professional-looking photos under natural light in portrait mode to get that effect immediately without any further required editing.
To Improve Aesthetics and "Bokeh" in Your Photo
Blurs are simply aesthetic, and one of the oldest concepts in photography is "Bokeh" which translates to "Blur" in Japanese.
Bokeh refers to the quality of the out-of-focus, blurred segments in your image. The more quality it is done, the "better Bokeh" your image has.
Although this sounds simple at first, it's something you must practice a lot to master, as Bokeh is not simply adding a background blur, it's how the blur affects the image, the lightning, and the overall feel it induces within the viewer.
So, when you want to improve your Bokeh, or just overall aesthetics within your image, you can rely on modern editing tools, such as Optics, to adjust a few parameters and get the best results possible.
Since we've now mentioned Optics, let's take a look at how you can blur photo backgrounds using this renowned photo editing software.
How to Blur the Background of a Photo With Optics
Optics is a popular photo editing software from Boris FX that comes both in the form of a plug-in for Photoshop or as a standalone computer program.
You can download a free trial version of Optics to learn the software before deciding to purchase a license.
Once you have it downloaded and installed on your PC, follow these steps to blur the background of a photo with it.
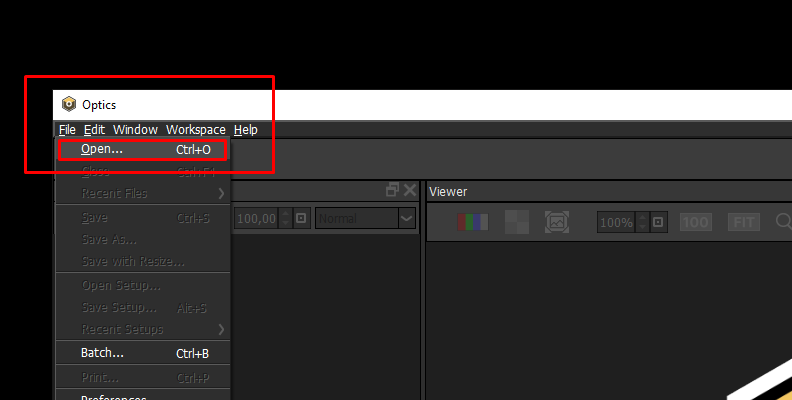
Step 1: Load Optics and Import Your Image
Open Optics on your PC, then click File -> Open and choose the image you wish to add for the photo background blur effect project.
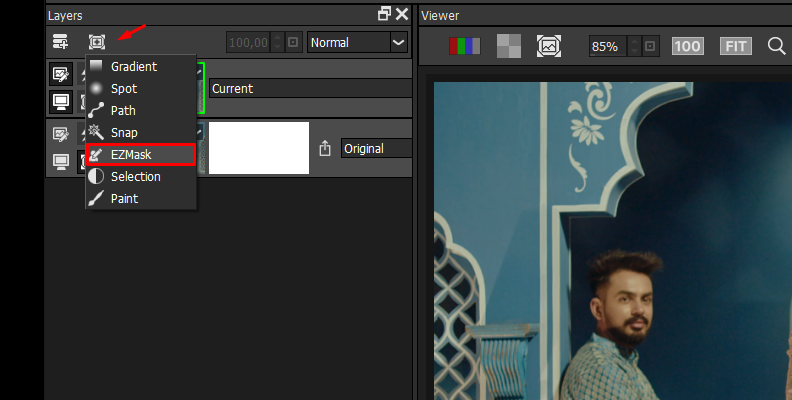
Step 2: Add a Mask and Start Using the "EZ Mask" Tool
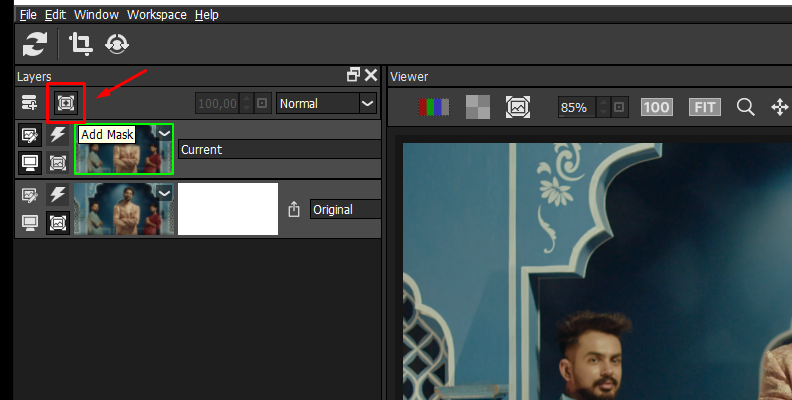
There's a tool in Optics called "EZ Mask" that makes masking very simple and convenient. To use it, click on the "Add Mask" icon, then choose "EZMask" from the list of options, as shown in the images below.
Upon selecting "EZMask" as your tool of choice, you will be able to draw on your layer using your left and right mouse buttons. The left mouse button will draw a green color, and the right will draw with red color.
The red area you draw will tell EZMask what you wish to keep outside of the mask, and everything within the green area is what you want to keep in the mask.
Note: If we were to apply a skin tone effect, for example, we would've masked our subject within the image with green and then made a red area around him to keep the rest of the background out and prevent it from being skin-toned as well. However, in this case, we want to mask out the person so they don't get blurred, so the colors are reversed. We're keeping the person out of the mask by drawing a red area around them.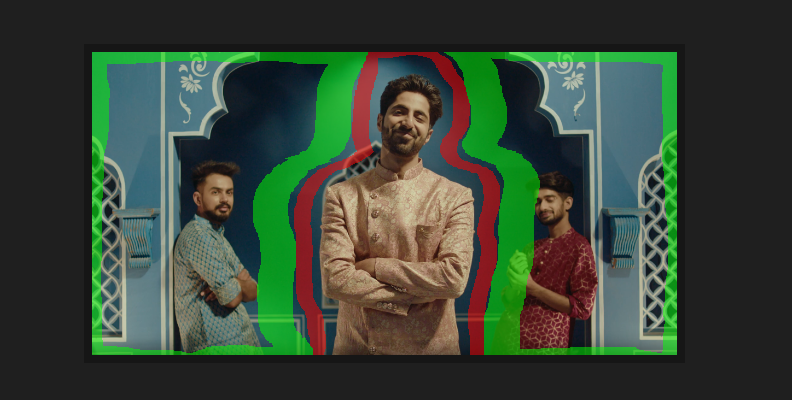 Note: For easier masking, you can hold the CTRL key on your keyboard and then click and drag anywhere on the screen to increase or decrease your brush size.
You don't have to be very precise when drawing with EZMask, and you can also make changes easily if you are not satisfied
Step 3: Generate the Mask
Once you're done drawing, you can click the "Generate Mask" button, and the software will process the information you gave it and create a mask.
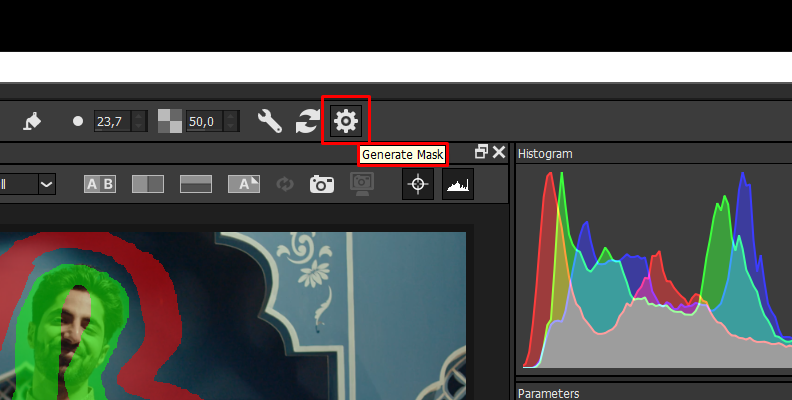
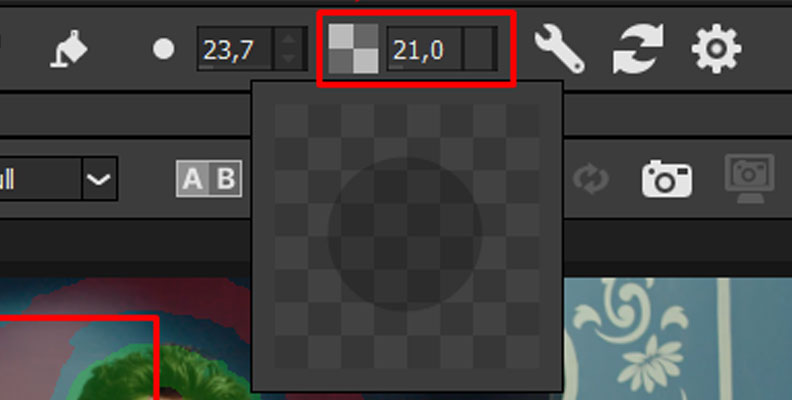
You can also use the option shown in the image below to reduce the opacity of your drawn lines so that you can see clearer.
Step 4: Apply the Effect
Using the search bar in Optics, look up the "Blur" effect (or any other you would like to add) and click on it.
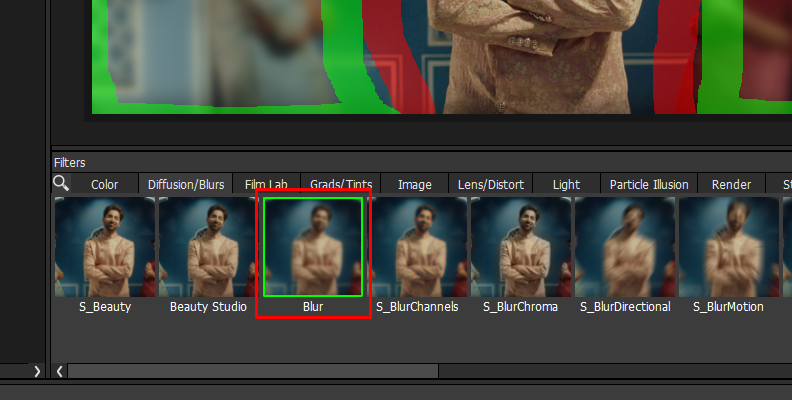
You will immediately notice that the background is blurred but your subject is not.
If you believe you can get better results by adjusting the mask, simply draw some more and then click the "Generate Mask" button again, and the mask will be adjusted in seconds.
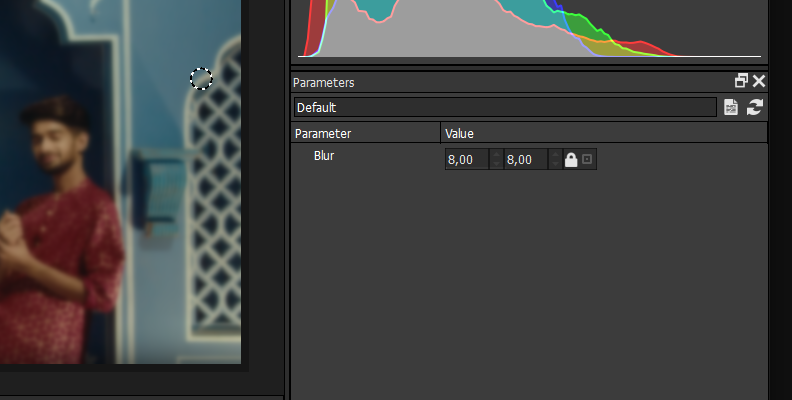
Step 5: Adjust Parameters and Preview Changes
The last step is to adjust the parameters of the effect you just added. If you want a more blurred background, you can increase the value of the blur parameter in the control panel on the right. This will depend on whether you want more blur to further "hide" some details in the background or just give more focus to your main subject and make them stand out more.
That's all there's to it!
Please note that these are just very basic and minor changes that we've made to the image, but it already made a huge difference.
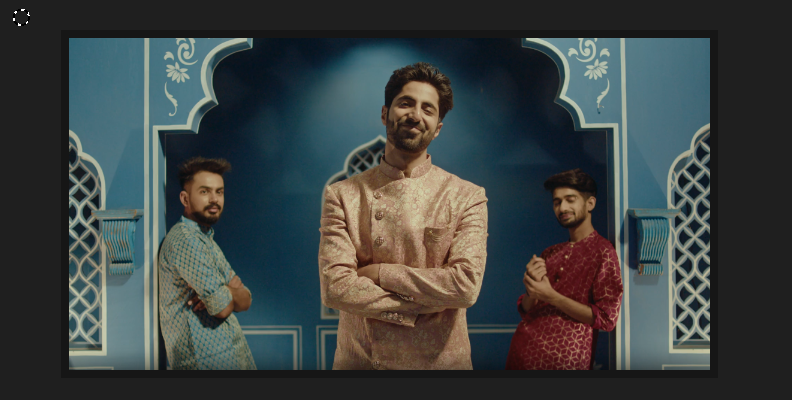
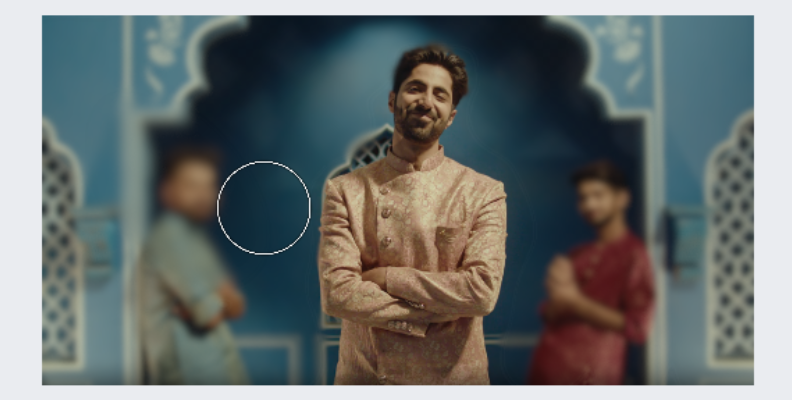
Here's how the image looked before
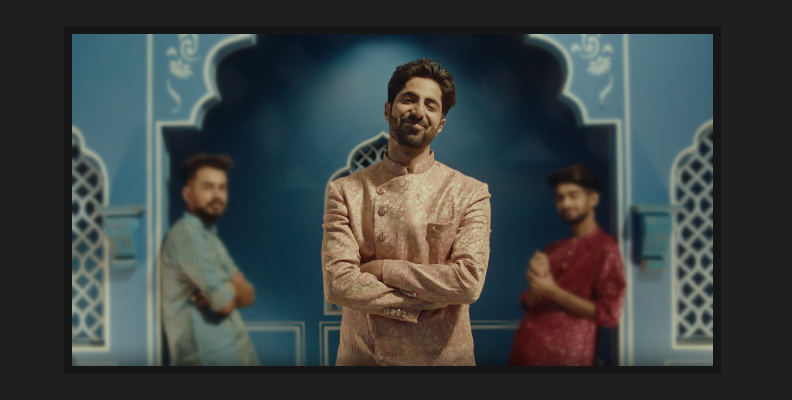
And here's how it looks after using the blur tool.
You can use this method to make more professional photos, easily blur any others you need to, or just add other effects for better aesthetics, such as a lens blur or anything else out of the many offered choices in Optics.
For a more extensive, detailed tutorial on EZ Masking in Optics, take a look at this informative video below.
And, for a detailed tutorial on retouching portrait photos in Optics like a pro, take a look at this recording.
Free Blur Background Tools
With the rise of AI, more and more free photo retouching and editing tools become available, including ones that help with the background blur task. These will be of great help if you've forgotten to switch the shutter button on your camera app and activate portrait mode for your capture.
You can get the same effect by doing a quick and simple upload and letting AI do the rest of the work using one of the apps listed in this section.
Magic Studio
Magic Studio is one of the easiest, free-to-use photo retouching and editing web apps that you can use to create a blurred background for your image.
It's AI-powered, so all you need to do is upload an image and let it do its work.
At first, upon uploading the image, the AI detected all humans within the photo and masked them out, then blurred the rest of the image.

However, we decided to tinker a little further and blur based on photo depth, so we switched to semi-manual mode and marked the subject ourselves.

After providing the points, the AI figured out what our main goal is, and then came up with this result.
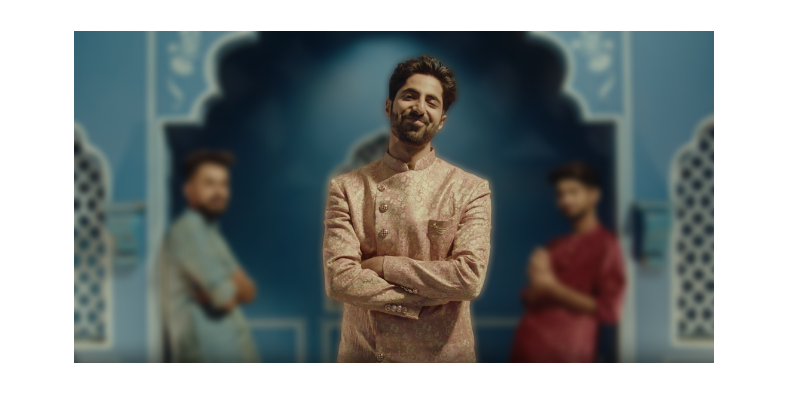
As you can see, it managed to only blur the background and our main subject in front is in focus.
Then, you can simply download the photo, and that's all there's to it!
Canva
Canva is very popular and already well-known to those who are into online image retouching and editing.
We decided to put it in the second spot as it didn't provide much automation like Magic Studio.
For those of you who prefer the manual approach though, it can be a good option. Here's what blurring a background with Canva looked like.
You upload the image and choose whether you want to add blur or remove blur. Then, you choose brush size and intensity and paint the picture.
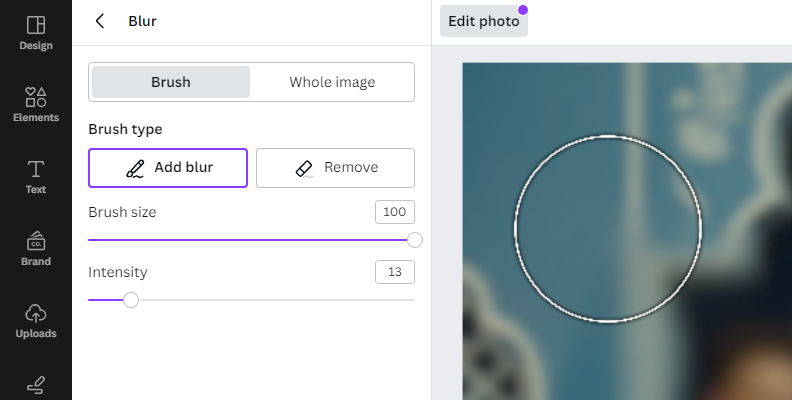
When done, the results are automatically generated.
It has almost the same results as Magic Studio, but it requires more manual work, which for some people is preferred, but for some, automation is better.
Final Words
That's all you need to know about blurring the background of a photo, why you would want to do it, as well as some of the best methods to choose when you need to complete this task.
Hopefully, this information will help you improve all your future work.
Thank you for reading and good luck!
FAQ
Can you blur background of a photo already taken?
Yes, you can blur the background of a photo that's already taken thanks to modern digital editing tools like Optics that make it quite easy. Otherwise, in the past, you would have to retake the photo with the desired depth of field adjustments.


