


Dealing with video noise is an inevitable challenge. The issue can be caused by various factors, such as shooting in low light or having a high ISO setting, and can also occur as a result of compression during the post-production process.
Luckily, most video editing software, including DaVinci Resolve, offers a noise reduction tool to help you smooth out and remove unwanted noise from your footage. DaVinci Resolve is an excellent choice for both beginners and professionals in the film industry, as it provides exceptional tools to eliminate noise in no time.
In this article, you'll learn how to reduce noise in DaVinci Resolve, regardless of whether you're using the free version or not. I'll also provide a step-by-step tutorial on how to remove noise using the professional third-party Boris FX plug-ins Sapphire and Continuum.
If you’re unsure as to how this type of noise looks like, or simply want to find out more about the nature of grain in videos and what causes it, I’d recommend you check one of our articles here.
Let’s dive in!
How to Remove Grain from Footage in DaVinci Resolve
I'll explain two methods to remove noise in DaVinci Resolve. The first technique makes use of the Motion Effects panel in the Color interface, which involves working with nodes. The second one involves applying an open FX noise reduction effect in DaVinci Resolve Studio.
Noise Reduction with Motion Effects
Step 1: Set up Your Timeline
Create a project and import the videos you want to remove noise from. Go to File > Import > Media, then drag the video footage from the Media Pool to the Timeline.
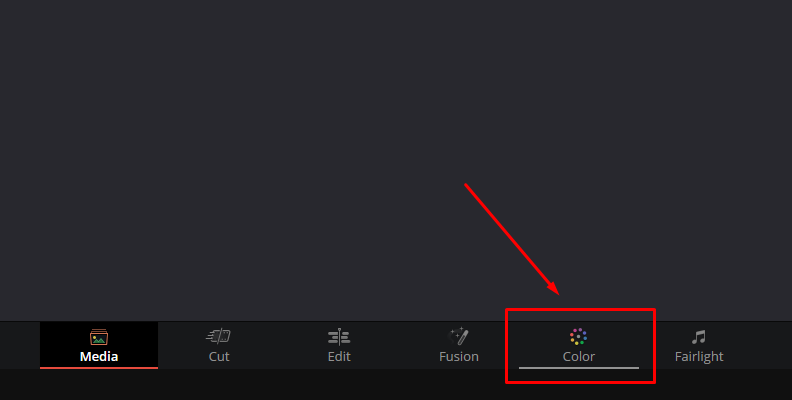
Step 2: Setting Up the Color Page
Switch to the color tab by choosing the color icon on the bottom menu. If you don't have this menu, go to Workspace and click on Show Page Navigation. Having the page navigation active will allow you to change from one page to the other easily.
![]()
You will see your video clip, the Nodes view, and color tools panels on the bottom screen on the Color page. If you don't see the nodes, click the Node button on the top right corner of the screen. You can toggle the Nodes view on and off as you need.
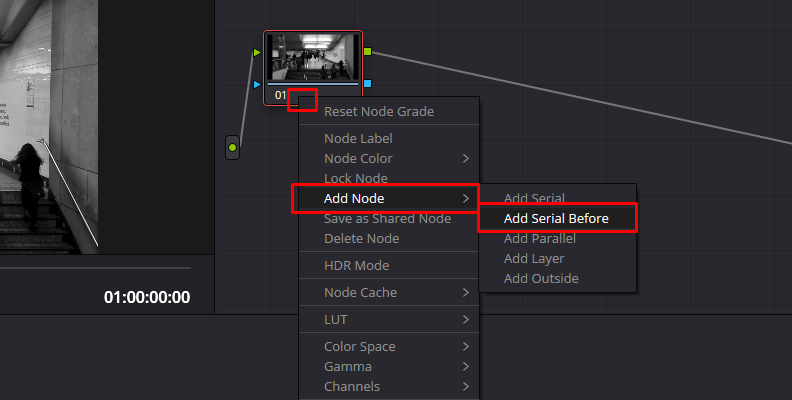
You only have one node with your original clip on it right now. Let's add a new node before the current one to apply noise reduction only to that node.
Right-click the node and select Add Node > Add Serial Before from the dropdown menu.
![]()
Creating a dedicated node will allow you to change the amount of noise reduction applied without affecting other effects or color grading tools.
Step 3: The Motion Effects Panel
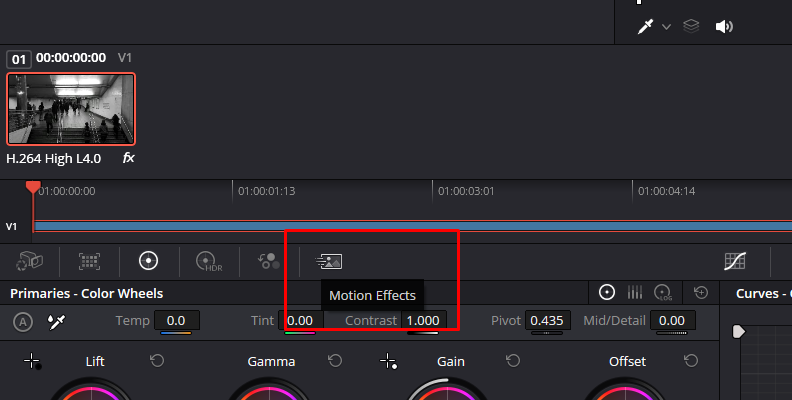
Select the first node (the one you just created) and search for the Motion Effects Panel on the Color page. If you can't find it, hover the mouse over each icon to show the panel's name, and look for Motion Effects.
The Motion Effects panel is divided into three sections under Motion Effects and a Keyframes section to the right. The temporal NR and Spatial NR tools provide specific purposes and reduce noise differently.
![]()
Step 4: Temporal Noise Reduction Tool
Temporal NR stands for Temporal Noise Reduction. This noise reduction tool analyzes and samples noise in the frame before and after the one you want to use Resolve's grain removal on, making it the best option when you have noise during a few frames in your video.
However, be careful when applying temporal noise reduction because it can cause your image to lose detail and affect the subsequent frames in the video.
Here are the settings you can adjust under Temporal noise reduction.
Frames: A range of 0 to 5 frames to tell DaVinci Resolve to analyze noise.
Motion Estimation Type: Choose between Faster, Better, or None to allow DaVinci Resolve to detect motion in your video footage. Better is more accurate but will take longer and consume more CPU.
Motion Range: Determines the amount of movement present in your video.
Temporal Threshold: Sets the amount of temporal noise reduction applied to the luminance and chroma section of the image.
Step 5: Spatial Noise Reduction Tool
Spatial noise reduction analyzes noise in the same frame, focusing more on chroma noise pixel by pixel. If your image is full of specks of colors in noisy zones, spatial noise reduction is your tool. You can create a new node for spatial noise reduction if you need to change things without affecting the other.
The settings under Spatial noise reduction are as follows.
Mode: Choose between Faster, Better, or Enhanced to change the algorithm used by DaVinci Resolve to analyze noise. Bear in mind that Better and Enhanced options are CPU-heavy processes.
Radius: Selects the radius where you want to apply spatial noise reduction.
Spatial Threshold: Set how much spatial noise reduction to apply to your video. If you keep seeing color specks, unlink the chroma and luma settings and adjust only chroma.
Step 6: Sharpen Your Video Footage
The way noise reduction works is by adding artificial blur to the image, but that can turn into a very smudgy video. Let's add a sharpening tool to bring back image detail to your video. Right-click the node where you apply noise reduction and select Add Node > Add Serial. The new node will be after the noise reduction node.
Select the Blur panel (the icon with a drop and a triangle). In the Blur panel, select the triangle to switch to the Sharpen tab. The panel should read Blur-Sharpen now. Lower the radius slider slightly until you see your image recovering detail.
Step 7: Finalizing the Video
Preview the video to see if all noise has been reduced. You can return to the noise reduction node to make changes and preview again. Once you’re happy with the result, render the video free from unwanted noise.
Noise Reduction with DaVinci Resolve Studio
Step 1: Apply Noise Reduction Open FX
Ensure you have your video in the Timeline and go to the Edit page (Shift + 4). Open the effects library by clicking on the magic wand icon on the top left corner of DaVinci Resolve. Select Open FX and scroll down until you find the Resolve FX Revival category. There, you should see the Noise Reduction effect. To apply the effect by dragging and dropping the effect into the video clip.
Step 2: Noise Reduction Settings
Open the Inspector on the top right corner of the Workspace and select the Effects tab. If you have worked with the Motion Effects tool before, you'll notice you have the same parameters here. Use the Temporal Noise Reduction settings if your noise is present over different frames on your video and Spatial NR for noise and color noise in the same frame.
Step 3: Resolve FX Sharpen
To bring back some sharpness to your video, you can apply any sharpening effect you like. You'll see the Resolve FX Sharpen when you scroll down in your effects library below Noise Reduction. Drag and drop Sharpen to the clip and adjust its settings on the Inspector. Adjust the sharpened amount and detail levels.
How to Remove Grain with Boris FX Plug-Ins
Boris FX offers powerful and professional tools which can help you to fix grainy photos or videos. Here, I'll explain two options, depending on which Boris FX plug-ins you own. One of the highlights of Boris FX plug-ins is that they come with presets, so you won't need to spend time making adjustments to your effect unless you want to
Noise Reduction with Sapphire
Step 1. Apply GrainRemove
With your video on the Timeline, go to the Edit page and display the Effects Library.
![]()
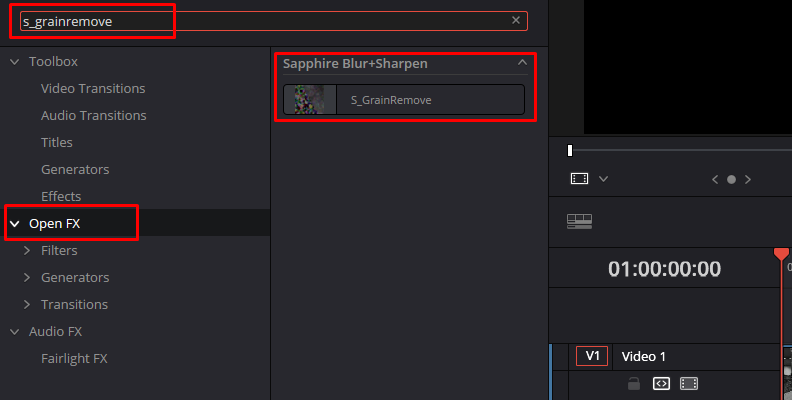
Search for the Sapphire Blur+Sharpen category under Open FX and search for S_GrainRemove.
![]()
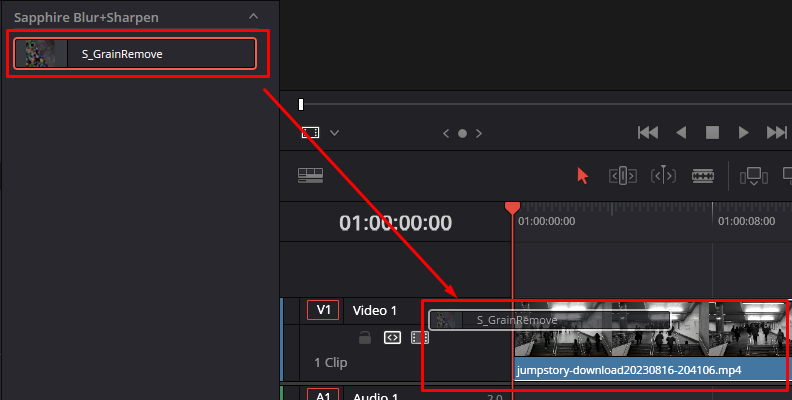
Drag it to the clip with noise to apply it. You'll notice the effect working as soon as you drop it on the clip, but let's look at the Inspector to find out more about S_GrainRemove.
![]()
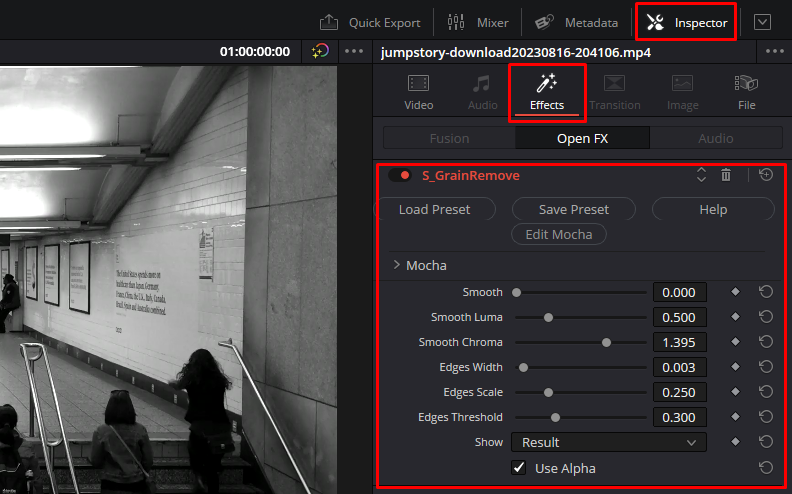
Step 2. GrainRemove Settings
Open the Inspector and click on the effects tab to see the GrainRemove parameters. The settings in Sapphire's GrainRemove are very straightforward. You can adjust the luma, chroma, and general smoothness and adjust the edges.
![]()
Step 3. Finalize Video
Preview your video footage and render it once you’re happy with the result.
Noise Reduction with Continuum
While Sapphire's GrainRemove offers a quicker solution, Continuum Noise Reduction tools provide a more comprehensive visual palette with more presets available.
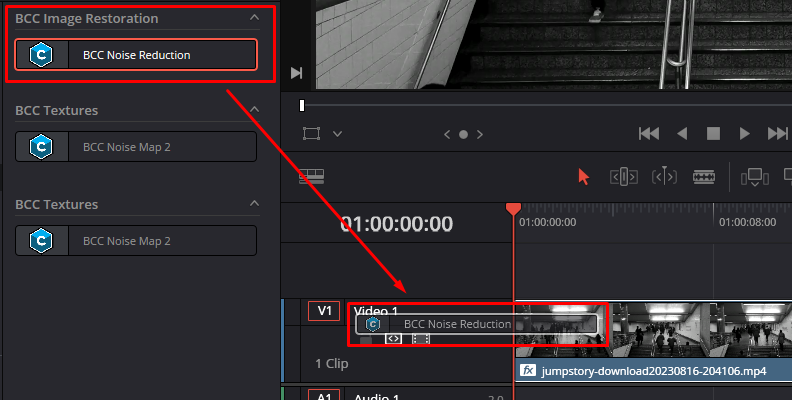
Step 1. Apply BCC Noise Reduction
Open the Effects Library and search for the BCC Image Restoration category under Open FX (you can use the search box and type noise reduction.) Drag the effect to your video clip to reduce noise.
![]()
Step 2. Exploring BCC Noise Reduction
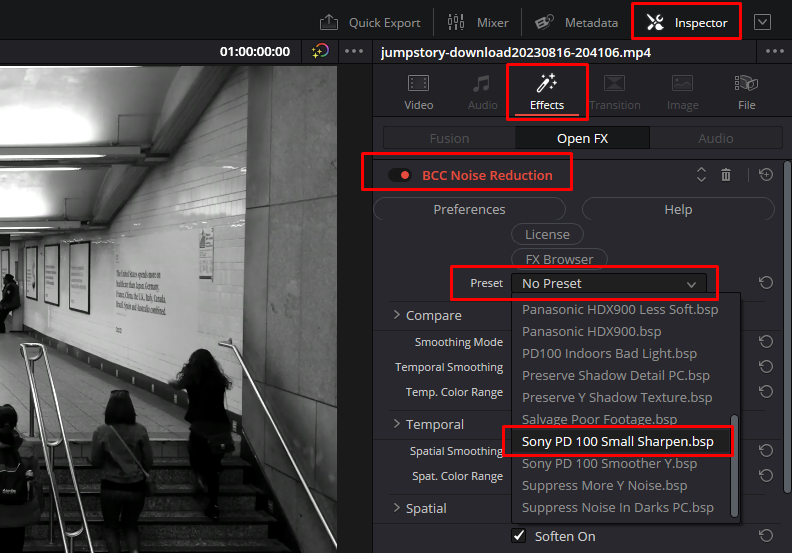
Now I’ll show you why BCC Noise Reduction is one of the best plug-ins for noise reduction. Go to the Inspector> Effects to display the parameters. Start by selecting a preset if you have a particular camera or frame to correct.
![]()
- Activate the compare mode to preview the effect in real-time side by side.
- Choose a smoothing mode: Temporal-Spatial, Spatial, or Temporal only. Temporal Noise Reduction and Spatial Noise Reduction work like the Motion Effects panel in DaVinci Resolve. Temporal Noise Reduction analyzes noise frame by frame and Spatial Noise Reduction pixel by pixel in an image.
- Adjust smoothing and color range for your smoothing mode.
- Enable Sharpen to add detail to your video footage that might have been blurred due to noise reduction.
Step 3. Render Video
Preview your video to ensure that noise reduction blends well across the entire footage and render once you’re satisfied with the noise reduction applied.
Final Words
Whether you're a beginner or a professional in the film industry, you can easily tackle video noise with DaVinci Resolve's built-in noise reduction tool or other powerful plugins like Boris FX Sapphire and Continuum. With these tools, you can restore your footage quickly or customize your approach to get the perfect result.
Good luck!


