


Posting quality pictures and videos on your YouTube channel, TikTok, or Facebook and Instagram profiles is important, as it speaks about your attention to detail and the effort you've put into creating the content.
Unfortunately, not all videos we want to upload are top-notch quality, whether because they were captured a while ago or because we didn't have the right equipment available at the right time.
Luckily, as technology advances, especially with the rise of AI UpScaling, more and more options are available to enhance photos and videos, improve their resolution, and make them look modern and professional.
In this guide, we'll focus on explaining how to convert videos from SD quality to HD, the difference between sd and hd, and more. Since we have a lot to cover, let's get straight into it.
What is SD Compared to HD?
Before we get into the process of converting lower-quality material into HD videos, it's important to address the basics and understand them at their core so that the rest of the process is easier to digest.
First, the "SD" term stands for "standard definition" and is used to describe content with resolution at 480p or lower.
On the other hand, "HD" stands for "high definition" and is used to describe content that's at least 720p or higher.
Now, even though this guide is centered more around SD to HD, it's important to address the other two popular formats since they're everywhere today, FHD and UHD.
FHD stands for "Full HD", and it refers to content that's at least 1080p, while UHD stands for "Ultra-High Definition" also known as "2K" and stands for content that's at least 2160p.
As technology keeps progressing, we start seeing more of 4K and 8K too.
When comparing SD to HD, there is a very noticeable visual difference. Material recorded in HD video resolution will look "crisper" and more detailed than "SD" videos.
So, if you want to improve video quality using video converter tools and turn SD material into something with HD quality, take a look at the section below, where we cover the process step-by-step and show you everything you need to know to complete this task flawlessly.
How to Convert SD Video to HD with BCC UpRez
There are many HD video converter options available out there. Some you must pay for, others are free to use but have limited customization options.
For this task, we'll rely on BCC UpRez, a tool you can use as an SD to HD converter in your favorite and already familiar working environment.
There are many advantages to BCC UpRez when compared to other HD video converters, the main one being its compatibility with the world's most popular video editing programs, like Adobe Premiere Pro, Magix VEGAS Pro, Apple Final Cut Pro, Avid, Adobe After Effects, and others.
Besides, BCC UpRez is part of the renowned Boris FX Continuum pack that you can try for free by downloading a free trial version from the official website.

So, without further ado, here's how to upscale SD videos into an HD format using BCC UpRez.
Step 1: Import Video in Premiere Pro and Create a Sequence
Your first step would be to import the video material you want to upscale into your software of choice, in this case, Adobe Premiere Pro.
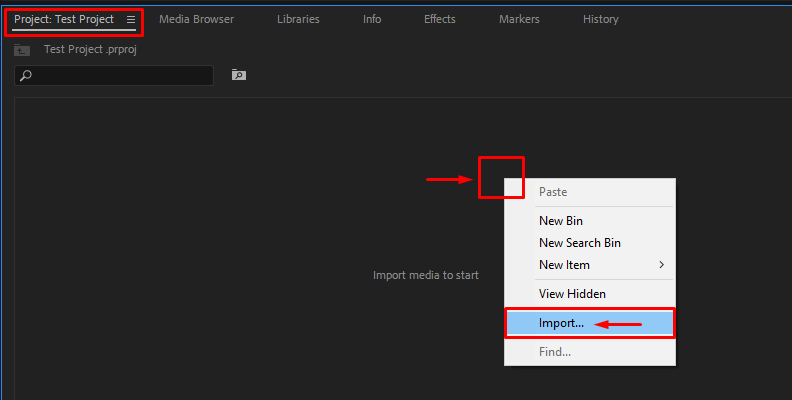
Feel free to use the "drag and drop" method, as that one is the easiest, or simply open the "Project" section, right-click the empty area, and choose "Import" as shown in the image below.
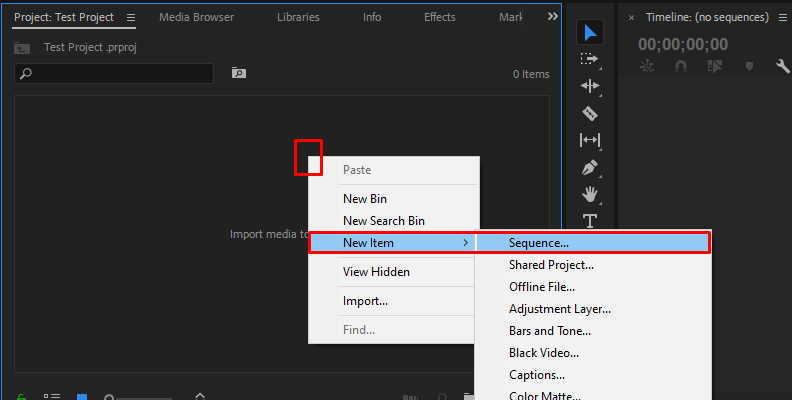
Now, you need to create a sequence (a timeline to work on) within Premiere Pro.
Right-click anywhere on an empty area within the "Project" tab to bring up the list of options on your screen, and from there, choose "New Item" -> "Sequence".
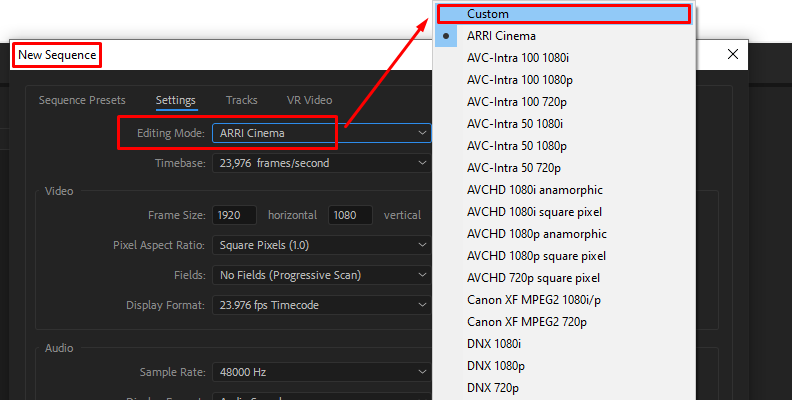
In the "Settings" tab within the "New Sequence" panel that opens, change the editing mode to "Custom" and type in your custom resolution of choice.
Next, ensure the aspect ratio of the clip you're going to upscale is the same as your sequence's aspect ratio.
To do this, head back to the "Project" tab again by simply clicking on it.
Then right-click the clip that's within and choose "Modify" -> "Interpret Footage".
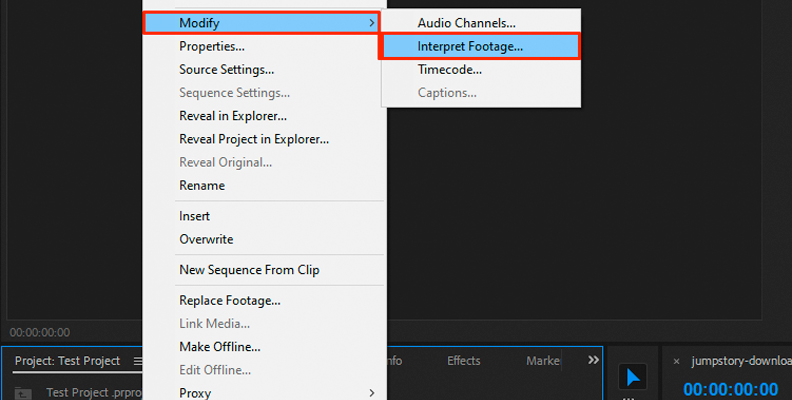
A panel will show up on your screen, in which you need to find the "Pixel Aspect Ratio" field and input the same values to match the aspect ratio with the one the sequence has.
To finalize the procedure, click on the OK button.
Step 2: Create a Black Video Slug
Now, you're required to create a black video slug. In Premiere Pro, this is a simple task to accomplish.
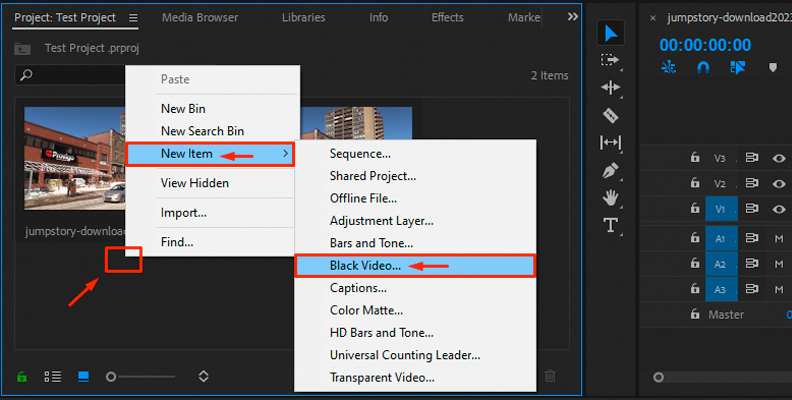
Right-click anywhere on an empty area within the "Project" tab like you did while importing media, and "hover" with your cursor over the "New Item" option. Click on "Black Video" from the list of available choices.
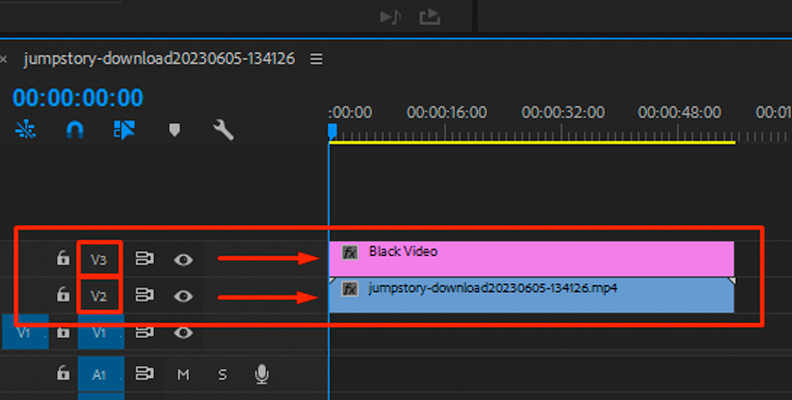
The next step is slightly tricky but the image below shows what you need to do clearly. Place the black video slug that you just created onto the V3 video track and the original clip, the one we're upscaling, on the V2 video track.
Step 3: Apply the UpRez Filter
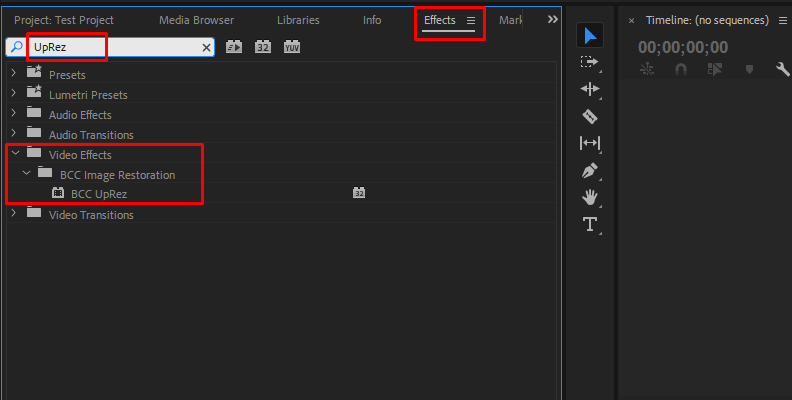
Open the "Effects" section and use the search bar to look up the "UpRez" effect.
When you find the UpRez video effect (it will be within the "BCC Image Restoration" folder, under the "Video Effects" category as shown in the image below) drag it over the black video (not your original clip).
Click on the black video with the effect applied and open the "Effect Controls" panel in the top-left corner of your screen.
In the Effect Controls panel, set the value of the "Source Layer" option to Video 2.
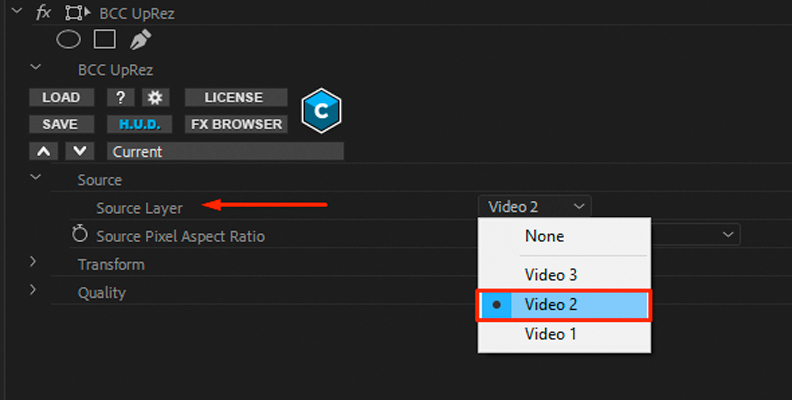
Under the "Source Layer" setting you'll see the "Source Pixel Aspect Ratio" feature. Next to it is an expandable dropdown menu. Open it, then choose a setting that matches the aspect ratio of the clip you imported for upscaling.
In the "Transform" category, set the "Frame Size" option to "Layer Size".
Step 4: Adjust Desired Quality Settings
The last thing you need to do is open the "Quality" section and choose the settings you'd prefer to use for your specific task.
A recommended starting point is to set the "Method" to "Magic Sharp" and the value of the "Sharpness" parameter to 25. Then adjust from there, depending on the results that you'll preview.
Render, save, and export the material when satisfied with the results.
That's all.
3 Best SD to HD Converters
When it comes to video converters, many users favor one product more over others if it's easy to use. But, customization and details are also important when looking to get the best out of your converted HD videos.
Our list of choices offers three different products, all with their pros and cons that may be suitable for the various needs of users.
BCC UpRez
Boris FX's Continuum pack and the BCC UpRez tool are on this list for a few good reasons.

Primarily, there's a free version available for the entire creator's pack which offers a lot more than just a video upscaling tool. The content will be watermarked until you purchase a license, but you can try out many different things before deciding if you want to pay for it.
Next, you can use it in your video editing software of choice, meaning you won't have to spend any time learning a whole new working environment.
As for those interested in the more technical details, the BCC Uprez tool will provide the most customizability and in-depth adjustments compared to other upscalers, meaning you can get the best results and make the important changes that suit your project best.
Last but not least, there are many informative guides and videos out there regarding Boris FX products. This means that if you're ever "stuck" on a specific task, you can easily find out how to properly finish it with a quick and easy Google search.
For starters, here's a helpful video showing the BCC Uprez tool in action.
Also, take a look at the official BCC Uprez info page where you can read about every setting in detail and what it does.
AVCLabs Video Enhancer AI
This is one of the most popular choices on the market. The AVCLabs Video Enhancer uses AI to upscale your video(s) from SD to HD, from HD to FHD and UHD, and 4K to 8K.

When it comes to quality, the converted HD video you'll get using the AVCLabs Video Enhancer AI tool will be clean and free of artifacts, and you'll even have the choice to enhance the image even further using features such as face refinement, unblur, and more.
You can also colorize or color correct your material using this tool, but as a "downside" for such a wide availability of options and top-quality enhancement, you'll have to buy a license for the product.
The price is $119.95 for a full year.
Accessibility-wise, it's also not the easiest tool to start using, as you'll have to download and install it as software on your PC. There are also recommended system requirements that are slightly above what the average "light work" laptop or desktop office PC would have.
All in all, a great tool, no doubt, but the amazing, quality results come with a few "obstacles" along the way.
Fotor Video Enhancer
Fotor is a website known to those who often tinker with images and videos. They already have a popular product that's amongst some of the best AI image upscalers, but they also offer a quality video-enhancing service that you can use to improve the quality of your videos with solid results.

Fotor is very easy to use. Compared to the second product on our list, the AVCLabs Video Enhancer AI tool, to start using Fotor's enhancer, all you need to do is access their website and upload files using a user-friendly UI.
Once you upload a video, you "tick' a few boxes and wait for the process to complete.
The tool also offers to automatically adjust your brightness, contrast, and saturation, which is a great added bonus.
Overall, Fotor is a great website for various image and video editing tasks that you need to do on the fly.
Final Words
That's all there is to know about converting a video from SD to HD quality. Hopefully, this information will help you improve your work in the near future.
Thank you for reading and good luck!
FAQ
This section contains some of the most commonly asked questions about converting video material, increasing output video quality and resolution, going from SD to HD resolution, and more.
Does upscaling SD to HD improve video quality?
Yes, upscaling from SD to HD will improve video quality. You can even try to upgrade from SD to something like FHD or UHD, but the results may contain some anomalies as that's less realistic compared to a smaller "jump" like from SD to HD.
What is the best option SD or HD?
HD will be superior to SD in every aspect, and there is no reason to have a video in SD if you have the option to have it in HD. The only "downside" may be the larger file size of the HD video, but that's rarely an issue with modern storage devices that go into terabytes easily.
Can you upscale SD video in low quality to HD video?
You can upscale an SD video that's low in quality into an HD video with higher quality using the method shown in this guide. There are multiple ways to convert video material from SD to HD, including with AI upscaling.


