Gone are the days when removing unwanted objects from your photos was a tedious task. Thanks to recent advancements in technology, developers have created apps that use artificial intelligence (AI) to remove objects from your mobile phone and tablet photos. This means that you can now take a picture and share it on social media without worrying about any imperfections or random people photo-bombing your shot!
In this article, I will introduce you to the seven best apps that can remove unwanted objects from your photos in a matter of seconds without requiring any photo retouch. I will also teach you how to use two powerful desktop tools to remove people or unwanted objects from your photos more professionally.
Let’s dive in!
7 Best Apps to Remove Objects for iPhone & Android in 2024
PhotoDirector
PhotoDirector, available for iOS and Android, is a free AI-powered app that allows you to remove unwanted objects and backgrounds with a few taps and edit your photos with a wide range of tools and filters to create the perfect shot.
The PhotoDirector remove objects tool is intuitive and easy to use. Just upload your photo and draw on the objects you want to remove. PhotoDirector AI will identify the selection and decide what to remove, even small details like hair. Not only will it automatically remove objects, but its AI technology will use pixels from the surroundings of the selection to fill the background seamlessly.
Download:
Pros:
Easy to use.
All-in-one app.
Free to download and try.
Cons:
Remove object function is limited to one per day in the free version.
TouchRetouch
Android and iOS users can download TouchRetouch, which includes four advanced editing and removal tools that quickly remove objects from photos: object removal, line removal, mesh detection and removal, and pixel-to-pixel cloning. However, though the app is free to download, you have limitations unless you upgrade to a subscription or pay for each photo editing item.
To remove objects, upload your photo and select what type of removal you require. Whether you need to remove blemishes, mesh, power lines, or watermarks, TouchRetouch offers easy-to-use tools in a clean interface.
Download:
Pros:
Dedicated and advanced removal tools.
Remove objects from 360º photos.
Export files in JPEG, PNG, or TIFF files.
Cons:
In-app purchases for essential tools.
Not an all-in-one app.
YouCam Perfect

YouCam Perfect is your best option for editing your selfies. It features editing tools, beauty filters, face retouching, and object removal, the last only available in the Premium version.
Its remove object tool uses AI to remove objects and backgrounds instantly, cut out the photo's subject, and fill it with a clean background. YouCam Perfect allows you to preview the original version of the photo to compare the before and after, which comes in handy to ensure a smooth edit.
Download:
Pros:
Targeted for selfies.
Easy to use.
You can save your photos to your cloud services.
It offers a seven-day free trial.
Cons:
Limited object removal tools.
Ads.
Snapseed

Developed by Google, Snapseed is a free, all-in-one, comprehensive, and professional photo editing app. Among the featured tools, the Healing tool will help you remove unwanted objects and persons from your photos.
To remove objects with Snapseed, select the Healing tool and draw with your finger over the unwanted object. It will automatically be removed using AI technology. Snapseed might not be as precise and advanced as other photo editing apps on this list, but it’s more than enough for quickly deleting small objects, and it’s free with no hidden purchases or subscriptions.
Download:
Pros:
Free app.
Opens JPG and RAW files
The amount of editing tools.
Best for basic editing.
Cons:
The Healing tool does not work well with complex and large objects.
Picsart AI
Picsart AI is a video and photo editor targeted to content creators. It includes a suite of AI-powered editing tools, including easy object and background removal for social media posts, design, and product shots.
Picsart’s removal tool works similarly to others in the list: just paint the unwanted object and let Picsart AI do the rest. You’ll need a Gold subscription to export the result, but you can try it for seven days, plus the top feature and ad-free experience.
Download:
Pros:
Great for content creation tools.
It includes both video and photo editors in one app.
Free trial.
Cons:
Object removal is only available in the subscription.
Adobe Photoshop Express
The portable version of Photoshop is a mobile editing app for those familiar with Adobe's big desktop app. You’ll need an Adobe account to sign in or create a new one, but you won’t need a subscription to use the remove object functions. However, with a subscription, you get more precise editing controls.
Remove blemishes and imperfections with the Healing tool, which you can use to remove small unwanted objects. Just paint the object, and Photoshop Express will remove it. Adobe Photoshop Express is excellent for existing Adobe users to edit photos quickly on the go.
Download:
Pros:
Edit raw files.
All-in-one photo editing app.
Easy to use.
Cons:
Limited removal with healing tool.
PhotoEraser

Photo Eraser is an intuitive and beginner-friendly app that uses AI-powered technology to remove objects and blemishes. Its user interface is the simplest among the rest of the apps in the list and sometimes can be laggy, but it offers a quick and straightforward solution in the palm of your hand.
Removing objects with Photo Eraser is as simple as selecting the lasso or free-hand tool and painting the object. It features a lines detection tool to remove cables and power lines for pictures outdoors.
Download:
Pros:
Free app.
Easy to use.
Simple user interface.
Cons:
High-quality exports are only available in Premium.
Sometimes, the app is slow.
Remove Objects with Boris FX Continuum
Boris FX plug-ins are professional and advanced editing tools for video and photos. The following tutorial will show you how to remove objects from photos with Boris FX Continuum.
Step 1: Apply the BCC Remover Effect
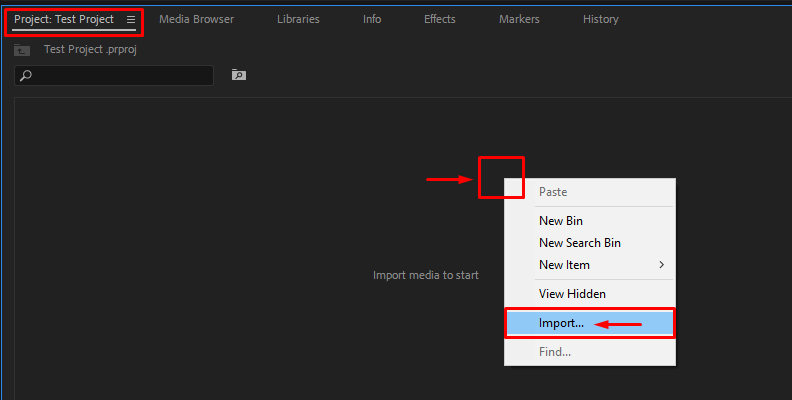
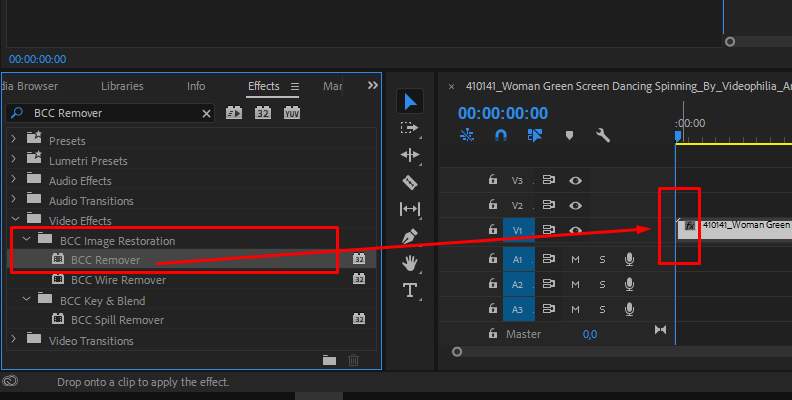
Import your media into your photo or video editing software and search for the BCC Remover effect. Drag it to the clip with the photo and open the effects settings.
Step 2: Setting the BCC Remover
BCC Remover offers different Removal Methods. By default, you have the Clone Spot method, which works like any other cloning tool. Move the Source circle to an area to sample and the Destination Center to the object you want to remove. Adjust radius, feather, scale, opacity, and color, among other settings, to make a clean removal.
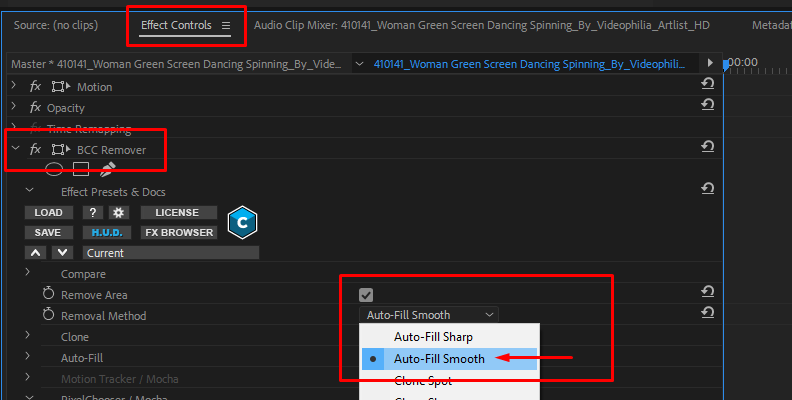
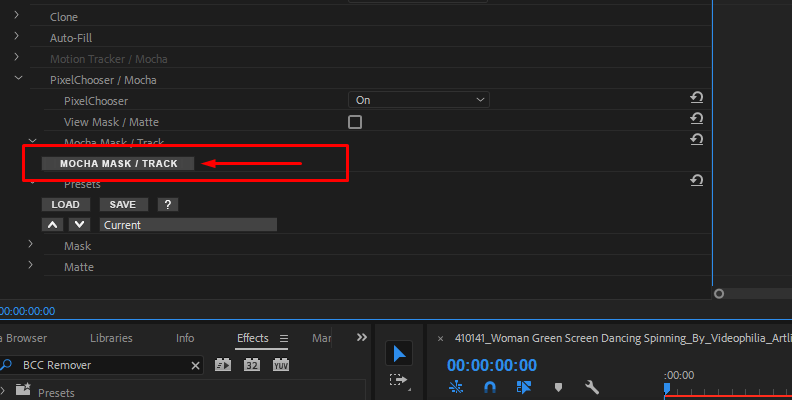
The other method I like using is the Auto-Fill Smooth. To use this method, you must enable pixel chooser and click on Launch Mocha Mask.
Step 3: Create a Mask in Mocha
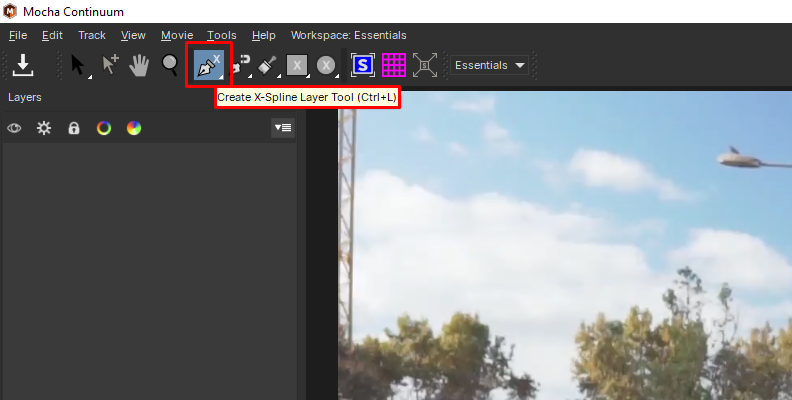
Select a spline tool and create a mask around the object to remove. You can add more masks to the same layer with the "Add X-Spline to Layer" tool. Click Save and close Mocha.
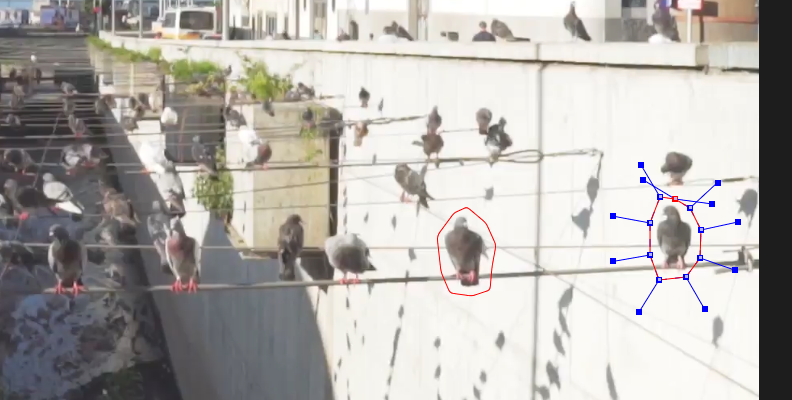
Step 4: Final Touches
Adjust the search radius under Auto-Fill and the Mask settings to feather the edges. You can add other effects such as Blur and use Mocha Mask to create a shape and apply it only to the area where the object was removed to get a polished image.
Use Photoshop to Remove Objects
Photoshop is still one of the best photo editing tools, and professionals and advanced users who like to have more control over their edits should choose it over mobile apps. But did you know Photoshop has a feature that allows users of any level to effortlessly remove unwanted objects with a few clicks? I’ll show you a quick way to remove objects from photos using Photoshop’s Content-Aware Fill tool.
Step 1: Import Your Photo
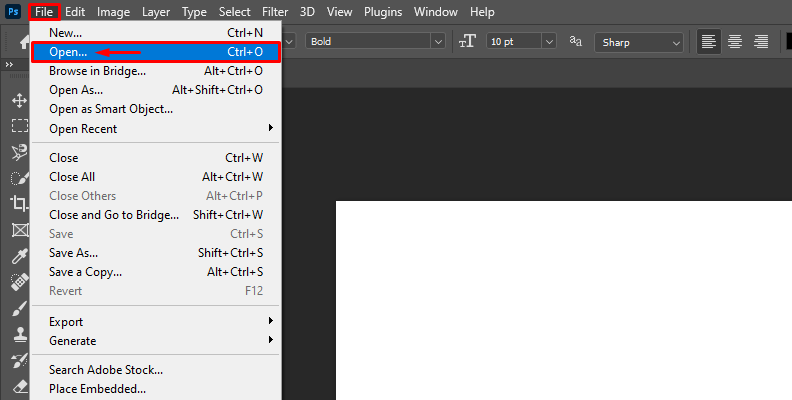
Open your photo with unwanted objects or people to remove in Photoshop. This method works best with photos when the object is not cramped with other elements and a clean background. However, there are ways to adjust to complex backgrounds that I will explain later on.
Step 2: Select the Unwanted Objects
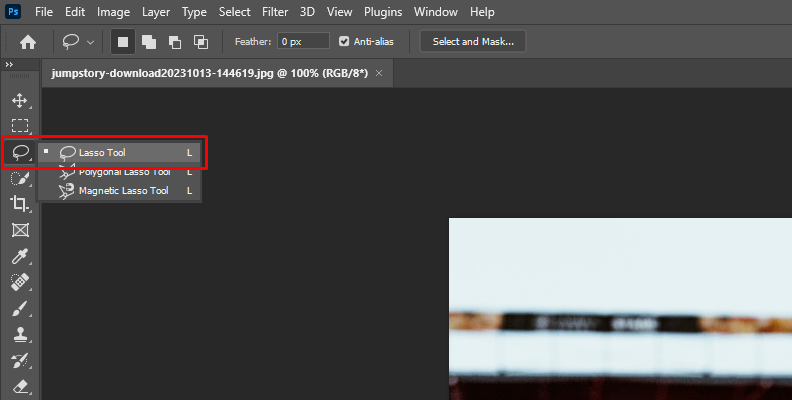
Use the selection tool you prefer and select the undesired elements you want to remove from your picture. With the lasso and selection tool, you can press shift and select multiple objects.
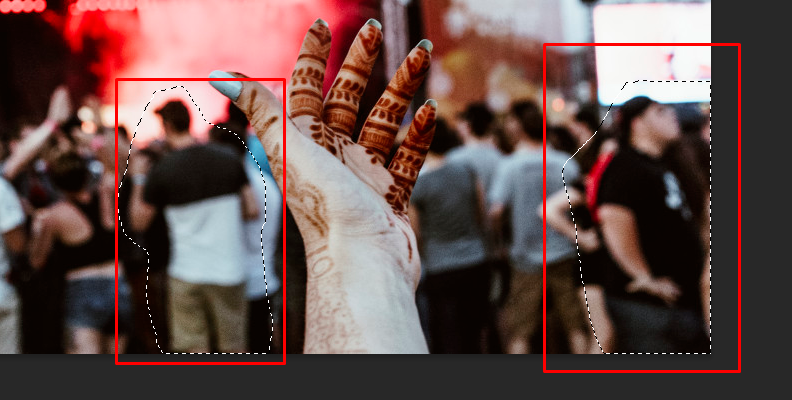
Step 3: Content-Aware Fill
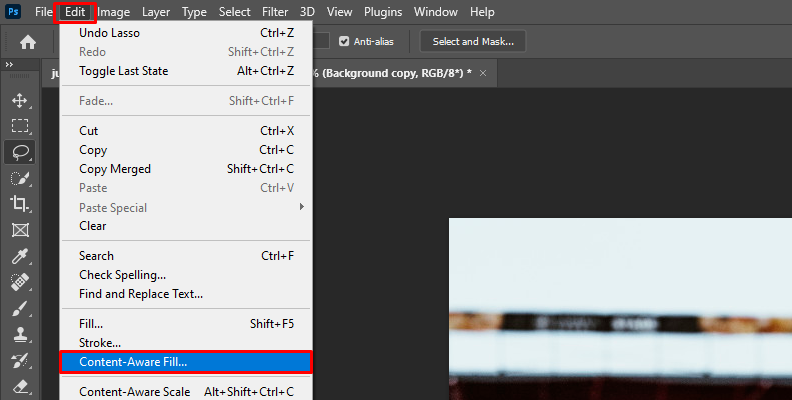
Content-Aware Fill allows you to choose the area that Photoshop uses to fill your selection, making the object removal tools more precise. Go to Edit > Content-Aware Fill. It will automatically remove the object from your photo and show you a preview of the result. You can adjust the selection and sampling area on the second window.
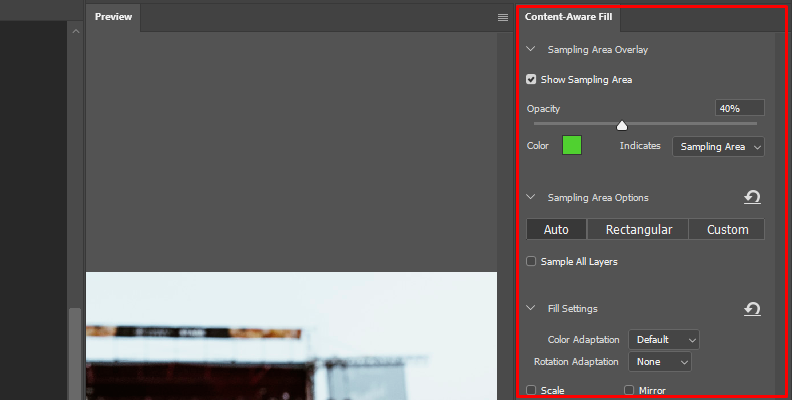
Step 4. Edit the Sampling Area
You can manually select which area Photoshop uses as a sample to remove your object. You’ll notice the current sampling area is in green (you can change the color and opacity from the settings). To subtract from the area, select the Sampling Brush tool and choose the minus sign and the brush size. Click to paint the zones you want to remove from the sample. If you need to increase the sampling area, select the plus sign in the Sampling Brush and paint. Once you reach a result you’re satisfied with, click OK to continue.
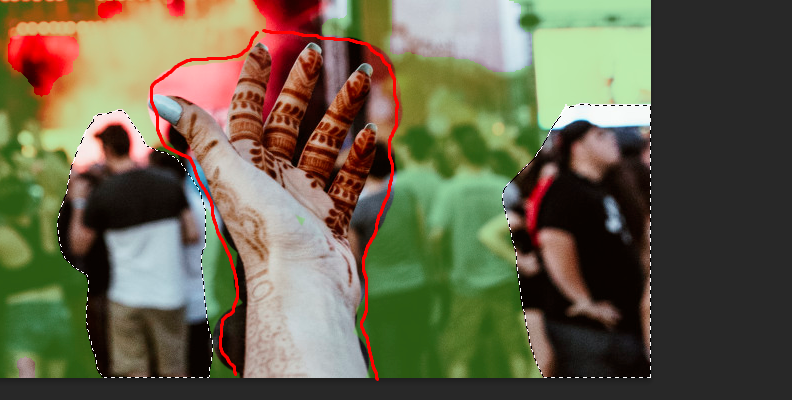
Step 5: Final Touches
To make the blend more natural, here are some things I like to do after an object removal. Select and duplicate your layers (CTRL/CMD + J) and merge the duplicated layers (CTRL/CMD + E). Select the Clone Stamp Tool and set a low flow and opacity.
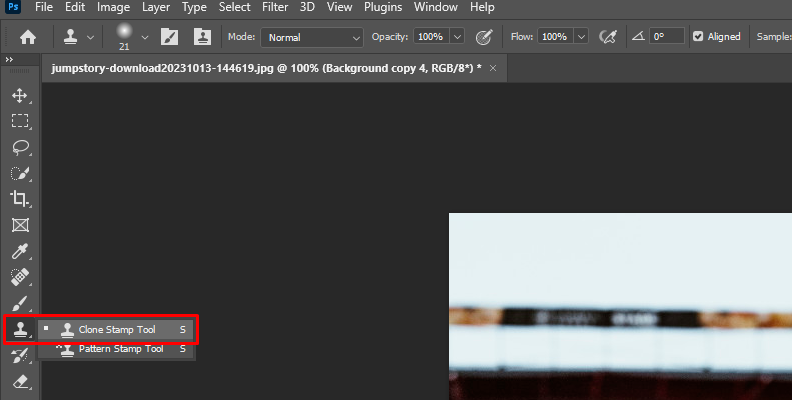
ALT/OPT + Click to choose a reference point and paint where some edges need correction. Try sampling from different points each time to make them look seamless. You can also work with the healing or smudge tool to hide the removal. It might take more time, but the result will be worth it!
Final Words
Options to remove objects on your mobile devices have never been as abundant as today. The only thing left to decide is which is the best object remover app for you: you can use multiple or choose one app that does everything according to your needs.
Consider the user interface experience, the number of tools and key features, and the value for money. Most of these apps offer free trials to try the premium features and decide which one is worth it.
Back at home or in the office, you can count on Photoshop and the Boris FX plug-ins to achieve more professional results.
Good luck!


