


The video quality on iPhone devices has always been excellent, both for casual videos and more serious projects. Even some professional movies are recorded using only an iPhone camera, Tangerine being a great example.
However, sometimes you may still want to know how to upscale video to improve final product quality, and that's quite a common situation.
So, what does upscaling a video mean, and what is the best way to upscale a video on iPhone?
This guide covers everything you need to know, so without further ado, let's get straight into it.
What it Means to Upscale a Video
Upscaling a video means virtually increasing its native resolution. Resolution refers to the number of pixels the image is made of, so the higher this number is the "crisper" the footage will be.
For example, if you have a 480p video, and you manage to properly upscale it to 720p, it should look much better because you've now increased its resolution.
Does Upscaling a Video Increase its Video Quality?
Increasing the video resolution, also known as upscaling a video, will improve video quality, but you should not expect miraculous results. You cannot turn a 480p video into 4K UHD footage.
But, modest increases in video resolution and overall video quality are possible.
Usually, conversions are most successful when the "jumps" between the video's original (native) resolution and the target resolution are not too drastic. For example, 720p to 1080p is possible, but 320p to 1080p will likely be impossible, even when using the best video enhancer and the most advanced video editing platform.
For this type of task, you'll have to use video enhancer apps, and since this is a guide for iPhone devices, you must make sure that the video enhancer app is available on iOS.
In the following section, you'll find more information on various video enhancement tools as well as a few recommendations about which you could use for your specific goal of upscaling a video on an iPhone.
How to Upscale Video on Your iPhone
To increase video quality on iPhone devices without having to rely on using a computer, you'll have to download and install an app that offers an upscaling feature.
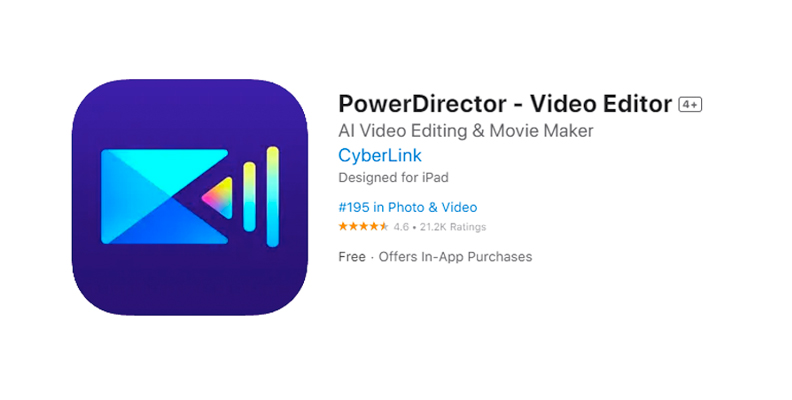
There are multiple video enhancer apps available on the AppStore, but for this specific tutorial, we'll recommend PowerDirector due to its reputation and availability of informative content online.
PowerDirector is a full-spectrum editing app for iPhone devices, containing other editing features like a built-in video enhancer, a voiceover tool, a camera stabilizer, and a royalty-free stock footage library you can also use if needed.
The app is free to download but some of its features require payment, which isn't surprising at all given the quality and effort put into it.
With that said, here are the steps you need to follow to upscale your video using this video enhancer app for iPhone.
Download and Install the App
To upscale your video footage and video clips using this iOS video editor app, you first need to download and install it on your iPhone device through the Apple App Store.
Import Your Media into the App
Once the app is installed on your iPhone device and ready to use, open it and import your media into it. You'll first need to create a new project and choose an aspect ratio.
Add Clips to the Timeline
Once the project is created, you can access your iPhone's library and choose one or multiple clips to add to your timeline. Simply select them and tap the button to add each one.
Use the Video Enhancer Features and Save the Video
Select each of the clips you've added to your timeline, then use one of the many available image-enhancing features provided by this iPhone video enhancer app. You may need to choose the resolution manually.
When the videos are processed and enhanced, save them on your device, or continue editing if needed.
The PowerDirector app has features like a camera shake effect, AI effects, color-grading profiles, and numerous other editing tools you can use to improve the quality of your iPhone videos.
Please note that although this is a free video enhancer app for the most part, some of the features built into it will require you to purchase the premium version. Out of all other iPhone video enhancer apps though, PowerDirector has likely the best rating and easiest workflow for editing videos.
How to Upscale iPhone Footage with Boris FX Continuum
If iPhone video editing apps are not your go-to way of working when it comes to fixing blurry videos or upscaling a low quality video, another way to go about it would be to use a renowned plug-in for software that's available on Mac and Windows.
We recommend UpRez by Boris FX, a tool used by many professional studios, in combination with Adobe Premiere Pro, one of the most popular video editing programs available for both Windows and MacOS if your devices are all part of the Apple ecosystem.
Here's what you need to do to upscale an iPhone video using UpRez by Boris FX in Adobe Premiere Pro.
Download And Install Adobe Premiere Pro and The UpRez Plug-in
UpRez is a part of the BorisFX Continuum. There's a free version available on the website if you want to try it. Once you download and install the Continuum pack, all filters and features available in it, including UpRez, will be available for use.
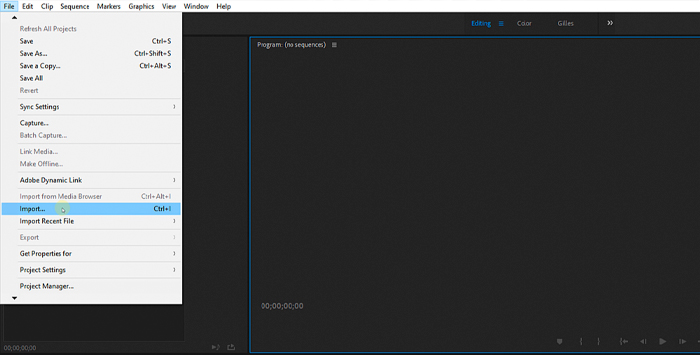
Import the Video You Want to Upscale and Create Sequence
![]()
Once you have everything set up, import the media you wish to upscale in Premiere Pro, then create a sequence on your timeline from one of the videos you imported. You can do this by dragging and dropping a video you imported over the timeline area.
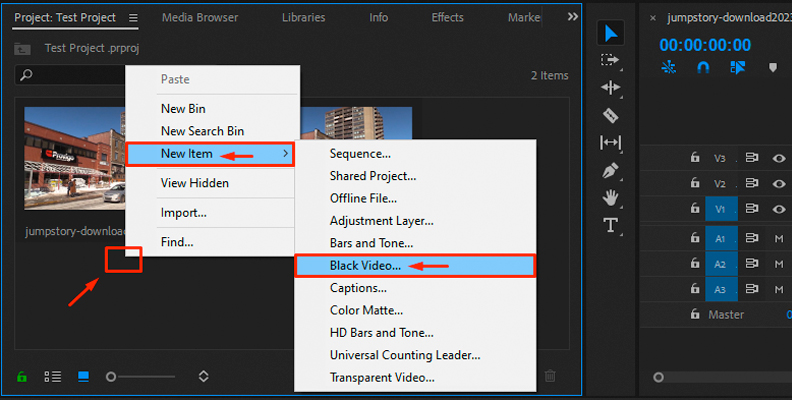
Create a Black Video Slug
The UpRez Premiere Pro workflow includes creating a black video slug. You can use the "New Item" -> "Black Video" approach for this.
![]()
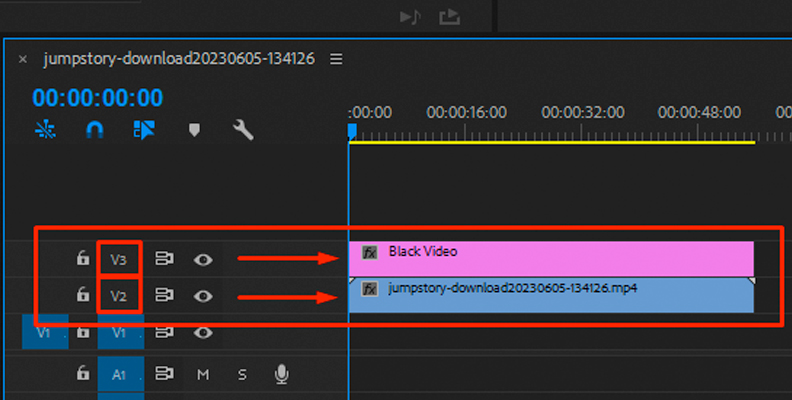
Place the video slug you just created on a video track that's one level above the original video clip you imported on your timeline that you wish to upscale.
![]()
Apply the UpRez Filter
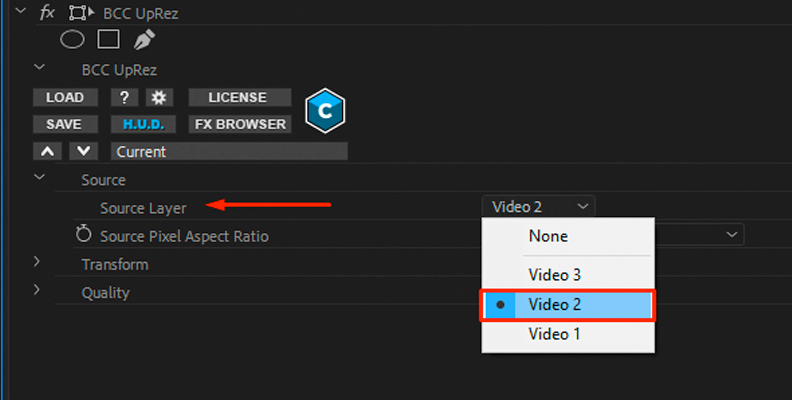
Open the "Effects" panel within Premiere Pro and find the UpRez filter. It's under the "BCC Image Restoration" category. Apply the filter over the black video slug you created, not your original video clip.
Now, click on the black video slug and open the "Effect Controls" panel. In the "Source Layer" section, expand the dropdown menu and choose the video track on which you have the original video (not the black slug). So, if the black slug is on video track 3, and the original video is on video track 2, choose video track 2.
![]()
Set the "Source Pixel Ratio" to a value that matches the true source aspect ratio of the clip you wish to upscale. In the "Transform" category, set the "Frame Size" to the "Layer Size" setting.
Adjust Desired Quality Settings
The last thing you need to do is open the "Quality" section and choose your preferred settings. A good recommended starting point is to set the "Method" to "Magic Sharp" and the "Sharpness" to 25, then adjust from there depending on the results. Render and export the video when done.
Final Words
That's all there's to it! Now you know how to upscale any iPhone footage both on your device or by using a Windows or MacOS computer if you want a more professional and customizable approach.
Hopefully, this will help you produce higher-quality videos in the future, both for casual and more serious purposes.


