Installing Node-Locked Licenses
Node-locked Installation
-
Make sure you have downloaded the correct version of Mocha for your operating system. The licensing system for this version is different from v5 and earlier.
-
Make that your version of Mocha is the product you have purchased (You will not be able to use a Mocha Pro AVX Plugin activation code for Mocha Pro standalone unless you have a multi-host license for example.).
-
You will need to install the Mocha package:
-
Apple OS: Double-click the dmg package and drag the application to your application folder
-
Windows: Double-click the exe package and follow the instructions
-
Linux: Double-click the installation rpm file and follow the on screen instructions. (64-bit versions of the software will not run on a 32-bit version of Linux).
-
Standard Node-Locked License Activation for Mocha Pro Standalone
When you purchase your license, you will be emailed a serial number. To activate:
-
Make sure you are connected to the internet
-
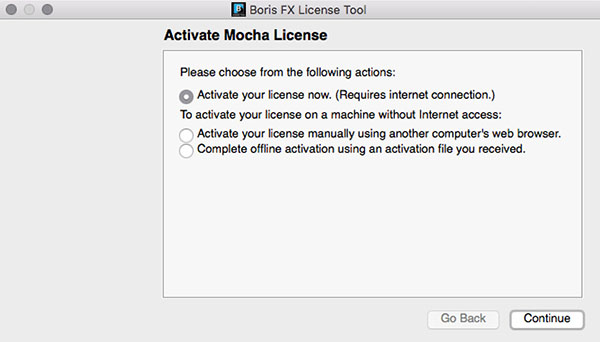
Open Mocha and choose 'Activate' from the welcome screen or 'Activate nodelocked License' from the help menu.
-
The BorisFX License Tool will load. Choose "Activate your license now":
-
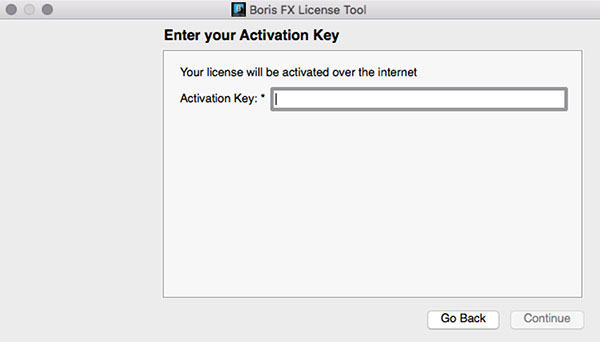
Paste the serial number into the available activation field and click 'Continue'
-
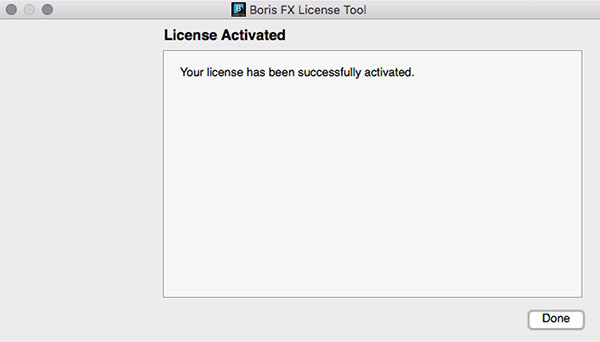
If the activation is successful, details will appear on the next page:
-
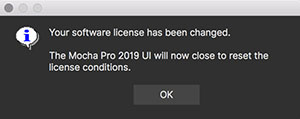
Your license should now be installed and Mocha will close to reset into a licensed state:
-
Reopen Mocha to start using your licensed version!
If your machine is not connected to the internet, or you are behind a firewall:
-
Open Mocha and choose 'Activate' from the welcome screen or 'Activate nodelocked license' from the help menu.
-
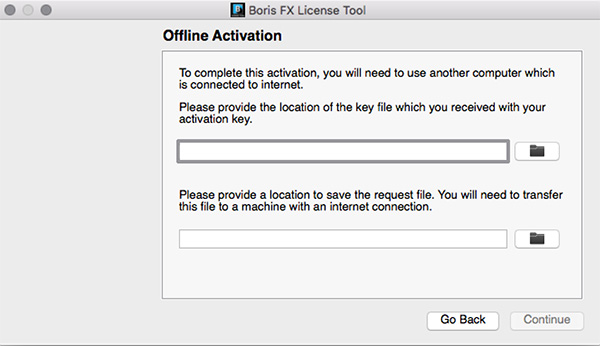
. The BorisFX License Tool will load. Choose "Activate your license manually" from the alternative options:
-
You will be provided with file fields to load a key file:
-
Download and save the key file that you received from your license email from a computer that has Internet connection.
-
Transfer the key file to your offline machine you are going to activate via a flash/thumb drive or a shared network.
-
Select the location of the key file in the first field.
-
Pick a location for the request file (which will be created) in the second field.
-
Copy the request file (.req) to a machine with an Internet connection.
-
Upload it to http://activation.borisfx.com/offline-activation.php.
-
Save the activation file it returns (via download or email), and copy that back to the offline machine.
-
Enter its location into to the license tool:
-
Your license should install automatically and Mocha will close.
-
Reopen Mocha to start using your licensed version!
Standard Node-Locked License Activation for Mocha Pro Plugin
First locate the licensing button for your host plugin.
Adobe After Effects Plugin License
For After Effects this is called "License…" and sits on the bar of the effect title in your Effect Controls:

Adobe Premiere Plugin License
For Premiere, click the small icon next to the effect title:

Avid Media Composer
For Avid, click the 'License Control' checkbox under the 'License and Registration' section at the bottom of the plugin controls:

After that, the rest is the same as the process above for Mocha standalone. See "Standard Node-Locked License Activation for Mocha Pro Standalone" for more details.
We recommend restarting the host if you see any issues with licensing.
Node-Locked License Troubleshooting
-
It is important that your Mocha software matches your activation code, so check your purchase order to make sure everything matches up version wise. It may be that you don’t have the correct version of Mocha installed from our download section. This is especially important for legacy software before V5, where a different licensing method is used.
-
If you are attempting to install via a terminal instead of directly on the machine itself and you are having trouble getting Mocha to install, try installing directly on the machine.
-
Check to make sure you are not restricted to using certain ports due to a firewall or other admin permissions. When in doubt, temporarily turn your firewalls off for the duration of the installation and then turn them back on when you are done.
-
Troubleshoot your machine; try uninstalling all your Mocha software, restarting your machine, and installing the software again from scratch, and make sure you follow installation directions off our website exactly. It sounds redundant, but sometimes it’s a great way to figure out what is going on inside your machine.
-
If all else fails, our support team is happy to help you figure this out. Please contact support!
Installing Floating Licenses
This guide will walk you through the process of installing floating licenses. Installing node-locked licenses does not require the use of the license manager. See above.
Floating licenses - How it works
A floating license allows central administration of your license deployment, avoiding the need to manually activate and deactivate our software on every machine, which is particularly beneficial for large facilities.
Configuring a new machine to use your floating license server is very straightforward and requires no internet connection.
Similarly, replacing a failed machine can be done without needing to contact technical support for the license to be released.
How do I Install the Floating License Server?
Mocha uses the Genarts RLM License server for floating licenses.
You can download the license server from the Boris FX website. See the steps below.
Floating licenses are easy to set up if if you are familiar with configuring network services, but if you need any help with the process, please contact technical support.
|
|
To configure a license server you must have Administrator (or root) privileges |
Installing Floating Licenses with Online Activation
-
Download the RLM License Manager from the download section here: RLM License Server.
-
Run the License Manager file then follow the installation prompts
-
Open a Web browser and go to: http://SERVERNAME:5054/goforms/activate (Replace “SERVERNAME” with the name of the license server)
-
Click "BEGIN License Activation"
-
Enter
activation.genarts.comin the “ISV activation website” field provided and click “Next”. -
Enter
genartsin the “ISV” field -
Copy and paste your Mocha Activation Key license that you received from your license email into the “License activation key” field. Then, click “Next”
-
Your Ethernet address will auto-populate in the “License Server or Node-lock hostid” field. Accept the auto-populated Ethernet address
-
Enter the number of licenses that should be locked to this server in the “License count (for floating licenses)” field. Or just enter 0 to assign all licenses to the specified server. Click “Next”
-
A default license location will auto-populate in the “License File to create or edit” field. Accept the default license location and click “Next”.
-
On the “Activation Request Data” screen, verify all the information you have entered, and click “REQUEST LICENSE”
-
On the “License Activation” page, click on “(Re)start License Server”
-
Then, on the “Reread/Restart Servers” page, click on “Reread/Restart”
The license server should now be set up.
To confirm that the GenArts license server is working, go to http://SERVERNAME:5054 (replace SERVERNAME with the name of the server), and click “Status” on the top left hand corner.
Genarts should show up under the ISV Servers and it will say Running: Yes.
Installing Floating Licenses with Offline Activation
In cases where you cannot install the license via an Activation code (normally where the server is not connected to the internet) you can manually install your license:
-
On a machine with internet access, download the RLM License Manager from the download section here: RLM License Server
-
Install the License Manager on both the machine that has an internet connection AND the offline server you intend to run on (You will use the online machine to get the license for your offline server)
-
One the online computer, open a web browser and go to: http://SERVERNAME:5054/goforms/activate (Replace “SERVERNAME” with the name of the license server)
-
Click "BEGIN License Activation"
-
Enter
activation.genarts.comin the “ISV activation website” field provided and click “Next”. -
Enter
genartsin the “ISV” field -
Copy and paste your Mocha Activation Key license that you received from your license email into the “License activation key” field. Then, click “Next”
-
The Ethernet address of the machine you are on will auto-populate in the “License Server or Node-lock hostid” field.
You will need to overwrite it with the Ethernet address of the offline license server.
To find the Ethernet address on the offline license server:-
On Windows: Go to start → GenArtsRLMServer → Get RLM HostID
-
On Mac: In a console type: “/Library/Application Support/GenArts/rlm/Get Hostid.py”
-
On Linux: In a terminal type: /usr/genarts/rlm/hostid_wrapper.py
-
-
The command above will print out the results – Get the first mac address from the first line: “Hostid of this machine:“
-
Enter the mac address into the online “License Server or Node-lock hostid” field.
-
Enter the number of licenses that should be locked to this server in the “License count (for floating licenses)” field. Or just enter 0 to assign all licenses to the specified server. Click “Next”
-
A default license location will auto-populate in the “License File to create or edit” field. Replace the default location to a location that you can easily write to and access the file, such as your Desktop or the Downloads folder.
-
Click "Next"
-
On the “Activation Request Data” screen, verify all the information you have entered, and click “REQUEST LICENSE”
-
On the “License Activation” page, click on “(Re)start License Server”
-
Then, on the “Reread/Restart Servers” page, click on “Reread/Restart”
-
Transfer the License File on to the offline license server and save the License File to the RLM directory.
-
For RLM Server v13 and newer:
-
For Windows:
C:\Program Files\BorisFX\rlm -
For Mac:
/Library/Application Support/BorisFX/rlm/ -
For Linux:
/usr/borisfx/rlm/
-
-
For older versions of RLM Server:
-
For Windows:
C:\Program Files (x86)\GenArts\rlm -
For Mac:
/Library/Application Support/GenArts/rlm/ -
For Linux:
/usr/genarts/rlm/
-
-
-
Open the License File in a text editor and edit the file with your offline server’s Hostname
-
Open a Web browser on the offline server, go to http://localhost:5054 and click on “(Re)Start License Server”
This completes the License server set up.
To confirm that the GenArts license server is working, go to http://SERVERNAME:5054 (replace SERVERNAME with the name of the server), and click “Status” on the top left hand corner. Genarts should show up under the ISV Servers and it will say Running: Yes.
Now that everything is installed and activated, you no longer need the RLM server installed on the temporary online computer – you can remove it at this time.
Installing the Floating Client License on a Client Machine (Manual Install)
If you haven’t yet installed the server license, follow the instructions above in How do I Install the Floating License Server.
Once you have the server license installed, perform the following steps to get the client license running:
-
Install Mocha on the client machine
-
Get the host line from the server license, which looks like this:
HOST ServerName EthernetAddress PortNumberFor example,
HOST camelot 00000000042e 5053 -
Create a new file in a text editor called
mocha_client.lic. The file name is not important, as long as the '.lic' extension exists. -
Paste in the HOST line into the client license file and press enter to create a new line
-
You can either keep the server Mac address in the client or replace it with the word "any". See example below:
mocha_client.licHOST camelot any 5053
-
Save the file to the Mocha RLM directory. For your particular system this is:
-
For Windows:
C:\ProgramData\GenArts\rlm -
For Mac:
/Library/Application Support/GenArts/rlm/ -
For Linux:
/usr/genarts/rlm/
-
-
If the installation is successful, you will now be able to use Mocha
How do I point to the server license using an Environment Variable?
If you want to point to a license file via environment variable, use genarts_LICENSE. It uses the usual RLM syntax, e.g:
genarts_LICENSE=5053@server-name
genarts_LICENSE=/path/to/file.lic
You can also set up the RLM environment variable to read all .lic files in a directory:
genarts_LICENSE=your/rlm/directory
Troubleshooting Floating Licenses
As with any software, problems may arise during the installation process. Please take a moment to read our troubleshooting section and check for common errors.
If you continue to have issues installing, please contact support and we will be happy to help you. You may contact our support team here: https://borisfx.com/support/open-a-case/
Verify your server license has been successfully installed
Check that your license actually exists on the Server:
For RLM Server v13 and newer:
-
For Windows:
C:\Program Files\BorisFX\rlm -
For Mac:
/Library/Application Support/BorisFX/rlm/ -
For Linux:
/usr/borisfx/rlm/
For older versions of RLM Server:
-
For Windows:
C:\Program Files (x86)\GenArts\rlm -
For Mac:
/Library/Application Support/GenArts/rlm/ -
For Linux:
/usr/genarts/rlm/
Verify your client license has been successfully installed
Check that your client license actually exists on the client machine:
-
For Windows:
C:\ProgramData\GenArts\rlm -
For Mac:
/Library/Application Support/GenArts/rlm/ -
For Linux:
/usr/genarts/rlm/
Verify you are using the latest version of the license server software.
Check to make sure your License Manager is up to date.
Verify there is not a firewall running between the server and the client computer
If your organization needs to run a firewall, you will need to check if the ports for the RLM server are open for use.
Check to make sure your Mocha software matches your activation code
Check your purchase order to make sure everything matches up version wise. It may be that you don’t have the correct version of Mocha installed from our download section. This is especially important for legacy software.
Check for conflicting licenses installed in your licensing folder
If you have more than one Mocha license installed on the server or client machine check to make sure they are not expired licenses. While rare, sometimes these licenses can conflict with any current ones you have on your system.
The client does not connect or see the server host name
If your client machine does not connect to the server based on the server name, try replacing the server name with the IP address of the server instead in the license file. You can easily do this via the License Manager or via a text editor.
When in doubt, check the logs!
Check logs and their paths: Read the logs from Mocha and from your server, they will tell you all about what is happening to your machine.
Check your firewall settings
Check to make sure you are not restricted to using certain ports due to a firewall or other admin permissions. When in doubt, temporarily turn your firewalls off for the duration of the installation and then turn them back on when you are done.
Check your host name settings
If your client machine is not able to connect to the server you may have a networking issue. Try changing the server name in the client license to the IP address of the server instead, or check to see if your host has ".local" appended to the end of it.
You can also do this in any text editor by opening up the client license and server license and manually editing the server name.
Sometimes the best solution is to start again
You might roll your eyes at this one, but try uninstalling, restarting your machine, and installing the software again from scratch. Make sure you follow installation directions off our website exactly. It sounds redundant, but sometimes it’s a great way to troubleshoot what is going on inside your machine.
When all else fails…
Contact us!
Our support team are more than happy to help you fix any floating license issues you may have.
Please contact support here: https://borisfx.com/support/open-a-case/
Installing Render Licenses
This section will discuss the installation of floating render licenses and how they differ from standard interactive floating licensed.
Render Floating Licenses vs Interactive Floating Licenses
A render license is a specific kind of floating license that only allows rendering of Mocha project output, be it inside a plugin or in the standalone application.
When you are using a floating license, it is broken into two parts: The interactive portion and the rendering portion.
For plugins, this is separated like so:
-
If you open the Mocha GUI in the Mocha Pro Plugin (and a license is available) you are entering the interactive portion.
-
If you are back in the host and not using interactive elements such as layer choosing or opening the GUI, you are using the rendering portion of the license.
For the standalone, this is separated like so:
-
If you open the Mocha Pro standalone application (and a license is available) you are entering the interactive portion.
-
If you have the Mocha Pro standalone application closed and are using the mocharender.py render script, you are utilizing the rendering portion. (See the Python guide for more details on rendering with mocharender.py)
If the interactive license is in use elsewhere or missing, the Mocha GUI will become unlicensed and attempting further work may encrypt your project if you choose to save.
If you have no interactive floating licenses available to render with, additional render licenses can be helpful to let you free up interactive licenses elsewhere.
Workflow for Render Licenses: Example 1
To help illustrate the Render License workflow, let’s look at the following situation:
-
5 floating licenses (interactive)
-
10 render licenses (render only)
-
There is only 1 user
The license server is operating with both sets of licenses.
-
If only one person is using Mocha on the network, there are 4 interactive and 10 render licenses still available to use.
-
If only that one person was using Mocha on the network, they would have 15 render machines available for use including the one they were working with.
-
If another person started working and all machines were in use for rendering, their version of Mocha would be unlicensed, as there would be no available seats.
Workflow for Render Licenses: Example 2
To help illustrate the Render License workflow, let’s look at another situation:
-
5 floating licenses (interactive)
-
10 render licenses (render only)
-
There are 5 users
The license server is operating with both sets of licenses.
-
There are 5 people working in Mocha.
-
If another user tries to work on a 6th machine, they will open Mocha unlicensed, because all interactive licenses are in use.
-
They open an existing project with Mocha in it (or render from the command line), they will be able to render, because all render licenses are available.
Now, say one person wants to send off a render to the network:
-
If 5 people are using Mocha on the network already, there would be 11 render machines available for use including the one the user was presently working with.
-
If another person stopped working in Mocha, the interactive license would be released, and a new machine would then be free to either use for work (interactive) or render (non-interactive) by another user.
Installing Render Floating Licenses
The installation of a render license is exactly the same as that of a standard interactive floating license. See the 'Installing Floating Licenses' for a complete guide.
File Management for Rendering on a Network
If you are planning to render either via the Mocha render scripts, an Adobe watch folder or a render farm (for example in Nuke), there are some file workflows you need to adopt.
You will need to make sure the necessary source footage is available for all machines. This includes anything you have imported into the Mocha GUI such as clean plates, insert clips and other imported files.
These files need to be managed by any of the following methods:
-
Placed in the same file structure on all machines
-
Relinked manually with an interactive license on all machines
-
Pointing to the same shared directory.
Failing to set this up may result in incorrect renders.
|
|
If you are using the plugin, you may have imported footage into the Mocha GUI separate from the host source footage. Make sure any imported footage is also available. |