< Previous | Contents | Manuals Home | Boris FX | Next >
Shot Settings Dialog
This dialog appears after you have selected the footage while creating a new scene, adding a new shot or survey, editing an existing shot with Shot/Edit Shot, or used Shot/Change Shot Settings. There is additional material in the Opening the Shot section of the main manual.
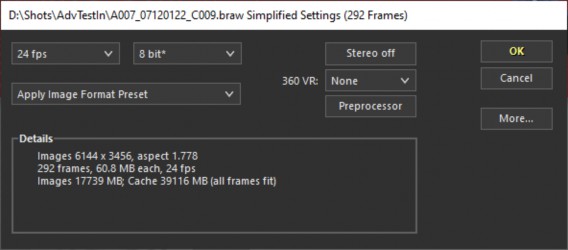
There are two versions of this dialog, a simplified and full version. The controls are essentially the same between the two, although combo boxes in the simplified version are spinners or radio buttons in the full version. Use More… to get to the full
version. The Shot/Edit Shot menu item always uses the full dialog. You can always use the full version by adjusting the preference in the Image Input section.


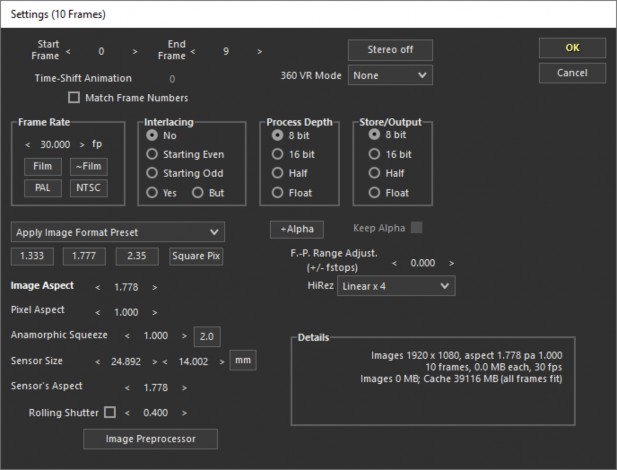
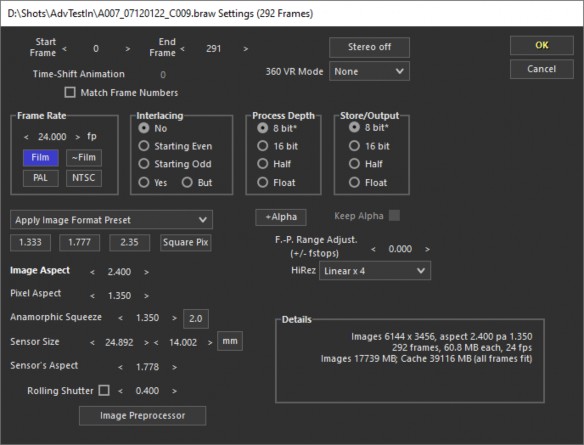
Start Frame, End Frame: the range of frames to be examined. You can adjust this from this panel, or by shift-dragging the end of the frame range in the time bar.
Stereo Off/Left/Right. Sequences through the three choices to control the setup for stereo shots. Leave at Off for normal (monocular) shots, change to Left when opening the first, left, shot of a stereo pair. See the section on Stereoscopic shots for more information.
360 VR Mode. Dropdown. Controls processing of spherical 360 degree VR footage, with three modes: None, for normal non-VR footage; Present, when the footage is 360 degree footage being processed as that; Remove, for 360 degree footage that is being dynamically converted to linear footage; or Apply, for linear footage that is being converted to 360 VR footage.
Time-Shift Animation: enabled only after a Shot/Change Shot Images menu item, this spinner lets you indicate that additional frames have been added (+number) or removed (-number) from the beginning of the shot, and that all the trackers, object paths, splines, etc, for this shot should be shifted earlier or later in the shot. For common cases with Match Frame Numbers or when timecode is available, Change Shot Images will have already worked out and applied the time shift, and you should not do it again! In other cases it may propose a value without applying it, or it may be up to you to determine the right value. The messages from Change Shot Images will let you know what it’s done, if anything.
When a time-shift is needed, you’ll typically need to adjust the Start Frame and
End Frame as well.
Frame rate: Usually 24, 23.976, or 29.97 frames per second. NTSC is used in the US & Japan, PAL in Europe. Film is generally 24 fps, but you can use the spinner for over- or under-cranked shots or multimedia projects at other rates. Some software may have generated or require the rounded 25 or 30 fps, SynthEyes does not care whether you use the exact or approximate values, but it may be crucial for downstream applications. This is a spinner in the Full dialog, but a dropdown in the simplified dialog. You can change the list of default frame rates from the Image Input section of preferences. On the simplified panel, any non-standard rate (ie from a movie file) is automatically added to the list so you can see it.
Interlacing: No for film or progressive-scan DV. Yes to stay with 25/30 fps, skipping every other field. Minimizes the amount of tracking required, with some loss of ability to track rapid jitter. Use Yes, But for the same thing, but to keep only the other (odd) field. Use Starting Odd or Starting Even for interlaced video, depending on the correct first field. Guessing is fine. Once you have finished opening the shot in a second, step through a few frames. If they go 2 steps forward, one back, select the Shot/Edit Shot menu item, and correct the setting. Use Yes or None for source video compressed with a non-field-savvy codec such as sequenced JPEG.
Channel Depths: Process. 8-bit/16-bit/Half/Float. Radio buttons. Selects the bit depth used while processing images in the image preprocessor. Same controls as on Rez tab of the Image Preprocessor. The format suggested by the image-reader is labeled with an asterisk…. But it may suggest different formats for integer vs floating formats, ie 16b for int and half for floating channels.
Channel Depths: Store. 8-bit/16-bit/Half/Float. Radio buttons. Selects the bit depth used to store images, after preprocessing. You may wish to process as floats then store as Halfs, for example. A Half is a 16-bit floating-point number, so it has enhanced range (not as much as a float) but is only half the size to store as a float.
Apply Preset: Click to drop down a list of different film formats; selecting one of them will set the frame rate, image aspect, sensor (back plate) width, squeeze factor, interlace setting, rolling shutter, and indirectly, most of the other aspect and image size parameters. You can make, change, and delete your own local set of presets using the Save As and Delete entries at the end of the preset list.
Image Aspect: overall input image width divided by height. Equals 1.333 for video, 1.777 for HDTV, 2.35 or other values for film. Click Square Pix to base it on the image width divided by image height, assuming the pixels are square(most of the time these days). Note: this is the aspect ratio input to the image preprocessor.
The aspect ratio shown in the Details section at lower right is the aspect ratio coming out of the image preprocessor.
Pixel Aspect: width to height ratio of each pixel, as determined from the overall image aspect. Usually 1.0 for most camera (unlike legacy NTSC, for example), can be larger for anamorphics (or not, depending on the situation). The final image
aspect coming out of the image preprocessor is shown in the Details section at lower right.
Anamorphic Squeeze. Enter any anamorphic squeeze value applied by the lens, for example 2 for a lens that squeeze the lens horizontally by a factor of 2. Used in lens distortion processing. The squeeze will often be the same as the pixel aspect ratio, but not necessarily. For example, shots with an anamorphic lens ratio of 2 are commonly resampled to have square pixels (pixel aspect = 1.0), but it is still important to have keep the Squeeze value at 2.0 in that case. Set the squeeze first, then adjust the pixel aspect ratio as needed.
2.0. Button. Sets the Anamorphic Squeeze and Pixel Aspect to 2.0, and toggles them back to 1.0 if clicked again. Helps speed anamorphic shot setup.
Sensor Width: Sets the width of the virtual camera, which determines the interpretation of the focal length. SynthEyes uses field of view, so this value does not affect the solve. Note that the real values of focal length and sensor (back plate) width are always slightly different than the “book values” for a given camera. Note: Maya is very picky about this value, use what it uses for your shot.
Sensor Height: the height of the film, calculated from the width, image aspect, and squeeze.
Sensor Units. Shows in for inches, mm for millimeters, click to change the desired display units.
Sensor’s Aspect: Convenience spinner showing the sensor’s aspect ratio; adjusting this changes the sensor height. Calculated from the image aspect and squeeze factor.
Rolling Shutter Enable. Checkbox. Enables rolling-shutter compensation during solving for the tracker data of the camera and any objects attached to this shot. CMOS cameras are subject to rolling shutter; it causes intrinsic image artifacts. If set here, it overrides rolling shutter in the solver.
Rolling Shutter Fraction. Spinner. This is the fraction of the frame time that it takes to read out the image data from the CMOS chip. For an old NTSC TV camera, there are 486 active lines, and 525 total (including vertical blanking) for a fraction of 0.9257. For a camera running at 60 fps, the frame time is 16.667 msec (1sec/60frames*1000msec/sec). If it takes 15 msec to read out the image, the rolling shutter fraction should be set to 0.9, ie 15/16.667. You will have to obtain these values from the camera manufacturer or by experimentation. If the value here is enabled, it will override and suppress a value in the solver.
+Alpha. Button. Click this to add a separate alpha image sequence to the shot. Click the button, cancel the file selector, then answer Yes to remove the alpha sequence. Button is blue when a sequence has been explicitly selected. Note that sequences can also be attached implicitly, if their names match the Separate-alpha suffix preference.
Keep Alpha: when checked, SynthEyes will keep the alpha channel when opening files, even if there does not appear to be a use for it at present (ie for rotoscoping).
Alpha data can be in the RGB files, ie RGBA, or in separate alpha-channel files, see Separate Alpha Channels. Turn on when you want to feed images through the image preprocessor for lens distortion or stabilization and then write them, and want the alpha channel to be processed and written also.
F.-P. Range Adjustment: adjusts the shot to compensate for the range of floating-point image types (OpenEXR, TIFF, DPX). Values should go from 0..1, if not, use this control to increase or decrease the apparent shot exposure by this many f-stops as it is read in. Different than the image preprocessor exposure adjust, because this affects the display and tracking but not images written back to disk from the image preprocessor.
HiRez: For your supervised trackers, sets the amount of image re-sampling and the interpolation method between pixels. Larger values and fancier types will give sharper images and possibly better supervised tracking data, at a cost of somewhat slower tracking. The default Linear x 4 setting should be suitable most of the time. The fancier types can be considered for high-quality uncompressed source footage.
Image Preprocessor: brings up the image preprocessor dialog, allowing various image-level adjustments to make tracking easier (usually more so for the human than the machine). Includes color, gamma, etc, but also memory-saving options such as single-channel and region-of-interest processing. This dialog also accesses SynthEyes’ image stabilization features.
Memory Status: shows the image resolution, image size in RAM in megabytes, shot length in frames, and an estimated total amount of memory required for the sequence compared to the total still available on the machine. Note that the last number is only a rough current estimate that will change depending on what else you are doing on the machine. The memory required per frame is for the first frame, so this can be very inaccurate if you have an animated region-of-interest that changes size in the Image Preprocessor system. The final aspect ratio coming out of the image preprocessor is also shown here; it reflects resampling, padding, and cropping performed by the preprocessor.
©2026 Boris FX, Inc. — UNOFFICIAL — Converted from original PDF.


