< Previous | Contents | Manuals Home | Boris FX | Next >
Quick Start: Stabilization
Adding 3-D effects generally requires a moving camera, but making a smooth camera move can be hard, and a jiggly shot often cries out “ Amateur!” SynthEyes can help you stabilize your shots for a more professional look, though like any tool it is not a magic wand: a more stable original shot is always better. Stabilization will sacrifice some image quality. We’ll discuss more costs and benefits of SynthEyes stabilization in the later full section.
We’ll begin by stabilizing the shot grnfield, available from the web site. We will do this shot one particular way for illustration, though many other options are possible. Note that this shot orbits a feature, which will be kept in place. SynthEyes also can stabilize traveling shots, such as a forward-looking view from a moving car, where there is no single point that stays in view.
File/New and open the shot using the standard 4:3 defaults. You can play through it and see the bounciness: it was shot out a helicopter door with no mechanical stabilizing equipment.
Click the Full Automatic button ![]() on the summary panel to track and solve the shot. If we wanted, we could track without solving, and stick with 2-D tracks, but we’ll use the more stable and useful 3-D results here.
on the summary panel to track and solve the shot. If we wanted, we could track without solving, and stick with 2-D tracks, but we’ll use the more stable and useful 3-D results here.
Select the Shot/Image Preprocessor menu item (or hit the P key).
In the image prep viewport, drag a lasso around the half-dozen trackers in the field near the parking lot at left (see the Lasso controls on the Edit menu for rectangular lassos). We could stabilize using all the trackers, but for illustration we’ll stabilize this particular group, which would be typical if we were adding a building into the field.
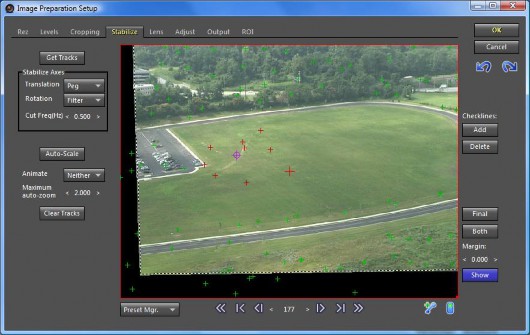
Click the stabilization tab ![]() , change the Translation stabilization-axis drop-down to Peg, and the Rotation drop-down to Filter. Reduce the Cut Frequency spinner to 0.5 Hz. This will attenuate rotation instability, without eliminating it.
, change the Translation stabilization-axis drop-down to Peg, and the Rotation drop-down to Filter. Reduce the Cut Frequency spinner to 0.5 Hz. This will attenuate rotation instability, without eliminating it.
Important : it is a common novice mistake to set the filter frequency too low for a given shaky shot in hopes of magically making it super-smooth. When a shot contains major bumps, much or all of the entire source image can go off screen. Start with a higher cut frequency, and reduce it gradually so you can see the effect.
You should have something like this:

The image prep window is showing the stabilized output, and large black bands are present at the bottom and left of the image, because the image has been shifted (in a 3-D way) so that it will be stable. To eliminate the bands, we must effectively zoom in a bit, expanding the pixels.
Hit the Auto-Scale button and that is done, expanding by almost 30%, and eliminating the black bars. This expansion is what reduces image quality, and it should always be minimized to the extent possible.
Use the frame number spinner in the playbar at the bottom center of the image preprocessor dialog to scrub through the shot. The shot is stabilized around the purple “point of interest” ![]() at left center.
at left center.
You can see some remaining rotation. You may not always want to make a shot completely stone solid. A little motion gives it some life. In this case, merely attenuating the jitter frequency becomes ineffective because the shot is not that long.
To better show what we’re going to do next, click the Final button at right, turning it to Padded mode. Increase the Margin spinner, below it, to 0.125. Instead of showing the final image, we’re showing where the final image (the red outline) is coming from within the original image. Scrub through the shot a little, then go to the end (frame 178).
Now, change the Rotation mode to Peg also. Instead of low-pass-filtering the rotation, we have locked the original rotation in place for the length of the shot. But now, by the end of the shot the red rectangle has gone well off the original imagery. If you temporarily click Padded to get back to the Final image, there are two large black missing portions.
Hit Auto-Scale again, which shrinks the red source rectangle, expanding the pixels further. Select the Adjust tab of the image preprocessor window, and look at the
Delta Zoom value. Each pixel is now about 160% of its original size, reducing image quality. Click Undo to get back to the 129% value we had before. Unthinkingly increasing the zoom factor is not good for images.
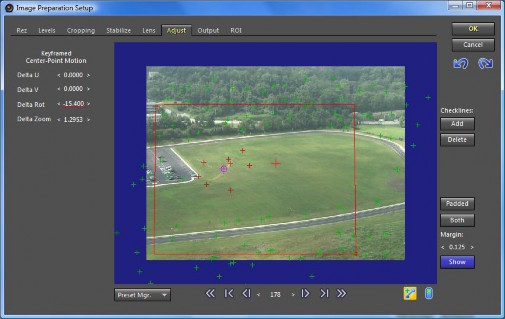
If you scrub through the shot a little (in Padded mode) you’ll see that the image-used region is being forced to rotate to compensate for the helicopter’s path, orbiting the building site.
For a nice solution, go to the end of the shot, turn on the make-key button ![]() at lower right, then adjust the Delta Rot (rotation) spinner to rotate the red rectangle back to horizontal as shown.
at lower right, then adjust the Delta Rot (rotation) spinner to rotate the red rectangle back to horizontal as shown.

Scrub through the shot, and you’ll see that the red rectangle stays completely within the source image, which is good: there won’t be any missing parts. In fact, you can Auto-scale again and drop the zoom to about 27%.
Warning : SynthEyes uses spline interpolation between key frames on the adjustment tracks by default. If you set keys close together, this can produce large excursions at other parts of the shot, driving the image off-screen. If you must animate many keys, open the Graph Editor to the stabilization tracks before opening the image preprocessor, so that you can monitor what you are doing. Switch to linear keys as needed.
Click Padded to switch back to the Final display mode, and scrub through to verify the shot again. Note that the black and white dashed box is the boundary of the original image in Final mode.
There's some slight blurring introduced by resampling the image. You can compare different methods for that: click to the Rez tab, and switch the Interpolation
method back and forth from Bi-Linear to 2-Lanczos. You can see the effect of this especially in the parking lot.
Tip : the interpolation method gives you a trade off between a sharper image and more artifacts, especially if the image is noisy. Bi-linear produces a softer image with fewer artifacts, Mitchell-Netravali is a little sharper, and then the comes Lanczos-2 and the sharpest, Lanczos-3.
To playback at speed, hit OK on the Image Prep dialog. You will probably receive a message about some (unstabilized) frames that need to be flushed from the cache; hit OK.
You’ll notice that the trackers are no longer in the “right” places: they are in the right place for the original images, not the stabilized images. We’ll later see the button for this, but for now, right-click in the camera view and turn off View/Show trackers and View/Show 3-D Points.
Hit the main SynthEyes play button ![]() , and you will see a very nicely stabilized version of the shot.
, and you will see a very nicely stabilized version of the shot.
By adding the hand-animated “directorial” component of the stabilization, we were able to achieve a very nice result, without requiring an excessive amount of zoom. [By intentionally moving the point of interest ![]() , the required zoom can be reduced further to under 15%.]
, the required zoom can be reduced further to under 15%.]
If you look carefully at the shot, you will notice some occasional strangeness where things seem to go out of focus temporarily. This is the motion blur due to the camera’s motion during shooting.
Important : To minimize motion blur when shooting footage that will be stabilized, keep the camera’s shutter time as small as possible (a small “shutter angle” for film cameras) .
Doubtless you would now like to save the sequence out for later compositing with final effects (or maybe a stabilized shot is all you needed). Hit P to bring the image prep dialog back up, and select the Output tab ![]() . Click the Save Sequence button.
. Click the Save Sequence button.
Click the … button to select the output file type and name. Note that for image sequences, you should include the number of zeroes and starting frame number that you want in the first image sequence file name: seq001 or seq0000 for example. After setting any compression options, hit Start, and the sequence will be saved.
There are a number of things which have happened behinds the scene during this quick start, where SynthEyes has taken advantage of the 3-D solve’s field of view and many trackers to produce better results than traditional stabilizing software.
SynthEyes has plenty of additional controls affording you directorial control, and the ability to combine some workflow operations that normally would be separate,
improving final image quality in the process. These are described later in the Stabilization section of the manual.
©2026 Boris FX, Inc. — UNOFFICIAL — Converted from original PDF.


