


Welcome Mocha User!
Welcome to the world of Mocha!
We highly recommend you go through this chapter and follow the introduction video below so you’re comfortable with the Mocha workflow.
Note | If you’re familiar with Mocha already you can skip this chapter entirely and just go straight to how to use it in VEGAS in later chapters. |
While this quick start tutorial is directly focused on Mocha VEGAS and how to use it in VEGAS, the vast majority of the tutorial is based inside the Mocha UI and is relevant to all Mocha users.
You can still follow along in your package of choice and you’ll come to grips with the overall Mocha process.
Only the top and tail of the video and this guide will be different for your version of Mocha.
We highly recommend watching the Mocha Essentials training for a broader guide to Mocha in general.
Tip | New Mocha VEGAS users working in VEGAS can still benefit from other Mocha "Getting Started" guides. This guide teaches tracking and roto basics as well as applying data to VEGAS layers. |
Watch this!
Follow the link below to watch a tutorial video that covers all the basics you need to know for Mocha VEGAS:
You can download the footage and project file in the link above to follow along.
Want More Mocha Training?
Visit the Mocha Essentials page for over 7 hrs of training on various light versions of Mocha and Mocha Pro.
Note | The Mocha Essentials video series was created before Mocha VEGAS was introduced, so don’t worry if Mocha VEGAS is not mentioned! Watch through and you’ll still get a lot out of the tips and techniques shown. |
Also visit the Mocha Useful Links page for documentation, FAQ and more.
A Super-Quick Intro to Mocha VEGAS
This will get you the very basics, but won’t get you out of trouble.
Finding and Opening Mocha VEGAS
Choose the media clip on the VEGAS timeline you want to track, or place media on the timeline to start
Select Event FX (i.e the
fxicon) for the clipIf you already have an Event FX applied to the clip, click the
fx+icon in the top right-hand corner of the Video Event FX dialog
A plug-in chooser dialog will appear. Find the Mocha VEGAS effect under the folder path below:
FX > Boris FX Mocha > Mocha VEGAS
This should now open the Video Event FX panel and show the Mocha VEGAS effect.
In the Effect Control panel, click the button 'Launch Mocha UI'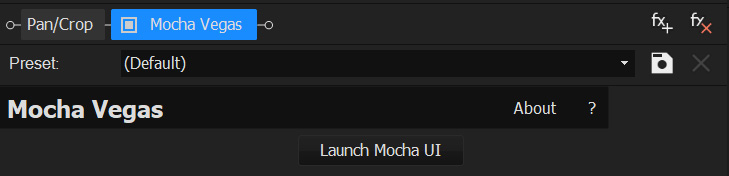
Tracking in Mocha VEGAS
Select a shape or spline tool and draw around the planar area you want to track


Adjust the shape so it is only around that plane. You can have a little bit of background but not too much.
Select the motion you want to track:
Translation: Just X and Y motion
Scale: How area changes in size
Rotation: If the area rotates at all in the XY plane
Shear: If the planar area skews or distorts
Perspective: If the area turns toward or away from the camera.
Press the track forwards or track backwards button.
Once the timeline is tracked, turn on the surface.

Adjust the surface to fit the area as you need it, The surface corners will define corner pin data for VEGAS Picture in Picture (PiP)
Close and save Mocha
Applying Mocha VEGAS Tracking Data
Make sure you have completed the steps above
Click
Create Track Data…in the Mocha VEGAS plugin effect controlsSelect the layer you tracked from the layer list
Click
OKClick
Apply Export. This will open the native Motion Tracking dialog in VEGASSelect the bottom right arrow in the Motion Tracking dialog. This will show your available clips to apply the tracking data to.
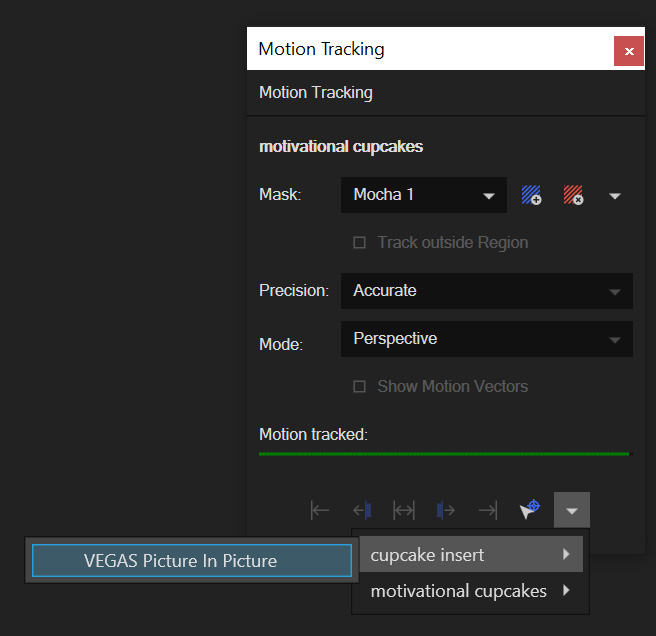
Select the clip from the dropdown that you want to apply the tracking data to, and select "VEGAS Picture in Picture"
The Moderately-Paced Guide to Mocha VEGAS
Watch This!
Aside from the intro above, we recommend watching the Essentials Course here.
This course covers Mocha AE, but will also cover most of what you need to know to be fluent in Mocha VEGAS’s workflow.
There are also further lessons for Mocha Pro should you decide to get all the fun tools in the full version.
General Mocha workflow - Tracking and Working with Spline Shapes
You can follow along with the footage from the video at the start of this page:
Finding and Opening Mocha VEGAS
Choose the media clip on the VEGAS timeline you want to track, or place media on the timeline to start
Select Event FX (i.e the
fxicon) for the clipIf you already have an Event FX applied to the clip, click the
fx+icon in the top right-hand corner of the Video Event FX dialog
A plug-in chooser dialog will appear. Find the Mocha VEGAS effect under the folder path below:
FX > Boris FX Mocha > Mocha VEGAS
This should now open the Video Event FX panel and show the Mocha VEGAS effect.
In the Effect Control panel, click the button 'Launch Mocha UI'
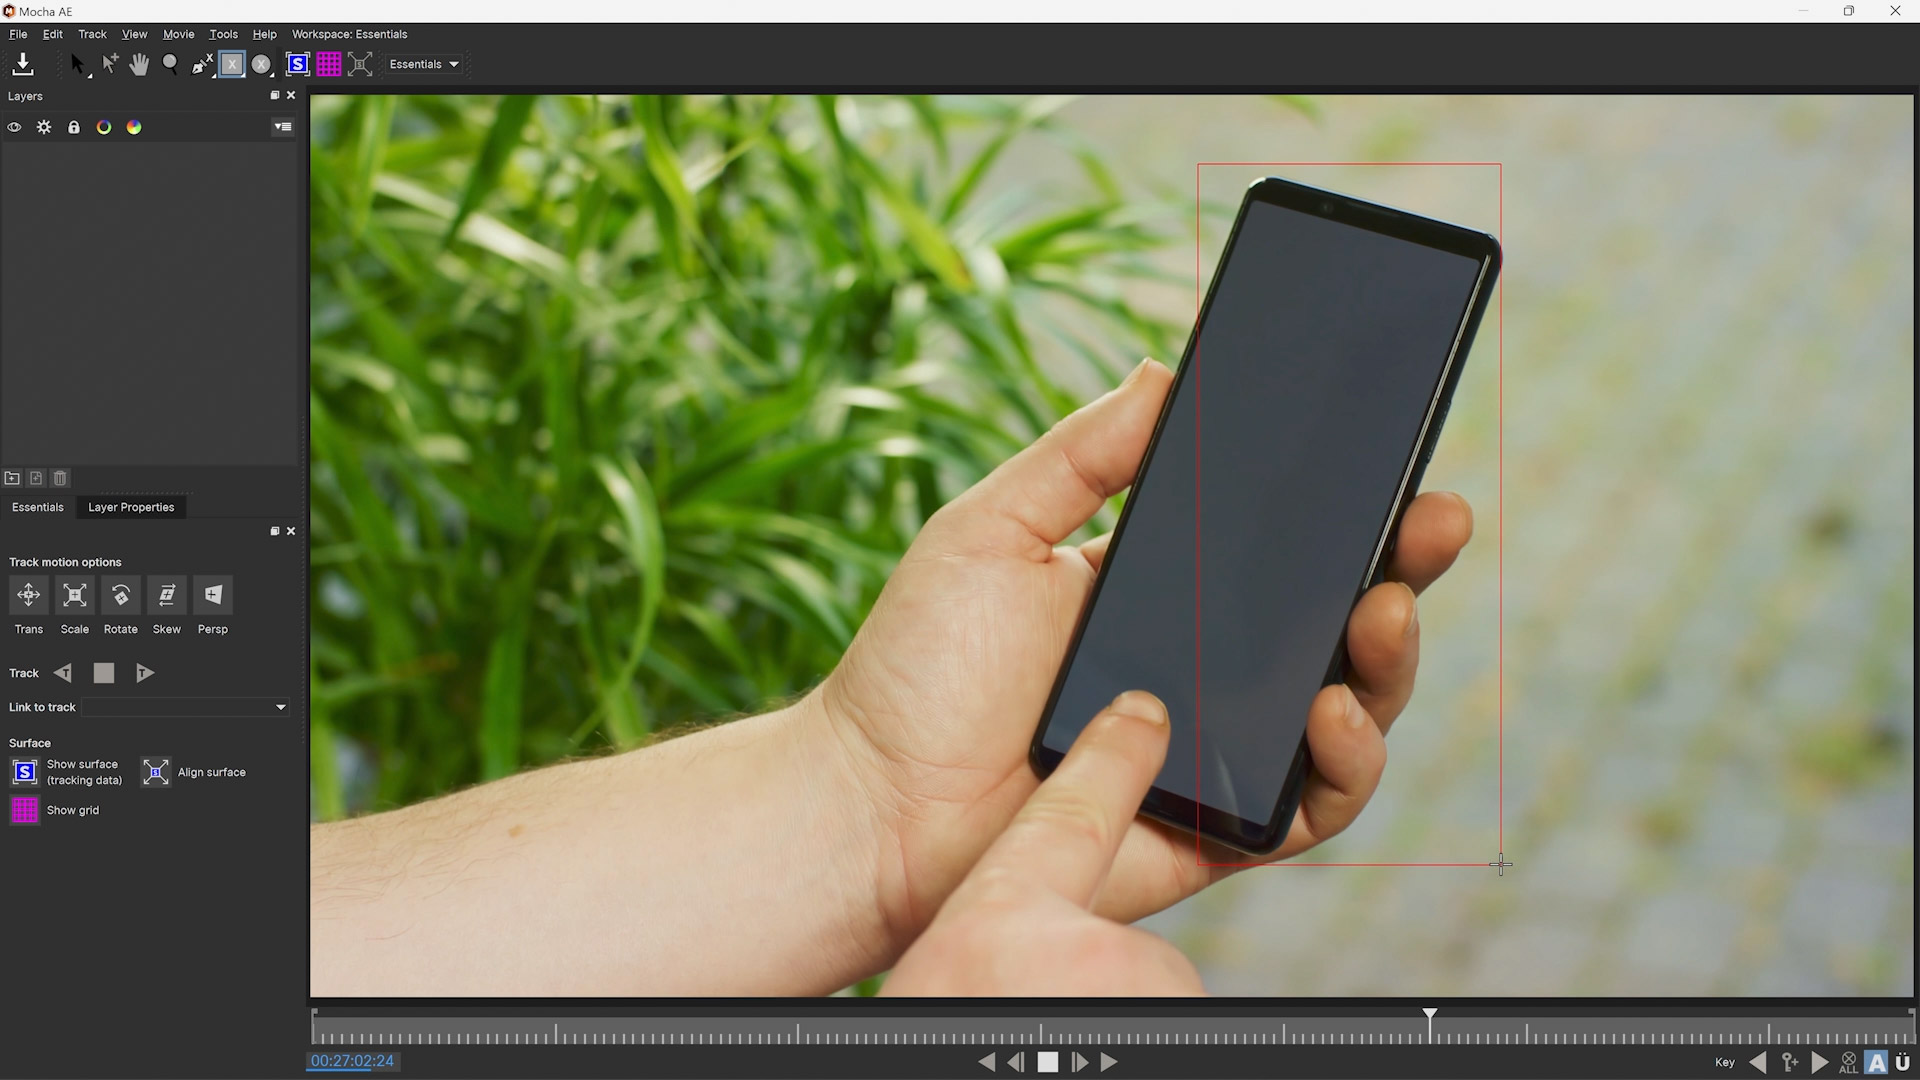
Tracking in Mocha - A Real-World example
Note | The images below will show the Mocha AE interface, which is exactly the same as the Mocha VEGAS interface. |
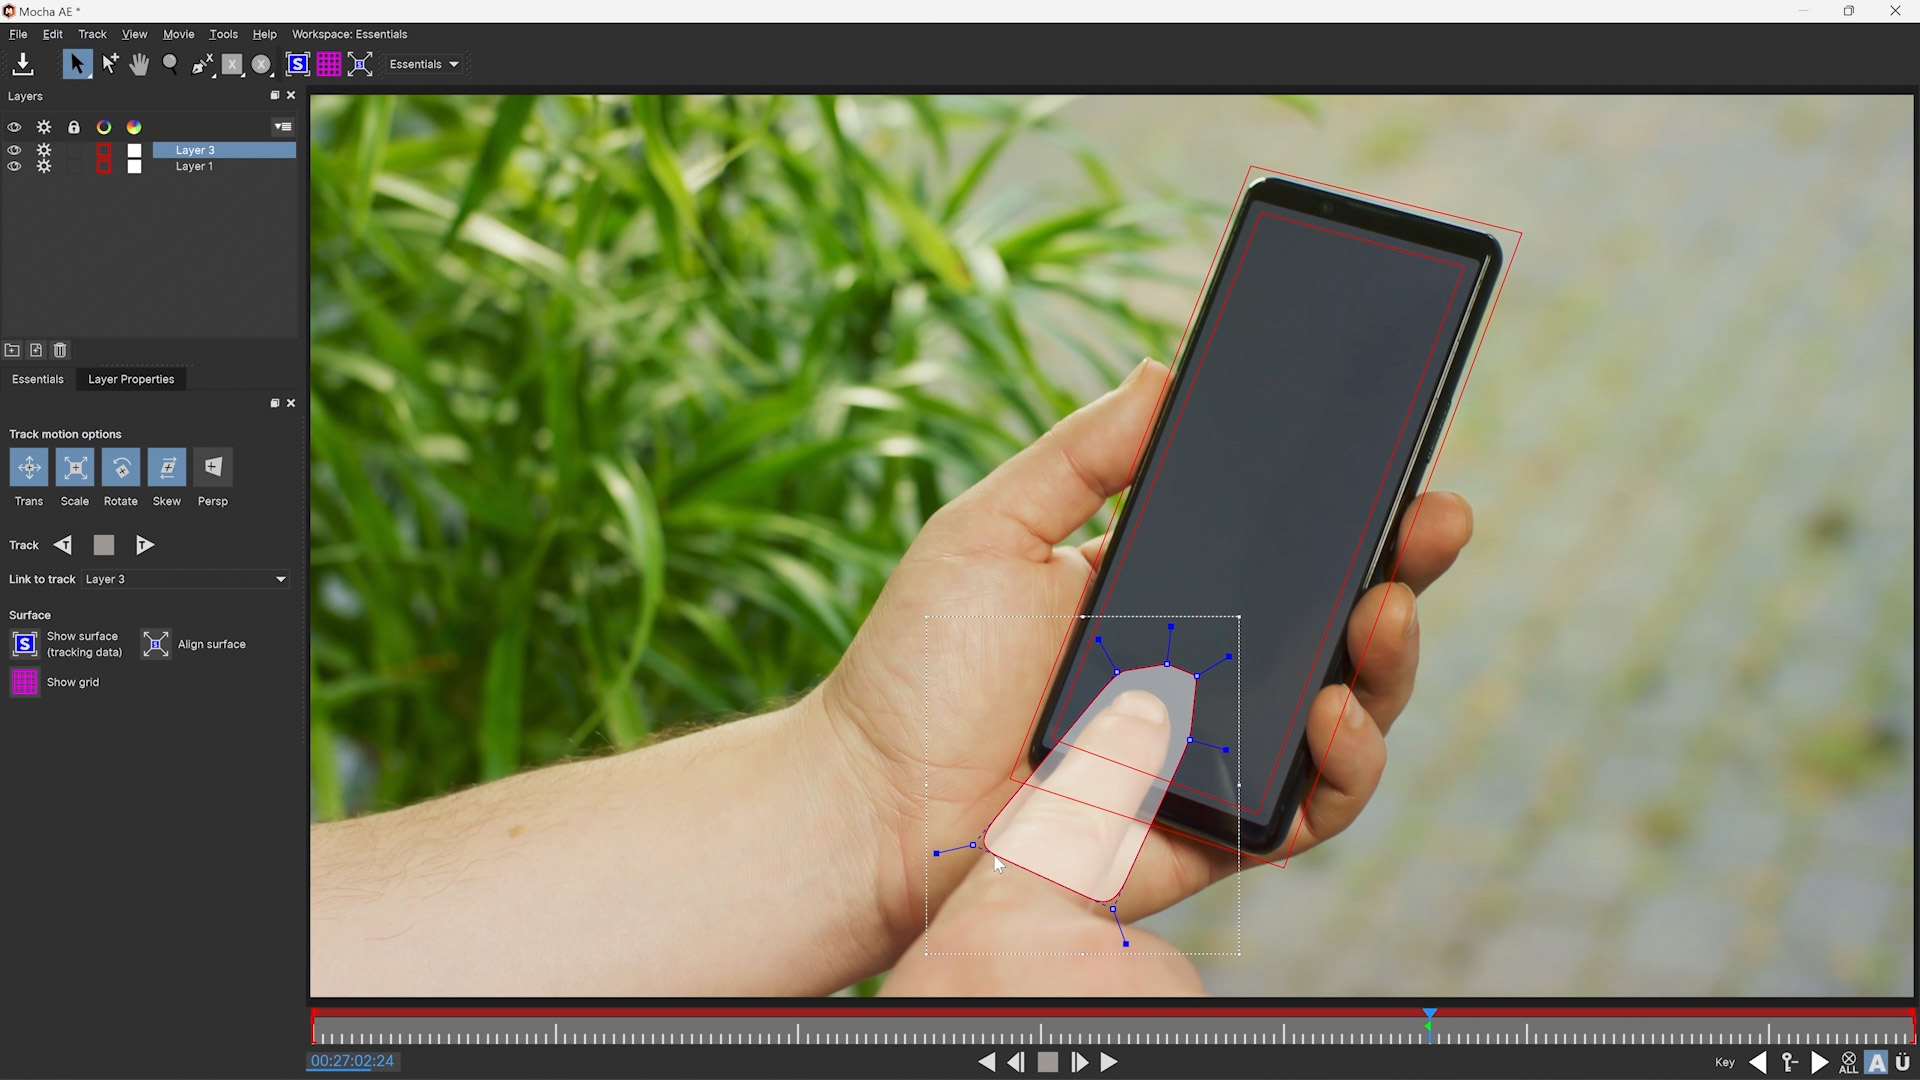
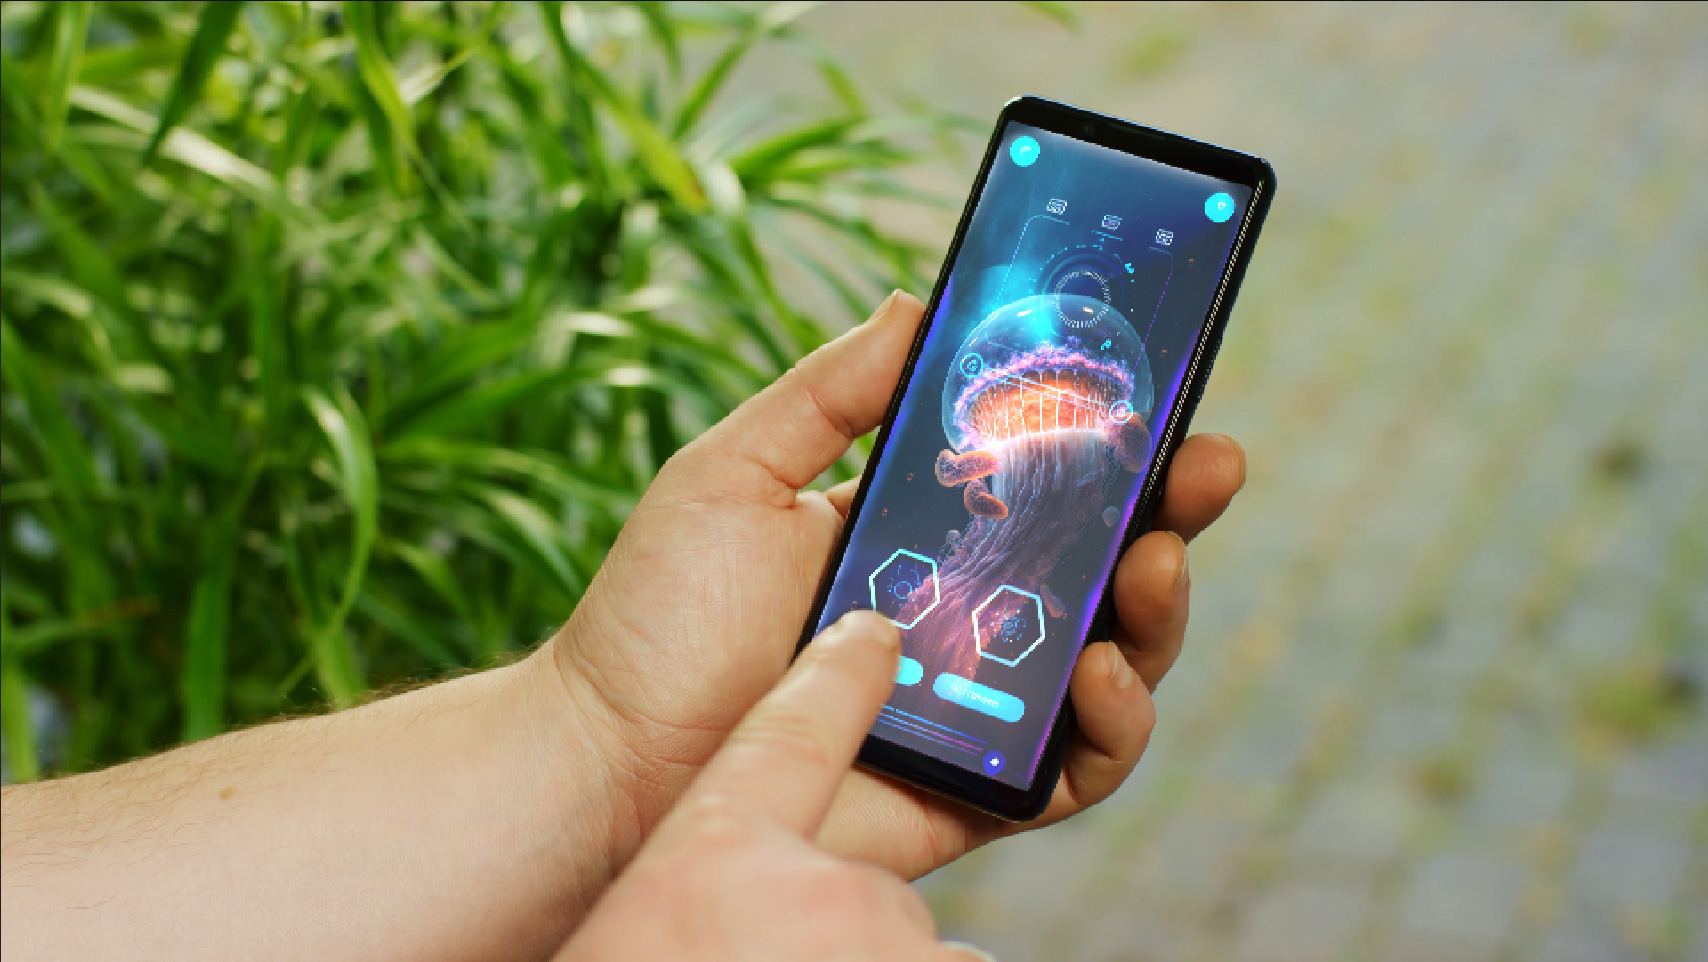
We’ll show an example here of a finger scrolling a phone, where we want to replace the screen. This example covers several items such as tracking, roto and dealing with problem areas.
Find a place in time where the finger is covering the phone clearly and the screen is fairly flat towards the camera. This helps define the shapes early on:

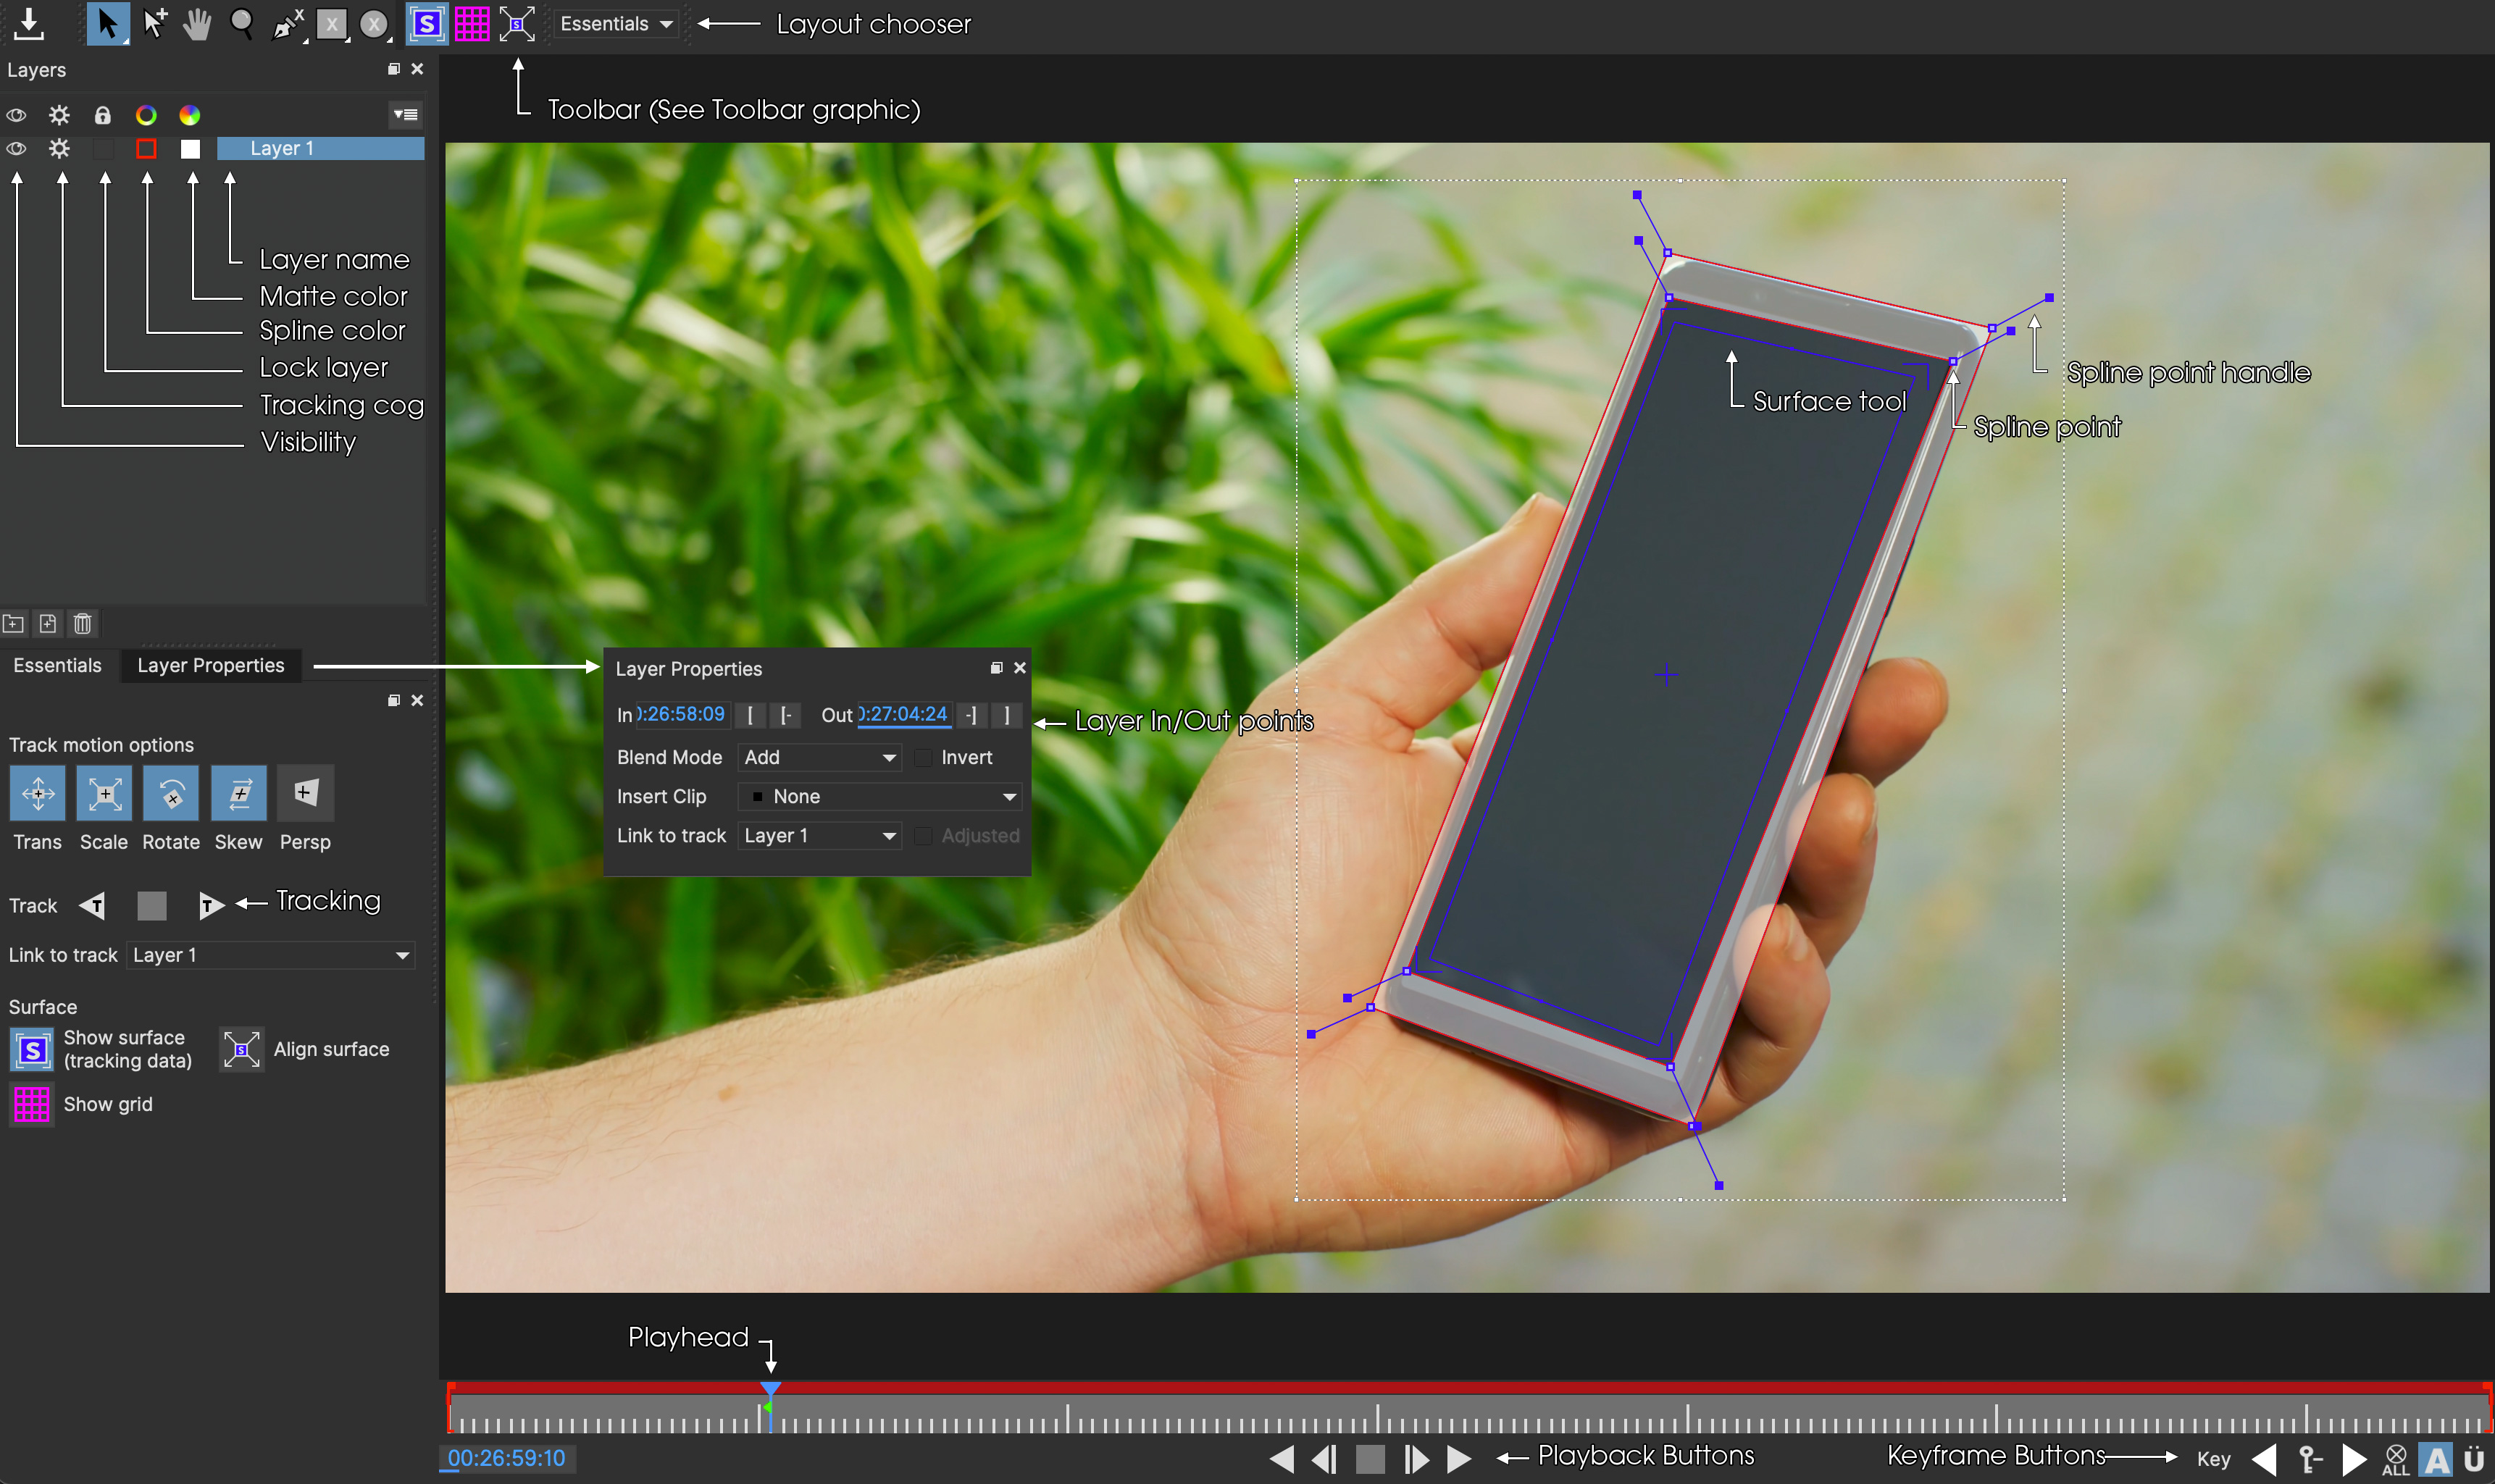
Mocha VEGAS will load in the Essentials layout by default. If it doesn’t look like the above interface, you can change it to match here:
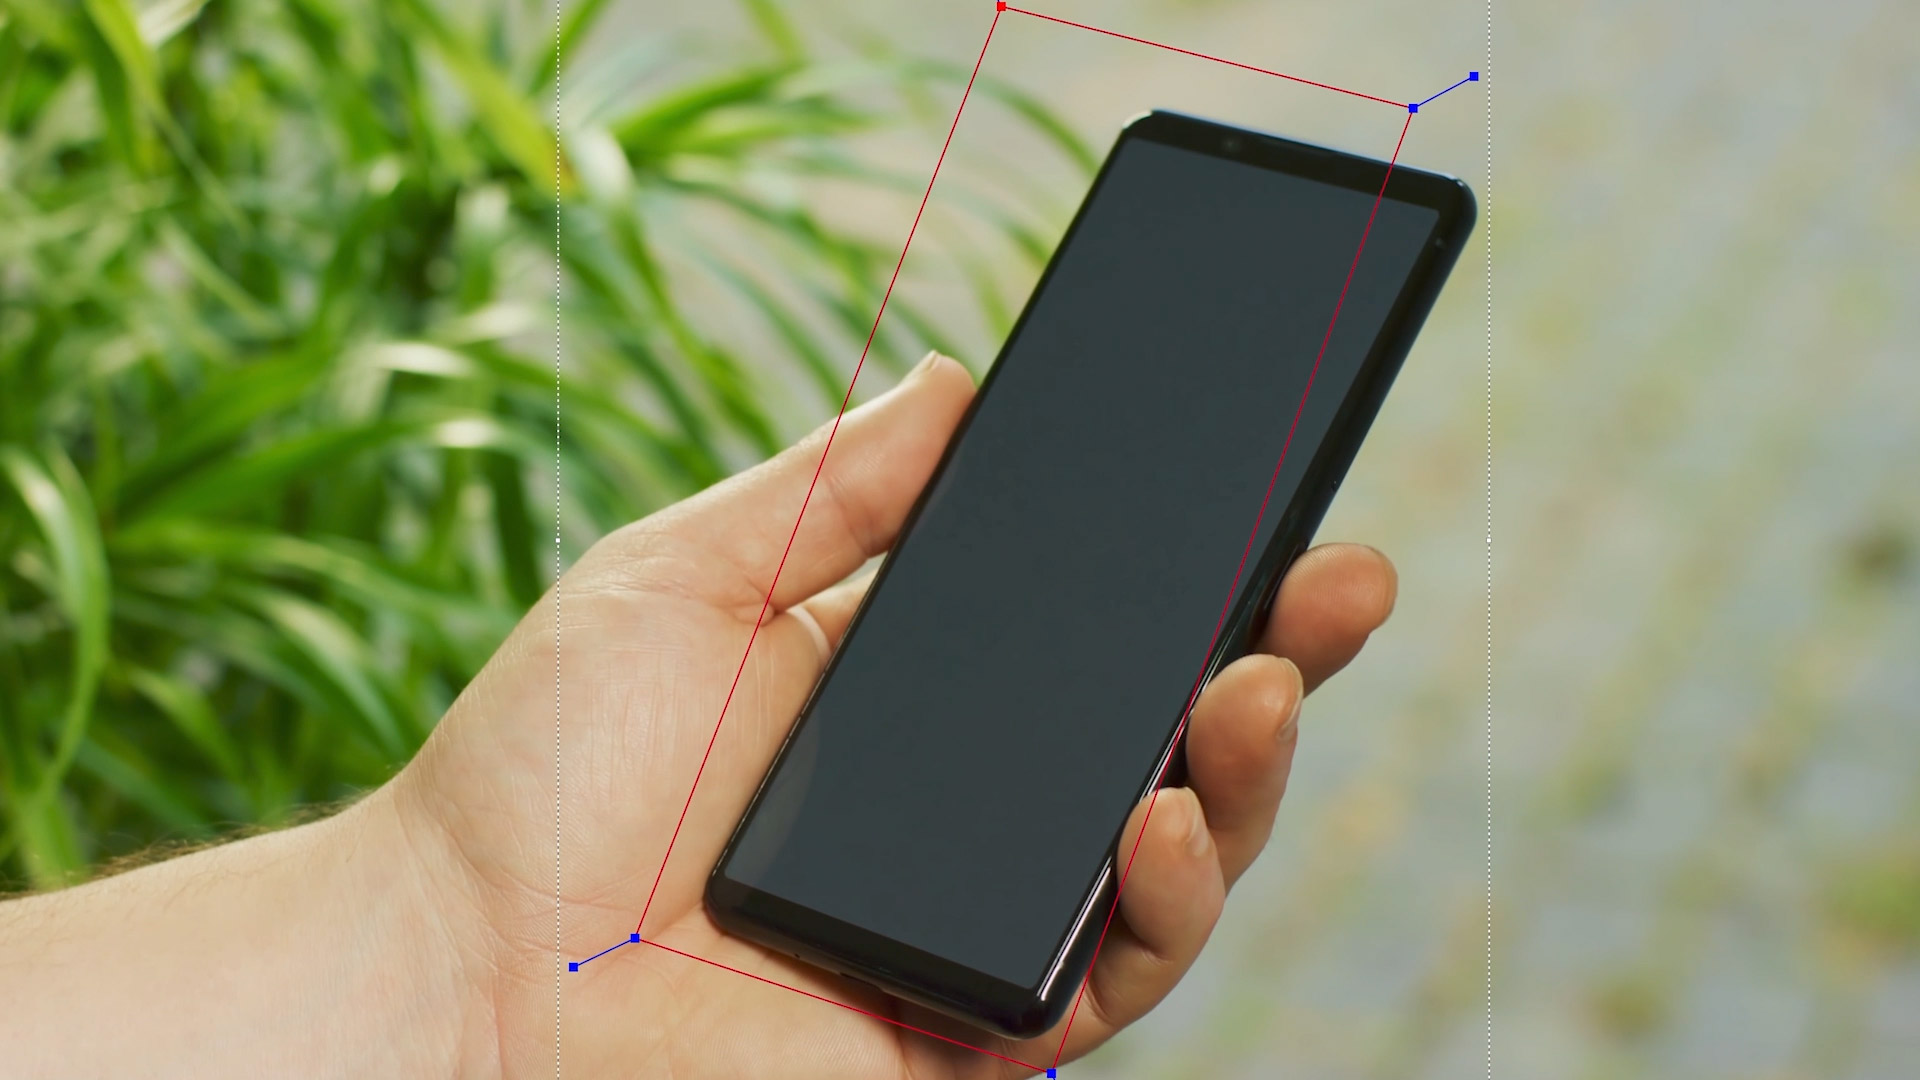
Start by drawing a shape in the view to cover the general area of the phone. You can use the pen tool to draw spline points, or use the rectangle tool to quickly draw a 4 point spline.
Once you’ve closed a shape, the tool will return to the selection "Pick" tool.
You can now use the Pick tool to adjust the shape just outside the borders of the screen.
For shots like this, it helps to have the spline shape have a little bit over the edge of the area you’re tracking to help Mocha define the plane. you don’t want this are too far out however, or it might find high-contrast areas in the background more interesting and try to latch onto that instead of the thing you’re tracking.

Obscuring reflections and obstructions
Now we have a shape drawn, we can track right? Not yet!
In this example we have a problem. The screen has reflections which will throw the planar tracker off!
Because trackers can’t determine what is a plane and what is a reflected object like humans can (yet), we need to tell Mocha to ignore the problem areas.
First, turn on the mattes for the layer. By default this is Alt+1 or you can find it under the View menu here:
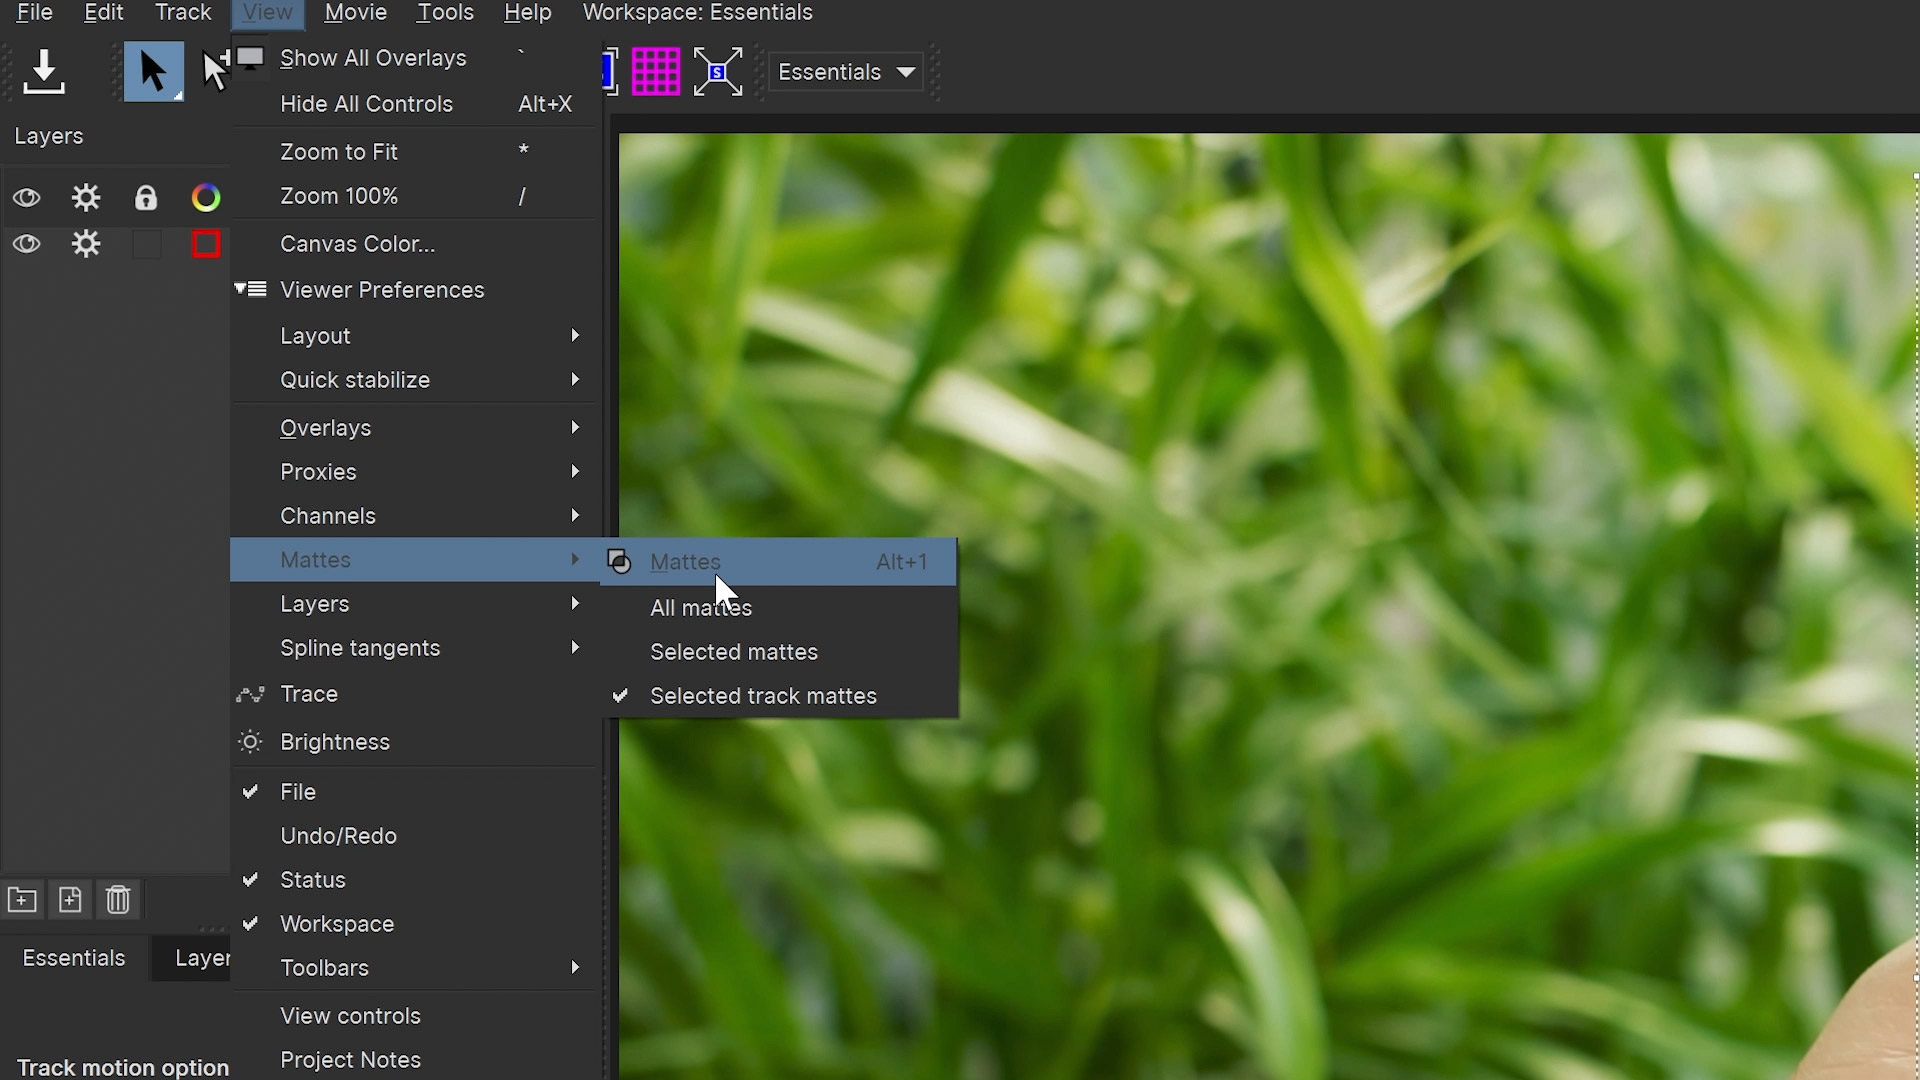
This shows the matte create by the spline:
We now want to cut a hole in the matte by adding a new spline to the existing layer. For this we need to use one of the Add Spline to Layer tools.
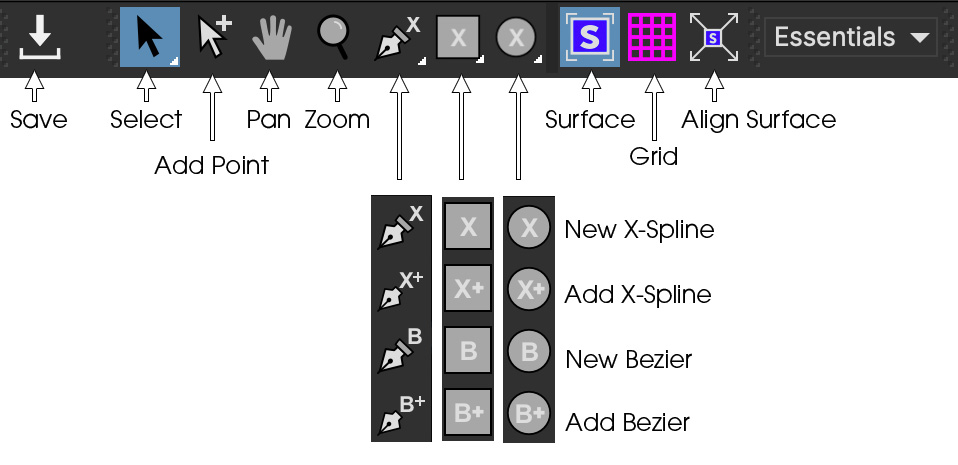
If you press and hold down the mouse button on any tool with a small arrow in the bottom right corner, you will get a series of other options related to that tool.
We want to choose a tool with the + sign next to it. In this case, we’ll choose the X-Spline pen tool "Add X-Spline to Layer".
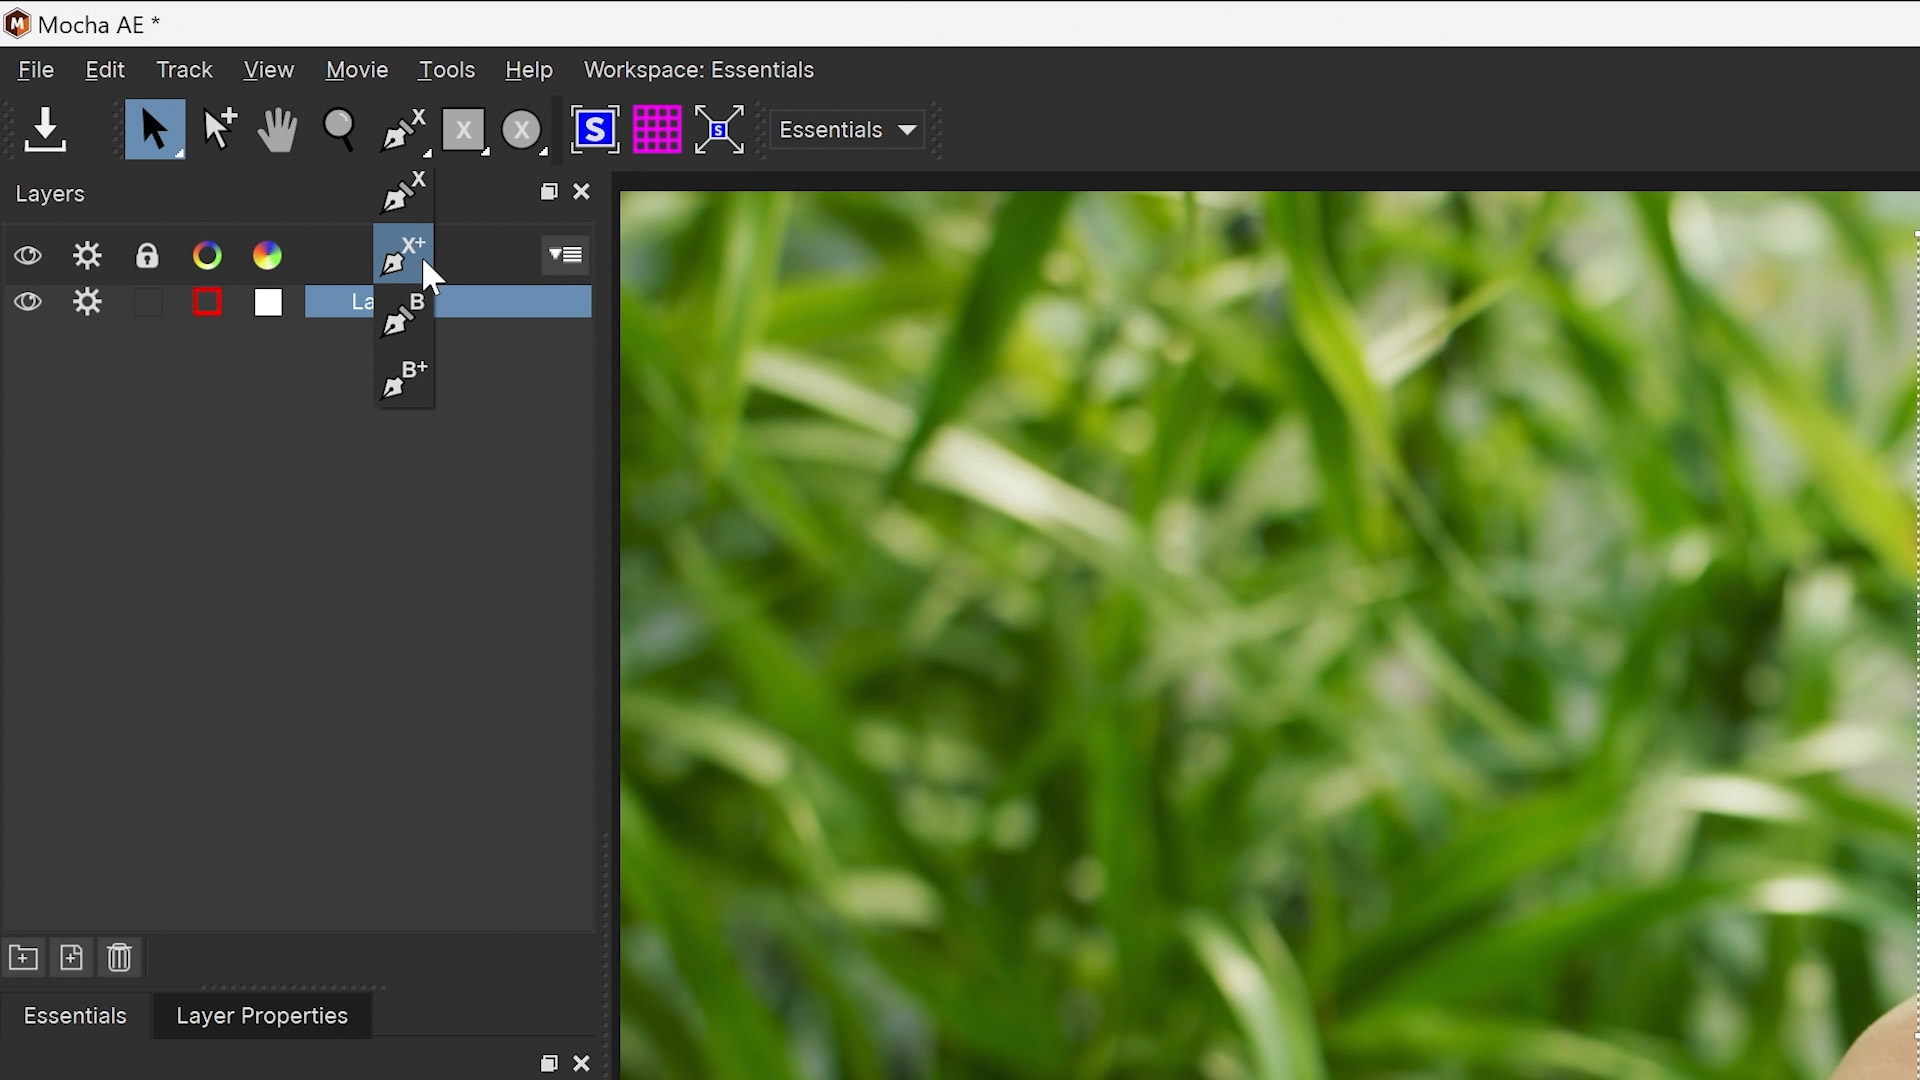
Note | A spline tool with a + sign next to it means "Add spline to the selected layer". If no layer is selected, it will create a new layer. |
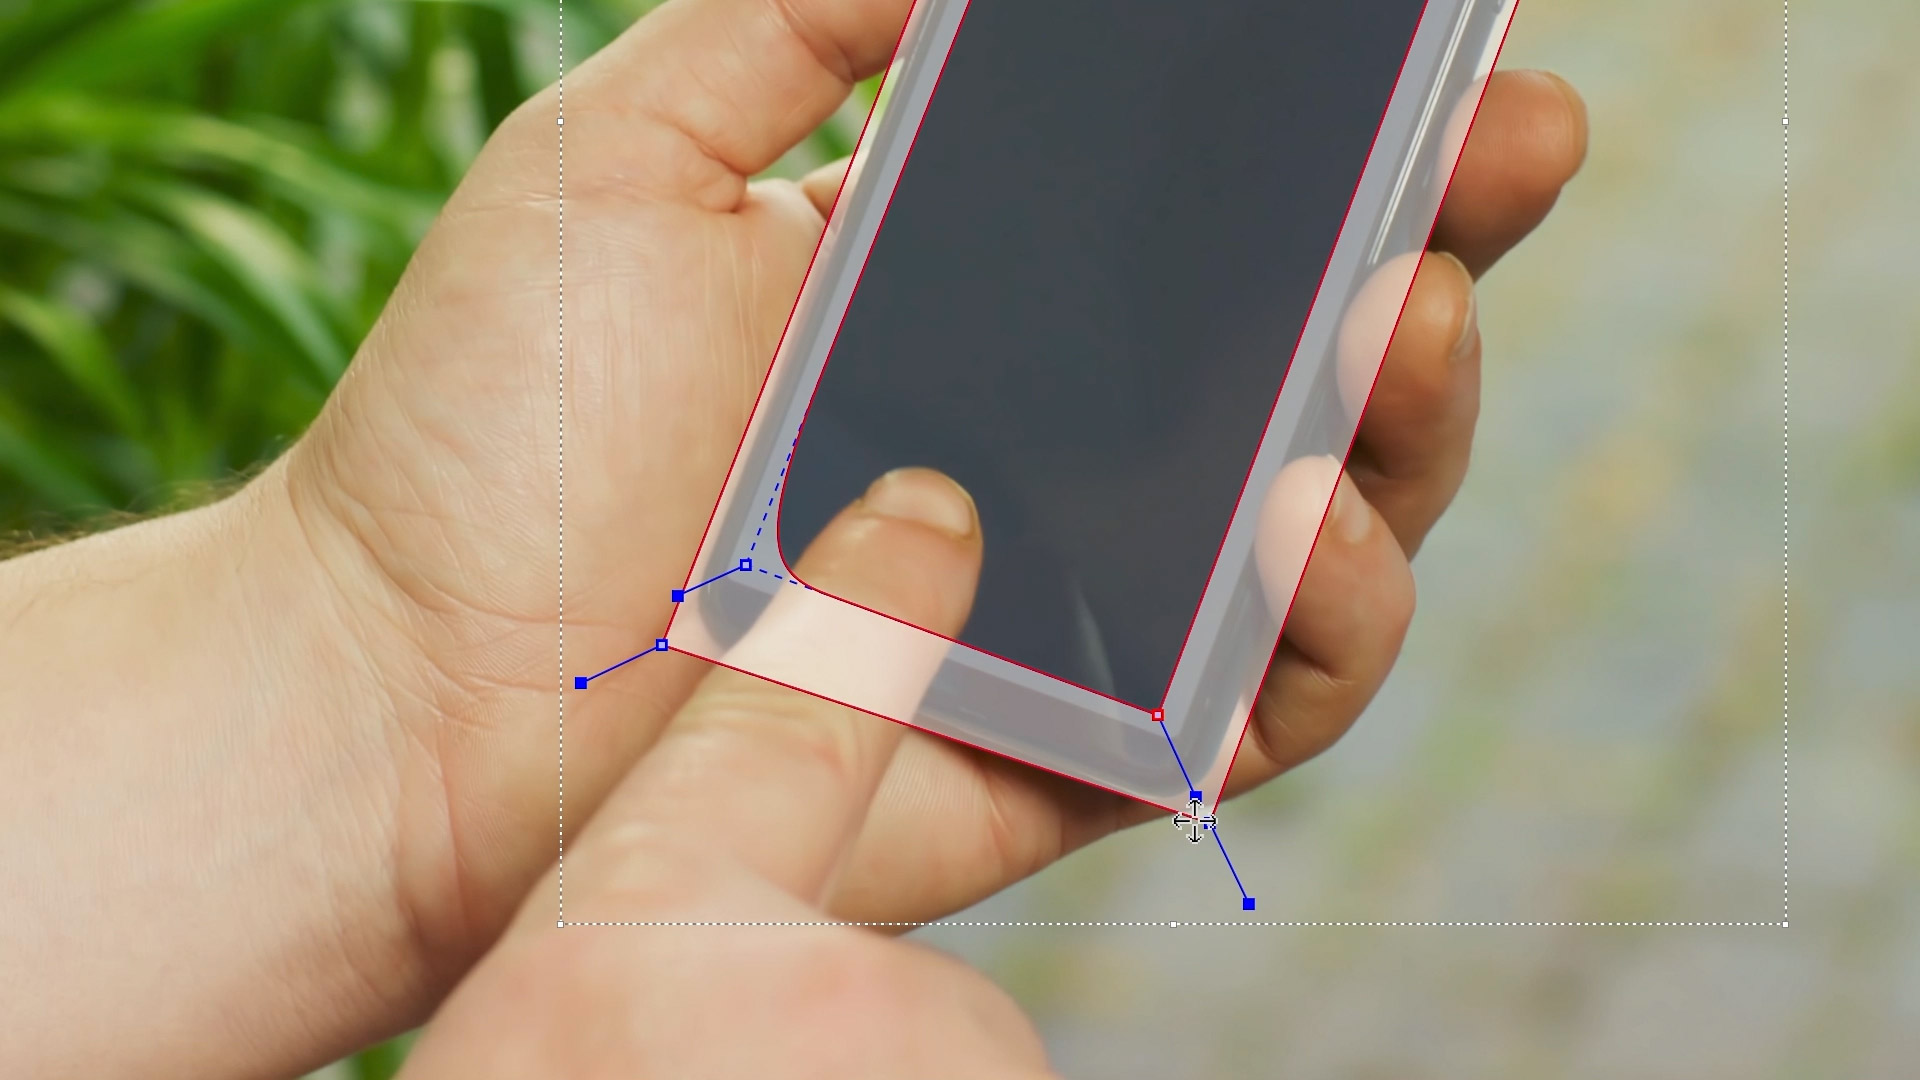
Now we can draw a new shape in the layer to cut a hole on the screen, cutting out most of the reflections. Anything in the white matte area will be tracked. Anything outside the matte area will be ignored.
You want to keep a little bit of the screen inside the matte. A small amount of edge will help define the plane while ignoring most of the problem reflections.

We can also tighten the curve of any X-Spline by pulling on the handles of the control points. A left click drag on a handle will change the selected points. A right click drag will change the handles of all points.
But there is still one glaring problem. The large finger swiping at the screen.
We need to roto out this finger for two reasons:
It will throw off the screen track if we don’t tell Mocha to ignore it.
We need to composite the finger back on top of the screen later.
To roto the finger, we’ll start by selecting the X-Spline pen tool to create a new layer (NOT the "Add x-spline" tool):
Then draw a basic shape around the finger:
We can then refine and smooth it out using the handles like we did before:
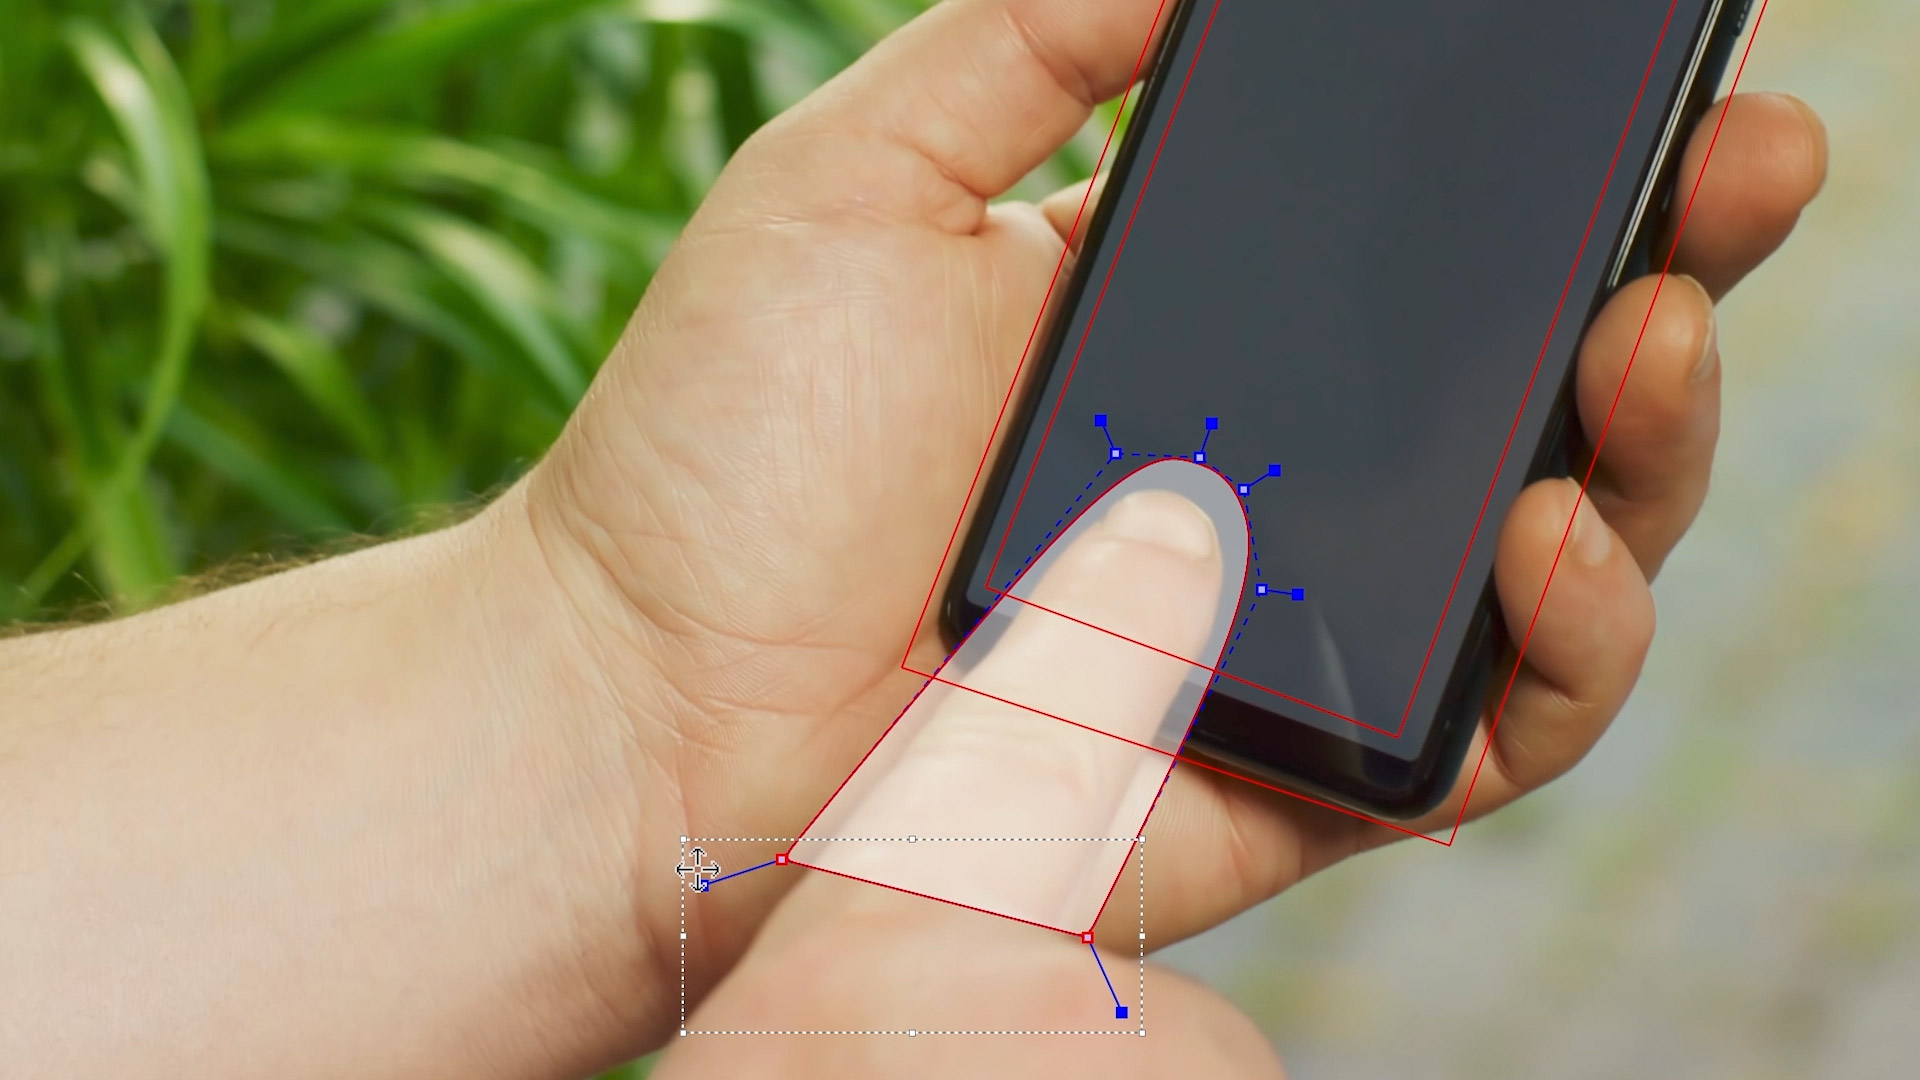
Note we’re once again creating a larger shape rather than following the edges. We’ll refine the shape later when we want to cut out the finger for compositing. For now, we want a bigger matte to make it easier to track.
Note that every time we create a new layer, it appears on top of the layer stack. In this case the finger layer we have made is on top of the screen layer and will matte out the layer below.

Layer order is very important. Layers higher in the stack obscure layers that are below. Think of it like a distance hierarchy:
Layers at the top of the stack are closest to the camera.
Layers at the bottom of the stack are furthest away.
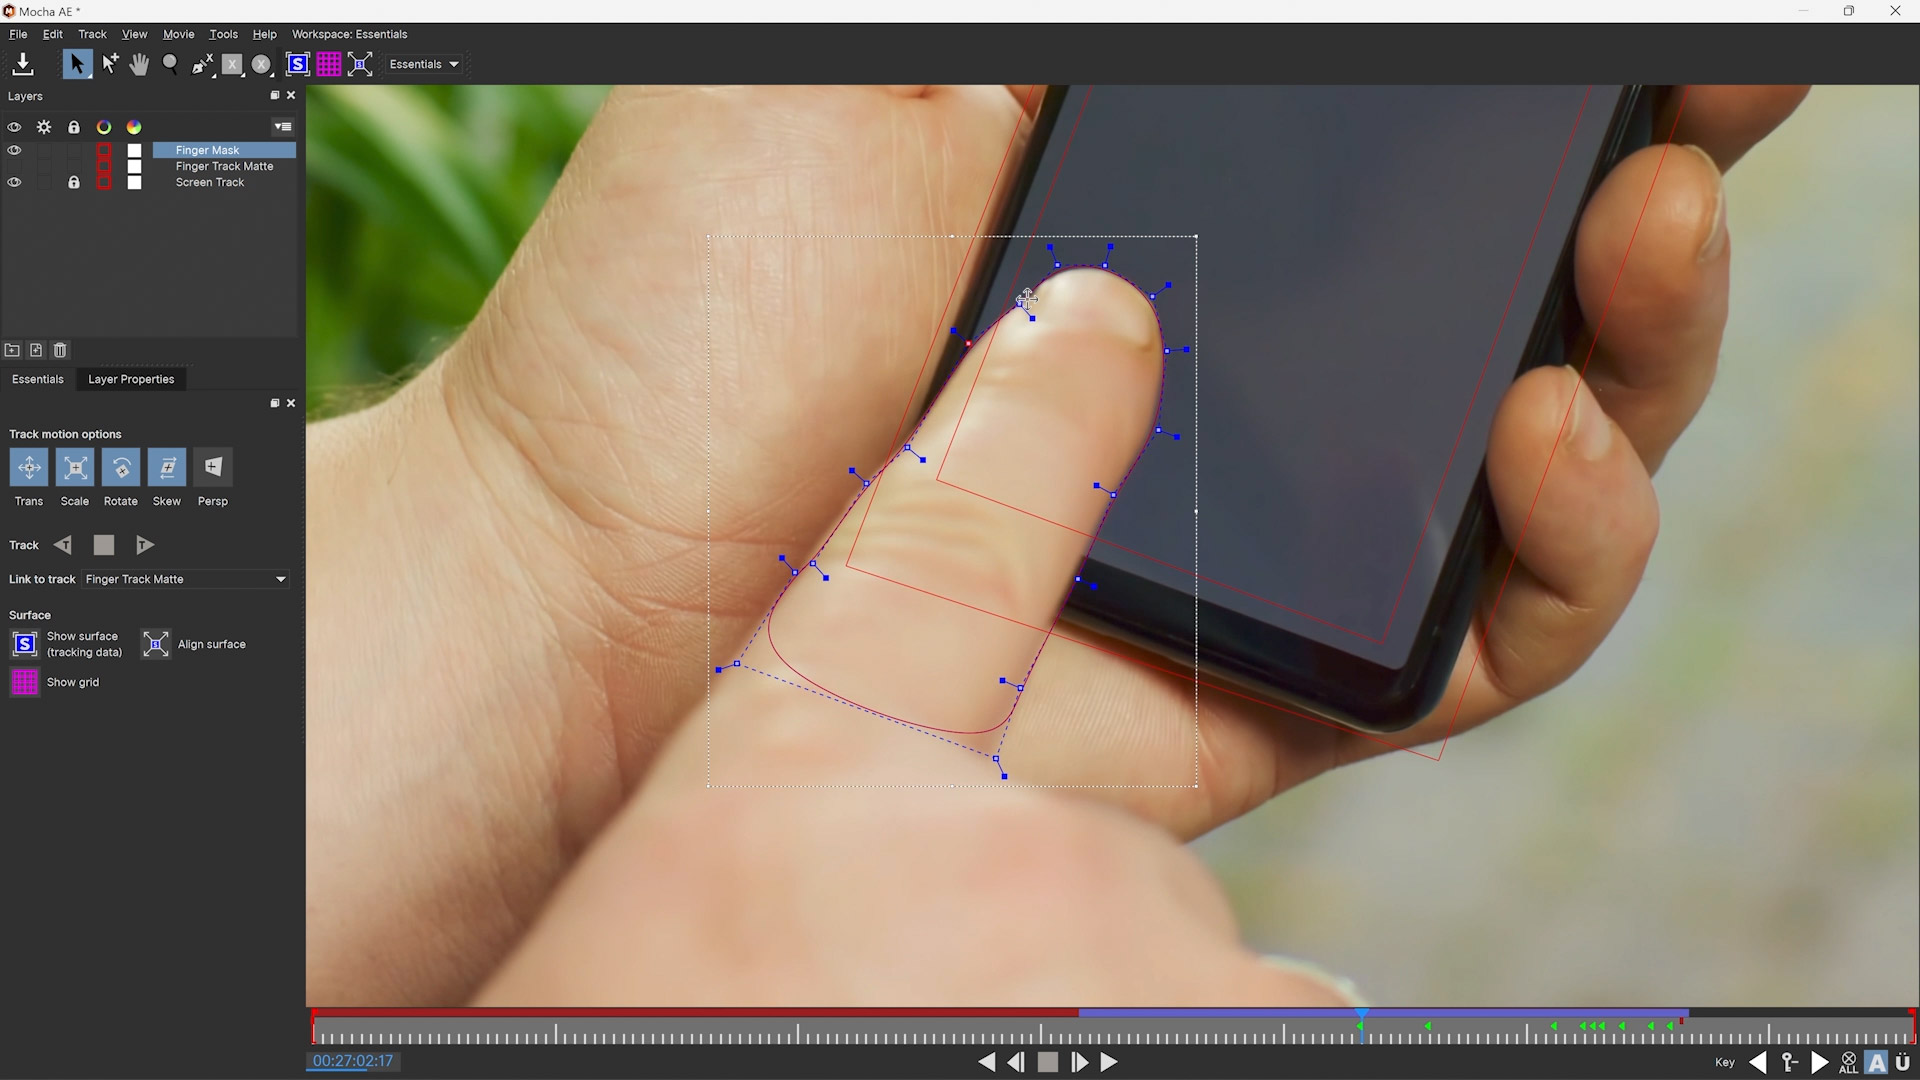
Let’s rename the layers while we’re here to make it easier to see what’s going on. Double click on any layer in the layer stack to rename it.
For clarity, we’ll use:
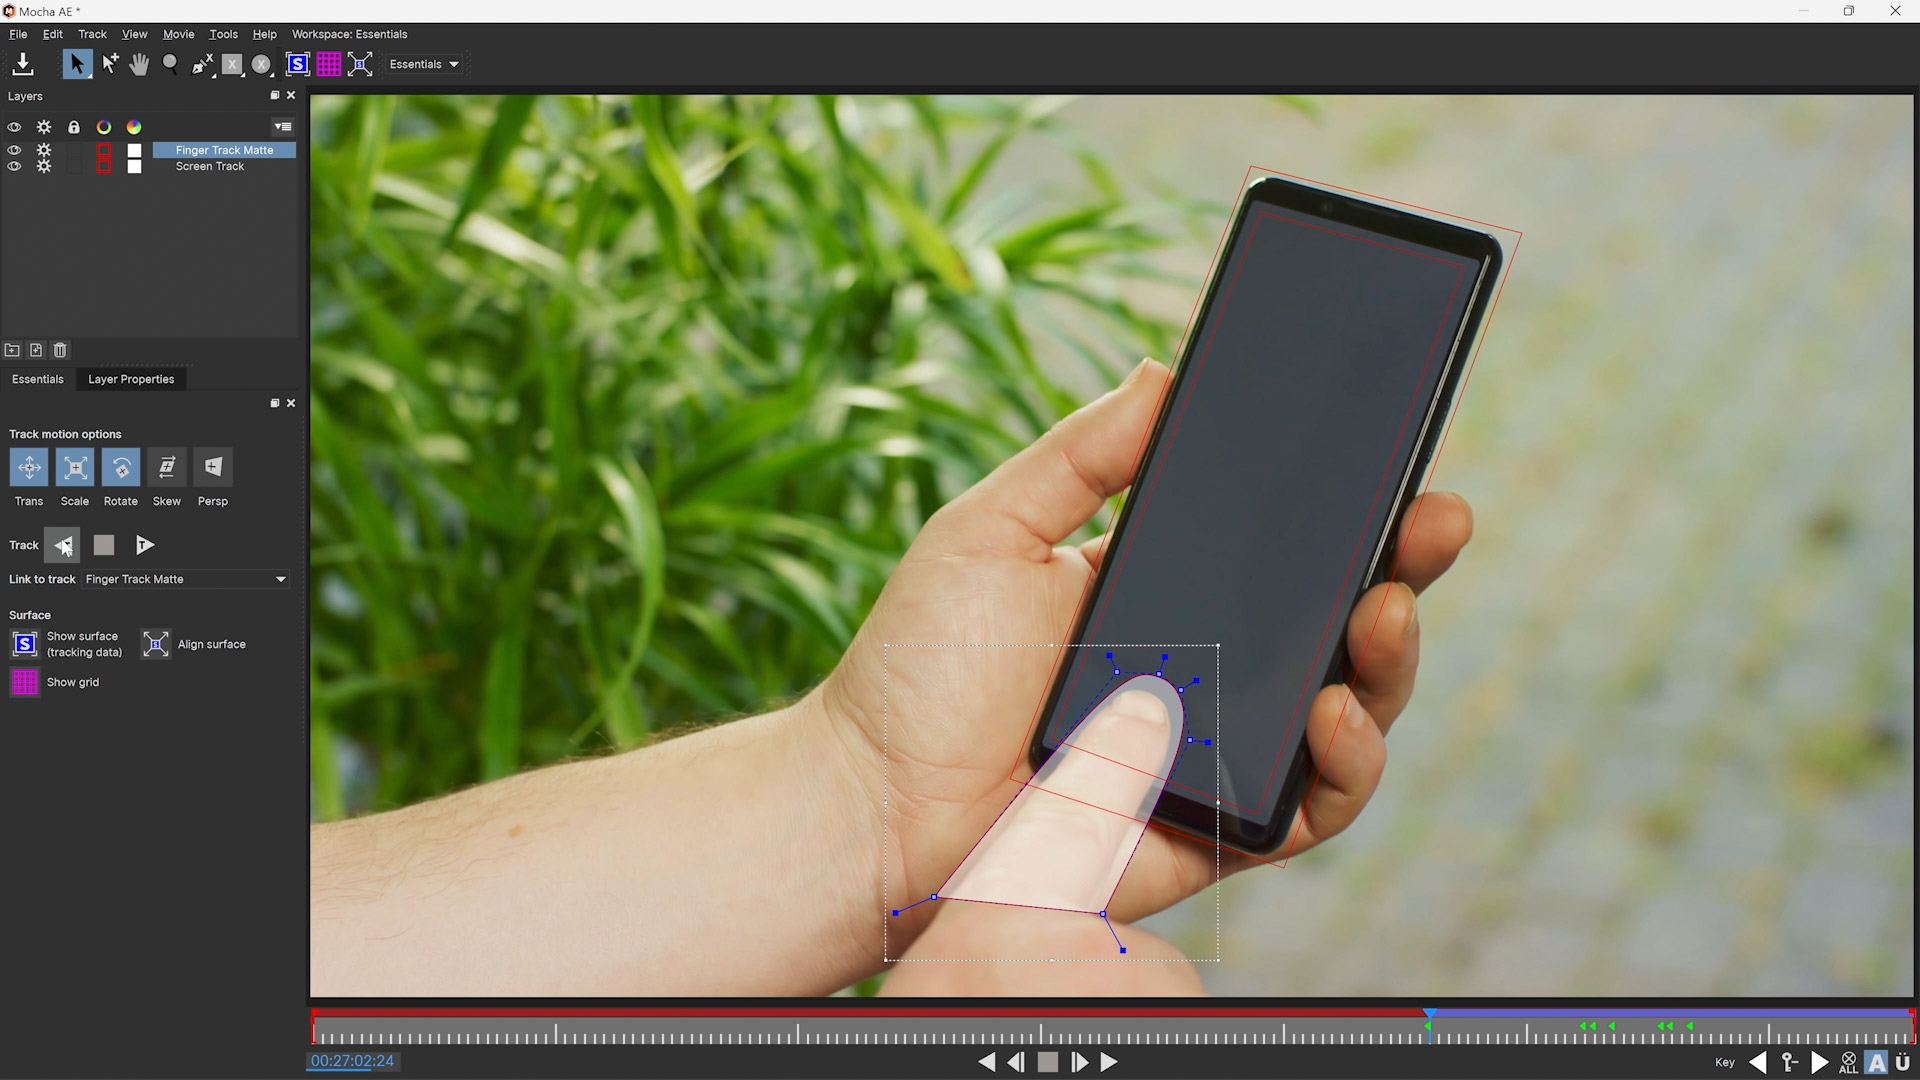
Finger Track Matte
Screen Track
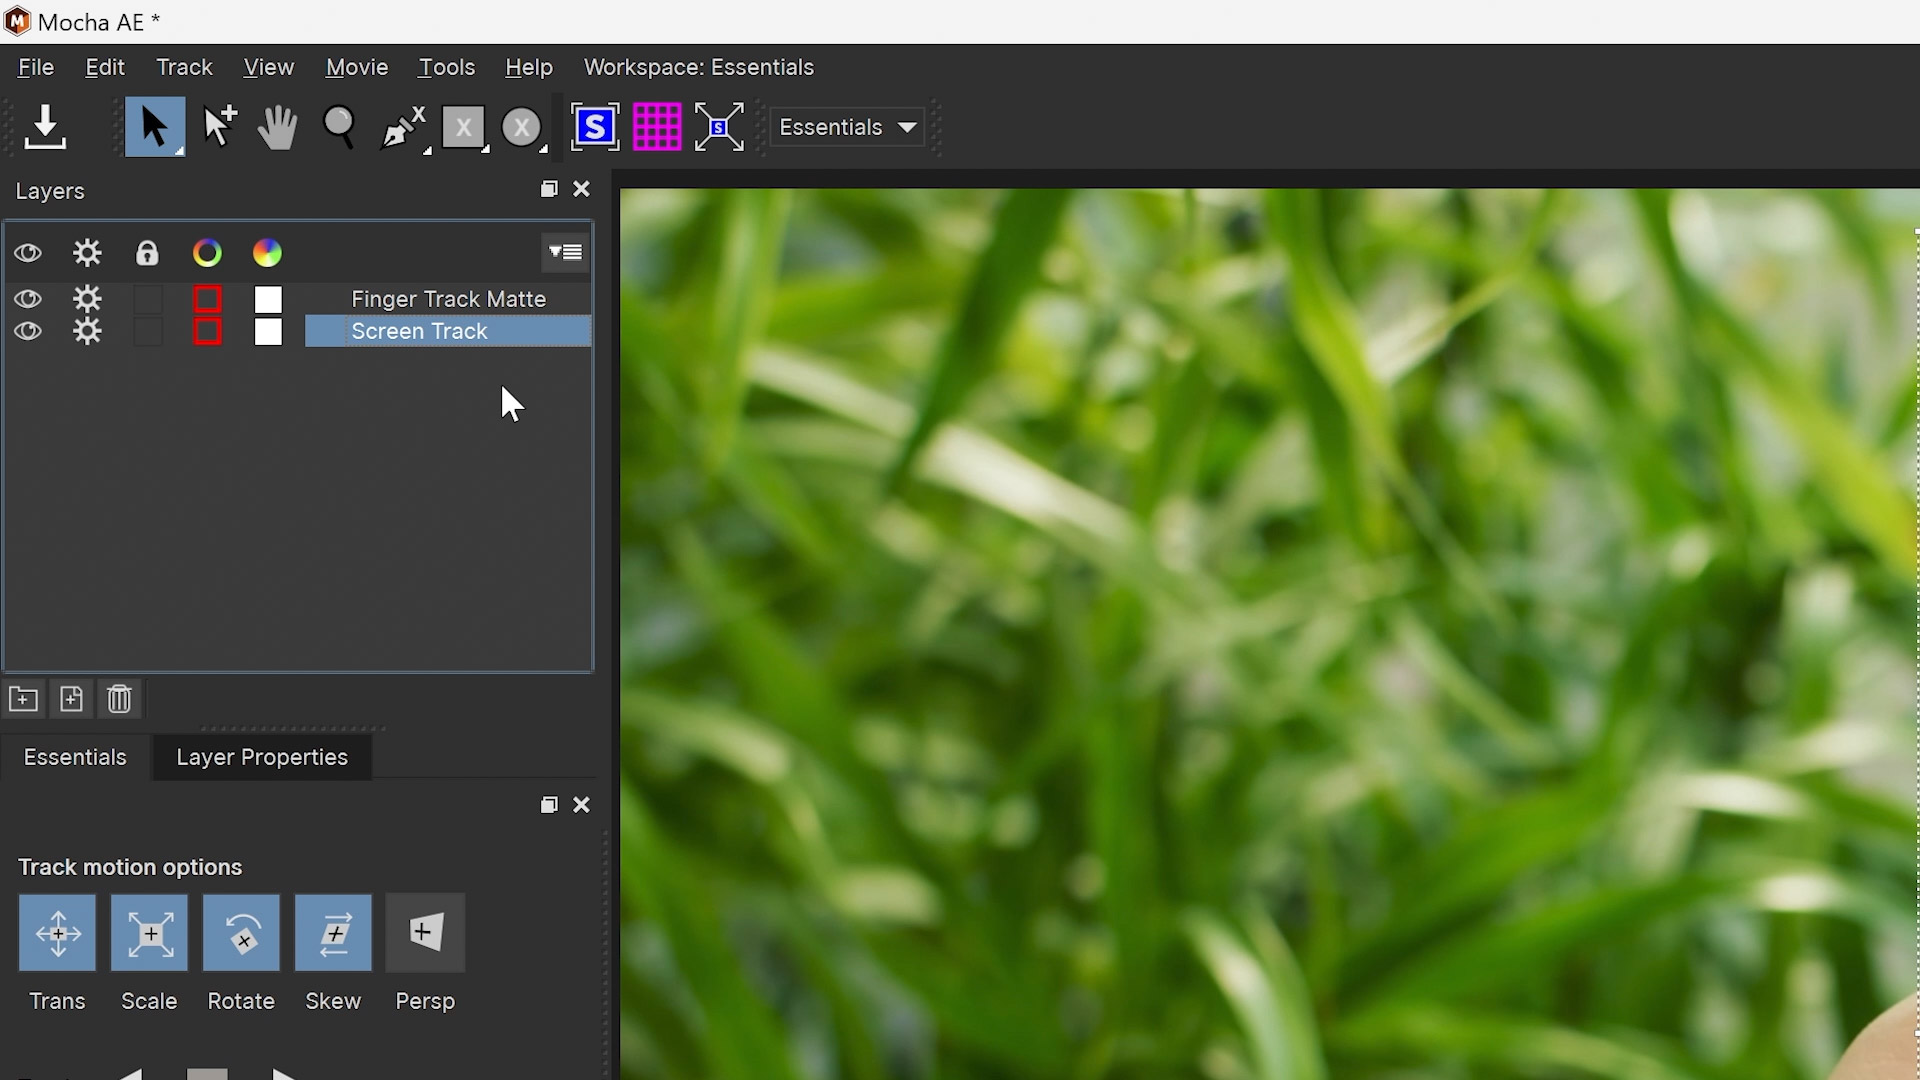
If you now select the "Screen Track" layer with the mattes still turned on, you’ll see the "Finger Track Matte" layer is also cutting a hole in the bottom edge.
Tracking process and Track Motion Types
Now we have the two layers we need, we can start tracking.
You can track multiple layers at once as long as they are set up correctly. The little cog icon next to each layer name defines whether the layer is going to be tracked or not.
Depending on what you’re going to track, you will want a different type of Motion analysed.

Translation (Trans): Just X and Y motion
Scale: How the area changes in size
Rotate: If the area rotates
Skew/Shear: If the planar area skews or distorts
Perspective (Persp): If the area turns toward or away from the camera.
Note | Each motion type relies on the previous one, so for example if you select Perspective, the other motion types will also be selected. |
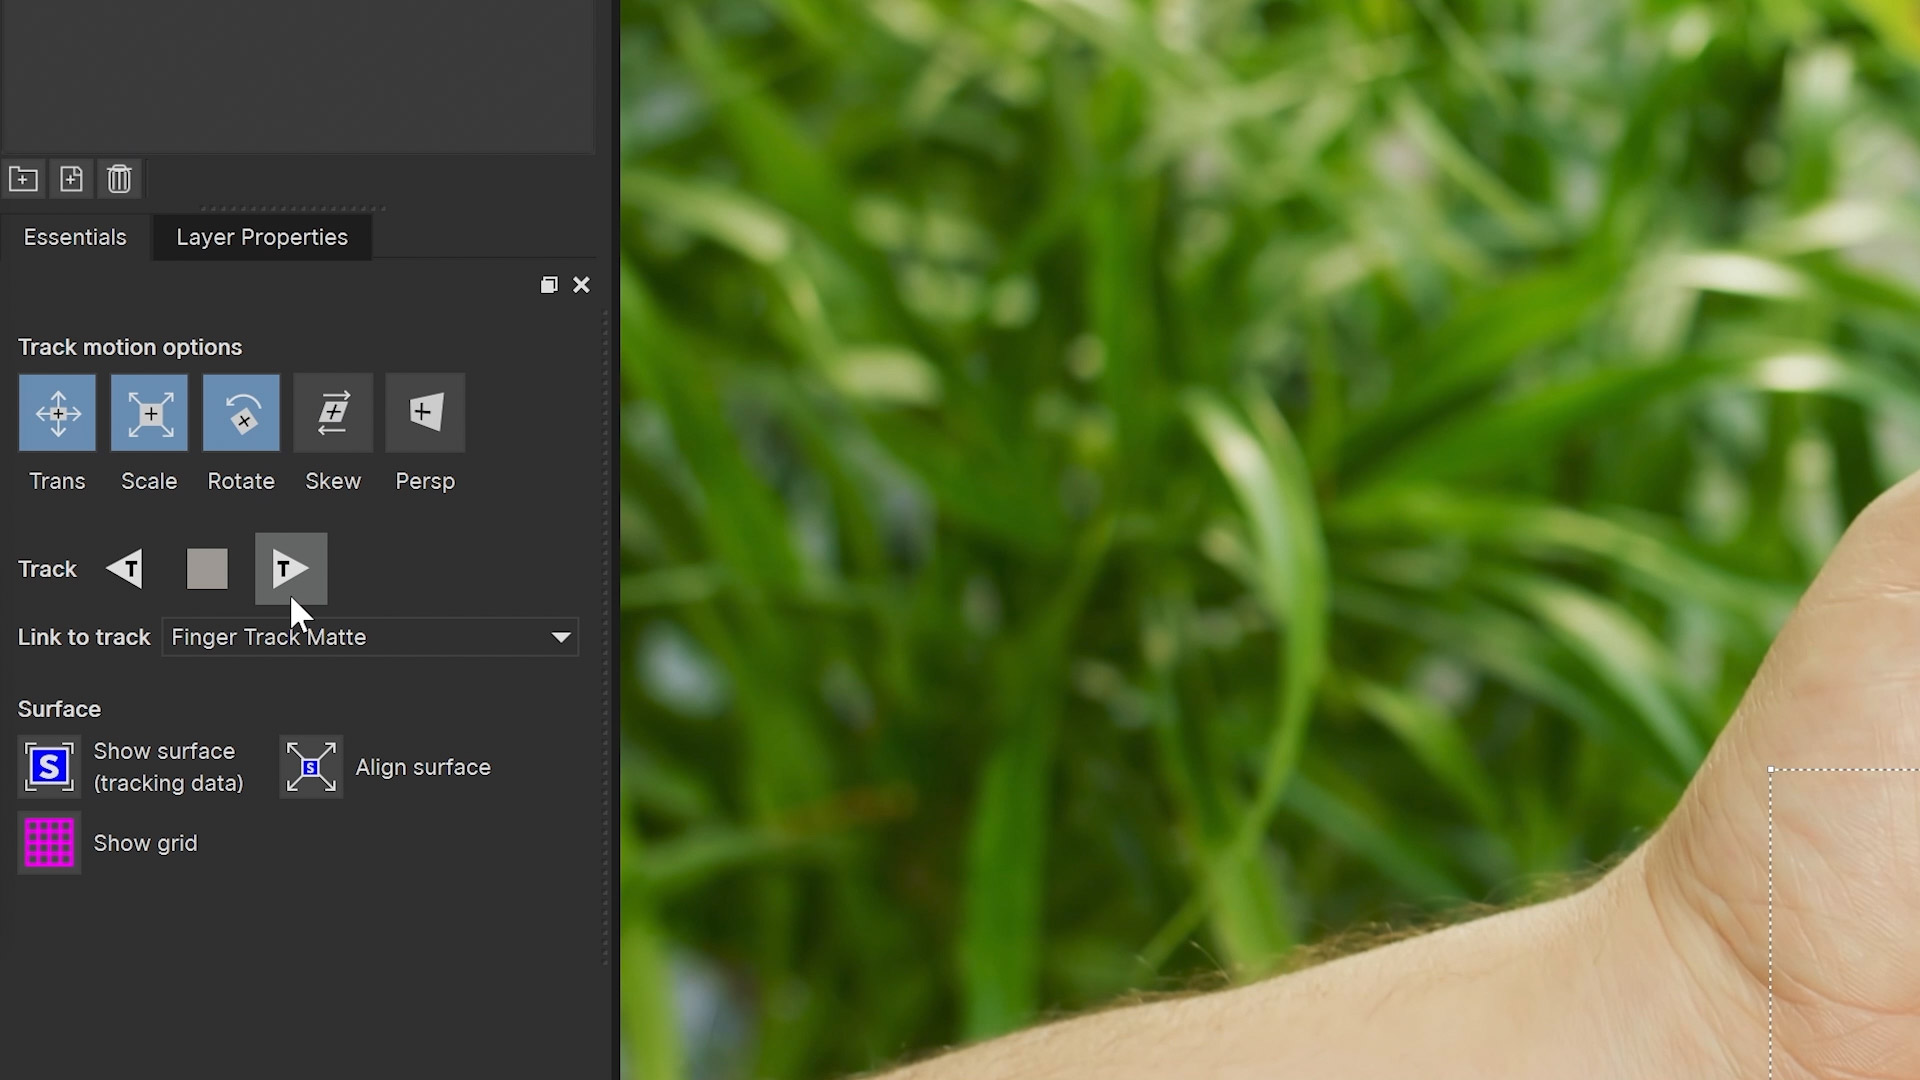
In our example, the finger is moving organically and has a lot of motion blur so we’ll reduce the motion types and just focus on changes to translation, scale and rotation. The screen however needs to be very accurate, so we want all motion types including Perspective.
Select each layer and set the track motion types accordingly:
Finger Track Matte: Select Translation, Scale and Rotation
Screen Track Mattes: Select all motion types (or just Click Perspective and the rest will be selected).
Now we can start tracking!
In the Essentials panel you’ll see two arrows with a little T in them.
These are the track forwards and track backwards buttons.
You can track in either direction. Let’s start by tracking forwards:
As you track, the timeline playhead will move and you’ll see the splines update as the objects you’ve drawn around are recognised and updated each frame.
However, at some point you will probably hit this message and everything will stop:
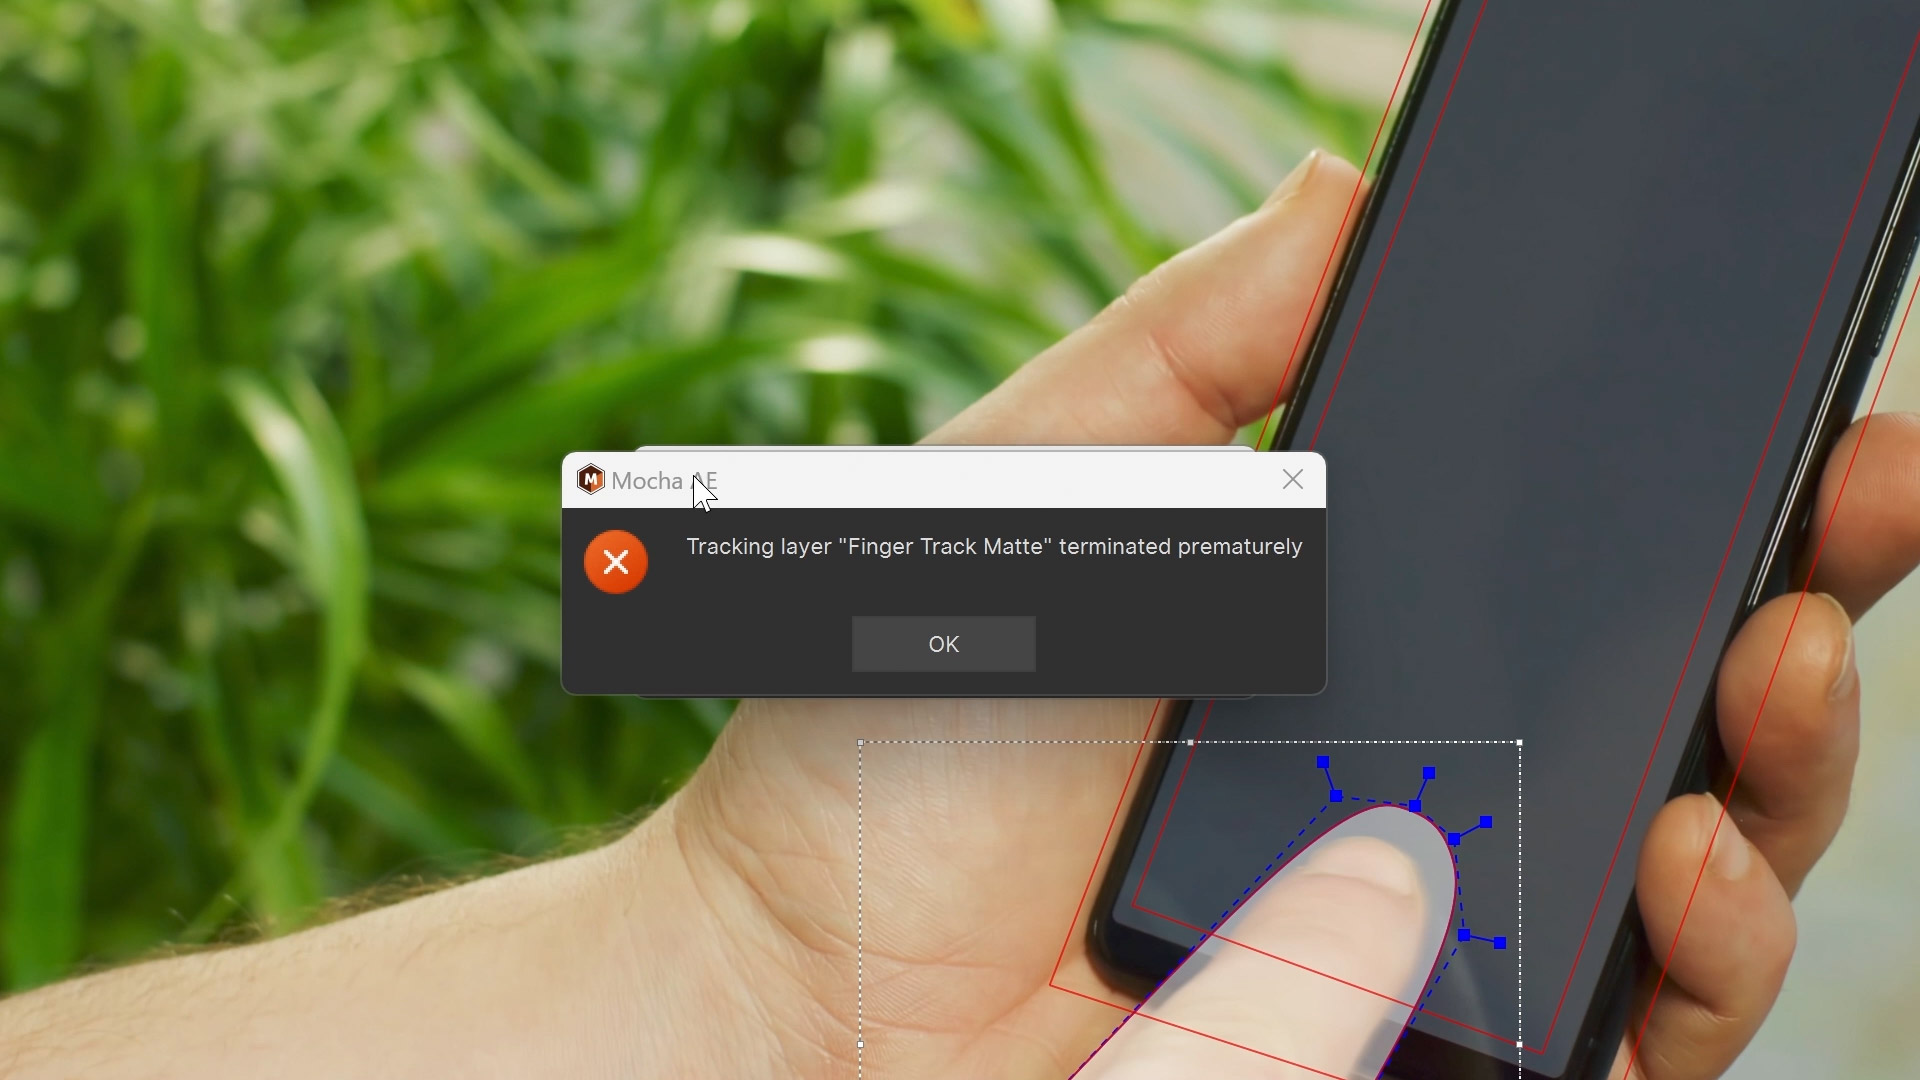
This message just means "We couldn’t find the thing you were tracking in the next frame". Usually, this is because:
The area you’re tracking has become too blurry or out of focus to have recognisable pixels
The area has changed significantly in light or texture or become so obscured by something else that there are no useful pixels left.
The area has gone off screen or is entirely covered by a foreground track matte
In this case, the finger has become really blurry during the swiping part of the motion:
Since we only care about the spline part of the finger layer and not the track, we can finish the finger portion by just keyframing the spline points by hand.
Move the playhead a little further along the timeline and adjust the spline points so they cover the finger in the same way until the finger is no longer covering the screen.
Notice that every time you adjust the shape around the finger, a new spline keyframe is created:
Important | It is important to know that keyframing the spline control points doesn’t keyframe the tracking data. It only updates the spline position. |
When you have finished tracking forwards, go back to where you started and track backwards.
You can stop the track when the finger moves off the screen again and we can trim this layer as it is no longer needed.
Trimming layers
Sometimes you don’t need to see a layer for the entire timeline. For example, in this shot, we only care about the finger when it is covering the phone.
You can turn off layers so they no longer contribute to a scene by using Layer Ranges.
Go to Layer Properties tab that sits next to the essentials tab on the left hand side of the GUI:
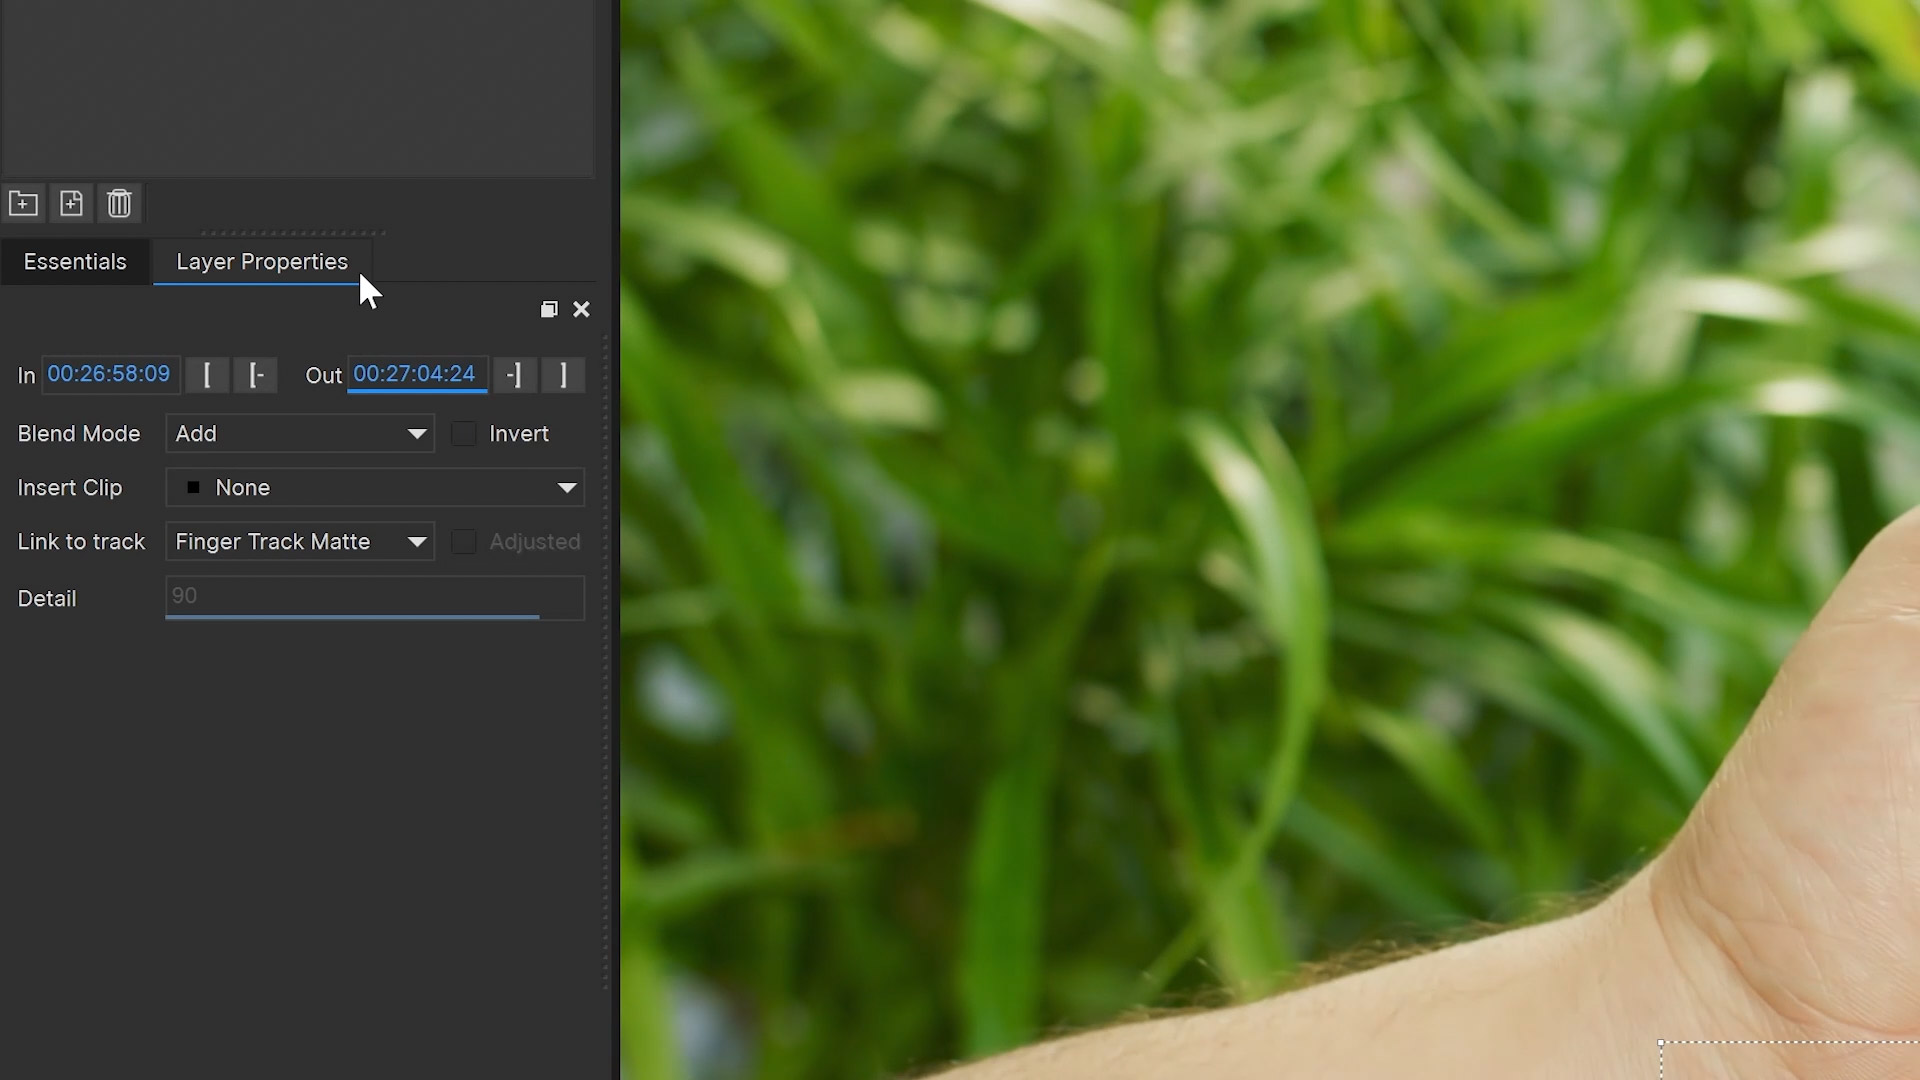
Next, move the playhead to where the finger is off the phone screen and click the In point:
Do the same at the other end of the timeline, this time clicking the out point. When you’re done you should see two small tabs on the timeline indicating where the layer ranges are set for the finger layer:
Now when you move the playhead outside these areas, the finger will not show up and won’t contribute to the track.
Checking Tracking Data
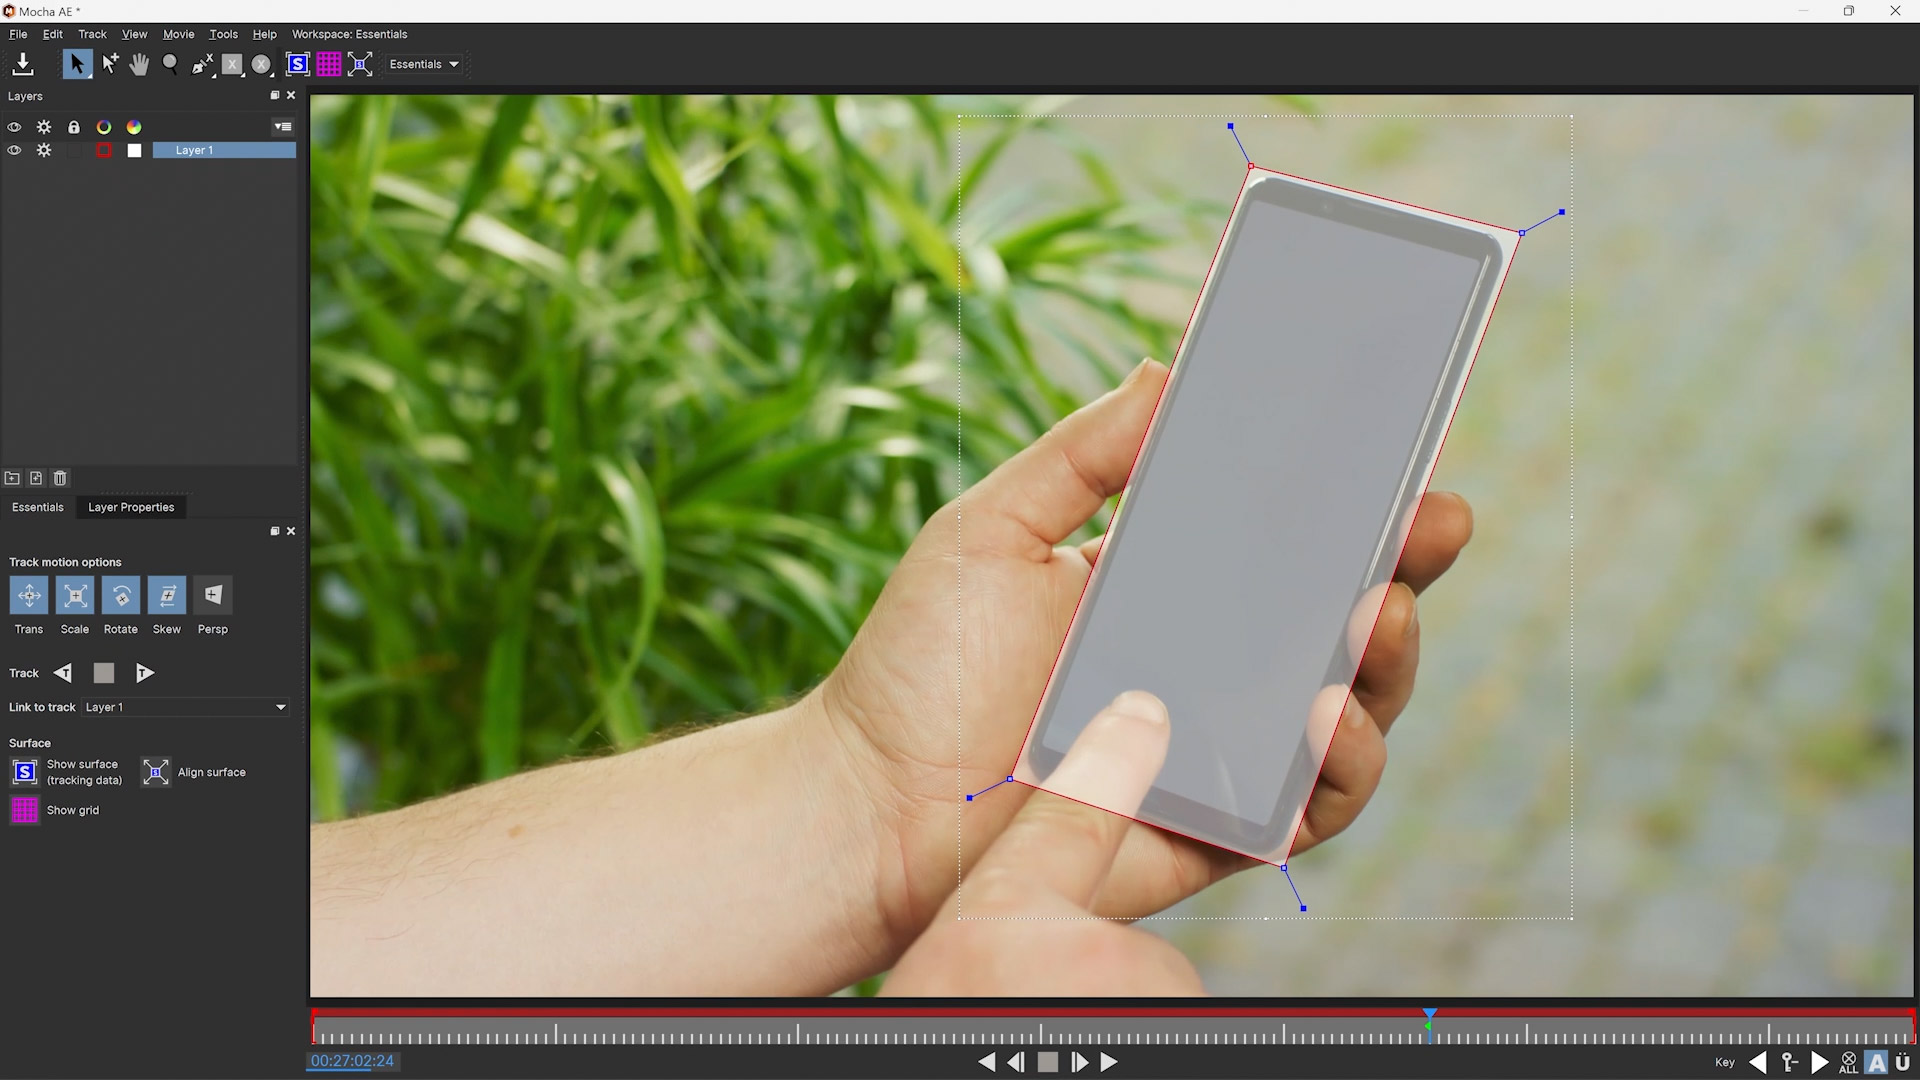
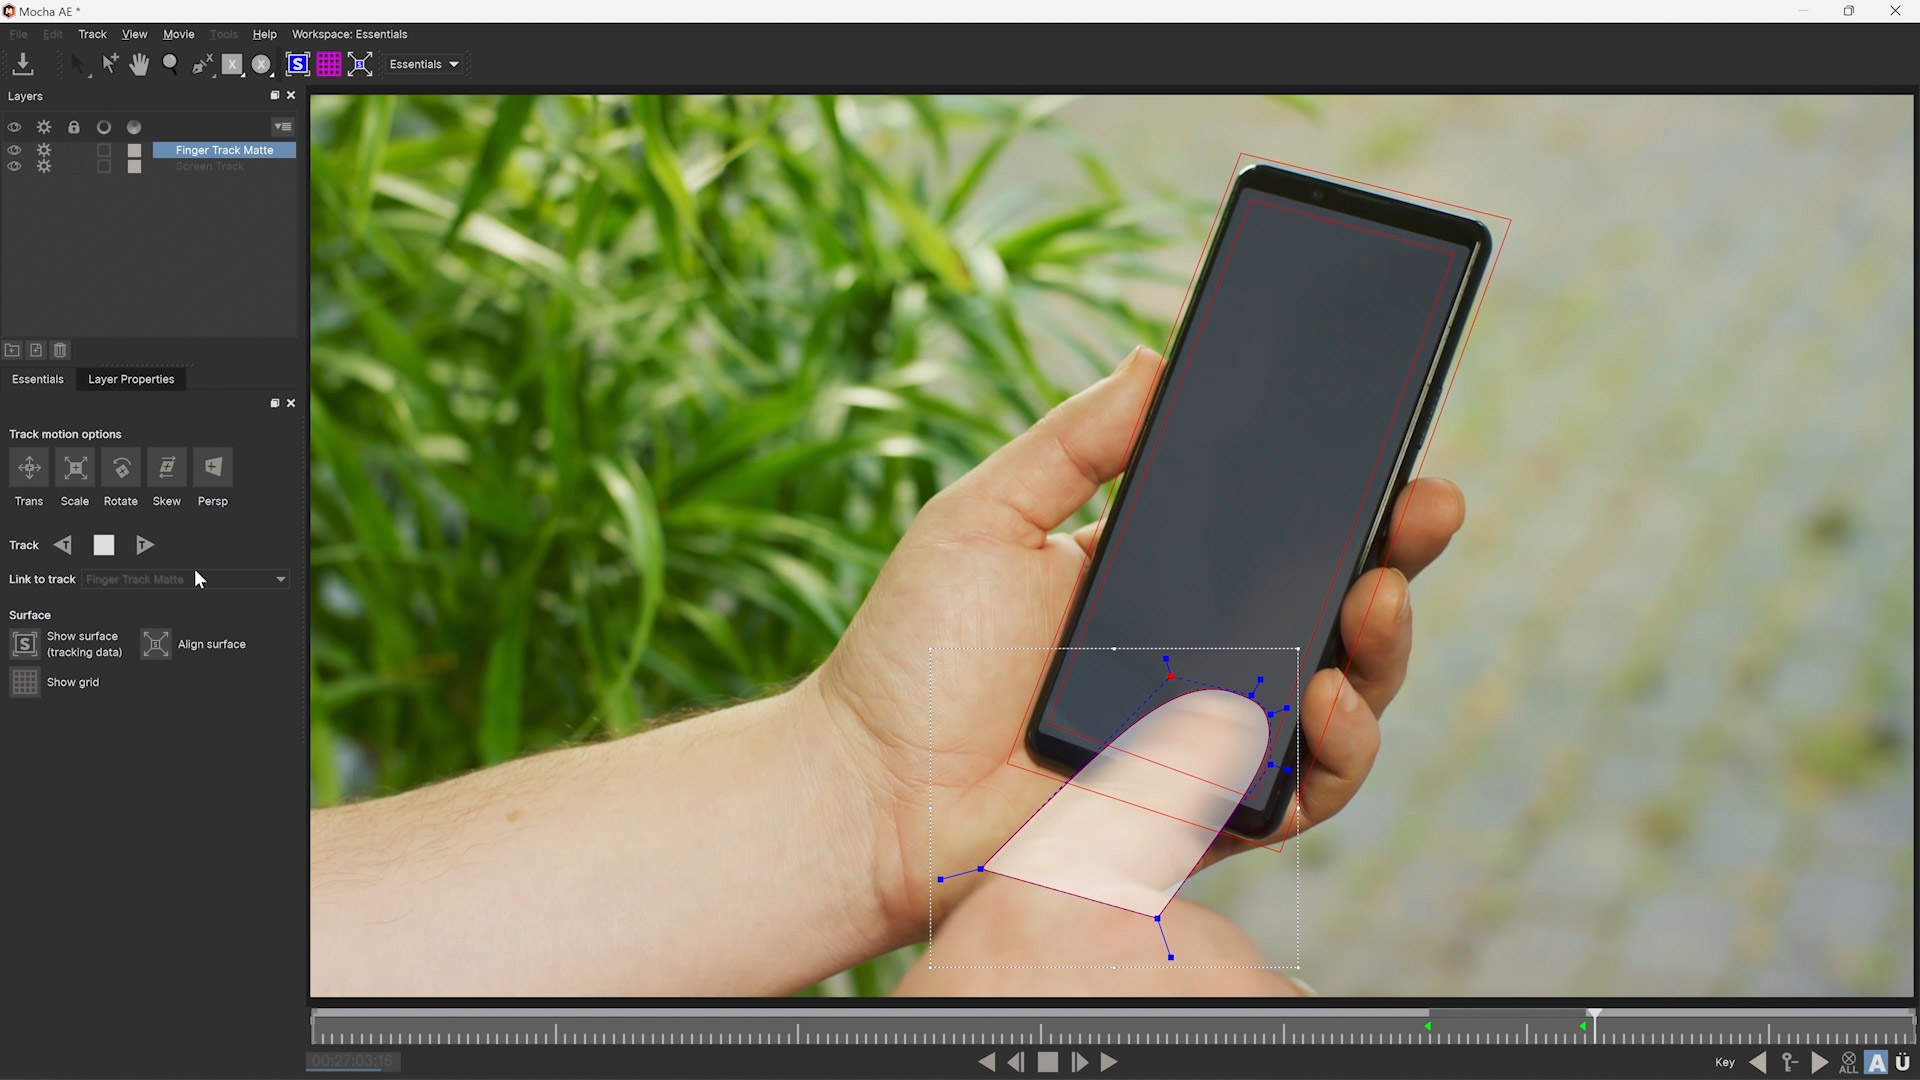
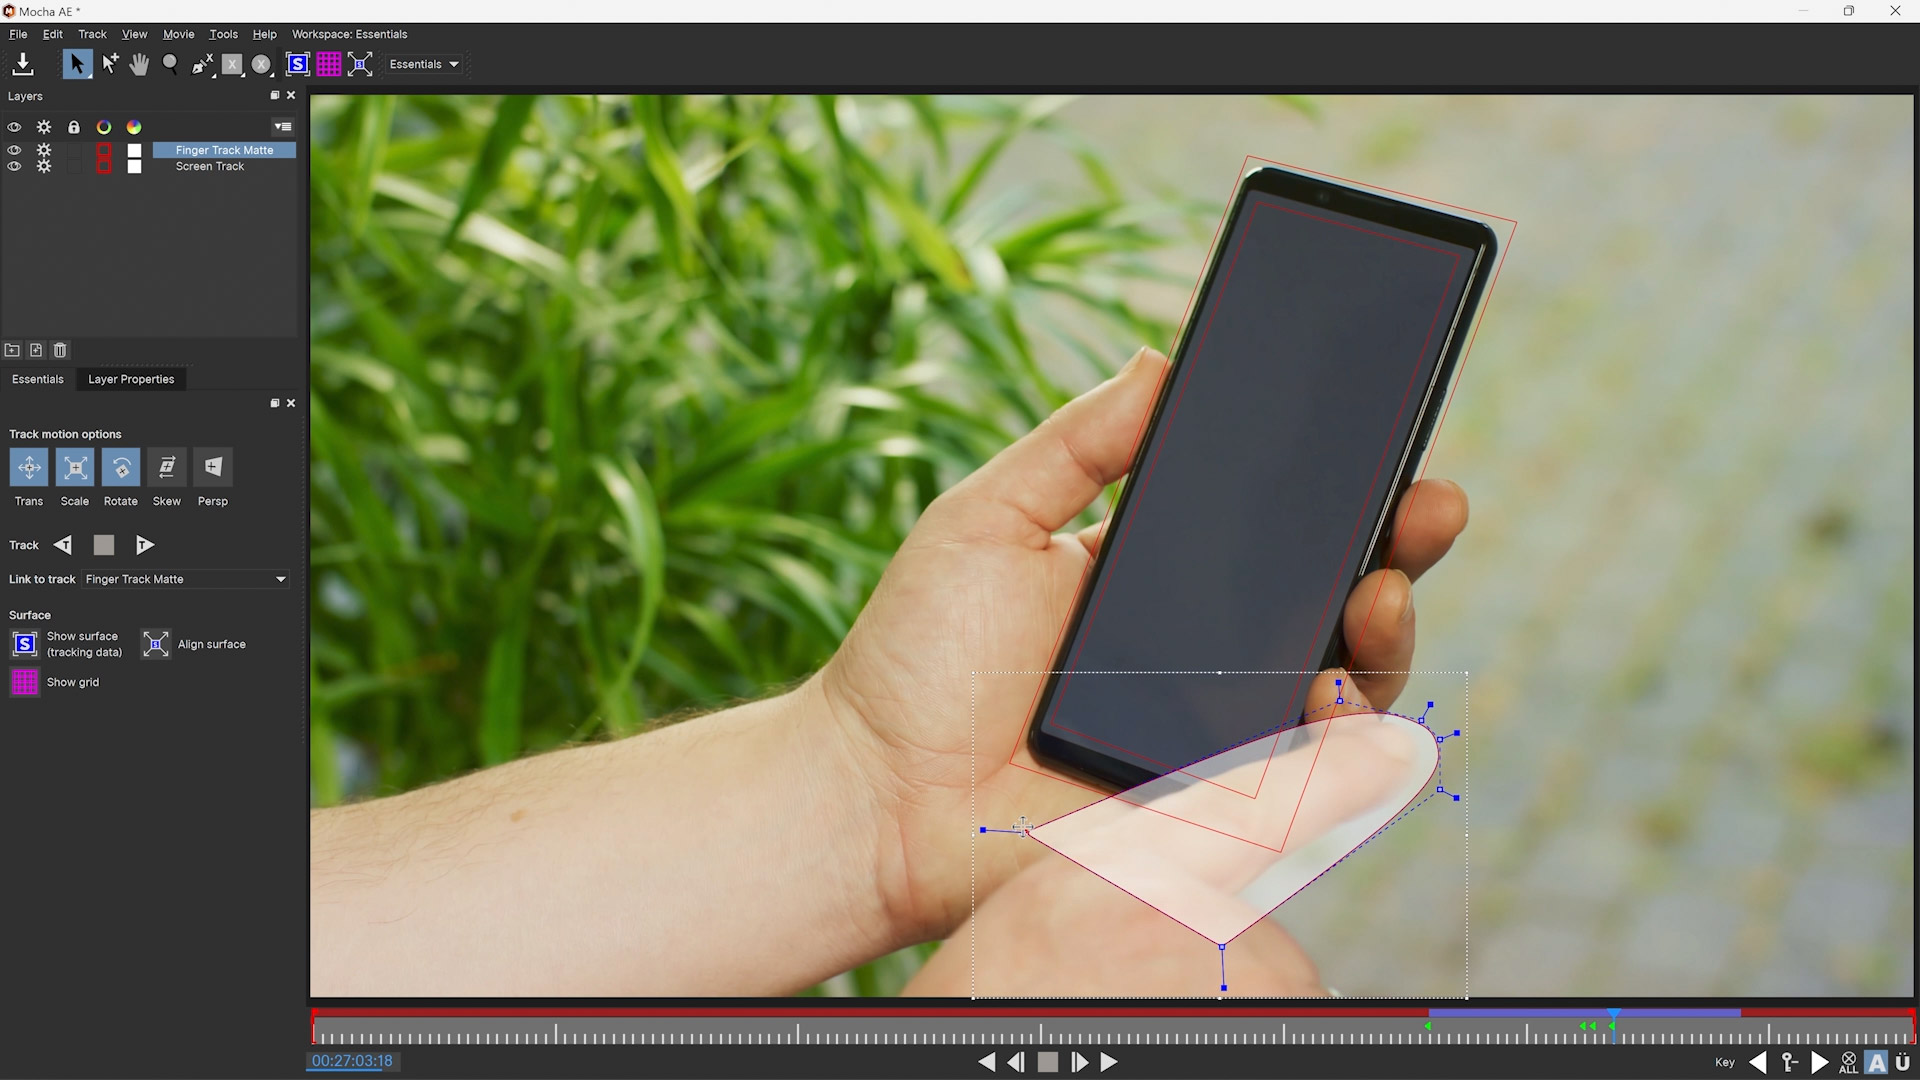
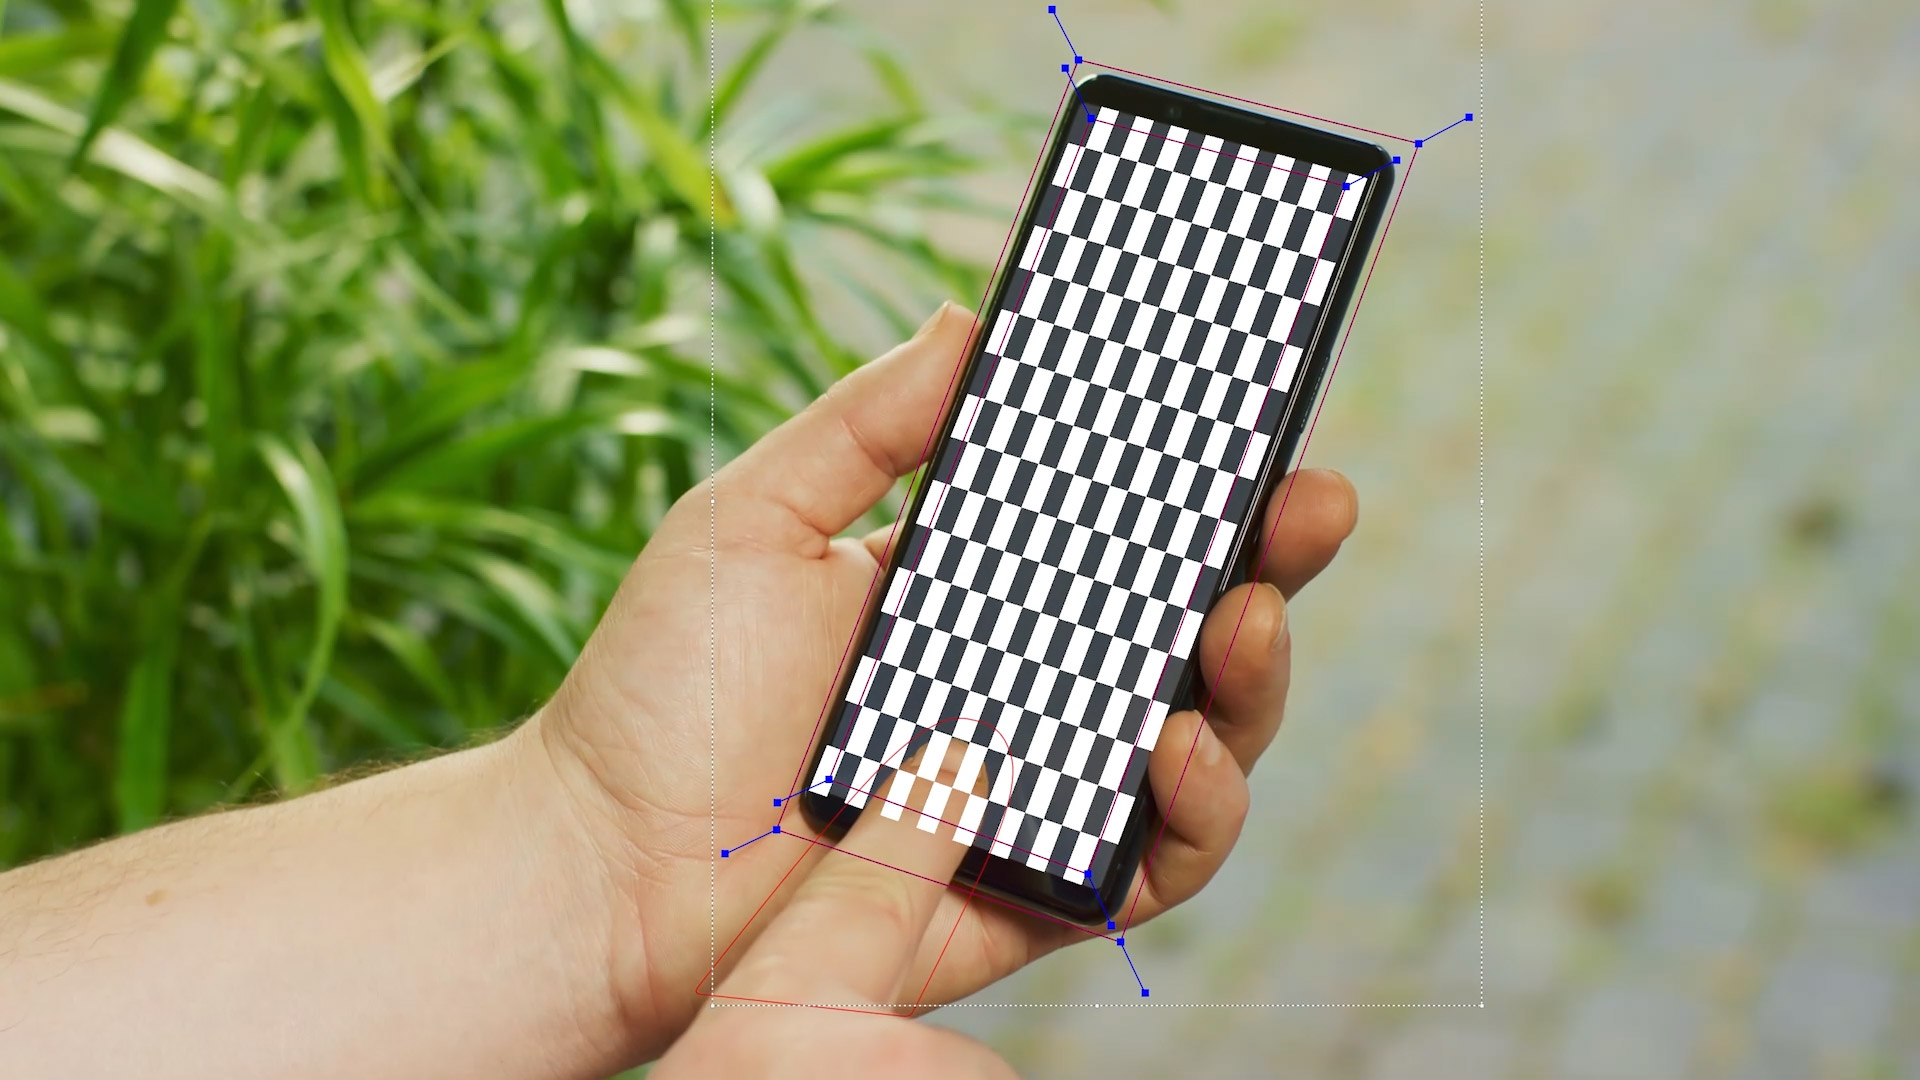
Now we have the phone tracked, we want to make sure the surface is lined up to the right spot and tracked correctly.
If you haven’t already, turn on the Surface tool again, and make sure the corners are lined up exactly with the screen corners.
You can also turn on the grid tool to give you a larger view of the tracking motion and spot any jitter.

The grid placement is directly linked to the Surface and can be adjusted by moving the Surface corners, edges or center point.
Playback the shot and check for any problems.
Another way to check the track is to insert a built-in clip that will help visualise the overall movement. This is available in the Layer Properties as a dropdown:
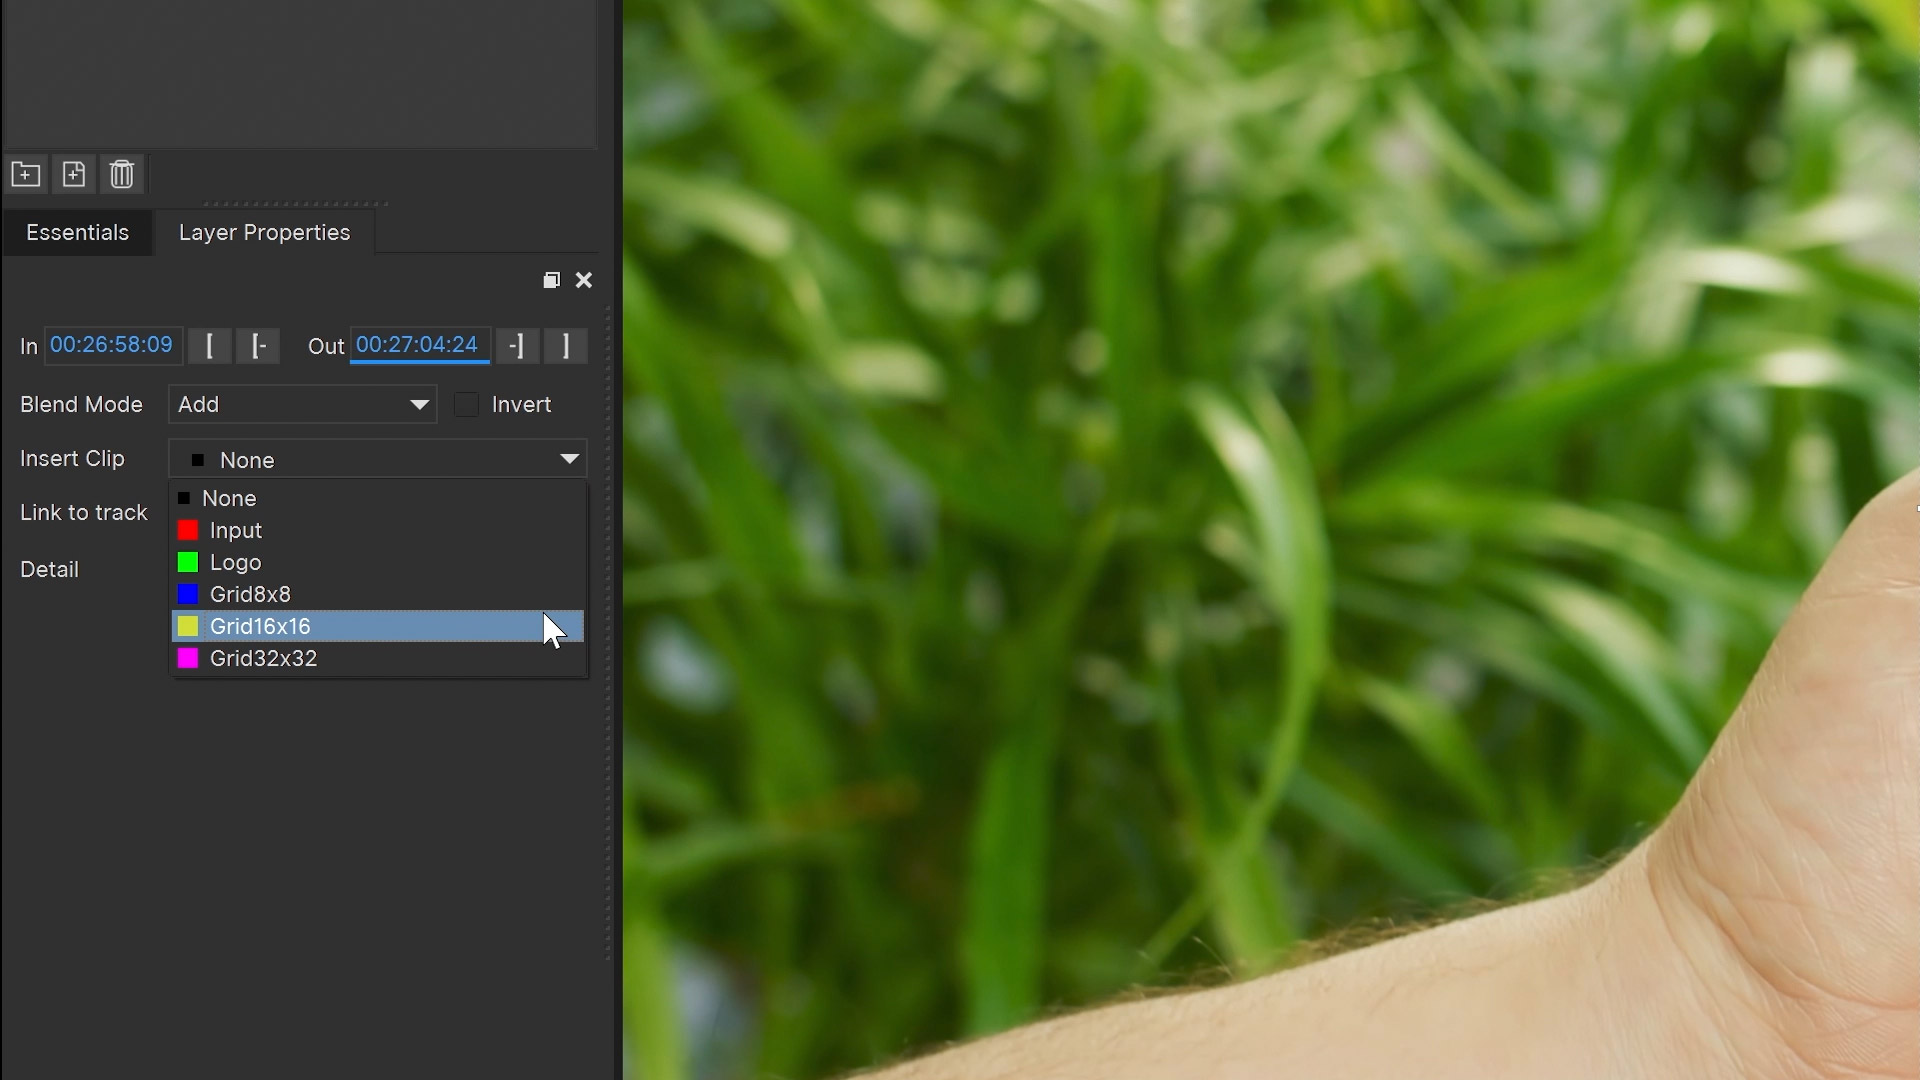
In Mocha Pro, you can import your own or use layers in VEGAS, but here we have a simple list of clips to try out.
For example, here is one of the Grid Clips:
Scrub the playhead with the mouse or playback the shot and see how the clip matches the screen.
If you see any issues, you might need to reposition your Screen Track spline to capture more of the phone edges, or check to make sure the finger matte is completely covering the finger.
We won’t cover the AdjustTrack module in this quickstart guide, but if you want to know more about adjusting a track after it is completed, see the Essentials Course.
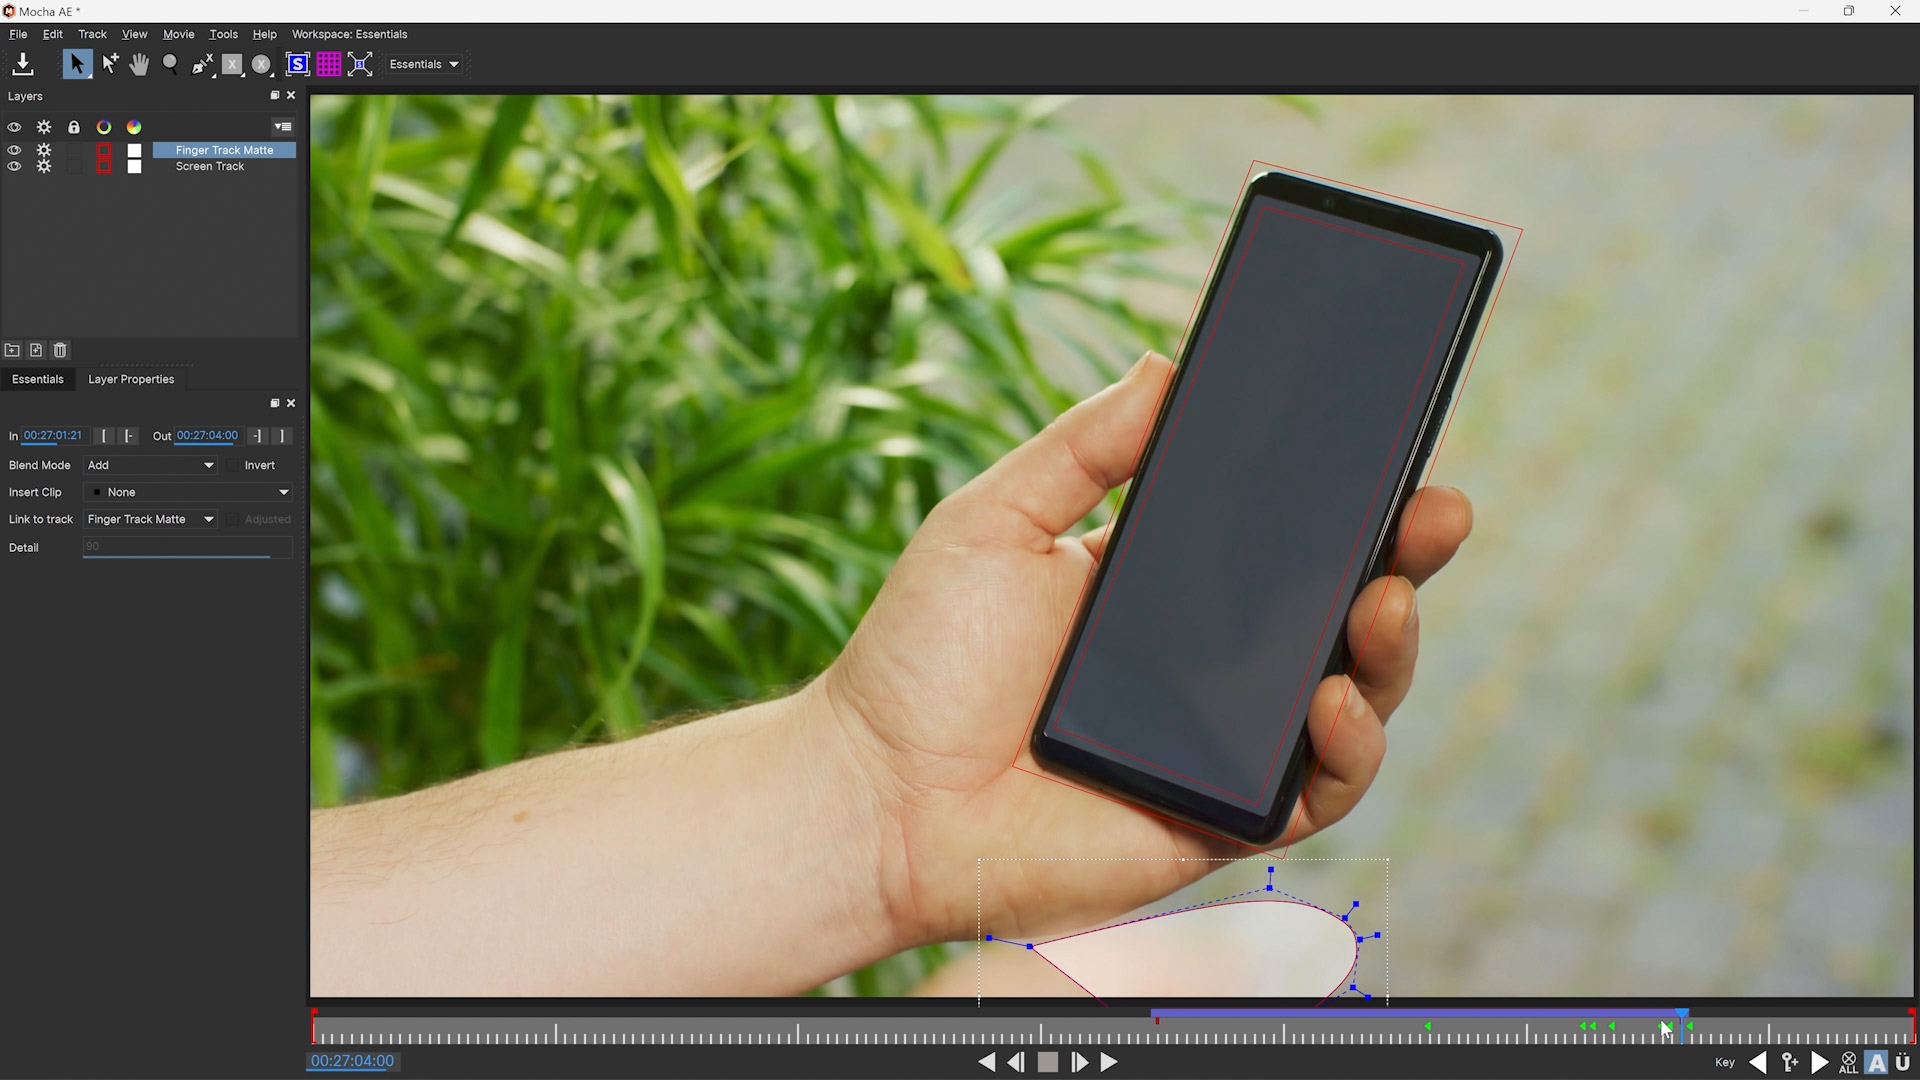
Refining Roto Masks
Now we have a screen track we’re happy with, we now need to make sure the finger swiping across the screen is correctly composited on top.
To do this, we’re going to need to make a refined roto mask around the finger.
There are two ways to do this:
Refine the existing finger track matte layer we already made
Make a new layer and link it to the original finger track, then refine that instead.
In general, we recommend option (2). Keeping all your different layers as they were originally used is a good practice so when you come back to a shot later you can see the work that was done.
Select the X-Spline Pen tool again. You may need to choose the dropdown to select the New X-Spline instead of add to X-Spline.
Now draw a tighter spline around the finger on a frame where the finger is most clearly in view. Follow the edge of the finger as closely as possible:
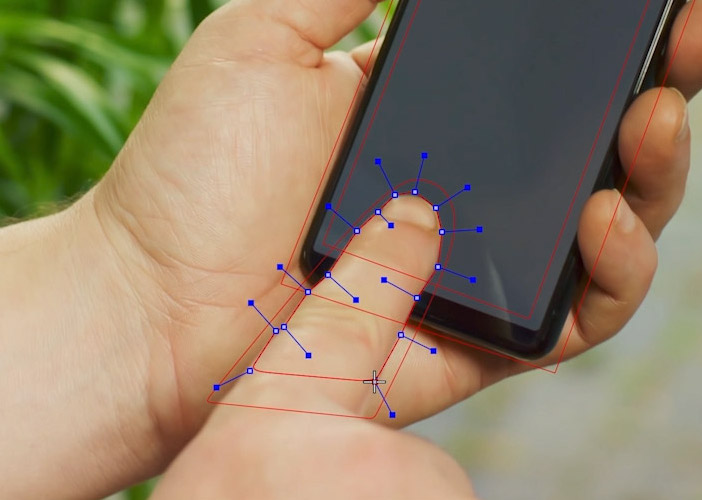
Right-click one of the handles and pull, smoothing out the spline curves:

Rename this layer Finger Mask to make it distinct from the Finger Track Matte.
To save some time, we’re going to use the existing track we made from the Finger Track Matte.
To do this, select the Link to track dropdown in the Essentials panel and select the Finger Track Matte layer:

You’ll now see the colour in the timeline of the Finger Mask change to the blue "tracked" colour. This means the Finger mask now has the tracking data from the other layer.
Note | Linking many layer masks to existing tracks is very useful technique to save a lot of time. |
Linking the track isn’t necessarily going to do everything though.
If you now scrub through the shot you’ll see some obvious problems where either the track isn’t positioning the finger mask correctly, or even where there is no tracking data at all.
The is when you need to refine the finger mask by manually adjusting each control point. Mocha keyframes the whole spline automatically when you move a point.
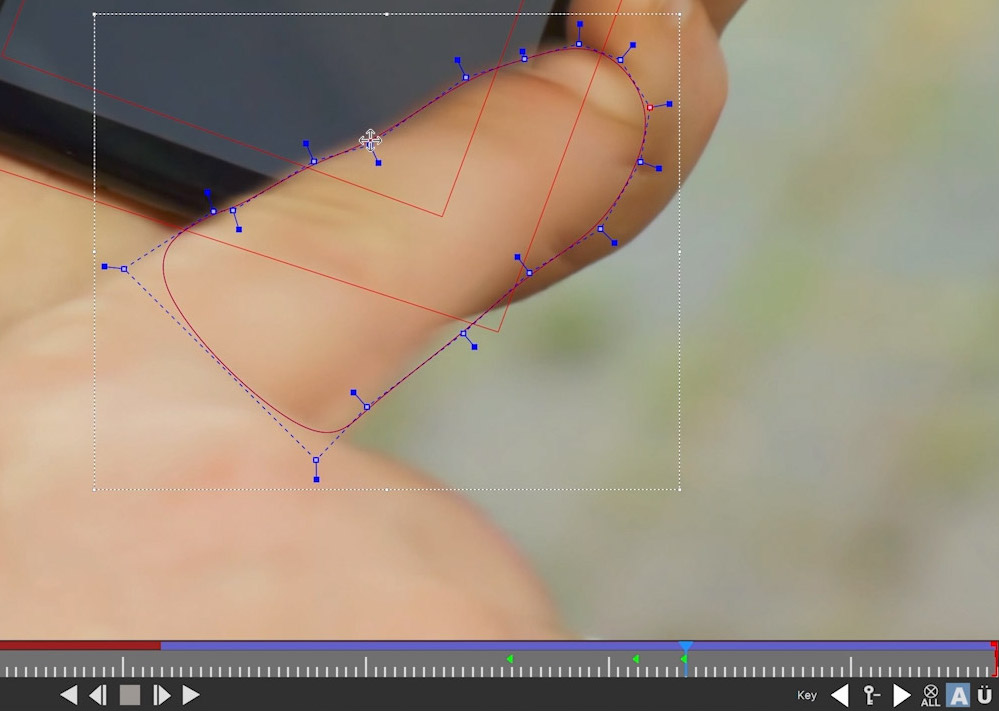
Note the spacing of the keyframes. Try to only keyframe at extreme points in the movement of the spline so you don’t create too many keyframes.
More keyframes means more work for you, so follow the basic keyframing methodology of:
Move to a point in time where the finger has reached a big movement in one direction
Move the spline to that point and make sure the spline points hug the finger closely.
Move between the previous keyframe and the one you just created to check for any drift in the spline.
Continue narrowing down between keyframes.
This way you reduce the amount of keyframes you need to make over time and reduce the amount of work you need to do.
Tip | Rotoscoping is a fun, exciting task that everyone loves. |
Keep refining the Finger Mask points until the finger is rotoscoped for the portion of phone covered by the finger
Exporting the Mocha VEGAS Tracking Data into VEGAS
Once you have your track and roto mask, it’s time to use it!
Close the Mocha VEGAS GUI and save when the prompt comes up.
You should now be back inside the VEGAS interface.
In order to use the tracking data, you first need something to apply it to.
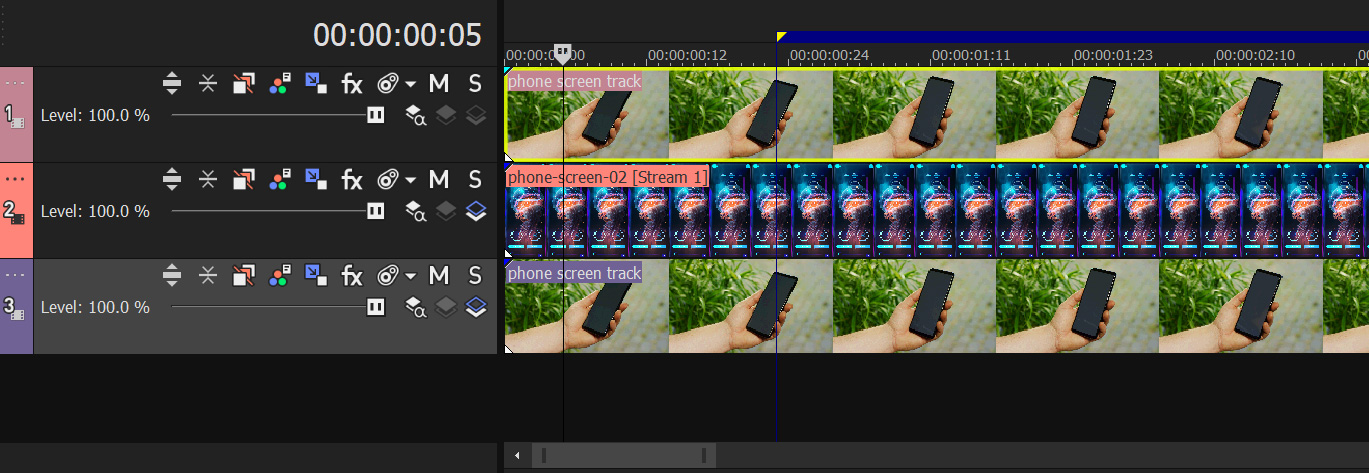
Drag the phone screen PSD file from the VEGAS Project Media window into the video track above your footage layer:
Make sure the video track layer is the same length as the phone clip in the layer below.
Applying Tracking Data
Now we can generate and apply the tracking data.
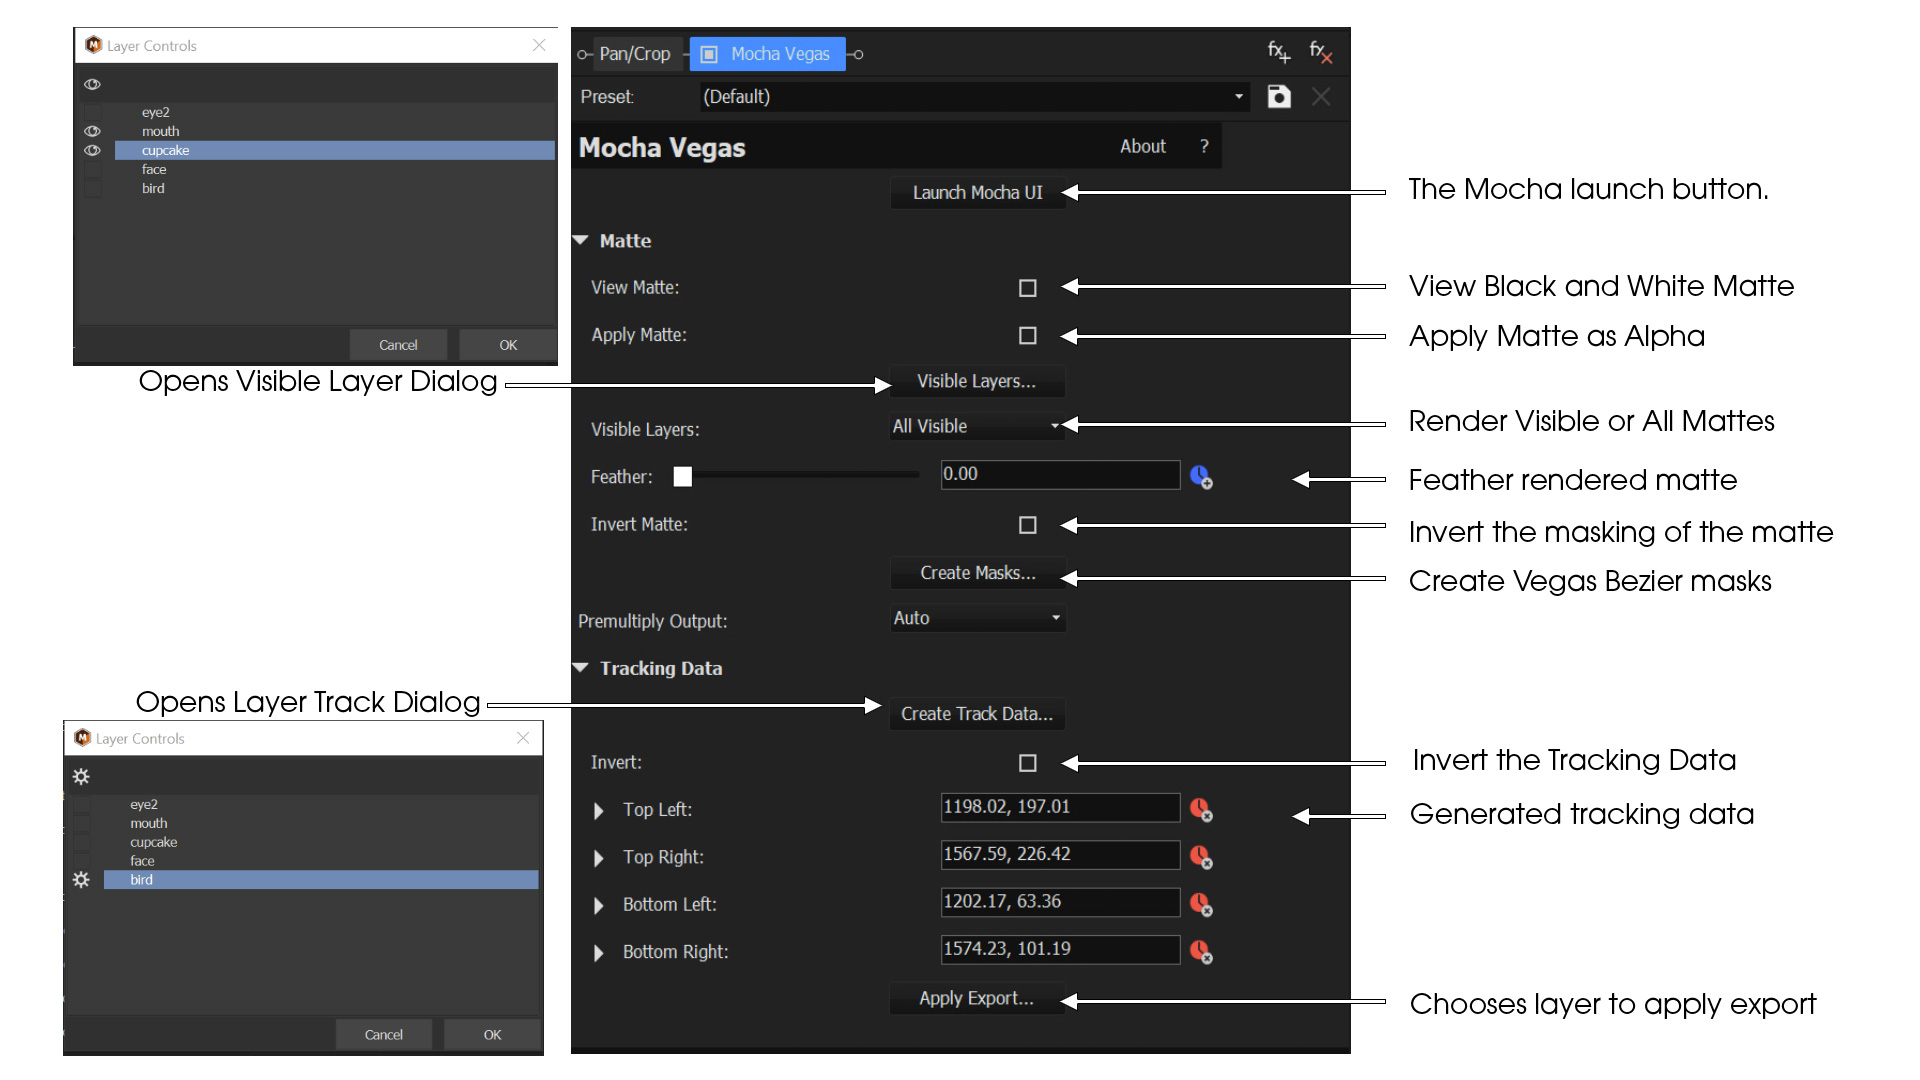
Here’s a reminder of where everything is in the plugin interface:
In order to use the Mocha tracking data:
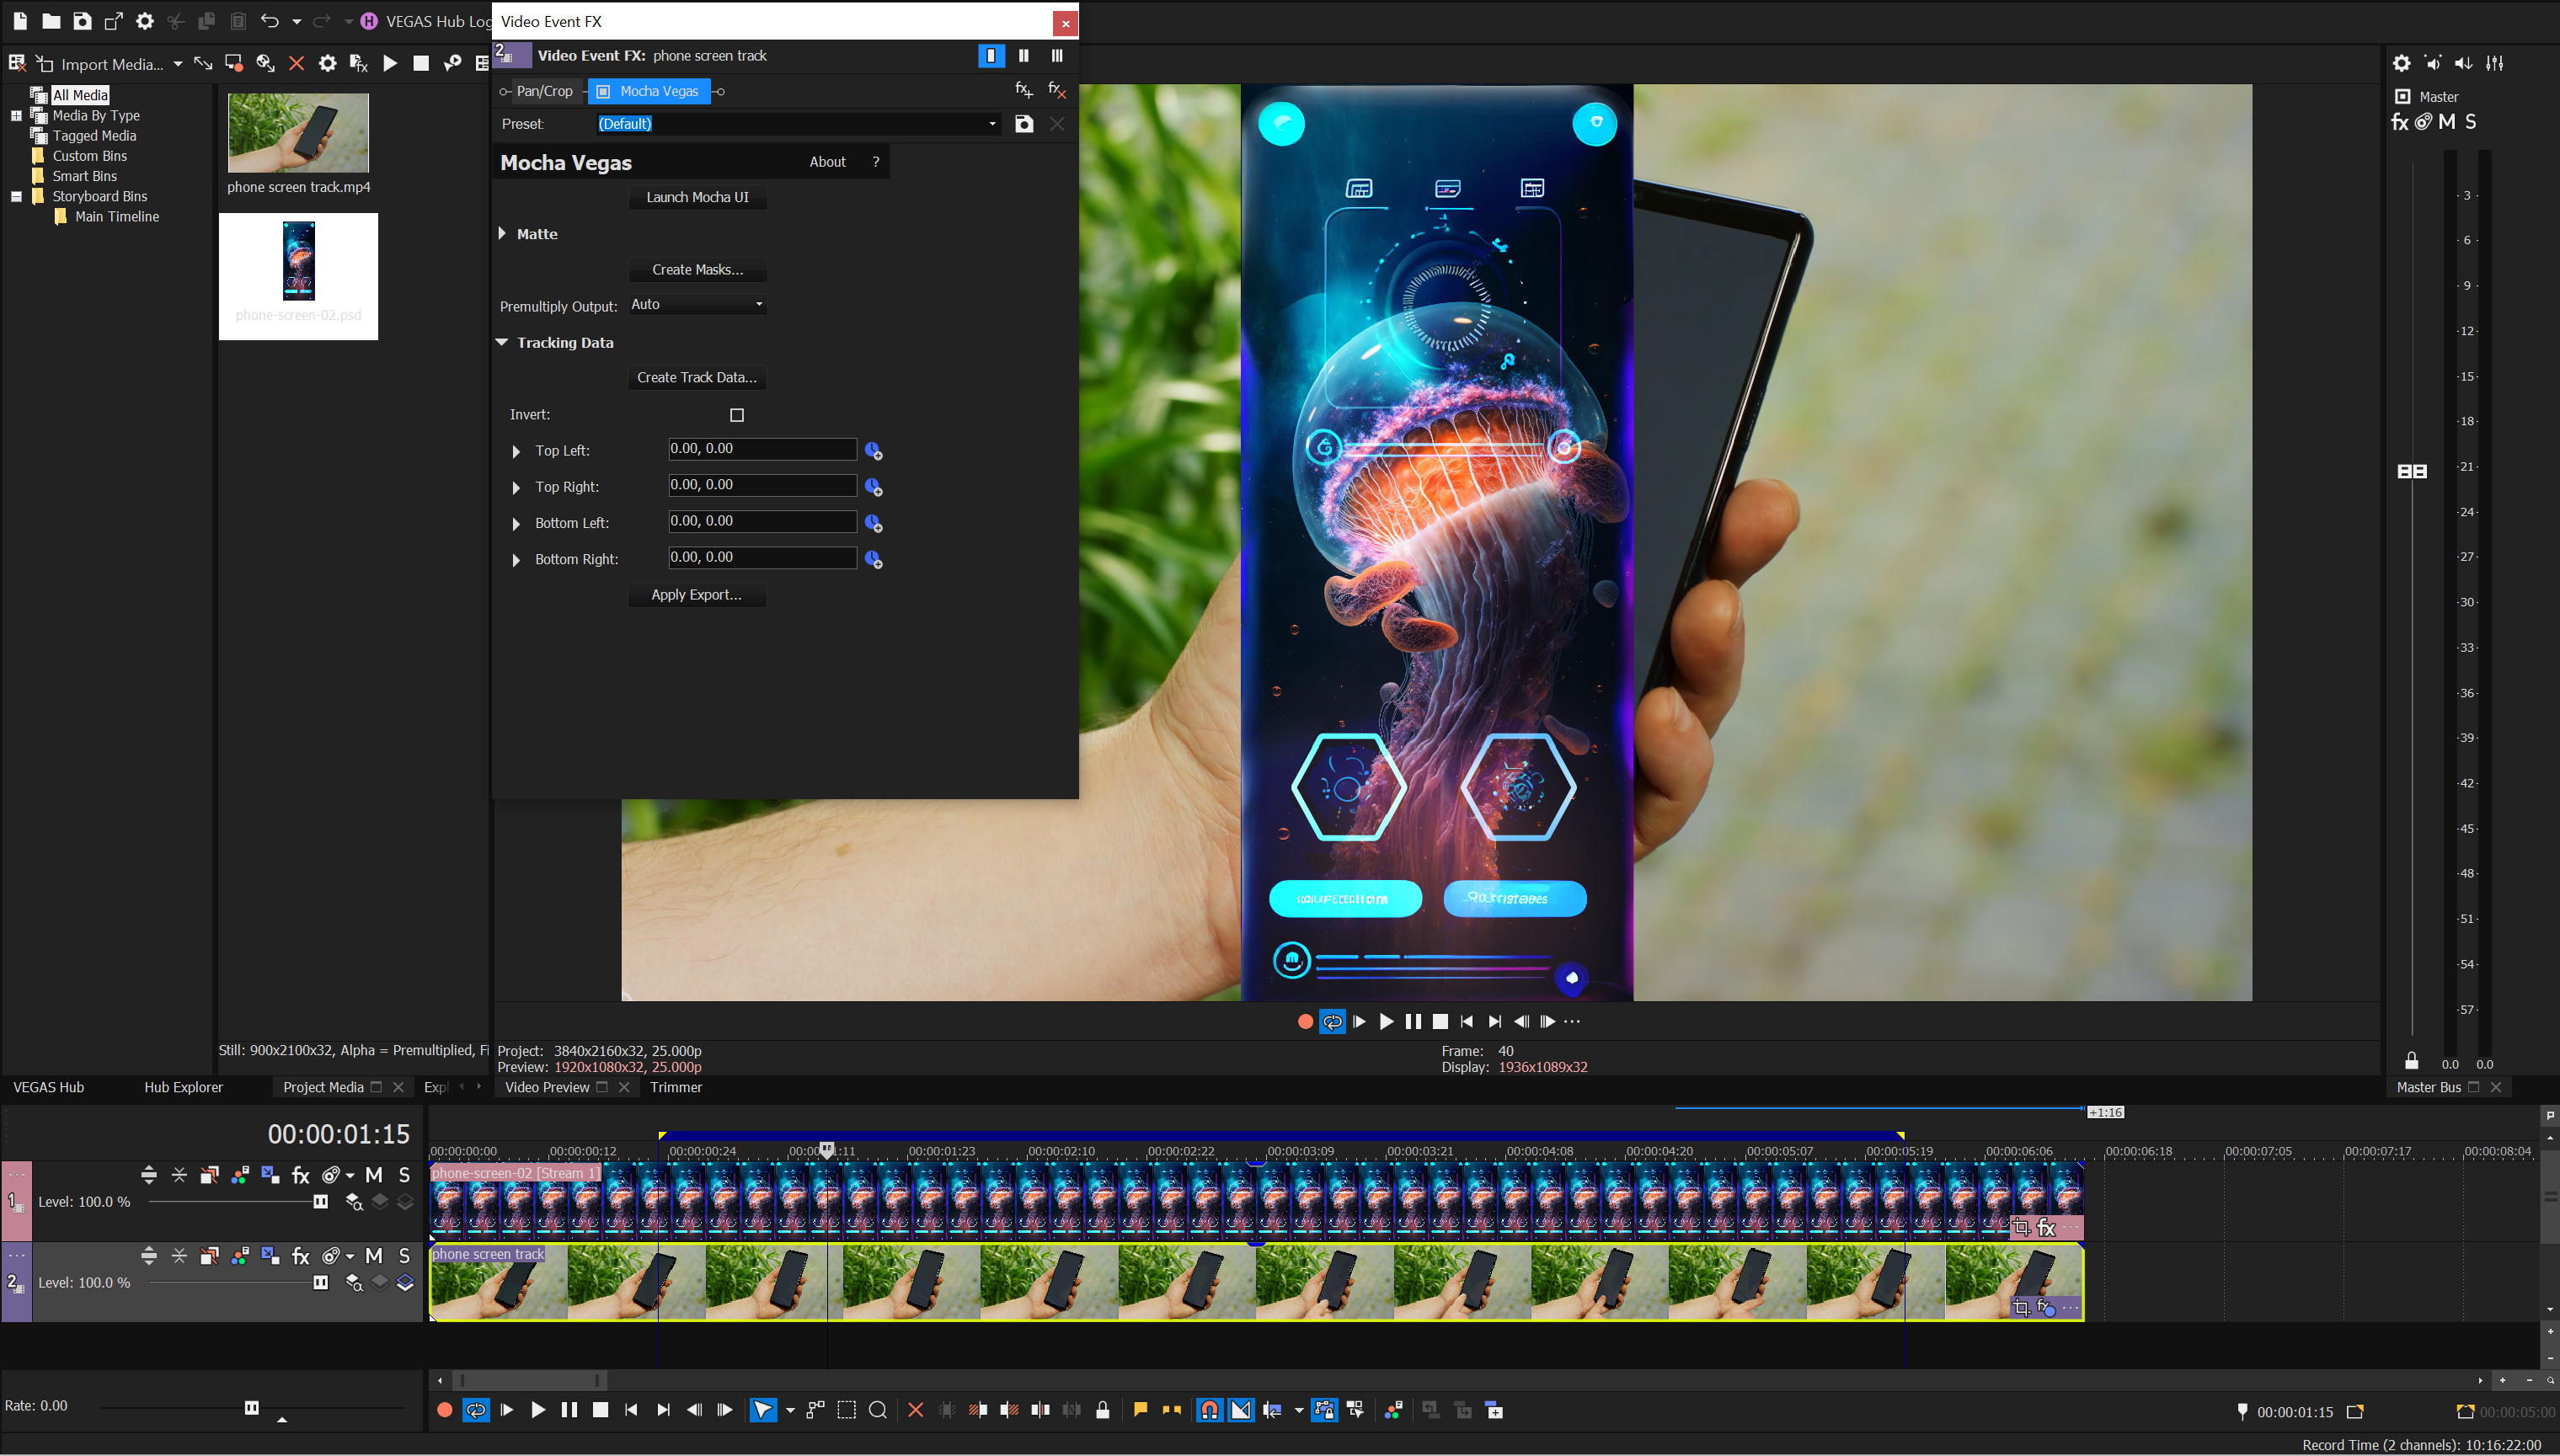
Open the Event FX dialog where the Mocha VEGAS Effect is applied
Click the
Create Track Data…button.Choose the layer you want to generate tracking data for. In this case, it is
Screen Track.Click Ok.
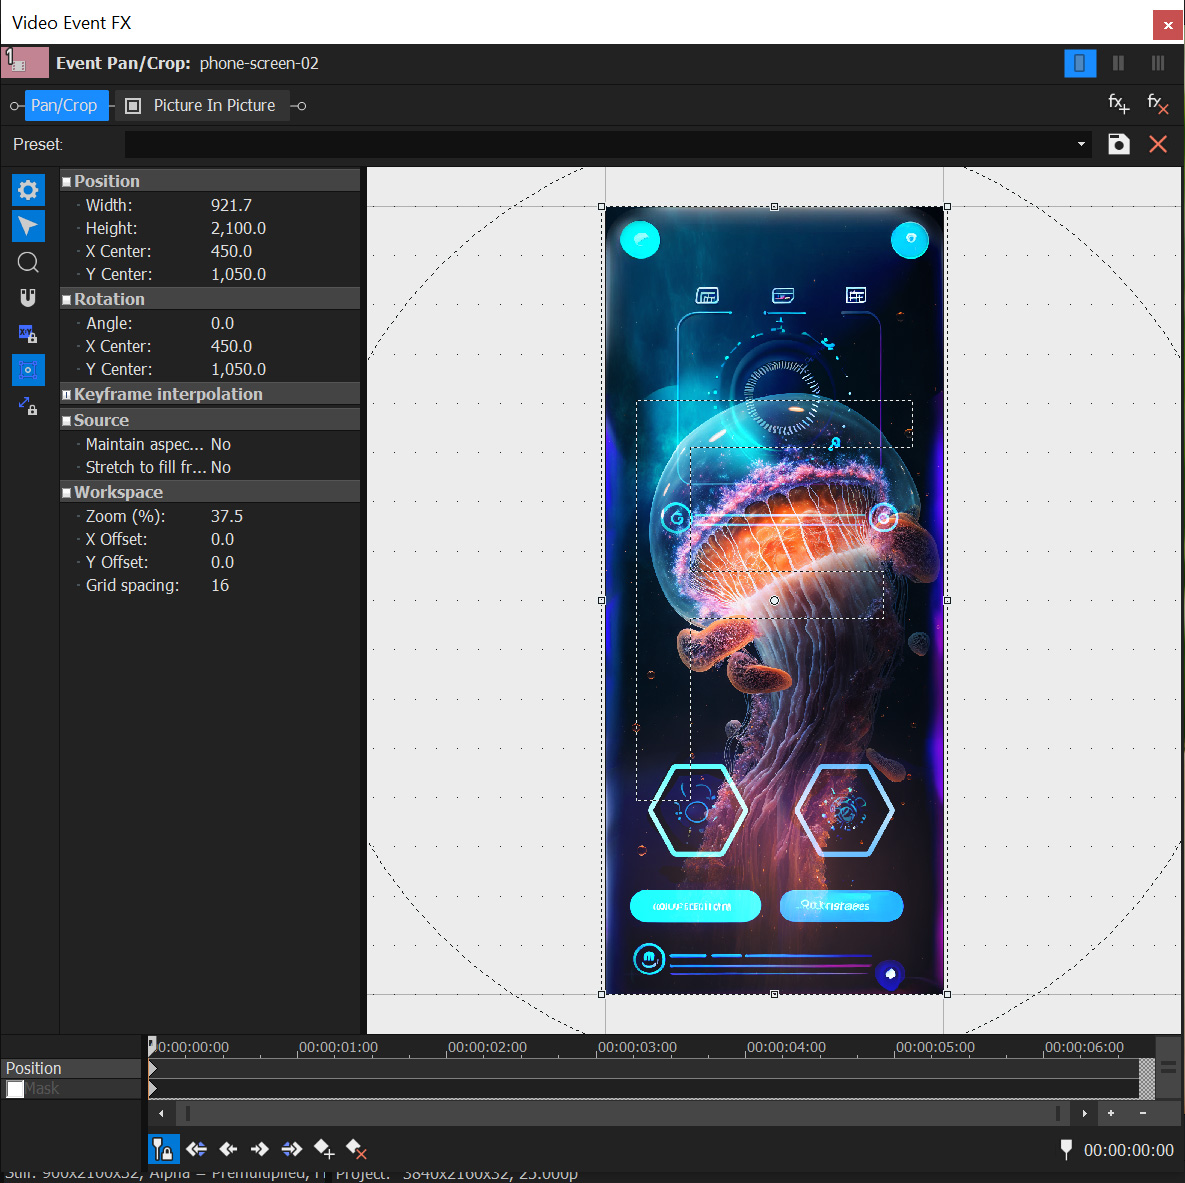
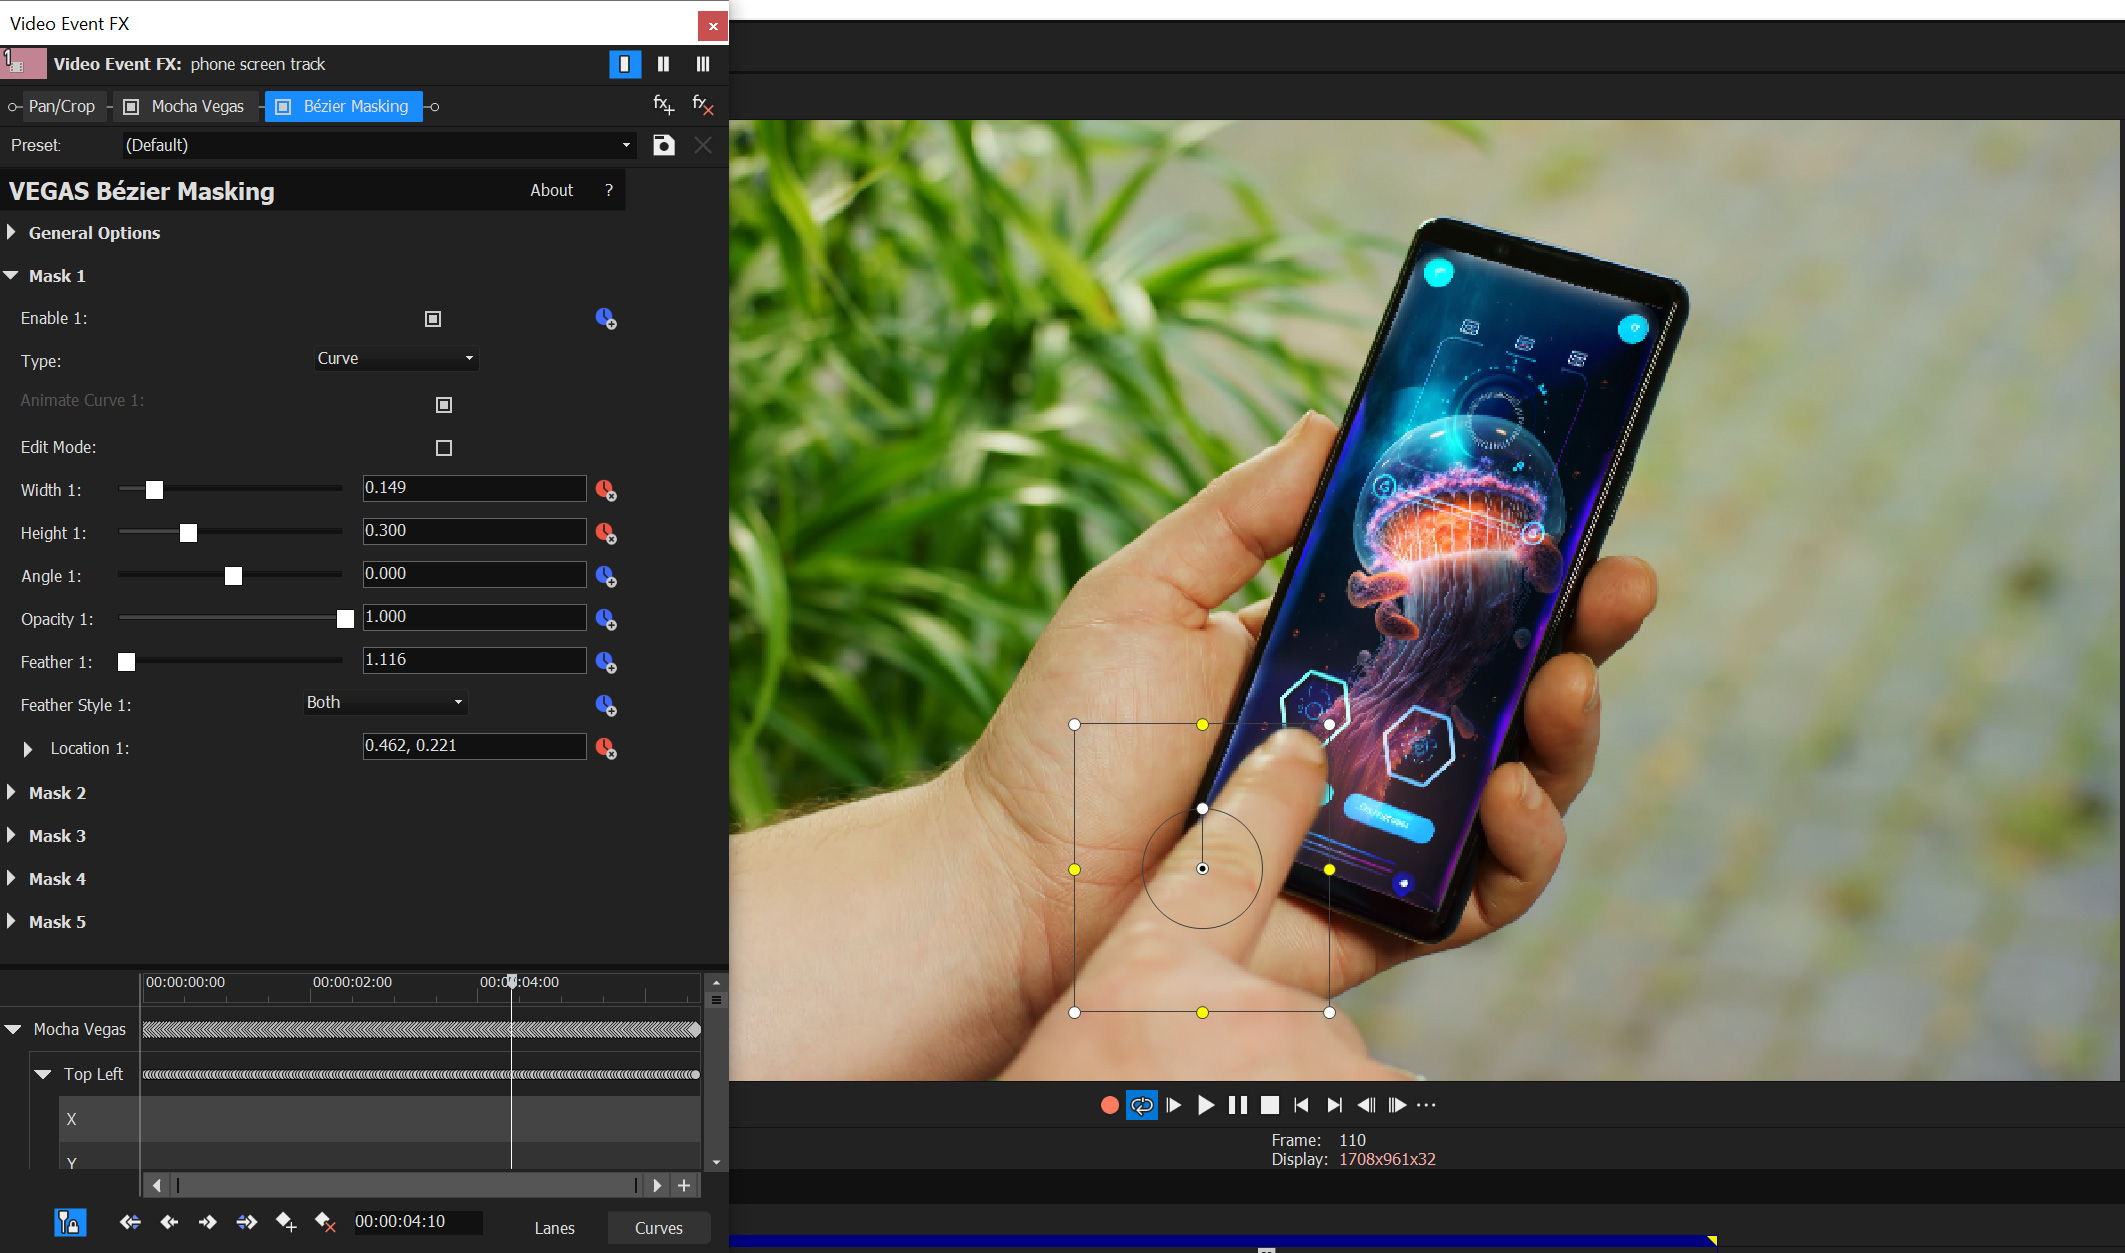
This will populate the fields in the effect with keyframed data:
![]()
Now we have the data generated, we just need to tell VEGAS how we want to apply it.
Click
Apply Export. This will cause the VEGAS Motion Tracking dialog to appear.Select the bottom right arrow in the Motion Tracking dialog. This will show your available clips to apply the tracking data to.
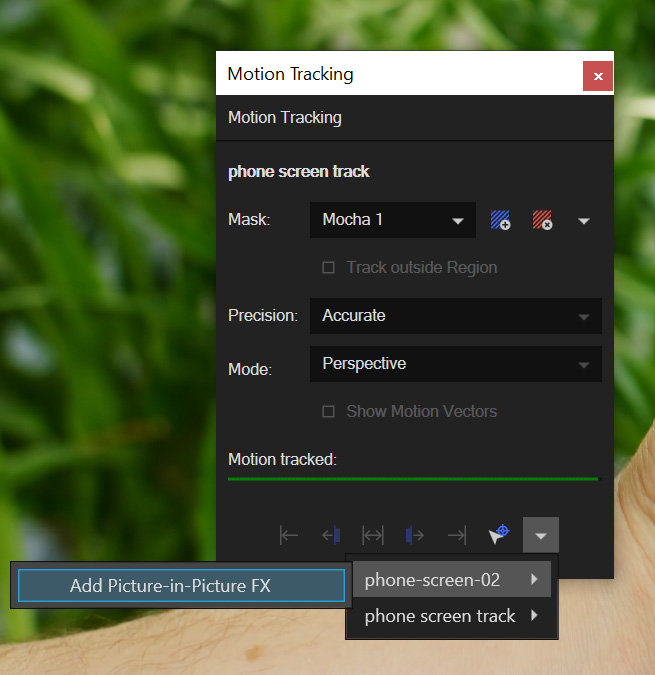
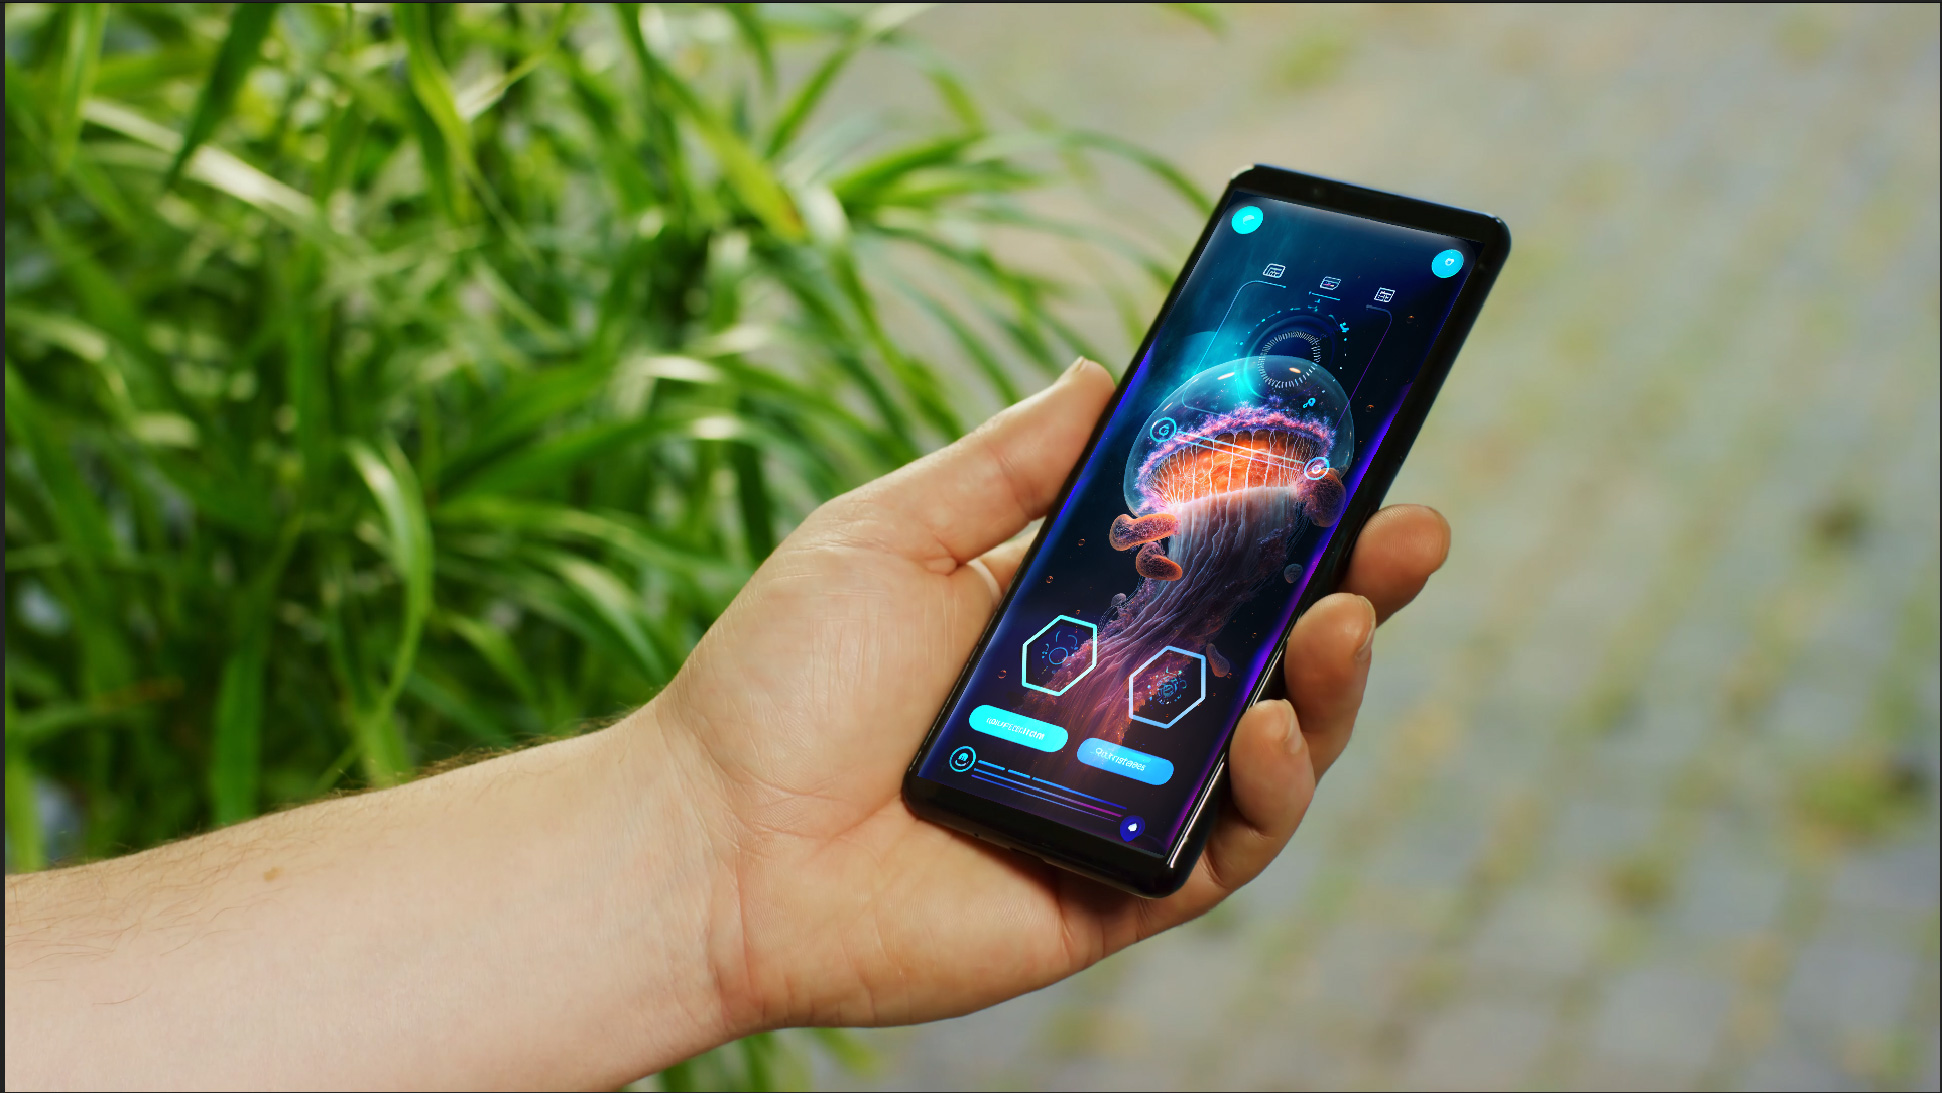
Select the "phone-screen-2" insert clip from the dropdown, and select "VEGAS Picture in Picture"
You should now see the screen corner-pinned to the phone.
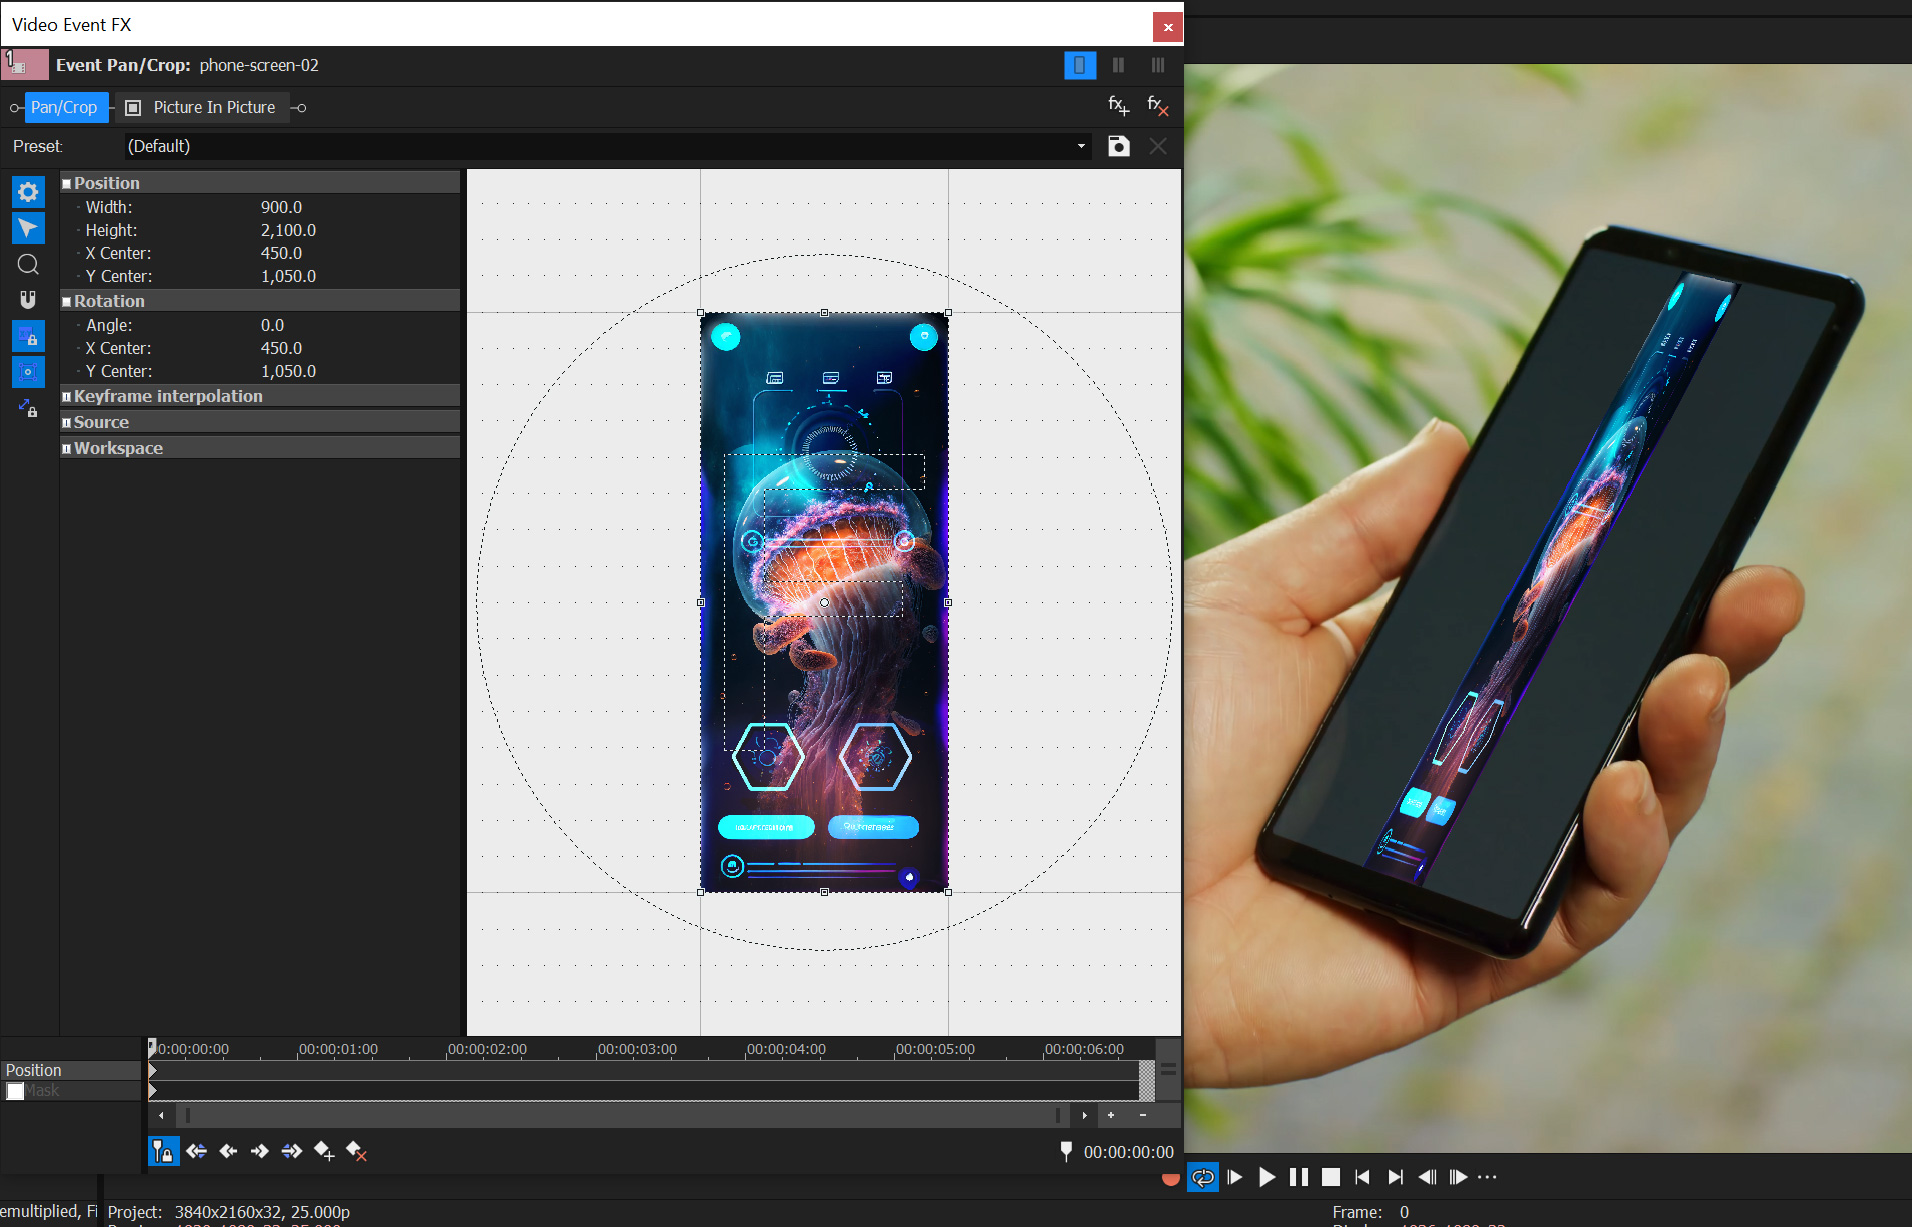
If your inserted clip looks squeezed, this is because of the default settings in the Event FX Pan/Crop tool.
To fix this, click on Pan/Crop tab to the left of Picture in Picture.
You need to change the following settings in Pan/Crop:
Maintain aspect ratio: Set to "No"
Stretch to fill frame: Set to "No"
You should then see the screen image fill the phone.
Exporting the Mocha VEGAS Mask Data into VEGAS
The final thing to do is place the finger back on top of the screen so it looks like it is resting on top.
Create a new video track above the other two tracks in your timeline
Duplicate the original phone layer by Ctrl+Dragging it to the top video track.
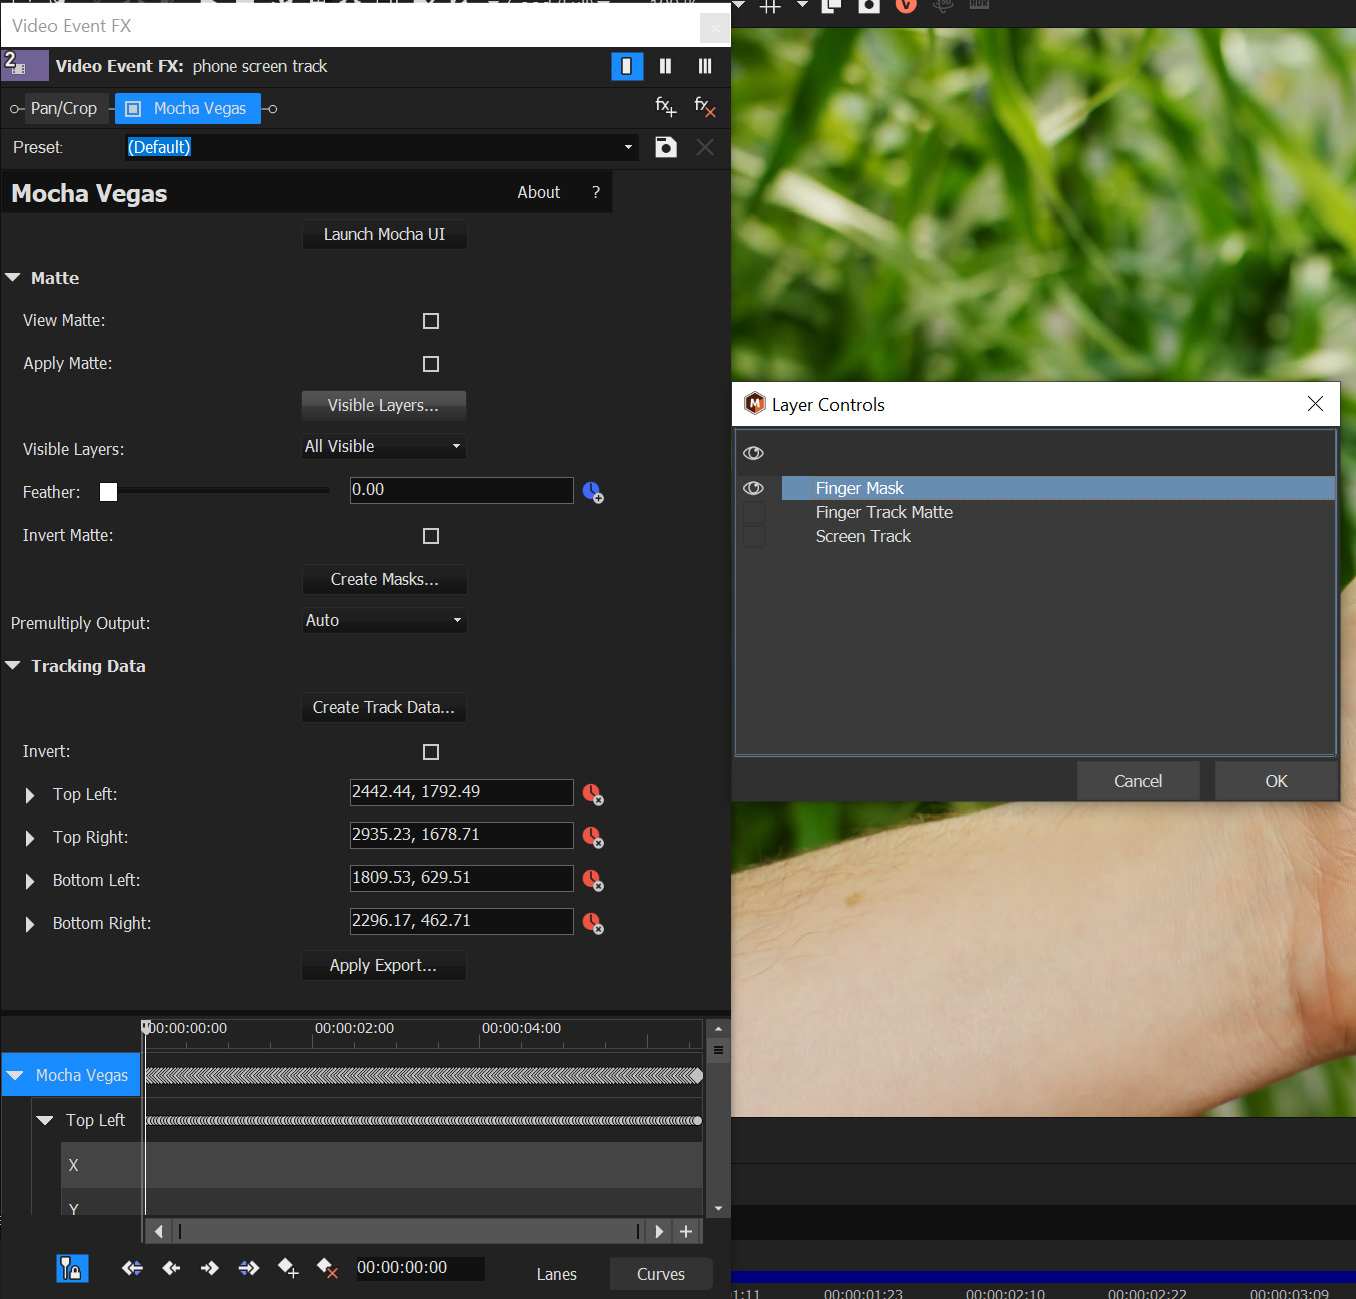
In the duplicated layer, twirl down the
Mattesettings of the Mocha VEGAS EffectTurn on
Apply MatteClick
Visible Layers…Choose the "Finger Mask" layer and click OK
Now when you scrub or play the shot you should see the finger composited over the screen.
This is because the plugin is rendering the mask and cutting the finger out over the top. You can then adjust blending and opacity to get the screen how you like it.
Generating Native VEGAS Bezier Masks
If you don’t want to render the matte directly from Mocha you can also create Bezier splines inside VEGAS.
Open the Event FX dialog for the topmost clip
Turn OFF
Apply MatteClick
Create Masks…
Now instead of a rendered matte you will see VEGAS masks on the layer instead, with generated keyframes:
You can now feather these masks manually or adjust them how you like separately from the Mocha VEGAS effect.
Note | VEGAS currently only supports up to 5 Bezier masks at a time. If you have more than this in your Mocha project, it will only create the first 5. |
And that’s it! You now have a functional composite using Mocha tracking data and masking.
If you’re unclear on any part of the process, we highly encourage you to watch the video at the start of this article, then follow up with the Essentials Course, which goes into much more detail.
The "I still don’t get it" Guide to Mocha
Read on if you’re still not sure what’s going on here. Below we explain the core concepts in more detail.
What is Planar Tracking?
Let’s talk about what you’re dealing with here.
Mocha’s core workflow is based around the planar tracker, which tracks patterns of pixels that move in the same direction. Essentially this means Mocha tracks anything on a flat or flat-ish planar surface. This includes things like walls, floors, ground, clothing with not too much distortion, skin, fields, doors, signs, screens, you get the picture. We also track pictures.
Shapes tell Mocha what to look for
To use the planar tracker you need to define areas to look for with splines, either by drawing them with the pen tool, or drawing predefined shapes.
Mocha looks at the pixels inside this spline area (called a track matte) and tries to find similar pixels on the next frame. If it finds the area, it generates a tracking keyframe.
By default the spline is linked as a child of the tracking data. This means if the tracking data moves, the spline comes along with it and ideally is still covering the same area.
This is an important concept to understand. The spline is just telling Mocha where to look for the object while tracking. It doesn’t act as a control for the position of the track.
If you move a spline from one place to another, all you are doing is telling Mocha "Look here", not "Move here".
The Surface defines what to export
The surface tool is like the spokesperson for the tracking data. It is how the data is defined for exporting.
Like the spline, the surface is a child of the tracking data but can be moved freely without creating any keyframes. This means you can reposition it before, during or after a track to visualise the accuracy of the track or set up a specific area for export.
Mocha Essentials Training Series
Want More Mocha Training?
Visit the Mocha Essentials page for over 7 hrs of training on various light versions of Mocha and Mocha Pro.
Note | The Mocha Essentials video series was created before Mocha VEGAS was introduced, so don’t worry if Mocha VEGAS is not mentioned! Watch through and you’ll still get a lot out of the tips and techniques shown. |
Also visit the Mocha Useful Links page for documentation, FAQ and more.