


Whenever footage is shot, care and attention are put into the planning and execution. A good cameraperson, director, or cinematographer will pay attention to details and ensure that everything is set up and recorded as it should be. All of this helps when it comes to video editing.
However, there can always be random elements that get in the way — nobody can control everything. Whether it’s the weather, something you didn’t notice at the time of shooting but see when it comes to playback, or just something that you think could be better.
Or maybe you just need to do some green screen work or composite an image. There are plenty of reasons to make changes in post-production.
Thankfully, masking is a great technique to help any editor get to grips with these kinds of changes. Adobe Premiere Pro is a great tool for it.
What is Masking in Adobe Premiere Pro?
Masking is a way to take one part of an image, target it, and make changes to it. Those changes can be almost anything — cutting parts of the image out, applying special effects to it like motion blurring, altering color balances, color correction, hiding things, and more.
A mask is simply a way of defining the area of the image you want to work on. You create the area by using the masking tools to define the space on screen that you want to make changes to.
Masking is a very powerful tool and a great way to ensure your footage looks as good as possible.
Types of Masking
When it comes to masking in Premiere Pro, there are several different types that need to be considered. Selecting the correct Adobe Premiere mask will help you get the best results from your masking.
Circle and Ellipse Shape Tool
Allows you to draw circles and oval shapes.
Rectangle
The rectangle shape tool allows you to draw squares and rectangles.
Polygon
Enables you to create polygons. Polygons can be created with as many or as few sides as you like.
Pen Tool
This is a free draw bezier tool and allows you to create free-form shapes not bound by any particular geometry. It’s the most flexible of all the masking tools and lets you work with great precision and accuracy.
These are the main tools that are used to create masks. The Rectangle and Circle tool make for the easiest masks, while the Polygon and Pen tool are more involved.
Each one has its uses, so for example, you might use the Rectangle tool to create a rectangle shaped mask to remove a building. The regular rectangle shape makes this easy.
However, you might choose to use the Pen Tool to trace along the line of a horizon if you want to adjust a skyline. Picking the correct type for your mask will make your life considerably easier.
In addition, there are also mask refining tools available in Adobe Premiere Pro to help you further apply effects.
Vertex Points (Nodes)
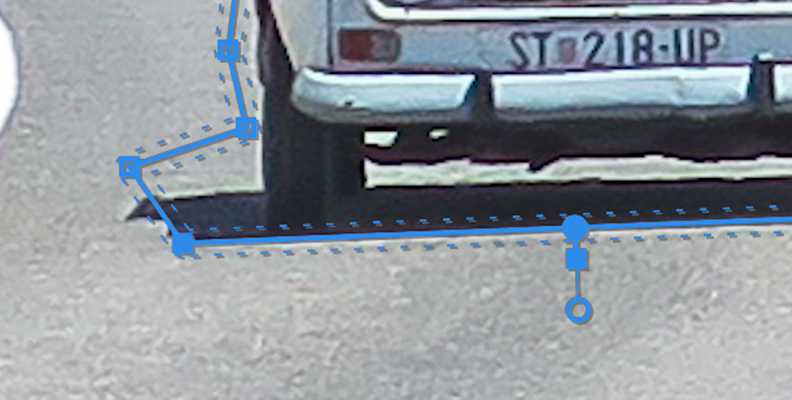
These allow you to manage and control the shape, size, and rotation of any mask you have created. To create mask vertex points, put the cursor over the mask edge and press CTRL. You will see it change to a pen icon with a plus sign next to it.
A vertex point is just a corner point on the mask you have created where the sides or the edges of the object meet. So, on a square, the vertex points would be any of the four corners, and on a triangle it would be any of the three corners, and so forth.
Mask Expansion
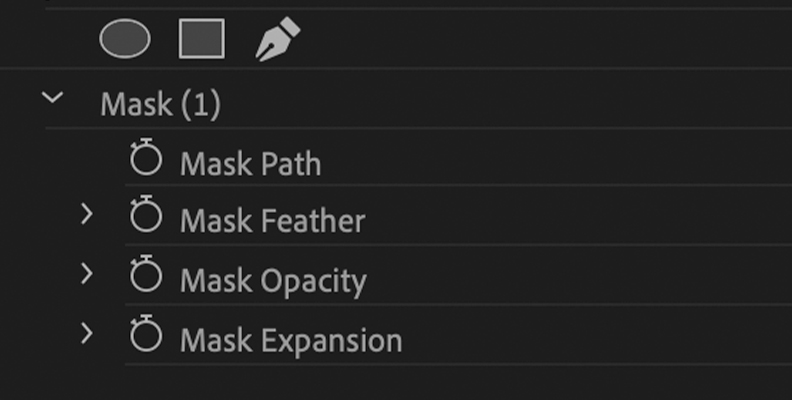
Mask Expansion is arguably the most important of these tools. This allows you to drag the expansion handle of a mask or adjust the area of the masked clip.
Moving the mask wrench icon away from the mask will increase the size of the mask and moving it towards the mask will reduce the size of it. If you want to use values for precision, remember that negative values will move the mask inwards (reducing its size) and positive values will move the mask outwards (increasing its size).
Mask Opacity
Mask Opacity is how transparent a mask is. An opacity value of zero means the mask is completely invisible and an opacity value of 100 means that it is completely solid, which is to say you can’t see anything under the mask at all.
Mask Feather
Mask feathering is a way of telling how your mask will blend in with the footage you are trying to apply it to. It is shown with a dotted line around your mask, and you need to assign a mask feather value to it to get the right results.
Once you have done this, you can drag the mask handle either away from the feathering guide to increase the amount of feathering or you can drag it towards the guide to reduce the amount of feathering. A little practice with this will make it second nature before long.
Invert Mask Selection
As the name implies, this inverses the unmasked and masked areas in the footage you are working on. The initially-defined mask area reverts to unmasked and the entire rest of your shot will be masked.
How to Mask in Premiere Pro
Creating masks in Premiere Pro is comparatively straightforward and getting hands-on with masks is the best way to learn about them.
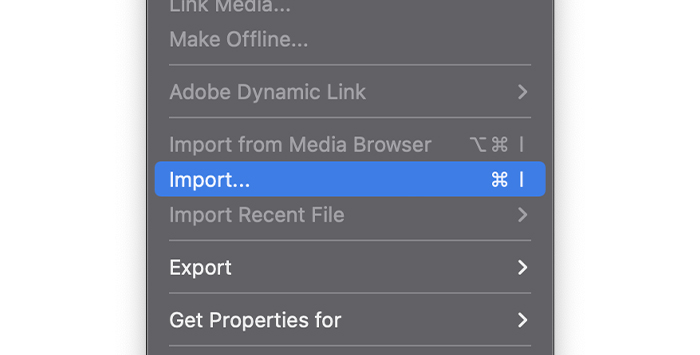
Firstly, import your footage into Adobe Premiere Pro. Go to the File menu, then choose Import.
When the footage has been imported, drag it to your timeline so that you create a sequence.
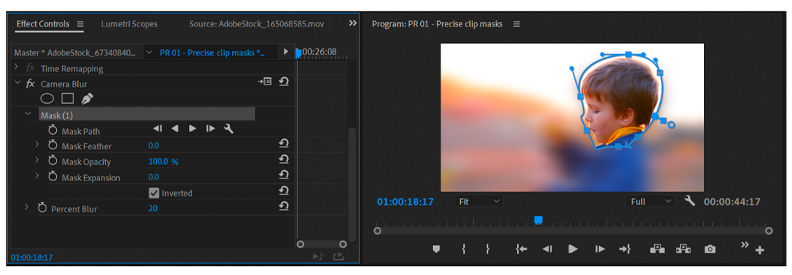
Once your footage is in the timeline, select an effect that you would like to use with a mask and apply that effect to your clip on the timeline. Now you are ready to create your mask. Select the clip with the effect applied, then open the Effects Controls. The Effects Controls is where Adobe Premiere Pro has its mask tools.
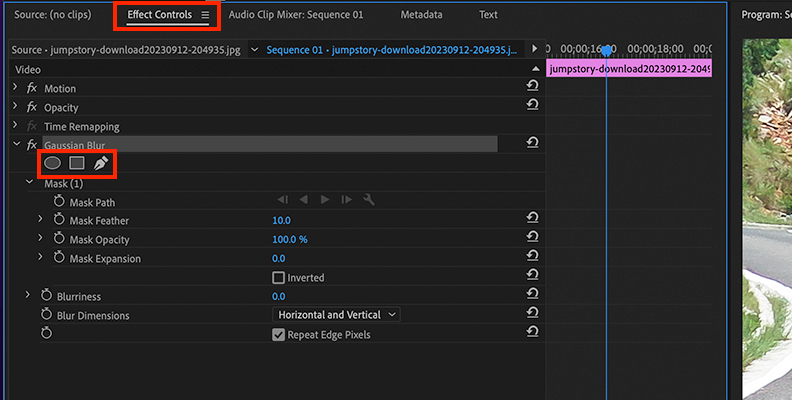
Select the shape you want your mask to be. As well as fixed shapes, you can also use the Pen Tool to define your mask either freehand or to create curved bezier path segments combined with your freehand mask.
Create Masks
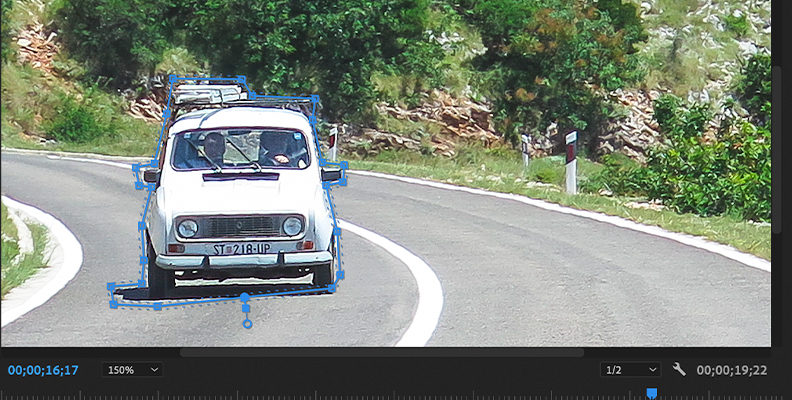
Next, you need to create the vertex points (nodes) that will outline the shape of your mask. Pick the object you want to mask, then create the shape around it.
It’s OK if this isn’t 100% accurate at this stage, just get a rough outline of the mask around the object you want to apply it to. The details will be tidied up and adjusted a little later on.
Once you finish creating the mask, the area inside of the shape should be effected. If it’s the outside you want to effected, then you can use the Invert Mask Selection tool to flip these round.
Your mask has now been created. If you want to adjust it, you can drag and drop it as required, add additional vertex points (nodes) to alter the shape of the mask or make any other changes you require.
You might also create an anchor point at this stage. An anchor point is the point where any changes, transformations, or masks revolve around. An anchor point is a sort of center of gravity that any changes can revolve around. While creating one isn't compulsory, it can make your life easier.
Edit A Mask
Once you have created your mask, it’s time to get down to the details and ensure that the mask is as precise as possible.
Editing a mask will allow you to ensure that the mask fits both the on-screen requirements you have for it and the effects you want to apply to it. Fine tuning mask parameters gets the best out of your masking.
Adding vertex points will add precision as to how tight your mask is to the object you are trying to mask. The tighter the mask edge, the better the result will be.
By default, the lines between these are straight, which can look artificial if the object you want to mask isn’t completely regular.
Curved Lines

However, you can change these straight lines into curves by clicking the vertex point and dragging it. You can also turn the handles on the mask to adjust the curve of the line until you are satisfied with it.
Keyframing Masks
There are also other ways to refine your mask. Adobe Premiere Pro also lets you keyframe your masks so that they can be changed throughout the footage if required.
A keyframe is where you define the start and end of a transition, and you can set this by clicking on the stopwatch icon.
This is also where you can use refining tools to make further adjustments to how your footage looks. Adjusting the feathering, opacity, and other parameters will allow you to have complete control over how the mask works on your footage and how it will affect the final result.
Green Screens and Compositing
What you do with your mask after all of that is then up to you! You could turn the entire mask green so that you can composite in another background using Adobe Premiere Pro’s green screen tool.
Using masks for green screen work is a very efficient and effective way to be able to change, alter and add backgrounds to existing scenes.
In conjunction with keyframes, it allows you to have very precise control over how your composite image will work.
However, green screen is just one option. It could be that you want to remove something that is in the frame by placing a mask over it and rendering it invisible.
You can also use it to blur out details if something personal accidentally gets captured on your recording, like a car license plate or someone’s face being in a shot if you don’t have their permission to film.
Whichever reason you want to use masking, it is a powerful tool and a great way to improve footage.
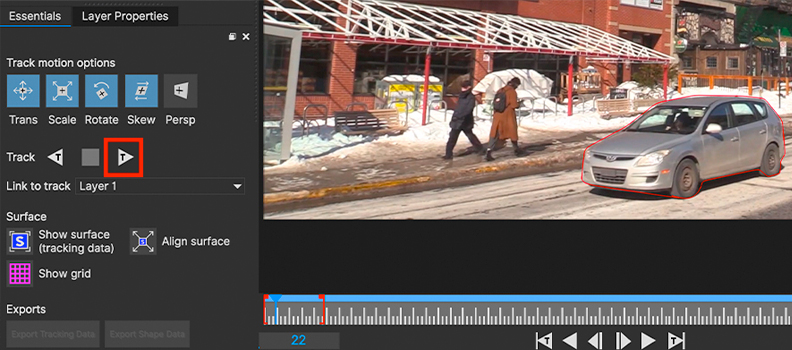
How to Create a Mask in Premiere Pro with Boris FX Mocha Pro
Although Adobe Premiere Pro’s built-in masking tools are great, they are not the only way to create a mask. Installing third-party plug-ins, such as Boris FX’s Mocha Pro, gives you more power and flexibility when it comes to mask creation.
Mocha Pro contains a number of great ways to mask. The masking workflow has one click object selection with Object Brush, automatically generated animated vector mattes with Matte Assist ML, and easy to use spline tools, which allow you to speed up the process of shape creation and requires fewer manual keyframes than traditional masking processes.
Object Brush and magnetic edge-snapping make masking and root shots even easier to construct. And there are Bezier, X-Spine, and freehand tools as well, so whatever tool you need to create the perfect mask will be available to you.
There is also support for 360-degree and VR footage, so masking need not be limited to traditional footage, the very latest developments are supported as well.
And despite the power of these tools, they remain easy to use and intuitive to editors, so you know you will always get the results you are after.
So if you want to take your masking to the next level and really compete with the professionals when it comes to video editing, Mocha Pro is the way to go.
Conclusion
Masking is a powerful feature of any NLE (Non-Linear Editor), and Adobe Premiere Pro is one of the most powerful NLEs on the market, so it’s a great way to learn masking.
Understanding masking and how to use it is a powerful tool for anyone undertaking video editing or post-production person to have in their toolkit, and a real way to take control of your footage. Masking can help you achieve incredible results — just figure out what you need from it, and off you go!


