


Have you ever seen an old CRT television? If not, you might have missed out on the grainy, low-resolution images that were common before HDTV. Sometimes, you could even see vertical lines in rows when you paused a scene.
This same effect can be seen in old photocopiers and printers, leaving behind a low-quality trace of lines that are often associated with vintage aesthetics. This is called a scan lines effect, and it can be used to add a gritty, low-resolution look to your photos for a vintage feel in Adobe Photoshop.
In this tutorial, you'll learn three different methods for achieving the scan line effect, including one using Photoshop's built-in tools and filters, as well as two others that use Boris FX plug-ins.
Let’s dive in!
How to Create Scan Line Effect in Photoshop
You’ll only need your pictures and Adobe Photoshop to follow this Photoshop tutorial. The first time you try this process, it might be time-consuming, but once you create your scan line pattern, things will get faster.
Scan Lines Effect with a Custom Pattern
The first method involves creating a custom pattern in Photoshop to apply to your images.
Step 1: Create a New Document
Go to File > New. Choose a dimension of 1-pixel width and 2-pixel height and click Create. You can increase the width and height if you want your lines to be thicker.
![]()
![]()
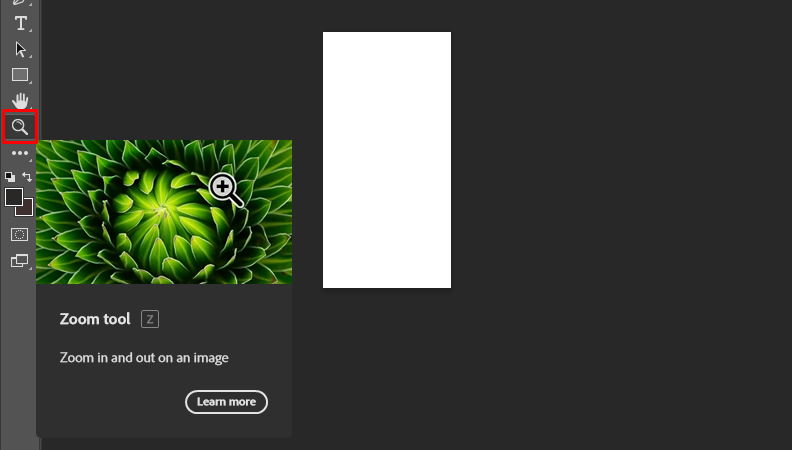
The new document will display an image with two pixels, but it will be too tiny to see. Use the magnifying glass to zoom in until you have a picture big enough to work on.
![]()
Step 2: Design the Pattern
Choose the pencil tool, paint the top pixel black, and leave the bottom pixel white or transparent. You can also select the square selection tool to choose the bottom pixel and paint it black using the paint bucket tool.
![]()
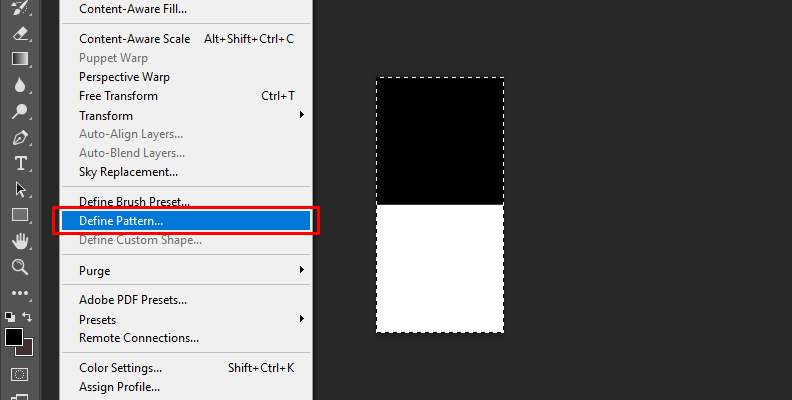
Once you finish designing the pattern, you must define it as a custom pattern. Select the whole image with the selection tool or CTRL/CMD + A, and click Edit > Define Pattern.
![]()
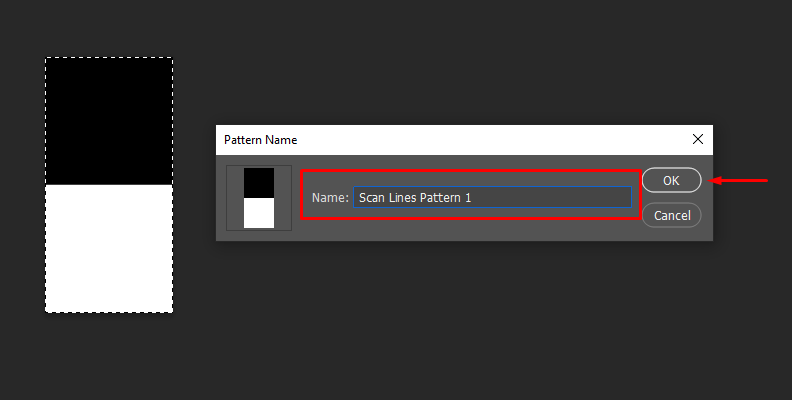
Name your pattern with something you will recognize, like "scan lines" or "horizontal lines," and click OK.
![]()
The new pattern is saved in Photoshop's library for later projects. You can take your time to create different patterns to have more options for the scan lines effect.
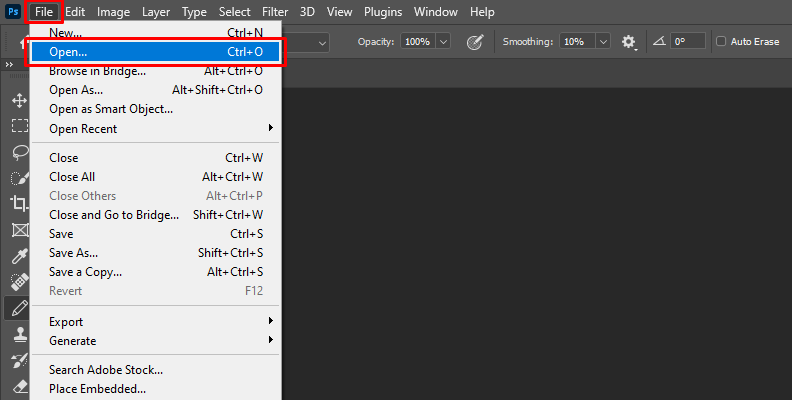
Step 3: Import Your Photos into Photoshop
Select File > Open to search for the photo to which you want to add scan lines. The next step is to add the pattern to the image.
![]()
Step 4: Using the Scan Lines Pattern
![]()
First, create a new layer above your photo. If you don’t see the layer panel, select Layers in the Window menu. Create a new layer from the main menu Layer > New > Layer.
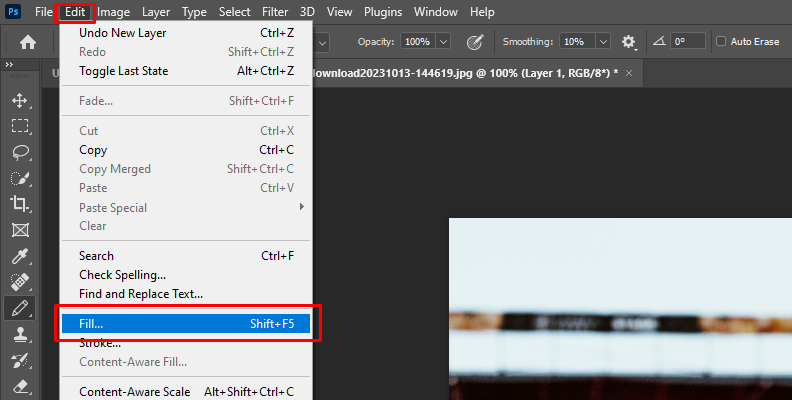
![]()
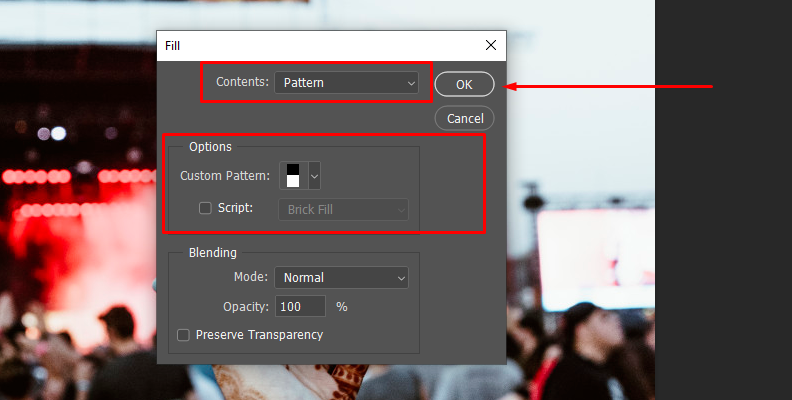
Select Fill from the Edit menu. On the Fill window, click the Contents dropdown menu and select Pattern. It will display more options where you can choose a custom pattern. Open the dropdown menu, search for the pattern created in Step 2, and click OK.
![]()
The pattern will fill the new layer. It might look like a colored layer, but remember that the pattern is just 1x2 pixels. If you zoom in on the layer, you will notice the small pattern of white and black lines in the picture. However, you do want those lines on your photo, so let’s blend it.
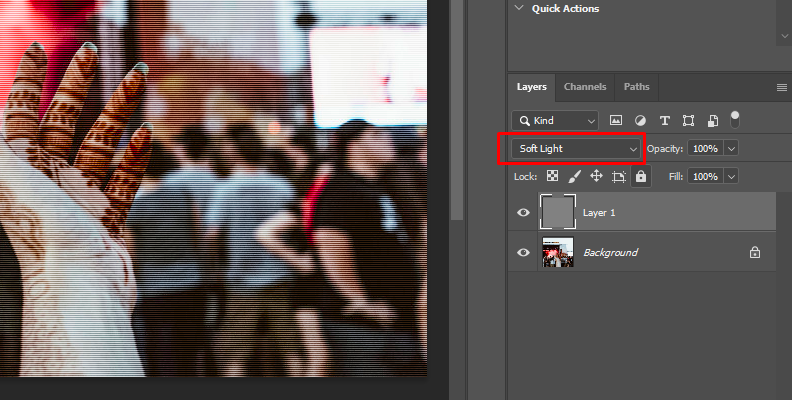
Step 5: Blend the Pattern with Your Image
Change the blending mode of your composition. Overlay and Soft Light work well, but you can experiment with all the settings and see which one suits your needs best. Preview each blending mode and adjust the opacity to enhance your image.
![]()
Step 6: Edit Your Pattern Overlay
If you want to make your scan lines thicker without changing the pattern, you can increase the size of the current pattern. Go to Edit > Free Transform and adjust the width and height percentages. The pattern size will increase, making the lines more prominent in your image.
You can add more effects like blur to smooth the scan lines on your image.
Step 7: Use Layer Masks
Add a layer mask to fine-tune the effects you apply to the image. Use the brush tool to control the amount of blur and other effects applied to your image, or choose to decrease the effect in some regions of your picture, like faces or skin.


How to Create Scan Line Effect in Photoshop with Boris FX
Among the vast library provided by Boris FX, there are a few professional plugins you can use to create scan lines in Photoshop. The most straightforward option is Optics, which includes many presets for image compositions, plus a few plug-ins from Sapphire and Continuum.
Sapphire's latest version is available as a plug-in for Adobe Photoshop and empowers you with over 270 non-destructive effects to produce artistic pictures in a nodal system.
Scan Lines with Boris FX Optics
Optics is a quick and easy way to add cinematic effects to your photos. For this Photoshop tutorial, I’ll guide you on how to add scan lines using Optics.
Step 1: Import Your Image and Create a Smart Object Layer
Open your photo and convert the layer to a Smart Object, allowing you to edit your image without causing any alteration to the original.
![]()
Step 2: Apply Optics Effect
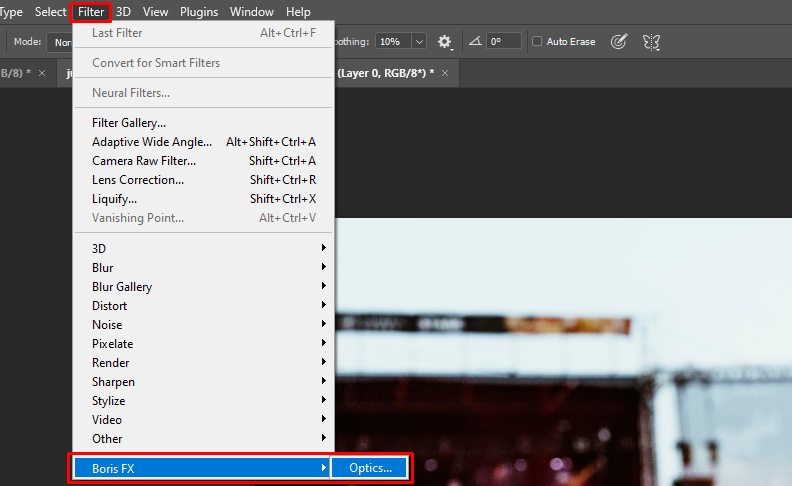
Choose Filter > Boris FX > Optics from the main menu to go to the Optics interface. It will automatically import your layer.
![]()
Step 3: Use Filters and Presets
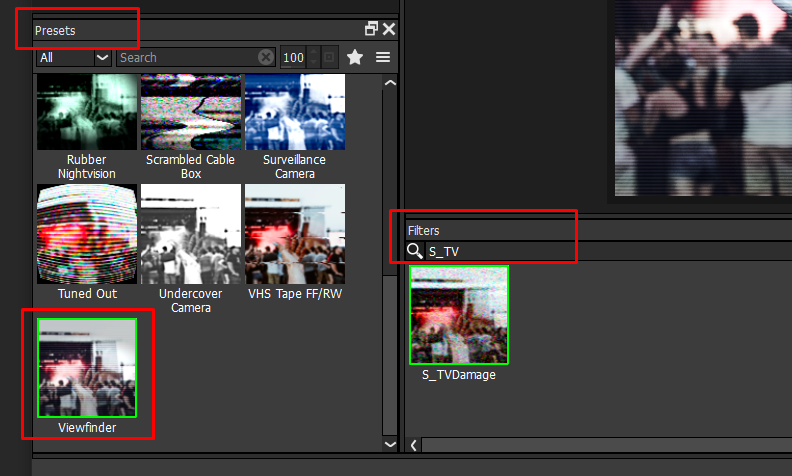
A filter that works magnificently for scan lines is S_TVDamage, under the Stylize category. Select it to create a new layer above the image. Under the layers panel, you can see the presets. The Viewfinder preset delivers a good scan line effect, but you can try others.
![]()
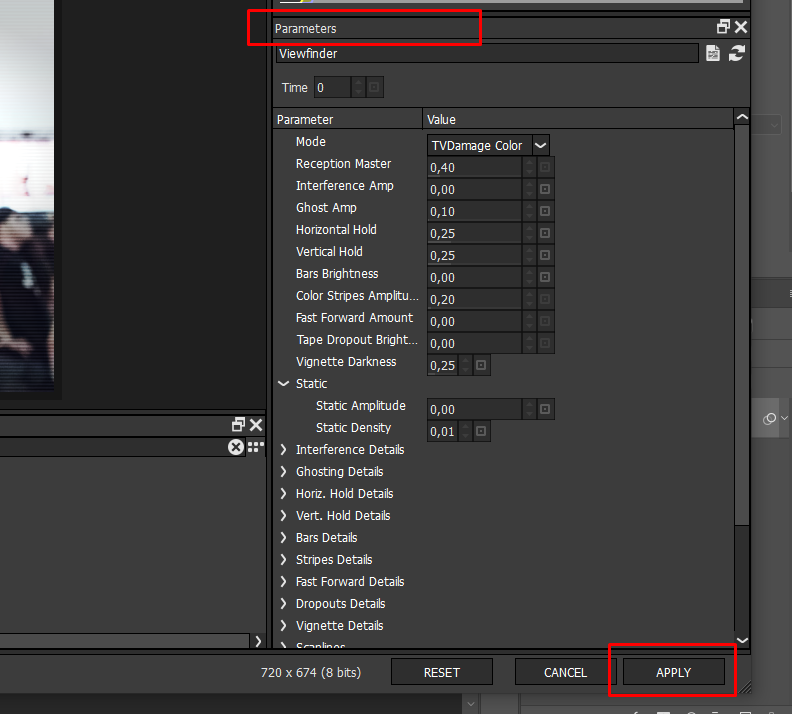
When you select a preset, its parameters will be to your right. You can adjust a few things like mode, for color or grayscale, the bars' brightness and sharpness, scan lines frequency, and even add blur, among many other settings.
![]()
For a quick effect, you can leave the default settings or set the ones under Scanline to adjust thickness and frequency.
Click OK to go back to Photoshop and continue editing your photo.
Scan Lines with Boris FX Sapphire
Taking advantage of Sapphire's integration with Adobe Photoshop, I'll show you how to add a scan line effect with Sapphire's filters.
Step 1. Apply the Sapphire Plug-in
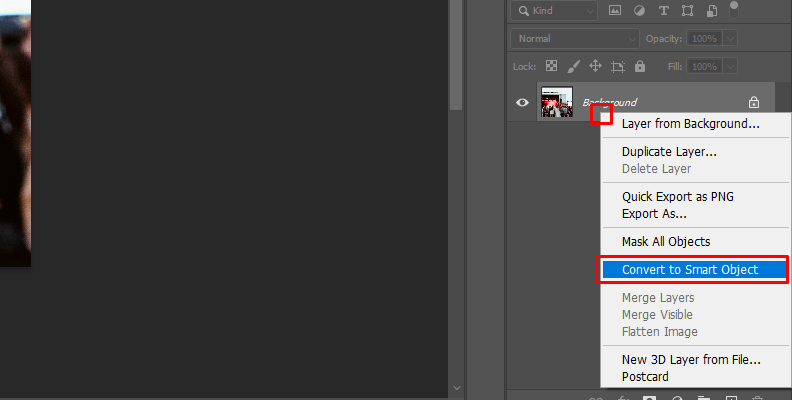
Once you have imported your photo, right-click the layer and select Convert to Smart Object. Then apply Sapphire from Filter > Boris FX > Sapphire. It will launch Sapphire's Effect Builder in Photoshop.
Step 2. Sapphire's Effect Builder
Search for effects on the left side of the interface. Under Stylize, you will find a specific effect called ScanLines. Double-click the effect to add the node and preview it on your image. You can adjust a few parameters to your right side, such as line frequency, sharpness, brightness, contrast, and color, and change the line angle.
You can create different presets from existing ones to have multiple scan line patterns available.
When you finish editing the effects, click OK to go back to Photoshop and add additional elements, filters, and backgrounds to achieve professional results.
Final Words
The scan line effect is an excellent filter to create a low-res look for your images and web design. With Photoshop tools and Boris FX plug-ins, you can recreate this effect with minimal effort and expand your visual palette in no time. Knowing these techniques will allow you to create stunning images for designs and artwork and hone your craft as a professional content creator.
For more free tutorials, you can visit the Boris FX website, where you'll find a video library with plenty of video resources to watch and keep learning.
Good luck!


