


Adobe Audition has a suite of powerful tools to help producers get the very best from any audio recording. Whether it’s unruly instruments or unruly hosts, Adobe Audition will have something to help you to remove background noise and get everything back under control so your audio sounds sweet. In this article, we will show you how to remove echo in Adobe Audition.
How To Remove Echo in Adobe Audition: When Is It Needed?

Echo and reverb in an audio file are the bane of any podcast producer’s life. However, not everyone can have a perfectly constructed, sound-deadening room for recording audio. Flat surfaces, hard floors, and glass can all cause unwanted echoes.
Fortunately, Audition can help you cope with echo and reverb so your audio sounds perfect.
There are two primary methods that can be used in Adobe Audition to achieve the removal of echo on an audio file.
The first method uses a built-in plug-in called DeReverb. This is a quick, one-size-fits-all solution for removing echo from an audio file. It’s straightforward to use and easy to get comfortable with, and the results on the audio file are dramatic.
However, there is a more involved method for getting rid of echo and reverb, which is EQing to eliminate echo by adjusting specific frequencies within your audio file. This will result in considerable noise reduction, better balance, and a more precise reduction than the DeReverb plug-in can manage on its own.
This is more technical, but your audio file will have even less of that troublesome echo.
Reduce Echo From Your Audio File Method 1: DeReverb
Let’s start with the simplest approach to removing echo from an audio file — using the DeReverb plug-in.
As the name implies, this will remove echo and also reduce reverb.
Firstly, launch Audition. On Windows, you will find it on the Start Menu, on a Mac it will either be on your taskbar or in your Applications folder.
Then, open the audio file you want to work on. To do this, go to the File Menu, choose Open, browse your computer, and then click the file and open it.

Then, you need to select your audio file. You can either go to the Edit menu, then go to Select and choose Select All. You can also double-click the track.

Noise Reduction Restoration Menu
Go to the Effects menu bar, then go to Noise Reduction Restoration and choose the DeReverb option.

This will open the DeReverb window.

The slider at the bottom provides a simple way to adjust the amount of effect that is applied to your audio track. Simply drag it to hear how the noise reduction process is doing.
If you drag the slider too far, you will hear clipping and buzzing. This makes your audio sound distorted. However, if you don’t move it far enough, you might not hear any change at all. Simply adjust the slider until you are satisfied with the result.
The Preview button can be used “live.” That way, you can start your audio playing back, then adjust the slider so you get to hear the change immediately. It's much easier than moving the slider, then previewing to hear the change, then moving the slider again, then previewing again.
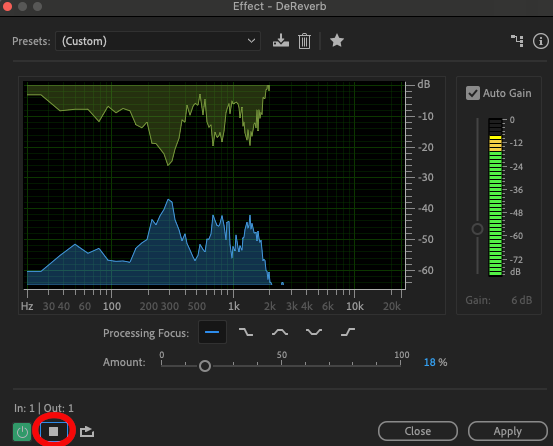
There is also a Processing Focus setting. This tells the DeReverb plug-in which frequencies to focus on.
For example, an echo created by glass may cause a high-frequency echo on the audio track, so you can choose the “Focus On Higher Frequencies” option to help the software know where the problem lies.

Conversely, liquids can cause low-frequency echo. If, for example, you have a fish tank in the room where the audio file was recorded, you might want to tell the software to focus on lower frequencies to eliminate that echo.
Whatever it is that causes the echo you need to get rid of, you can play around with the settings until you find a result you’re comfortable with.
Save your file by going to File, then choosing Save As.
Once you have that, just click Apply, and it’s done!
Even something that simple can make a huge difference when you want to remove echo and reduce reverb, and the DeReverb effect will really let you hear the difference.
Reduce Echo From Your Audio File Method 2: EQing
The advantage of using the Adobe Audition DeReverb plug-in for noise reduction is that it’s simple, quick, and effective.
However, if you want to go into more detail or have finer control over the end results, then the more involved EQing method is the way to go.
EQing is the process of adjusting specific frequencies within an audio file to either increase or decrease them. By focusing on specific frequencies, it is possible to decrease echo while reducing the overall impact on the track itself.
Adobe Audition has a few different equalizers for EQing. For this, the Parametric Equalizer is the one to use. It provides specific control over the frequencies that need to be adjusted.
Go to the Effects menu bar, then Filter and EQ, and choose Parametric EQ.

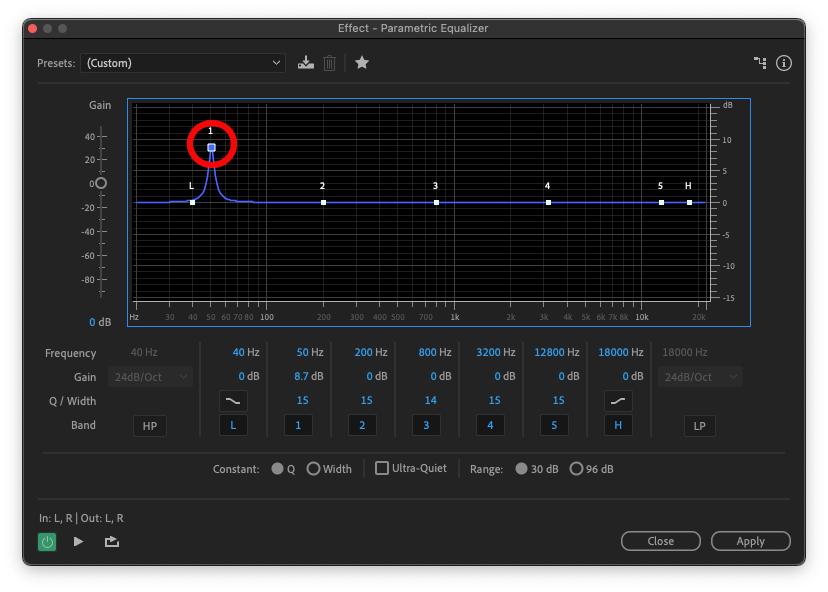
This will bring up the Parametric EQ dialogue box.

Parametric EQ
As can immediately be seen, this is a far more complex setup than the DeReverb filter. There are a few terms here, and it’s worth knowing what they mean before proceeding.
- Frequency: The part of the sound you are adjusting. A low number will adjust the bass. The higher the number, the more it will affect the treble.
- Gain: How loud the change you are making is. Volume, basically.
- Q / Width: The Q stands for “quality” and the value defines how wide across the bandwidth the changes will be applied. The higher the number, the narrower the affected part of the track will be.
- Band: The part of the audio file that’s being adjusted.
There are a few other settings, but we can focus on the main ones. Those will have the most impact on your audio files.
EQing
Now it’s time to start the actual process of EQing.
You will see white dots on the blue line. Those are the points that will make the adjustments. We want to keep the range of frequencies adjusted fairly narrow, so we only affect the echo and not the main part of the audio file.
To do this, adjust the Q / Width setting. Set the Q width on all of the bands to anywhere between 13 and 20, depending on how many echoes you’re dealing with.
Once this has been done, push the first white dot towards the top of the chart. That will push those parts of the sound up (increase the gain) on the audio file and make them easier to hear.
Click on the Preview button at the bottom left, so that your track starts to playback.

Then click and hold on the 1 with the left mouse button.
Now, you can drag that point across the whole of the audio file through the blue line. As you sweep it along (this process is actually called sweeping) you will hear the difference it makes to the way the audio sounds. You want to drag the point until you hear the place where the echo is most pronounced, scanning the track to find it.
When you've found it, lower that point so that the frequency and the echo are reduced. This will mean that the peak is pointing down instead of up. Drag the dot below the line to achieve this.

Reduce the gain so you can hear the echo and reverb has been eliminated, but not so much that the voice is affected by the change. To EQ this way takes a little practice, and it will be different every time because each recording will have a different amount of echo on it.
However, it’s quite easy to get the feel for it, and normally you want to adjust by around 5dB.
Repeat this process for each of the points — pull the point up, sweep across the whole of the track, find the place where the echo is strongest (if there is one), and then reduce it until you are satisfied with the results. When you have completed this for all the points on the equalizer, it will look something like this.

Low and High Pass Filter
You will also see that there are two other controls: HP and LP. This is the high pass filter and the low pass filter. These will help with background noise reduction across the entire file.

The high pass filter will help to remove any low bass noises that have leaked onto the recording, such as rumbling, traffic noise outside, or any kind of low-end frequency background noise from outside.
The low pass filter cuts out any high-pitched noises that have leaked onto the recording, such as the squeaking of a chair or a door being closed.
You will see when these filters are applied that the line dips at the start and end of the spectrum to show you the effect has been applied.
If you select noise reduction in this way, it will usually improve the way your audio sounds (and the overall audio quality), but if your audio sounds clean, it may not be necessary.
When you are happy with the changes to your audio file, click Apply, and the changes will be made to your recording.
As before, save your audio file by going to File, then choosing Save As.
AutoGate and Expander For Noise Reduction
Once the parametric stage is complete, it’s a good idea to adjust the dynamics of your audio. This will improve noise reduction further.
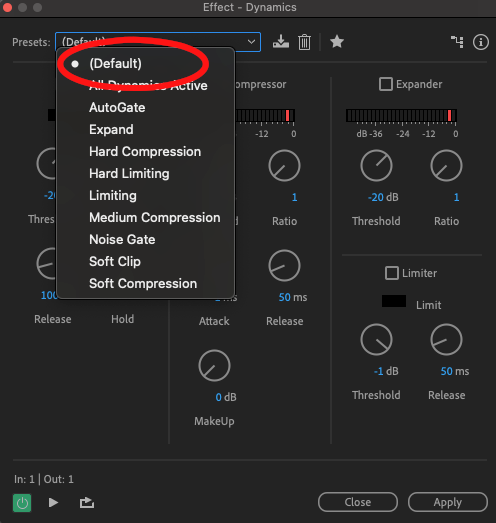
Go to the Effects drop-down menu, then Amplitude And Compression, and choose Dynamics.
The effects to use are AutoGate and the Expander.
AutoGate is a noise gate. That means when your audio goes above a certain threshold it will open (to allow sounds through) and when it goes below a certain threshold it will close (to stop sounds from getting through). Essentially, this combines a high pass filter and a low pass filter into one. This will help reduce the echo that occurs in between what is being said.
Ensure the Preset is set to Default. Then click the Preview button at the bottom left to start your audio playing back so you can hear the changes to your sound when you are making adjustments.
As with the equalizer, each audio track will be different, depending on how strong the echo is or the type of echo.
The Threshold and Hold settings are the important ones.
If the Threshold is set too high, the audio will sound distorted and clipped, so reduce it until everything sounds normal.
You can balance the effect using the Hold setting. Adjust them until you get to a point where you are happy with the way the audio sounds.
The Expander works similarly to the AutoGate, but it operates more as a sliding scale. The noise gate is binary — it is either on or off. The Expander allows a little more control. Adjust the Threshold, as with the NoiseGate, until you get a satisfactory result.
When using the Expander on an audio file, you also need to adjust the Ratio setting. This just tells the software how much to process the effect.
Both the Expander and the AutoGate can be used separately or together to blend the effects and achieve the best result.
Once finished, click on Apply and you can save the results to your whole track.
That’s it! Now you know how to remove echo in Adobe Audition!
While the parametric EQ and the Dynamics settings are more involved than using the DeReverb plug-in, there’s no doubt that the echo removal is better. There are also additional noise reduction possibilities with the high pass filter and low pass filter to improve quality further.
Which method is most appropriate to use will depend on how detailed you want to get, and how much echo there is on the audio track. But even the worst audio track will benefit from being cleaned up this way.
CrumplePop EchoRemover
In addition to Adobe Audition's tools, we have our own plug-in to remove echo.
EchoRemover is compatible with Audition and makes a dramatic difference to the amount of echo on any recording. Even the most reverb-heavy recordings which have been drenched in echo come out sounding pristine and clean.
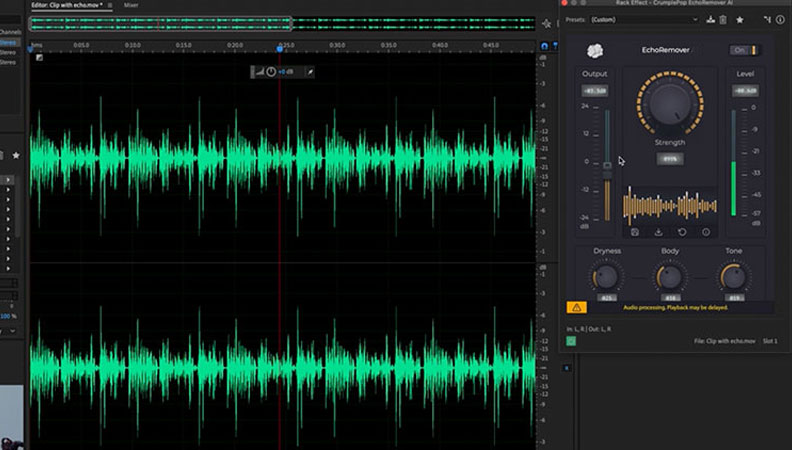
Once installed, this powerful, simple-to-use plug-in can remove echo by simply turning the main control knob. Adjust it until you find the perfect balance between the original recording and the echo removal, and that's pretty much all that needs to be done. The AI behind the plug-in does all the hard work for you — it's really that easy!
In addition, there are also controls for Dryness, Body and Tone. These allow for more precise control over the recorded voice and the balancing of certain characteristics.
- The Dryness setting allows you to adjust how strongly the echo remover is applied.
- Body allows a voice to sound thicker and fuller.
- The tone control will make your voice sound better, brighter and more treble-y.
Hear It For Yourself
Advanced audio AI removes noise and boosts your vocal quality.
Toggle it on/off to hear the difference.
Remove Wind
Remove Noise
Remove Pops & Plosives
Level Audio
Remove Rustle
Remove Echo
Remove Wind
You can also control the output level with a slider.
When you are happy with the settings you have, you can also export them as a preset for future use.
Conclusion
Recording audio professionally is no trivial task, but Adobe Audition is a powerful tool to use when it comes to removing echoes from any audio file during post-production. Even the simple DeReverb plug-in can make a huge difference to how your audio sounds. It takes next to no time to improve the quality of your recordings, even for beginners, by using basic noise reduction tools. For those with more ambition — or simply with recordings that have much more echo on them — there is plenty of scope to delve deeper into the world of noise reduction and improve your audio quality. But whichever approach is taken, you can look forward to a future of echo-free recordings with Audition.


