


There's a process in post-production that any motion graphic designer, video editor, or visual effects artist must be familiar with: motion tracking.
Tracking objects in footage to replace them afterward is a common task in video editing. Have you ever wanted to create moving photos like the ones in Harry Potter movies? A living graffiti for your music video? Or change the background in your car's windows to look like you’re flying? You can do all this and more with motion tracking!
Today, you'll learn the different types of motion tracking, how it works, why it’s a valuable tool, and how to apply planar motion tracking with Mocha Pro. I'll also briefly review point tracking so you can get an idea of when to choose planar tracking over other tracking methods.
Let’s dive in!
What is Planar Motion Tracking?
Let's start by identifying what tracking is.
Motion tracking is the process of capturing the movement of an element in footage and using that tracking data to match a different object to the other object's movement. In short, we use the movement of an object to apply that same movement to a different one. This allows you to add virtual elements such as creatures, logos, and labels and replace screens.
There are different motion tracking methods, but the most common are point tracking and planar tracking. Both are great resources for tracking and in certain situations, they can be used in tandem.
You might be more familiar with the point tracking method, which tracks how one or more points move in your original footage. Point tracking data can come from the edges, corners, or a high contrast mark in the tracked footage. It can track position, scale, rotation, and translation and is used to track the basic movement of objects to add graphics and for tracking effects such as lens flare. Most video editing software includes point-tracking tools.
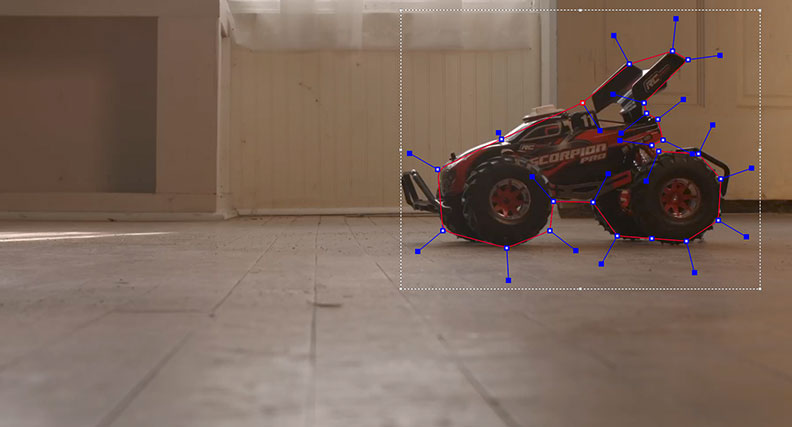
Planar tracking analyzes and tracks the movements of planes and flat surfaces in video footage without the need for making manual adjustments. A plane or surface can be floors, rooftops, walls, posters, signs, screens, windows, and car plates, but it can also track nonplanar surfaces such as people and faces. Unlike the point tracking method, the planar tracker tracks regions and focuses on shapes and textures. This allows the planar tracker to provide more accurate and stable tracking than other tracking processes.
The planar tracker can analyze basic movements such as translation, scale, and rotation as well as complex ones like perspective, skew, and distortion. It can deal with difficult shots with blur, poor lighting, and irregular shapes.
Tracking footage where the objects rotate too fast, causing motion blur in the image, can be a headache, especially if done with a point-tracking method. Using planar tracking for this scenario will save you plenty of time.
Here are some situations when you should use planar tracking:
Track even surfaces.
Tracking and following moving objects to insert screens or graphics.
Replace backgrounds or extend them.
Recreate historical locations.
Isolate actors or objects.
Remove unwanted objects without rotoscoping manually, frame by frame.
Digital makeup.
Creating tricky visual effects.
Nowadays, you can find many software for planar tracking, but perhaps the most awarded one is Mocha Pro.
Planar Motion Tracking in Video Editing with Mocha Pro
Mocha Pro is a world-renowned tool for planar motion tracking, rotoscoping, object removal, and many other features. It’s available as a standalone application, as a plug-in, and it's integrated into Sapphire and Continuum effects.
As a planar tracker, Mocha Pro tracks patterns of pixels or textures that move in one direction. When you work with Mocha Pro or another planar motion tracking tool, you need to think in terms of geometric planes as a flat two-dimensional surface that extends indefinitely, the planar movement in relation to the camera and co-planar surfaces, which are planes that are part of the same flat object you’re tracking.
These concepts are critical to understanding how the planar tracker in Mocha Pro works. But don't worry; as you familiarize yourself with Mocha Pro, everything will become easier.
Now, let's see the workflow for planar motion tracking in Mocha Pro. Follow these steps regardless of what video editing software you are using. Some steps might differ, like how to apply effects or import footage, so I suggest you revisit your software manual if you find yourself stuck.
Step 1: Import Video Footage into your Video Editing Software
Import the video file you need to use planar motion tracking for your project. Remember that planar tracking works best for footage with a planar surface, such as a screen, walls, signs, plates, etc. Drag the clip to your timeline and make the edits needed to the video.
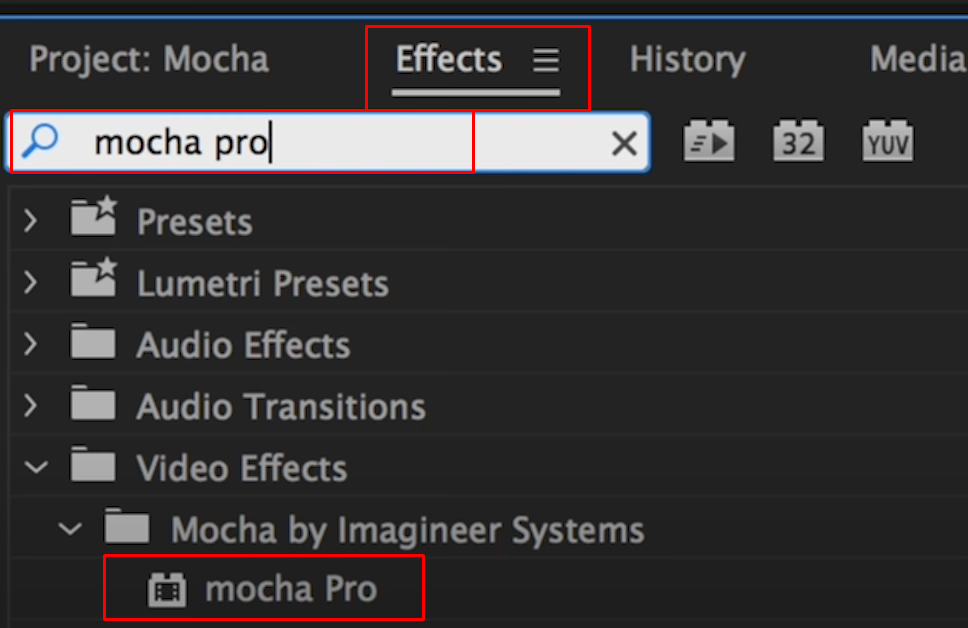
Step 2: Apply Mocha Pro Effect
![]()
Open your effects library and search for Mocha Pro. You’ll find it under Boris FX Mocha or just by typing "Mocha Pro." To add the effect, drag and drop it into the clip you want to use planar tracking.
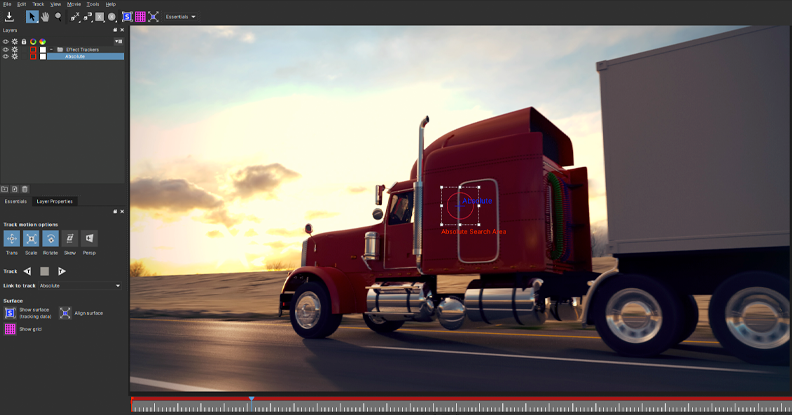
Step 3: Launch Mocha Pro Interface
![]()
Select the video clip with Mocha Pro, go to your effects control panel or inspector, and launch the Mocha Pro user interface by clicking the logo or the Launch Mocha UI button. When the Mocha Pro UI launches, it will import the video clip automatically.
Mocha Pro's interface is built for different needs, allowing you to choose between several workspaces with layouts targeted to different workflows. But for most planar tracking processes, you want to use the Essentials workspace.
In the Essentials workspace, you have the viewer occupying most of the screen and the player controls under it. On your left, you’ll see the layers panel, track motion options, surface tools, and export options.
Step 4: Select a Reference Frame
Selecting a reference frame for tracking the planar surface is essential to obtain professional tracking of your planar surface. The ideal frame will have the complete plane within it, not blocked by other objects or persons, with good lighting and contrast, with excellent detail and focus, and with little or no camera shake.
Starting in the middle of the video can help you track your plane from a critical point where it rotates or changes perspective, so your tracking is more accurate than doing it from the beginning, where sometimes, when it reaches the end, the shapes start to wobble.
The most important thing when choosing a reference frame is to find a planar surface to track. Remember the concepts for planar surface and co-planar to determine what to track.
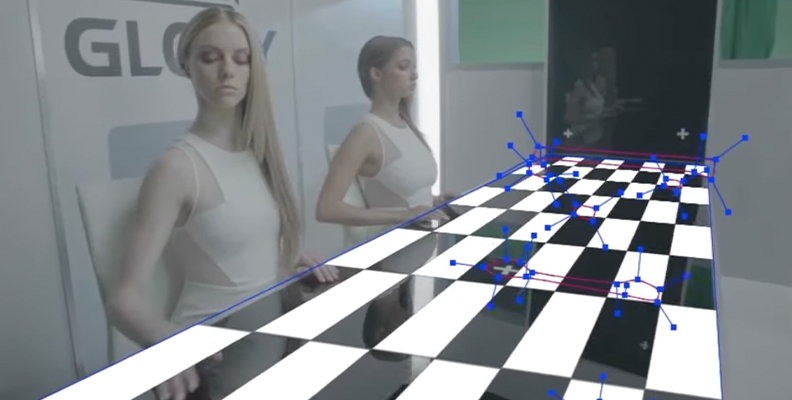
Step 5: Create a Shape
![]()
Select a spline tool to start drawing a shape around the surface you want to track. The shape will tell Mocha Pro where to look for the surface that needs to be tracked. You can use any other tools that work best for your surface: X-spline, Bezier, Magnetic spline, freehand or brush, or a rectangular and elliptical shape. What’s inside the shape will be the pattern of pixels that Mocha Pro will search and track.
Create a shape as big as the area you want to track. But avoid getting elements with no relationship with the camera movement in the shape to keep accuracy. Let's say you’re tracking a car in a shot from above, but there are other cars and people around. Create a planar tracker node close to the car, avoiding other surfaces.
Activate the planar surface (the blue square with an S icon) and adjust the planar surface tool to your plane. Activating the planar surface and the planar grid (the icon with a purple grid) will help you see if the planar tracking data is accurate, but it won’t affect it.
Things to consider when creating shapes:
The shape you draw is where Mocha is looking for the texture.
The surface tool shows you what the texture is doing.
Avoid getting elements not co-planar in your shape, such as reflections.
It’s OK to keep tiny, unnecessary elements in the texture if they’re hard to avoid. Mocha Pro will know which elements are the relevant ones.
Step 6: Tracking a Planar Surface
Once you create your shape in the reference frame and ensure everything seems right using the planar surface and the grid, the next step is to start tracking.
If you’re in the Essentials workspace, you must have your motion tracking options under your layer. If you are in the classic workspace, your motion tracking options will be under the viewer.
Decide the motion type that you need to track for your video footage:
Translation: tracks object movement left, right, up, and down in an x and y position.
Scale: tracks how the object's shape grows or shrinks for shots with zoom or when the camera moves away.
Rotation: tracks the rotation of the shape in the footage.
Stew: tracks shear movement and warp in an x and y space.
Perspective: tracks warp and morph in a z-space, like a door opening.
After choosing the tracking type, press the track backward and track forward buttons. Remember to start in your reference frame. It may take some time, depending on the length of your footage. Frames in blue mean tracked, while other frames not tracked will be in red.
Inspect the tracking and manually adjust your shape if it moves too much. You can stop the tracking at any point if you see the shape moving away in the current frame.
Step 7: Export Tracking Data
Export your tracking data to your video editing software to use it to add motion to another object or replace a sign, screen, etc. If you're working with the plug-in version of Mocha Pro, you need to go to File > Save and close the Mocha Pro user interface. Then, you can use the tracking data from the effect's settings.
On the standalone version, select Export Tracking Data and choose your video editing software from the list. Click Save and select a location for your export. Then, you can import the tracking data file from your video editing software.
Nodes, Corner Pins, and Planar Transform in Planar Tracking
Mocha Pro's planar motion tracking offers a diverse set of tools to simplify and your enhance video editing process.
Nodes are the core elements that represent tracking data, surfaces, and track points, interconnected for complex setups. A corner pin can adapt this data onto a new plane, which is perfect for screen replacements or graphic integrations, making the insertions appear natural within the scene.
The Create Planar Transform option compiles this data into a single transformation, allowing for seamless application to other layers, ensuring graphics move convincingly with the tracked planar surface.
Together, these features empower editors to create convincing, integrated visual effects.
Final Thoughts
Planar motion tracking has been used in the movie and television industry for over 20 years, so it’s safe to say this is a technology that’s here to stay!
Mocha Pro has helped visual effects artists optimize their valuable time in post-production tasks and has been used in many major productions such as Dune, Stranger Things, and The Last of Us, among others.
Get into planar motion tracking and upgrade your post-production skills with Mocha Pro. Download a free trial and start learning the basics of planar tracking with the Mocha Essentials Training Series available on the Boris FX website.
Good luck!


