


Over the years, Apple's GarageBand has become an indispensable tool for musicians and Mac users. It offers, for free, some of the features you'll find in more expensive DAWs (digital audio workstations) while providing the simplicity and versatility Apple is renowned for.
Many producers of all levels have been using GarageBand to record tracks and sketch out new ideas, but there's another thing: GarageBand is perfect for podcasting. So, if you're venturing into the world of podcasting for the first time, GarageBand is a light but powerful workstation that can provide professional results if you know how to use it correctly.
GarageBand: the Free Way to Start a Podcast

GarageBand is free, making it the perfect starting point if you want to get an idea of what it takes to make a podcast. Not only is it free, but GarageBand also offers everything you'll ever need to bring your shows to life, so you won't have to upgrade to a different workstation once your podcast becomes successful.
This Garageband podcast tutorial will explain how GarageBand works and why you should use it for podcast production. Next, I'll guide you through the necessary steps to make your podcast sound perfect using GarageBand. Specifically, we'll look into how to create a new project, record, and edit your podcast episodes in GarageBand.
Please note that I'll focus on the macOS version of GarageBand. While you can learn how to edit a podcast in GarageBand on your iPad or iPhone with the GarageBand app, fewer editing options are available there, so you might want to double check the steps for your device. I may be stating the obvious, but GarageBand is available only for Mac, iPhone, and iPad.
Enough said. Let's dive in!
What is GarageBand?
GarageBand is a digital audio workstation available for free on all Apple devices.
It comes with loads of features that can make the lives of musicians and podcasters much simpler, thanks to an intuitive interface and powerful tools you can use to edit and customize your recordings.
Developed in 2004, GarageBand is one of the best free DAWs you can use to make music and record podcasts.
GarageBand Main Features
Recording and editing audio in GarageBand is a no-brainer. Its drag-and-drop option allows you to add background music, recordings, and breaks without issues and in no time.
GarageBand stands out among other editing software for Apple users because it enables people with no experience in sound editing to use their smartphones or iPads to record music or radio shows. In GarageBand, you'll also find Apple loops and pre-recorded sound effects to help you figure out how to record a podcast in GarageBand and add music.
Compared to Audacity, another popular free option among podcasters and musicians alike, GarageBand has a more intuitive, user-friendly interface and more tools to edit your recordings. Plus, Audacity has a steep learning curve and currently doesn't have a mobile app, so you can't record and edit audio on the go with it.
Is GarageBand the Right DAW for You?
If this is your first DAW, then GarageBand is definitely the right software for you, regardless of your music genre or the purpose of your podcast. There's no better way to learn audio production than having an easy-to-use workstation that you can carry with you at all times.
Furthermore, it has all the features necessary to meet the needs of podcasters and musicians. Many musicians, from Rihanna to Trent Reznor and podcast hosts use it regularly, so it's unlikely GarageBand won't provide you with what you need to record your entire podcast!
Should I Record Audio with GarageBand?
Setting Up Your GarageBand Project
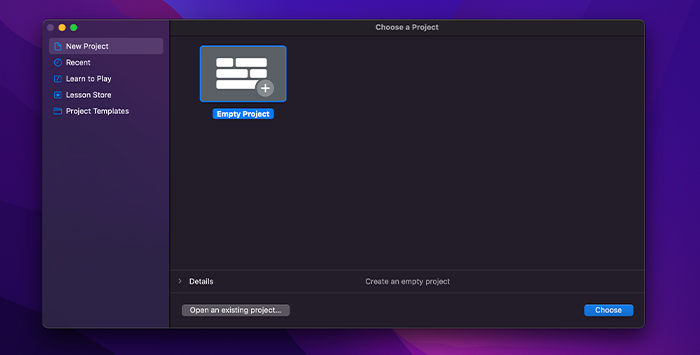
Open GarageBand. If this is the first time you've used it, select "Empty Project" from the Project Templates selection.
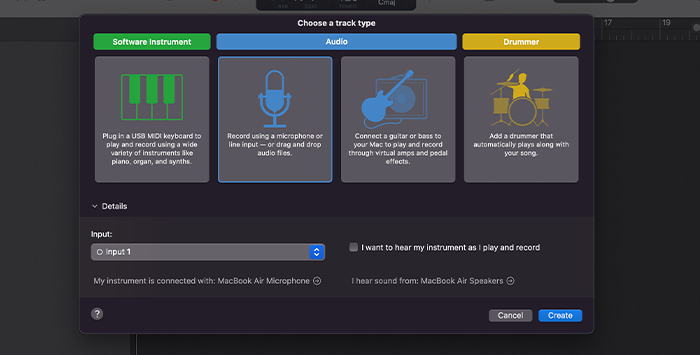
Next, a window opens, asking you what kind of audio track you'll be recording. Select "Microphone" to choose your mic's input, and set your output device, then click "Create." This will give you a single track.
If you're using only one external microphone, you're all set and can begin recording right away. However, suppose you need to record simultaneously with more than one microphone (let's say you're the podcast host and you have a co-host or a guest.) In that case, you'll need to create multiple tracks, one for each of the external microphones you're using, and select the correct input for each of them.
Podcast Recording in GarageBand
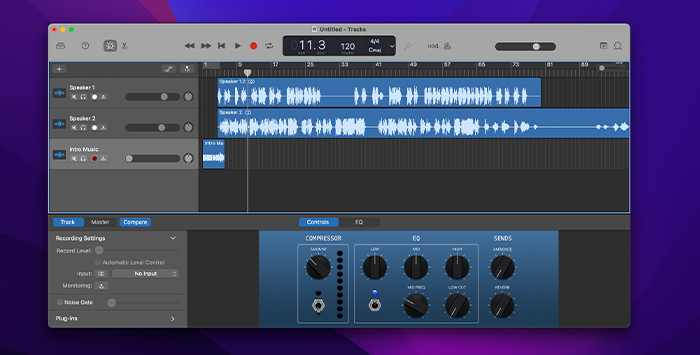
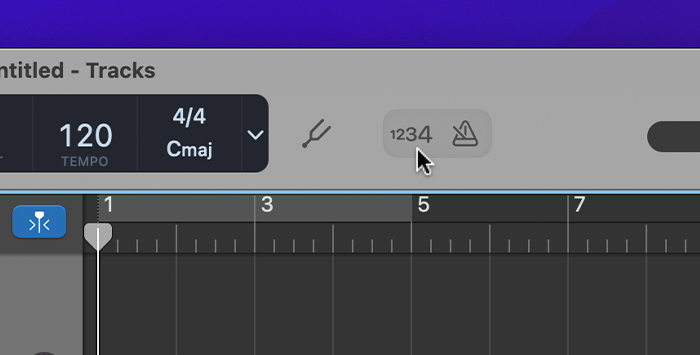
When everything's ready, the new project window will automatically close, and you'll see the main page of the workstation. Before you start to record podcasts, make sure you turn off the metronome and count-in features at the top right, next to the time signature and tempo.
I recommend you save your GarageBand settings in your project before you press the record button to ensure you keep your settings and don't change them by mistake afterward.
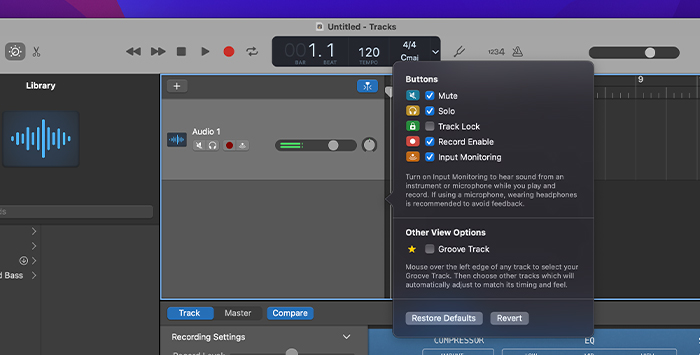
If you record podcasts with multiple microphones, you'll have to change some audio track settings for multitrack recording. From the menu bar, go to "Track / Configure Track Header" and select "Record Enable". You won't need to do this if you record podcasts only with one microphone.
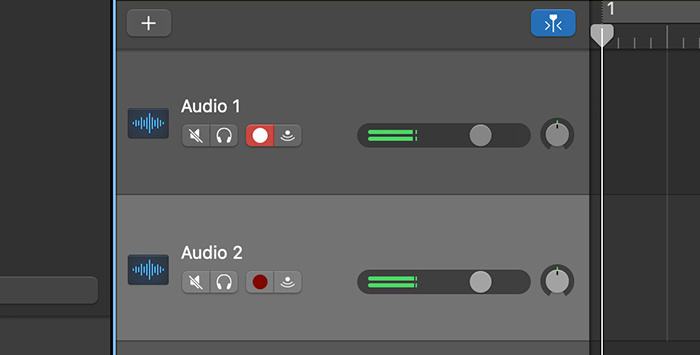
Now that you're all set, go to each track you're recording to enable multitrack recording and tick the record-enable button. After you click the record button in the menu bar, they'll turn red, which means the new tracks are armed and ready to record your voice.
Now you can start to record podcasts in Garageband!
Should I Edit My Audio Tracks with GarageBand?
Depending on the type of podcast you envisioned and the quality of your microphones, you can either publish the single long audio recording as it is or edit the audio files before uploading them online.
Many podcasters go through the editing workflow before making their podcast public and gain popularity simply because the audio quality of your show is paramount for most listeners. Do not neglect the editing process just because you think your content is superb. Always strive for the best audio quality.
Editing Your Podcast in GarageBand
Once the recording session is over, you can edit, trim, rearrange, and modify your audio files in many ways until you get the quality you aim for. To do this in GarageBand is an effortless task, thanks to the intuitive Edit Tool.
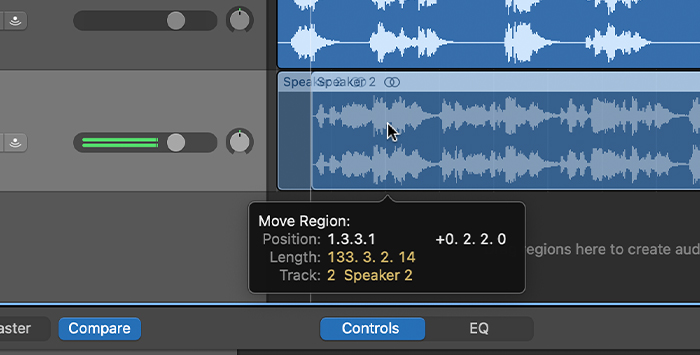
You can move your audio clip by clicking on it and dragging it wherever you need it. To cut specific areas of your recordings and paste them somewhere else, or for removing audio and adding theme music, you'll need to master a couple of editing tools GarageBand provides. Let's take a look at them.
Trimming
Trimming is one of the most crucial tools you need when editing audio recordings: it allows you to shorten or lengthen one track.
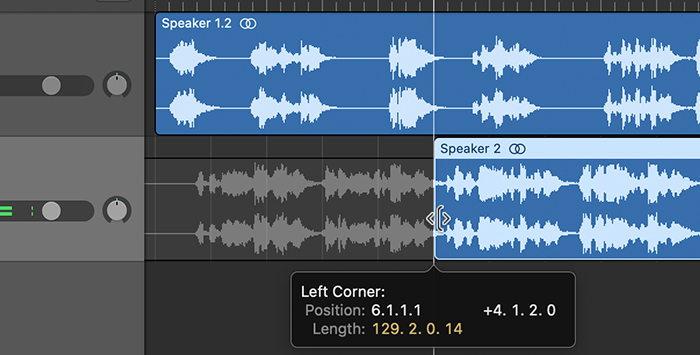
Let's say you want to remove the first and last few seconds of your recording because no one was talking at the time. In order to do that, you'll need to hover over the edge of that one track (at the beginning or end, depending on where the part you want to remove is) and simply drag the file as if to shorten the area you want to remove.
Split Regions
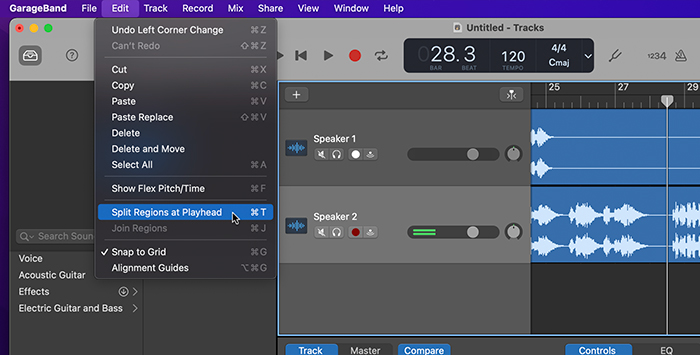
What if the part you want to remove is halfway through your show? Then, you'll have to use another fundamental tool called split regions at playhead. You can split an audio file and edit each part independently with this function.
You need to click on the area where you want to split the file and go to Edit / Split Regions at Playhead (keyboard shortcut CMD + T). Now, you'll have two separate files, so the editing you do to one part won't affect the other.
This is a fantastic tool for editing or removing a part of your podcast that is not at the beginning or the end of your audio files. By isolating a specific audio region, you can remove it quickly by right-clicking on it and selecting Delete.
All you have to do after this is drag the file on the right until it touches the one on the left in order to join regions and have a seamless audio file once again.
Automation Tool
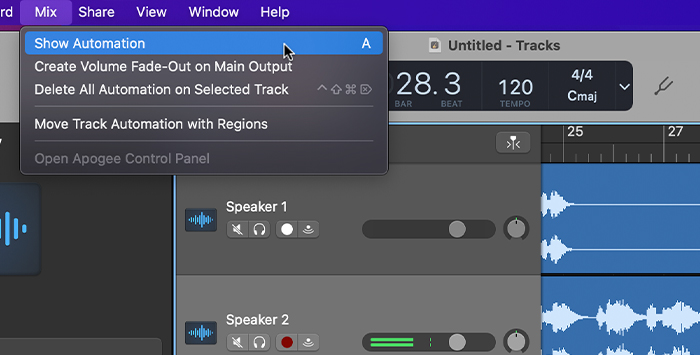
If you want to increase or decrease the volume of a specific area, you can use the Automation tool. Go to Mix / Show Automation (keyboard shortcut A). You'll see a horizontal yellow line that'll cover the entirety of your track.
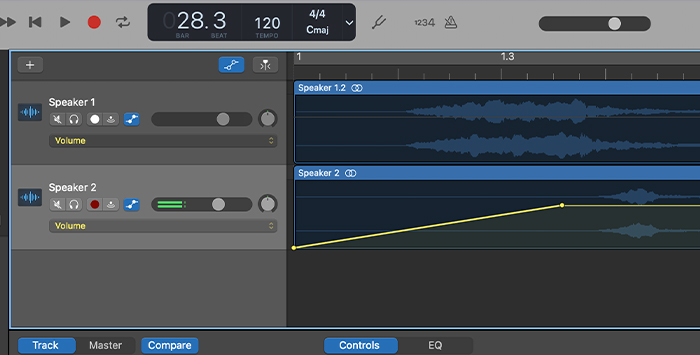
If you click on the area where you want to increase or decrease the volume, you'll create a node in the yellow line, which you can drag up or down to adjust the volume. This is especially useful if you want to create a fade or fade-out effect without adjusting the input gain.
Using Multiple Tracks
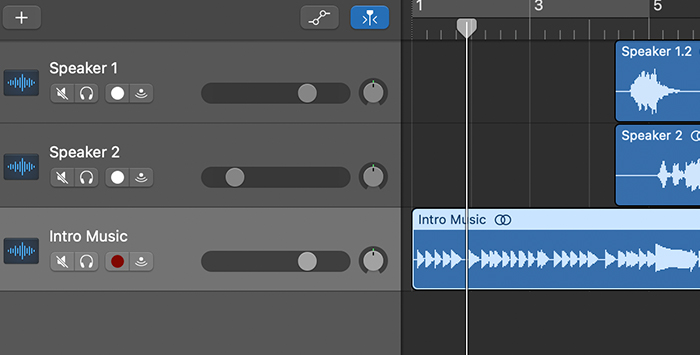
Finally, if you have multiple audio clips, including intro music or sound effects, adverts, outro music, and so on, it's good practice to keep them all in separate tracks so you'll be able to edit each individual track without affecting the others, as well as have more than one audio playing at the same time (voice and background music, for instance.)
Should I Mix My Audio Tracks with GarageBand?
If you're already familiar with music production and audio editing, you'll probably find GarageBand's mixing capabilities sub-par compared to other software and more expensive DAWs. However, rest assured that in order to edit podcasts, you'll have more than enough user-friendly features at your disposal to deliver professional results.
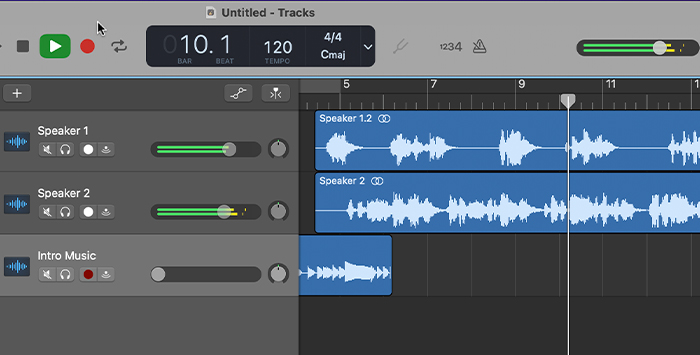
The first thing to analyze is the overall volume level of your show and ensure it's balanced throughout. Each track features a metered volume bar, which you can use to keep track of the volume level: when it's too high, it'll show a yellow or red signal, and you want to avoid that audio level to ensure audio quality.
Lower the volume whenever necessary, using the editing tools mentioned above or lowering the overall track's volume with the metered volume.
The result should be a podcast that provides balanced audio levels and a pleasant sonic experience. I'm not too fond of podcasts when they have extremely loud, tinnitus-trigger intros followed by quiet conversations. When listening to your episodes, people shouldn't need to raise or lower the volume at all, but maintain a constant volume for the show's duration.
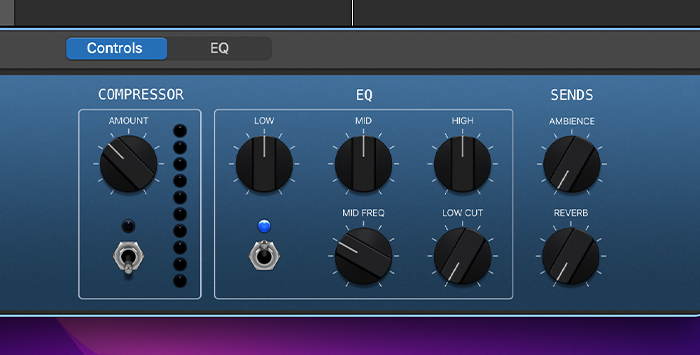
You can also use some compression and EQ to enhance the quality of your recordings. However, again, having a good microphone will save you plenty of time and headaches during post-production, so if you have one, your audio file might not need any post-production editing.
Saving and Sharing Your Podcast Episode
When you're happy with the result, go to Share / Export to Disk. Choose the file name, file location, and export format - then click export.
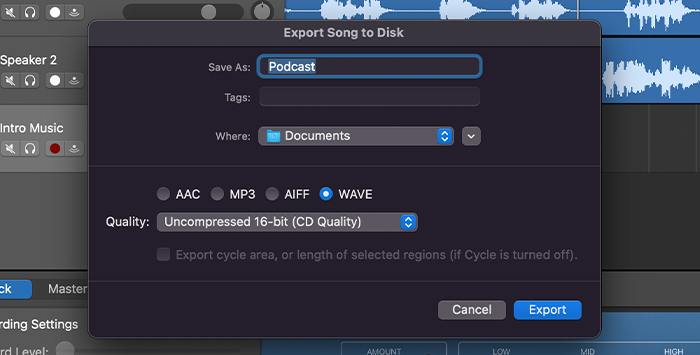
Although most podcast streaming services and directories are happy with a standard MP3, 128 kbps file, I suggest you export an uncompressed WAV file. Regarding WAV vs MP3, consider that WAV is a bigger audio file, but it's better to provide higher quality audio whenever possible.
You can always download both MP3 and WAV file formats with different bit rates and use one or the other, depending on the media hosts you rely on.
Speaking of which, now that you're starting your own podcast and have your first episode ready, all you have to do is share the podcast file with the rest of the world! Of course, you'll need to use a podcast hosting service to do that.
There are many podcast hosting options out there, and quite frankly, the differences in their service quality are minimal. I've been using Buzzsprout for many years and am satisfied with its sharing tools and reliability. Still, there are dozens of different media hosts available right now that can get your podcast into Apple Music, Spotify, Amazon Music, and more, so I'd recommend you do some research before choosing yours.
Final Thoughts
I hope this Garageband podcast tutorial helped you better understand how to make your first steps into the world of podcasting. As I mentioned earlier, GarageBand is a valid and inexpensive option if you want to start recording your show right away. It does have all the tools to make a podcast sound professional, as long as you have a good microphone and audio interface.
FAQ
Should I Buy a Mac Just for Garageband?
If you don't own an Apple Computer, iPad, or iPhone, is it worth becoming a Mac user to get GarageBand? I'd say no. Although GarageBand for podcast production is a great choice for beginners and professionals alike, there are loads of free or affordable software for podcast production that will cost you way less than any Apple device.
As you progress and your editing requirements increase, you may consider switching to a more powerful DAW; however, I can't think of a reason why someone would need more powerful software than GarageBand to record a podcast.
Meanwhile, enjoy this fantastic and free piece of software, and start recording your podcast today!


