


Have you ever shot footage in low light and been unhappy with the results? Perhaps you have shot video with a smartphone and had "grainy" footage?
If yes, you've just encountered a common issue for videographers the world over—noisy video!
Fortunately, it's easy to reduce video noise and grain using Final Cut Pro (a.k.a. Final Cut Pro X), and in this tutorial, we'll show you how.

A Brief Overview of Final Cut Pro Noise Reduction
Noise reduction in Final Cut Pro involves using the Noise Reduction effect to clean up your footage. We'll discuss this below, but first, let's consider why video noise arises in the first place.
What Causes Noise in Video Footage
The most common cause of video noise is low-light shooting conditions.
When you shoot video without adequate light, your camera's sensors struggle to capture a clear signal. To compensate, your camera amplifies the (poor quality) signal and boosts the inherent electronic noise in the signal. This results in the unwanted grain that we associate with video noise.
Other common causes of video noise include using high ISO settings (i.e., setting your camera's light sensitivity too high) or using a small camera sensor (e.g., in cell phones.)
Background Noise
Noisy video footage is also referred to as background noise. While this term is typically associated with audio recordings, it's also used to describe the grainy visual appearance that noise creates in video.
Noise Reduction Effect
The Noise Reduction effect in Final Cut Pro reduces or eliminates all types of unwanted video noise. It works by analyzing your video clips frame by frame to identify areas of noise. It then smooths these areas to reduce the appearance of noise in the video clips shot, while trying to preserve the details of the original footage.
When you add noise reduction using Final Cut, you can adjust its intensity (i.e., amount) and other parameters, such as the sharpness of your footage. This is especially helpful if you're applying multiple clip effects, which sometimes require adjustment using several parameters.
How to Reduce Video Noise and Grain in Final Cut Pro—Tutorial
Here's our guide how to reduce noise in Final Cut Pro using the Noise Reduction effect.
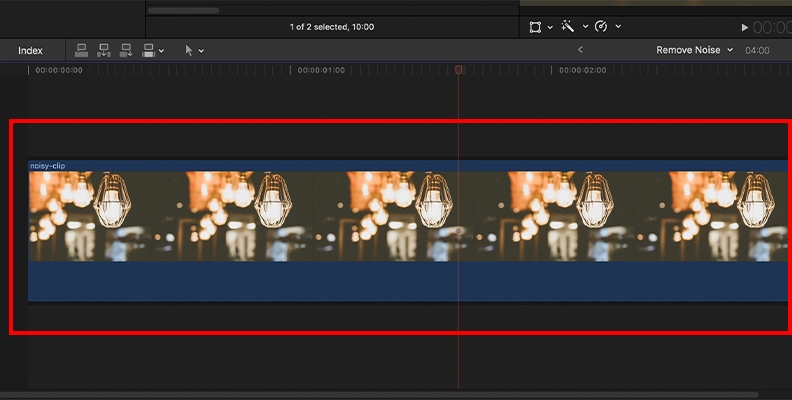
Step 1:
Select the noisy clip in your timeline and position the playhead so that the clip appears in the viewer.
Your timeline is the region in which you add, arrange, and edit all of your clips for a video project. It's found at the bottom of your window in Final Cut Pro.
![]()
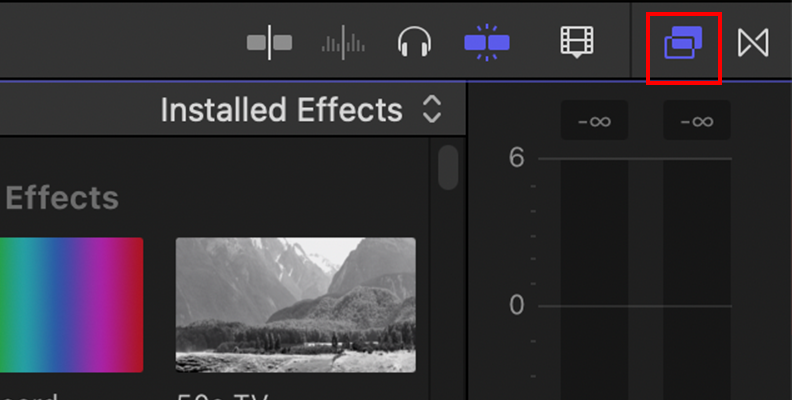
Step 2:
Open the Effects Browser by clicking its icon (i.e., the image of two overlapping squares). You'll find this at the top-right corner of the timeline region.
![]()
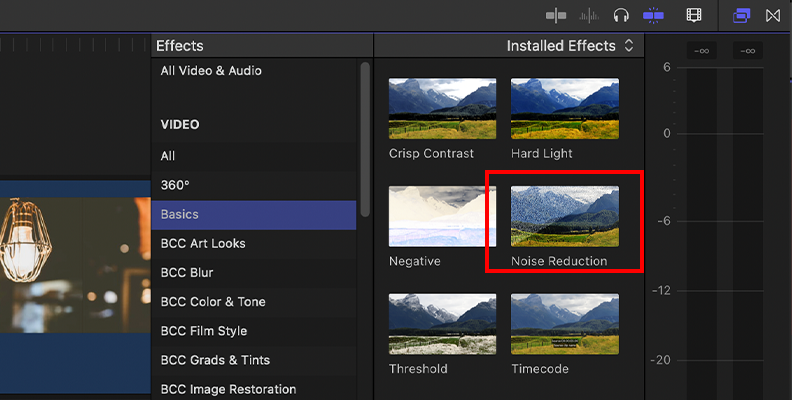
Step 3:
Locate the Noise Reduction effect. An easy way to do this is with the search bar in the Effects Browser (i.e., type in "noise reduction".) You can also navigate to the "Basics" category of the effects menu.
![]()
Step 4:
Apply noise reduction by dragging and dropping the effect onto your selected video clip. You can also double-click the thumbnail to apply it to your selected clip. The first time you do this, Final Cut Pro analyzes the clip to evaluate its noise.
![]()
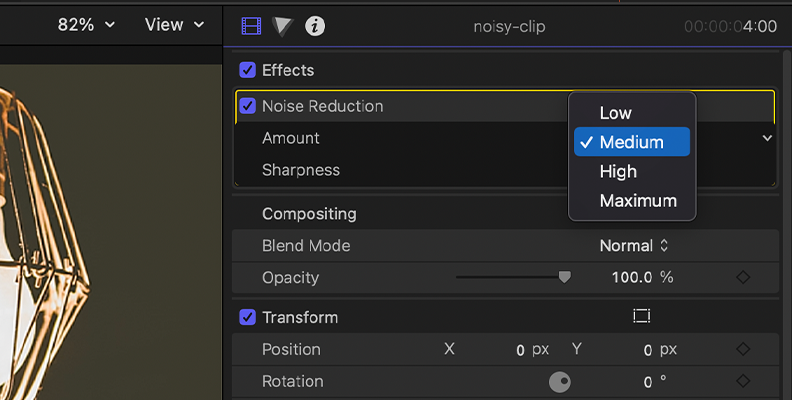
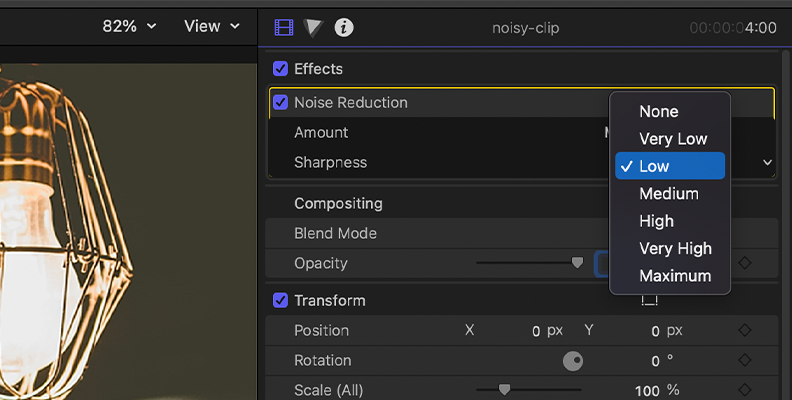
Step 5: (Optional)
You can adjust the amount of noise reduction applied, as a sort of "noise reduction filter", by setting its level in the Video Inspector panel, usually located in the top right section of your interface.
In the Video Inspector, go to the Noise Reduction section and look for a parameter called "Amount". Set the parameter to Low, Medium, High or Maximum.
![]()
Step 6: (Optional)
You can also adjust the degree of sharpness associated with noise reduction. This is also found in the Video Inspector panel under the Noise Reduction section. Look for the parameter called "Sharpness". As for the Amount parameter, set this parameter to Low, Medium, High, Very High, and Maximum.
![]()
Here's a before (left) vs. after (right) comparison of applying Final Cut Pro's Noise Reduction effect:
![]()


Balancing Sharpness and Noise Reduction in Your Clip
The sharpness parameter enhances the edges and details in your clip. When you increase it, the edges become more defined and add impact to your clip. However, if you overdo it, artifacts start to appear and your video may look unnatural.
If you apply too much noise reduction, your clip may become too smooth and lose some of its natural texture and detail. By increasing the sharpness, you can reintroduce some of the lost detail.
In order to get the best results and create a truly neat video, you'll need to balance the amount of noise reduction and sharpness.
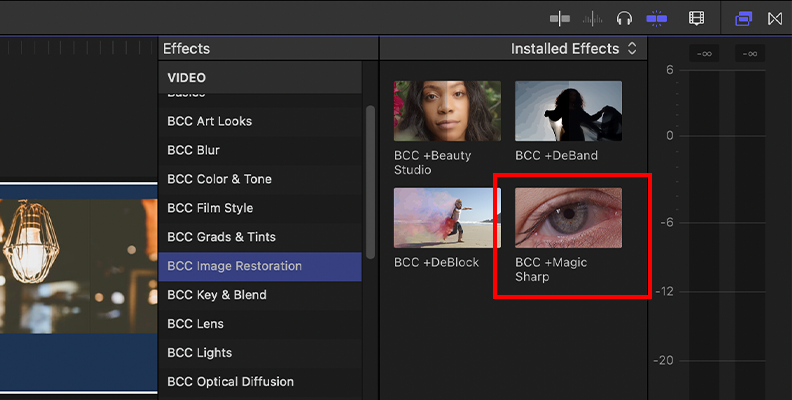
How to Reduce Video Noise and Grain in Final Cut Pro with Boris FX
While Final Cut Pro's out-of-the-box tools are good, you'll get better results using high-quality external plug-ins like those from Boris FX. The BCC+ Magic Sharp filter (BCC-MS), for instance, from Boris FX's Continuum suite for Final Cut Pro, makes it easy to improve your video footage and produce great results.
Using BCC-MS is as easy as:
- Install the Boris FX plug-in suite or Continuum if you haven't already done so.
- Access the BCC-MS filter from the effects panel.
![]()
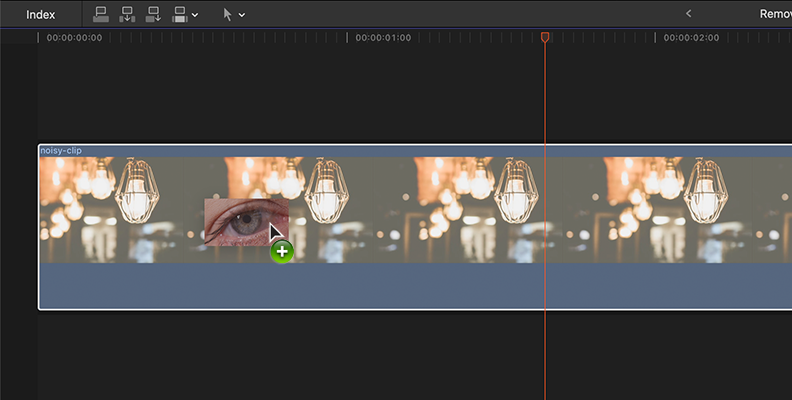
- Drag and drop the BCC-MS effect onto your selected video footage.
![]()
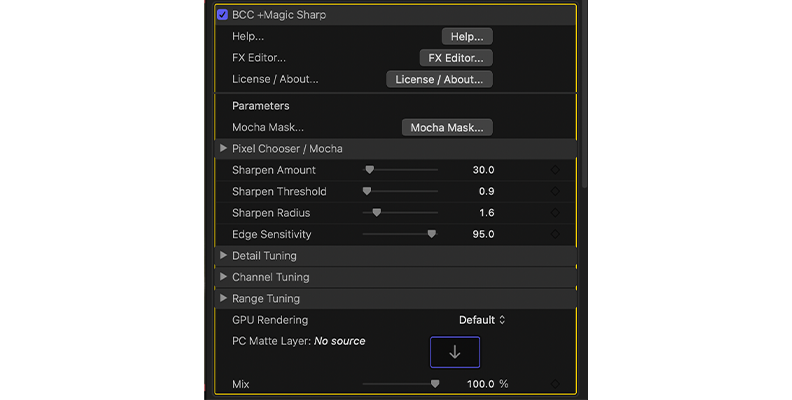
- Adjust the parameter settings to achieve the results that you want.
![]()
How to Avoid Grainy Video
As we've seen, grainy or noisy video doesn't look great and it takes some editing to eliminate (or reduce) noise using Final Cut Pro. So, while reducing noise is possible, the best strategy is to avoid producing grainy video in the first place.
Here are some tips for doing so:
Use Optimal Lighting
To avoid using inadequate lighting:
- Make sure that your subjects are well-lit.
![]()
- When shooting indoors, use external lights to brighten the scene.
- When shooting outdoors, use natural light when you can, especially during sunrise and sunset—the best times for natural light conditions, when light is softer and more diffused.
- Make sure that your subjects are well-lit.
Don't Overdo ISO
ISO settings determine your camera's sensitivity to light. Higher ISO levels allow you to shoot in lower-light conditions but introduce more noise. To avoid this, use the lowest possible ISO setting that you can for the light conditions that you have.
Use A Fast Lens
Fast lenses have wide apertures and allow more light to hit the camera sensor, so you can shoot in lower light without raising the ISO too much. These types of lenses help when shooting in low-light conditions without adding (too much) graininess.
![]()
Use A Large Sensor Size
Cameras with larger sensors, such as full-frame or APS-C sensors, perform better in low-light conditions compared to small-sensor cameras (e.g., smartphone or compact cameras.) Try to use large-sensor cameras when you can.


Conclusion
Noisy video is a recurring issue for videographers at all skill levels. Poor lighting conditions, high ISO settings, or small camera sensors are typical culprits that produce noisy video.
Fortunately, with Final Cut Pro you can easily reduce noise in your video footage, as we've seen in this tutorial.
If you want more flexible and professional results, however, you can turn to external plug-ins, such as the range of high quality plug-ins available from Boris FX.


