If you're a video editor, content creator, or someone putting together a video project for the first time, you're likely already familiar with the rendering concept.
The rendering process refers to a process during which the editing software "digests" all the work you've done to your video material. After doing the basic editing work and adding transitions and subtitles, what's left is to render the timeline to get a clear, smooth playback so you know whether or not you're on the right track.
In this guide, we'll focus on rendering in Premiere Pro - more precisely, we'll focus on how to render in Premiere Pro and what it means.
If you're willing to learn more on this topic, you've come to the right place. We've got quite a bit to cover, so without further ado, let's get straight into it.
What Is Rendering?
In Adobe Premiere Pro, rendering refers to the process of generating a preview of your timeline or video project by converting effects, transitions, or complex compositions into frames that your computer can display in real-time.

This process allows you to view a smooth playback of your edited footage, especially when the project involves heavy effects, multiple video layers, or high-resolution media.
There are two main types of rendering in Adobe Premiere Pro:
1. Rendering for Preview
Premiere Pro creates temporary files (preview files) for specific sections of your timeline to improve playback performance. You’ll often see colored bars (like yellow, red, or green) at the top of your timeline, indicating the need for rendering.
- A Red Render Bar means the section needs to be rendered for smooth playback.
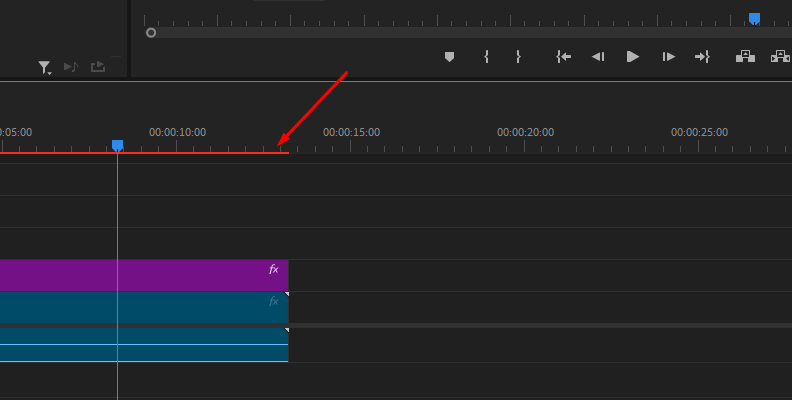
- A Yellow Render Bar means the section may play back fine, but rendering could improve performance.
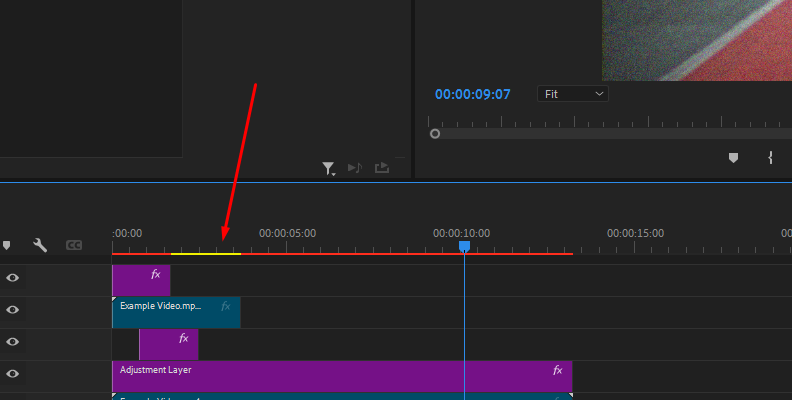
- A Green Render Bar means the section has rendered preview files and should play back smoothly.
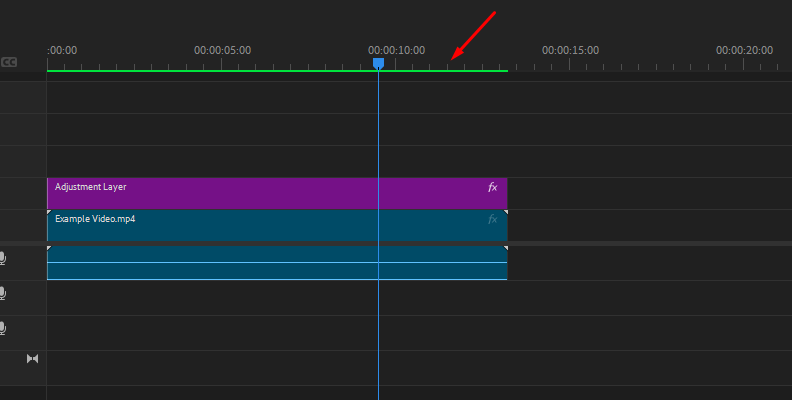
You should render for preview when:
Playback Is Laggy and "Choppy"
If your timeline playback is slow, stuttering, or skipping frames, it's a good time to render for preview. This often happens when you’re working with high-resolution footage (e.g., 4K or higher), multiple layers of video, or complex effects.
Effects and Transitions You Added Are "Heavy"
Certain effects, color corrections, or transitions can be computationally intensive, especially if combined with others. Premiere may struggle to play them back in real-time without rendering. You may not be able to fully preview the transitions you've created or the impact of the effects you've added until you render for a smooth playback.
If You See Red or Yellow Bars Above Your Timeline
This indicates that Premiere Pro may not be able to play these parts smoothly without rendering.
- Red bars indicate the section must be rendered for smooth playback.
- Yellow bars suggest it might play back okay, but rendering could help avoid possible slowdowns.
You're Working With High-Resolution or RAW Files
When working with high-resolution footage (like 4K, 8K, or RAW video files), your computer may struggle to process them in real-time, especially if your hardware isn’t top-tier and specifically designed for such computing tasks.
Rendering will allow smoother editing.
You Use Multiple Video Layers
If your video project involves multiple video layers, such as picture-in-picture effects or compositing, rendering will help your computer handle these complex elements.
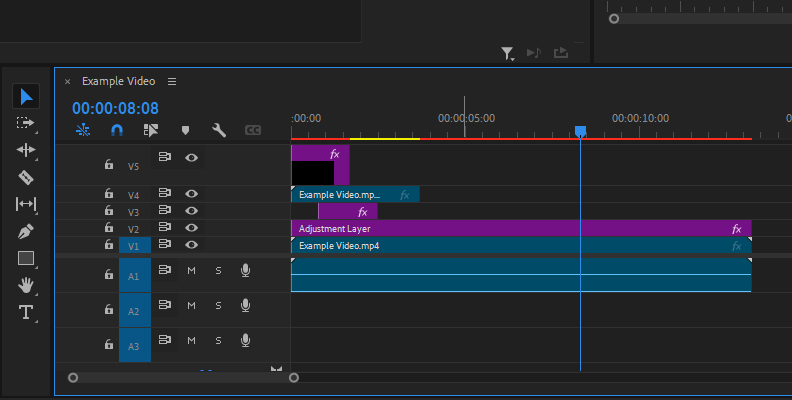
Attempting to preview complex video projects without rending the timeline first will be a frustrating experience due to the constant stuttering at times when there is a red or yellow render bar, and in the end, you'll spend more time compared to just rendering and previewing afterward.
Smooth Preview Is a Must Due to Attention to Detail and Project Needs
Rendering gives you a way to view your project in real-time without the performance issues caused by real-time processing, so you can ensure all edits, effects, and transitions work together as intended.
Small imperfections show up quite large on the movie screen, so you must pay attention to detail even to individual pixels, which is impossible if the preview skips frames and stutters.
You Are About to Present Your Project to a Client
If you're about to show your project to a client or make critical decisions, you may want to render parts of the timeline to ensure smooth playback, especially when effects or transitions are involved.
This is especially true when your client is not tech-savvy or informed about the whole editing process. They may get the impression that their final product will also lag and stutter. It's best to save yourself the explanations.
2. Rendering for Export / Final Rendering
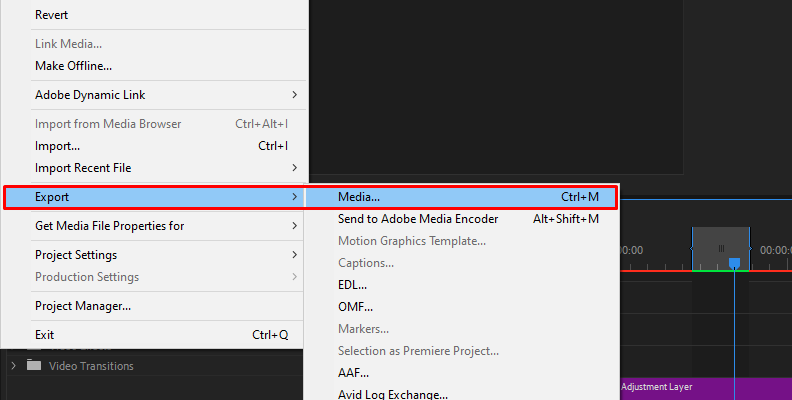
When you're ready to export your project, Premiere Pro performs a final render where it processes the entire timeline into a single video file based on your export settings. This is when all effects, transitions, color corrections, and edits are permanently applied to the output file.
You should render for export when you've already previewed your edit and are satisfied with what you've made, as this is the final step during which you create a video file from your timeline that you can later upload and share.
For more information on how to export video from Premiere Pro check out our guide on this topic.
You can also queue multiple renders through the Adobe Media Encoder.
How to Render in Premiere Pro
Select the Area to Render
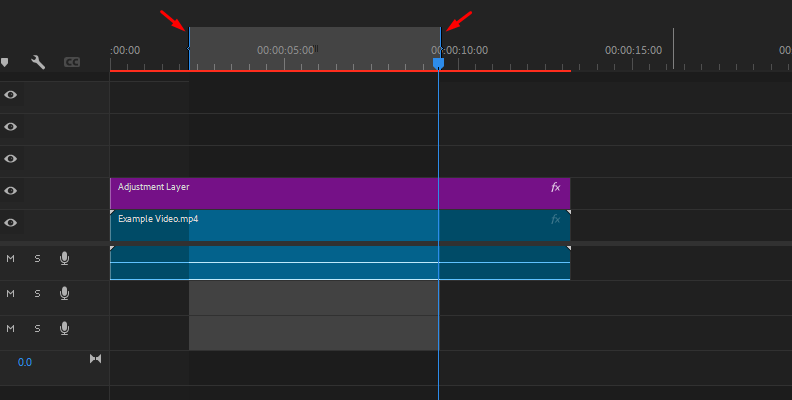
If you want to render the entire sequence, you can skip this step. To render only a specific section:
- Move the playhead to where you want to start rendering and press I to set the In point.
- Then move the playhead to where you want the render to end and press O to set the Out point.
Go to the Sequence Menu and Choose a Render Option
Click Sequence at the top of the screen in the menu bar.
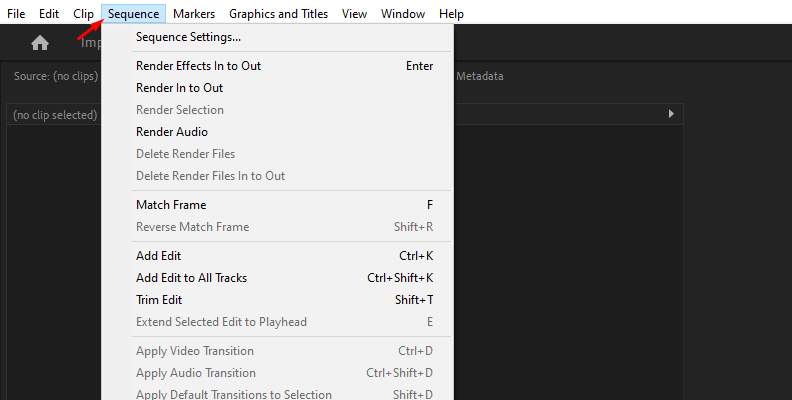
From the Sequence menu, select one of these options:
- Render Effects In To Out: Renders only the effects between the In and Out points.
- Render In To Out: Renders everything (both video and effects) between the In and Out points.
- Render Selection: Renders only the clips you’ve selected in the timeline.
- Render Entire Work Area: Renders the entire timeline.
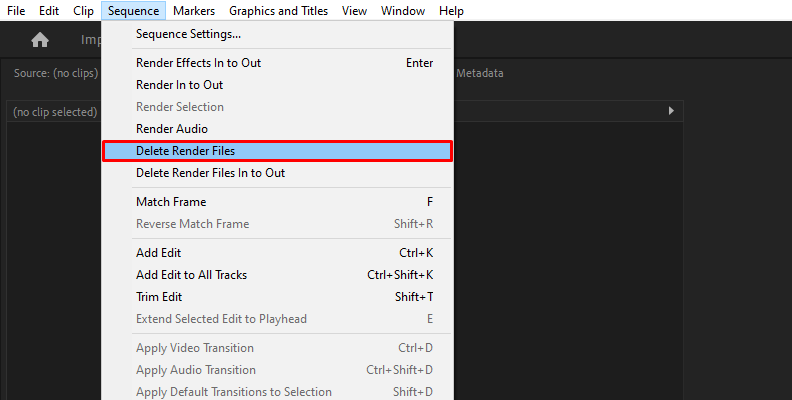
You can also delete render files by going to Sequence -> Delete Render Files.
Track the Progress and Preview When Finished
Premiere Pro will begin rendering, and a progress bar will appear.
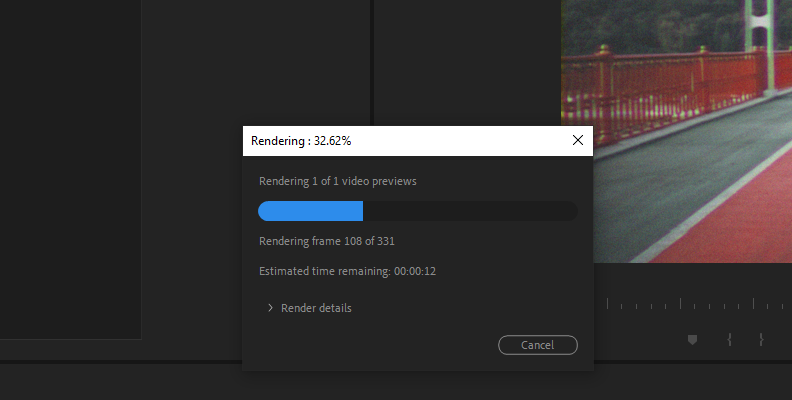
Once done, the colored bar above your timeline will turn green, indicating that the section has been rendered and should play back smoothly.
Play back the rendered section to make sure it runs smoothly without lag.
Render Settings in Premiere Pro
There are various Premiere Pro render settings available. Here's what you need to know about them.
Render Settings for Previews
These settings control how Premiere Pro generates preview files, which are used during editing for smoother playback.
- Preview File Format: You can choose the format and codec for your preview files. Common formats include:
- I-Frame Only MPEG: Good for general previewing with moderate quality and speed.
- QuickTime (ProRes/DNxHD): Higher quality but creates larger files. Ideal for higher-end projects.
- Resolution: When rendering for preview, you can choose to render at the sequence’s full resolution or a lower one for faster processing. Lowering the resolution can improve playback but decreases visual fidelity.
- Render Codec: The codec used for previews can be customized to match your system’s performance. Some editors choose ProRes or DNxHD/HR codecs for better-quality previews, especially for high-resolution projects.
- Maximum Bit Depth: Enabling this option ensures that your previews are processed at the highest possible bit depth (e.g., 10-bit or 12-bit), which is useful for projects with high dynamic range (HDR) content or when color grading. However, this can slow down rendering.
- Maximum Render Quality: This option improves the quality of preview files, particularly when scaling or resizing footage. Use it when working with high-resolution media (like 4K or higher) that will be output at a lower resolution. It can slow down the rendering process, so it’s best used only when necessary.
- Preview File Format: You can choose the format and codec for your preview files. Common formats include:
Render Settings for Export
These settings apply when you're rendering the final version of your video, and they ensure that your video is optimized for its intended use (e.g., online streaming, broadcast, or high-quality archival). If you don't manually change any of these in the export settings dialog box, Premiere Pro will use the default settings.
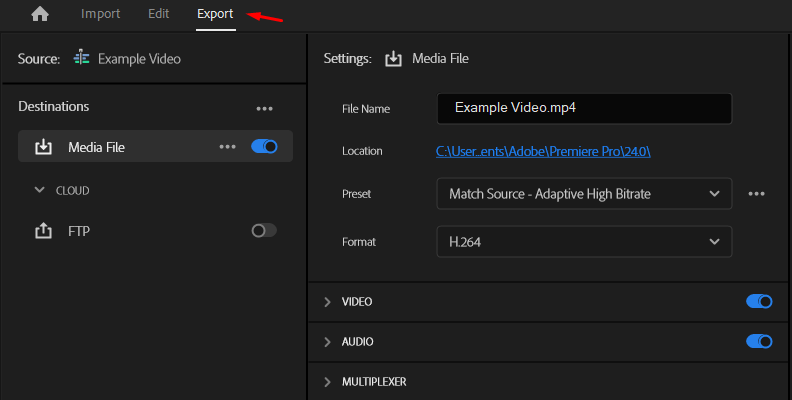
- Export File Format: This determines the container format of your final video file (e.g., H.264, H.265 (HEVC), QuickTime, MXF). Choose the format that’s most appropriate for your project’s final destination.
- H.264 is popular for web and social media.
- H.265 (HEVC) is more efficient, providing better quality at smaller file sizes, but takes longer to render.
- ProRes/DNxHD are high-quality formats typically used for professional deliverables.
- Bitrate Settings: Bitrate directly affects the file size and quality of your video. There are two main types:
- CBR (Constant Bitrate): The same bitrate is used throughout the video. It’s faster to render but might result in lower quality in complex scenes.
- VBR (Variable Bitrate): Allows the bitrate to fluctuate depending on the complexity of the scene, optimizing file size without sacrificing quality. You can choose between 1-pass (faster) or 2-pass (slower but better quality).
- Render at Maximum Depth: Like in previews, enabling this during export ensures the highest bit depth for color rendering. It’s crucial for HDR workflows or videos that need accurate color grading but can slow down export.
- Use Previews: If you’ve already rendered previews, enabling this option will use those preview files during the final export, saving time. However, the quality might not be as high as rendering everything fresh, so it's a trade-off between speed and quality.
- Frame Blending/Resampling: If you’re working with footage that has a different frame rate than your sequence settings (e.g., 60fps footage in a 24fps sequence), enabling frame blending will create smoother transitions between frames. This helps avoid stuttery or jittery playback in the final export.
- Export File Format: This determines the container format of your final video file (e.g., H.264, H.265 (HEVC), QuickTime, MXF). Choose the format that’s most appropriate for your project’s final destination.
Other Key Settings
- Time Interpolation:
- Frame Sampling: Duplicates or drops frames to match the target frame rate (basic, good for cuts).
- Frame Blending: Blends frames to create smoother motion (useful when retiming footage).
- Optical Flow: Uses advanced analysis to create new frames between original frames for smoother motion during retiming. Best for slow-motion effects but can be resource-intensive.
- GPU Acceleration: Premiere Pro can use your computer’s GPU (Graphics Processing Unit) to speed up rendering, especially for effects and transitions. In the Project Settings under Renderer, choose Mercury Playback Engine GPU Acceleration if your system supports it. This can drastically improve render times and overall performance.
- Time Interpolation:
Rendering for Specific Use Cases
- Web and Social Media: Choose H.264 as your export format, with a target bitrate of around 8-12 Mbps for HD and 20-40 Mbps for 4K. Match your frame rate and resolution to the platform’s recommendations (e.g., 1080p, 29.97fps for YouTube).
- Broadcast/High-Quality Exports: Use higher-quality formats like ProRes, DNxHD, or uncompressed formats. Set your bitrate higher (around 50-100 Mbps for HD and 100+ Mbps for 4K).
Final Words
That covers everything you need to know about how to execute a render in Adobe Premiere. Hopefully, this will help you with your whole exporting process with all your future work.
We thank you for reading and wish you the best of luck!
FAQ
How to quick render in Premiere Pro?
To quick render audio and video in Premiere Pro, simply select the timeline and press "Enter" on your keyboard. This will render the whole timeline. If you want to quick render only a part of it, use "I" to mark an input point and "O" to mark an output point, then press Enter, and only the selected area will be rendered.


