


The nemesis of people working with audio is noise. It comes in many different shapes and forms: wind noise, traffic, and other unwanted background noise if we're filming outside. If we’re inside, it could be air conditioning, fans, room reverb, and low-frequency noises from home appliances.
It’s impossible to eliminate noise completely, but you can reduce it considerably with a powerful noise reduction plugins and still obtain professional results.
Let’s find out how to remove background noise in Premiere Pro!
Removing Background Noise with the DeNoise Effect
Step 1: Open Your Project
The first step is to open your project on Adobe Premiere Pro. If you have several clips you want to edit, choose the first one.
Step 2: Adding Audio Effects
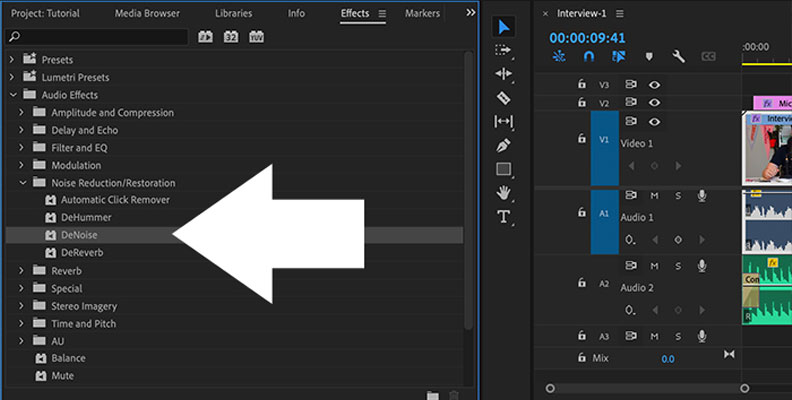
Go to your sound effects window, or activate it on Window > Effects and search for "DeNoise” or follow the path Audio Effects > Noise Reduction/Restoration > DeNoise. To add the denoiser effect, drag and drop it to your audio clip.
Step 3: Effects Control Panel
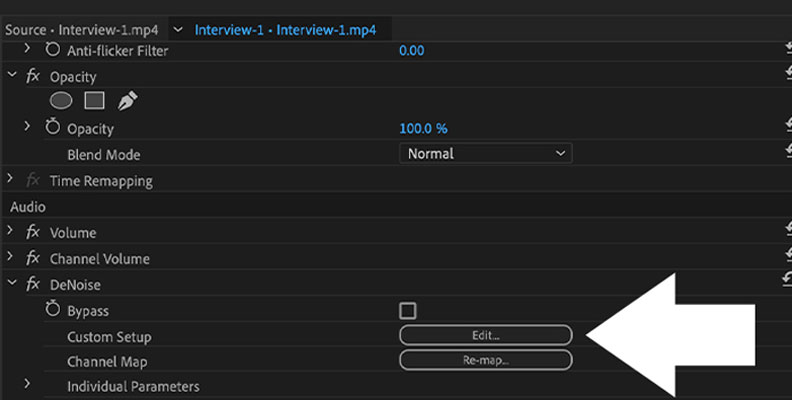
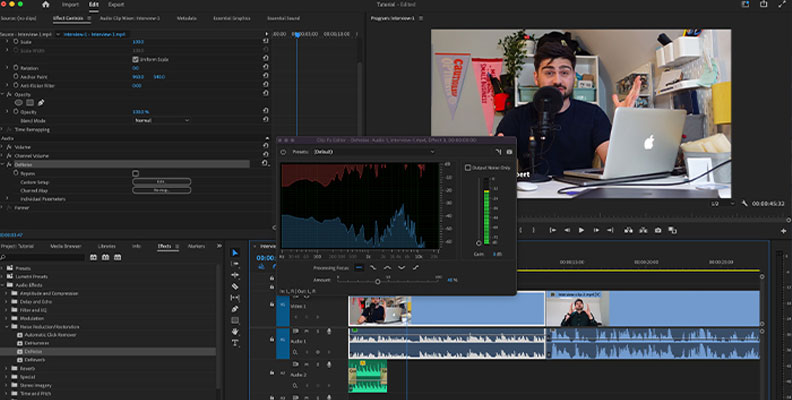
Now, we'll go to our Effect Control panel to find our DeNoise effect and click Edit. This will prompt a new window where we can adjust audio frequencies.
You can leave the default preset or try the ones Adobe Premiere Pro suggests. I'll explain how to create your own at the end.
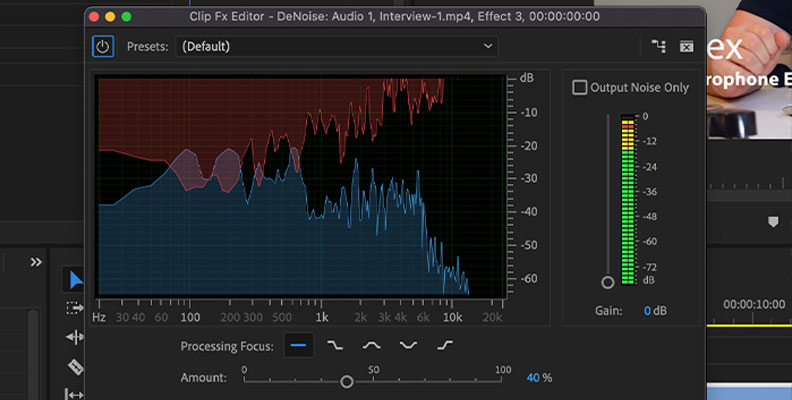
You'll notice there's only one Amount slider on the bottom, which defines how much of the noise reduction effect you want to add to your audio clip. It usually starts in the middle, and you can play your audio to listen and reduce or increase as needed.
Be careful and don't focus only on the noise. The DeNoiser effect can affect the sound quality of your voice or background music, so add enough to reduce the unwanted noise without affecting your voice.
If you find your volume lower than it needs to be, you can use the Gain control on Adobe Premiere Pro on the right to increase it. Once you're satisfied with the sound quality, close the window.
Removing Background Noise in Premiere Pro Using the Essential Sound Panel
The second technique to remove background noise in Adobe Premiere Pro is to work within the Audio workspace and use the Essential Sound panel. It will give you more tools to eliminate as much noise as possible. If you don't see this panel, you'll need to activate it first.
What is Essential Sound in Adobe Premiere Pro
Premiere Pro's Essential Sound panel is a powerful tool and the best option to remove background noise in Adobe Premiere Pro. It provides you with all the necessary mixing tools to enhance, mix and repair your audio.
How Essential Sounds Can Improve Your Audio in Premiere Pro
The sound effects in Essential Sound are professional yet extremely easy to use, making it incredibly intuitive to unify loudness and remove low-frequency noises and background sounds. It's the ideal audio workspace to reduce noise in Adobe Premiere Pro.
Step 1: Activate the Essential Sound Panel
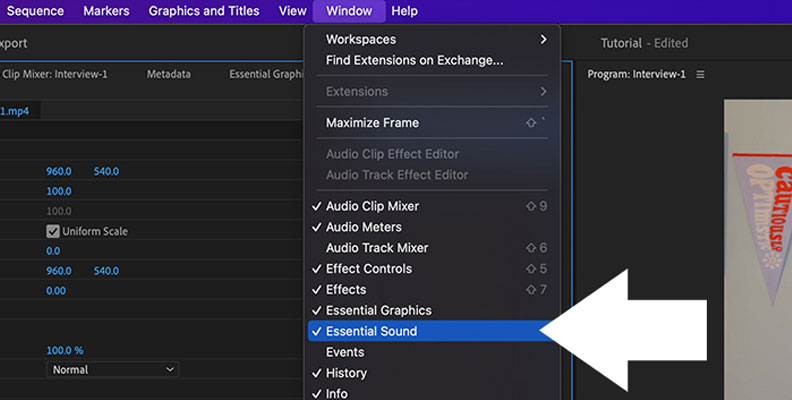
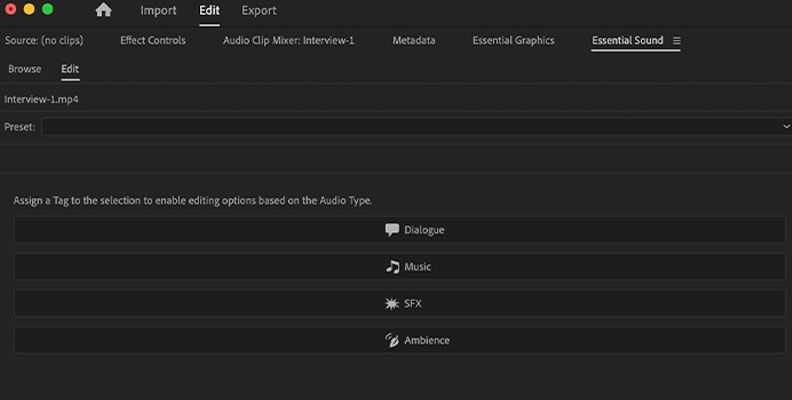
To activate the Essential Sound panel, go to Window > Essential Sound panel and check it. The Essential Sound panel will appear; select your audio clip and choose the tag Dialogue.
Step 2: The Repair Tab
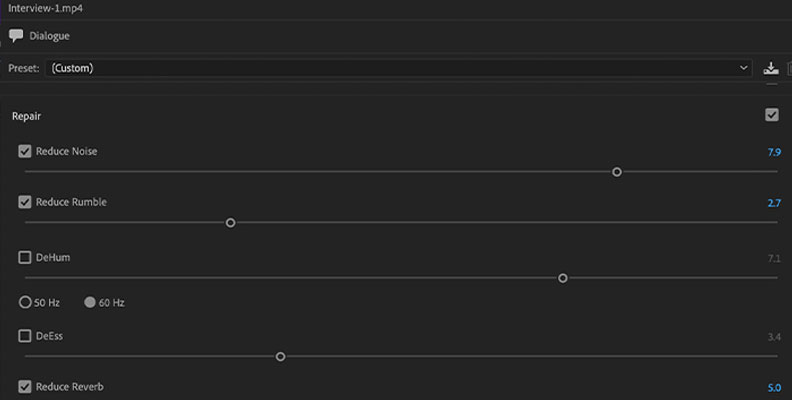
In the Essential Sound panel, a new menu with powerful features will appear as you click on Dialogue. In this menu, we'll find a few sliders and options to remove background noise:
Reduce Noise: the amount of noise removal applied to our audio clip. 0 means audio remains unchanged, and at 100, the maximum noise reduction effect is applied.
Reduce Rumble: reduces low frequencies noises, plosives, and microphone rumble caused by movement, wind, or rubbing sounds. Like the "Reduce Noise" slider, the more you increase it, the more rumble reduction you'll get.
DeHum: reduces hum sounds caused by electrical interference.
DeEss: reduces the harsh ess-like sounds and other high frequencies.
Reduce Reverb: reduces reverb from your audio track. Very helpful when you can hear an echo in your recordings.
To adjust each slider, we check the box next to each option and then move the slider. For the "Reduce Noise" effect, you want to start by setting the slider down to 0 and then moving it as you listen to the audio.
Sometimes when too many effects are applied, our audio will start to sound distorted, especially the voice. In those cases, it's better to leave some audible background noise to keep our sound quality at its best.
The tools in the Essential Sound panel can greatly improve your audio but must be used wisely.
Step 3: Repair Sound Quality
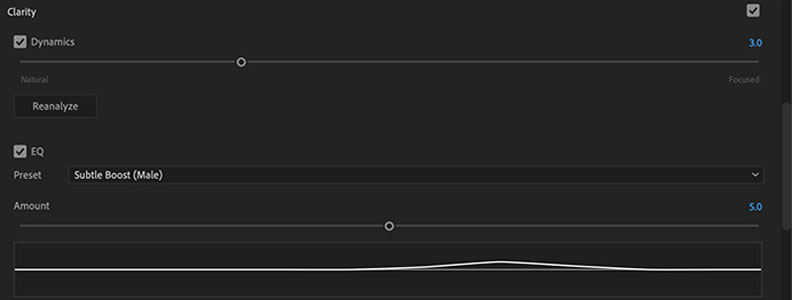
If you notice your voice quality was affected by the noise removal process, you can repair it in the Clarity tab. Check the box next to it, and a new menu will display below.
Here you can use the EQ option to reduce or boost specific frequencies in the recording. Select a preset you like (we recommend podcast voice) and adjust the amount of EQ for the audio with the slider.
You can also enhance your video sound with Enhance Speech and choose between high tone (female) or low tone (male).
When you're happy with what you hear, close the window.
Removing Background Noise with CrumplePop AudioDenoise
It's time to check out how to remove unwanted sounds with AudioDenoise, an exceptional tool with powerful features like an AI audio denoiser that automatically detects and removes background noise from your audio clip.
Step 1: Download and Install AudioDenoise
Go to the CrumplePop free download page and ensure it's properly installed on your computer before running Adobe Premiere Pro. You'll need to use Adobe's plug-in manager to install the plug-ins in Premiere. Go to Preferences>Audio>Audio Plugin Manager and click scan. Then enable the plug-in. To learn more about installing CrumplePop plug-ins, check out our tutorial videos.
Step 2: Add AudioDenoise Effect to Your Audio Clip
Import a video clip with background noise that needs a cleanup. Go to the Effects panel, search for "AudioDenoise," and drag it to the audio clip in the timeline. The AudioDenoise interface will launch, opening an intuitive interface you can use to make adjustments.
The main control is the strength knob, which will affect the amount of noise reduction applied to the clip, while the three knobs at the bottom control how much the plug-in affects the low, mid, and high frequencies.
Sometimes the effect will decrease the audio track's volume; if that's the case, you can increase or decrease the output volume with the slider on the left.
Step 3: Create AudioDenoise Presets
Creating presets will allow you to use the same settings for your video clips in other programs like Adobe Audition or Final Cut Pro.
- Click the floppy disk icon to create a preset with the current settings.
- Name the preset and click save.
Load a preset by clicking on the download icon, search for the preset, and click Open.
Hear It For Yourself
Advanced audio AI removes noise and boosts your vocal quality.
Toggle it on/off to hear the difference.
Remove Wind
Remove Noise
Remove Pops & Plosives
Level Audio
Remove Rustle
Remove Echo
Remove Wind
Create Your Presets to Remove Background Noise in Premiere Pro
Presets in Essential Panel
Go to the Essential Sound panel.
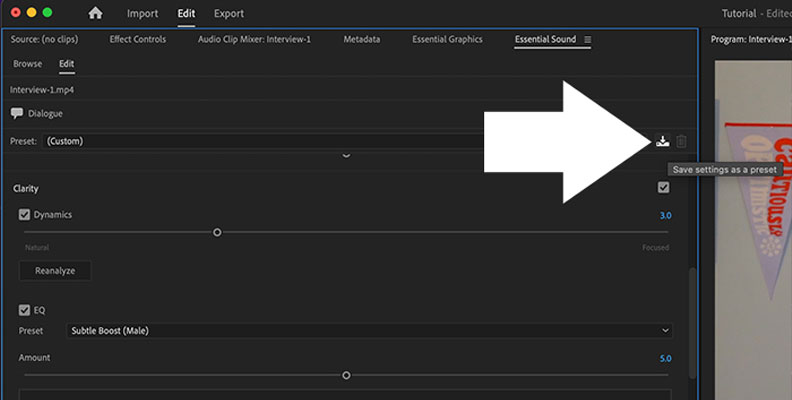
You'll see the Preset dropdown menu below Dialogue; click on the icon next to it with a down arrow when you finish editing.
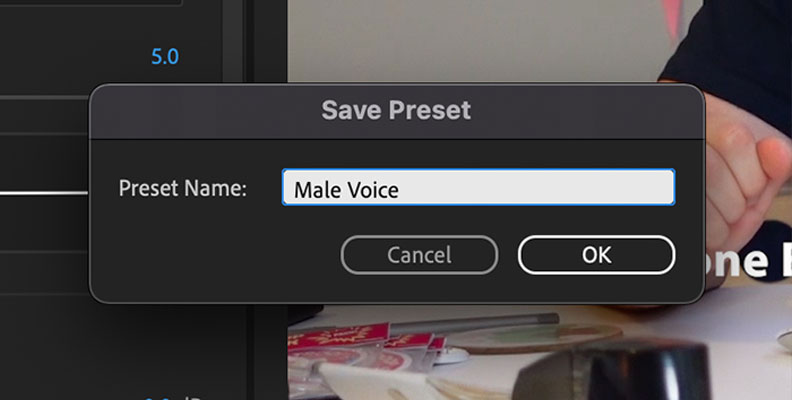
The Save Preset window will open; name your preset and click OK.
The next time you want to use your preset, select the clips you want to reduce background noise, and choose the new preset from the Preset dropdown menu.
Presets for the DeNoise Effect
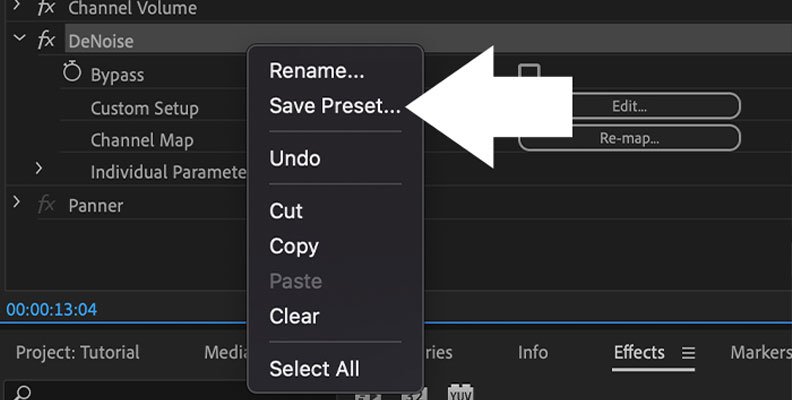
After editing the DeNoise effects, right-click DeNoise on your Effect Controls panel and choose Save Preset
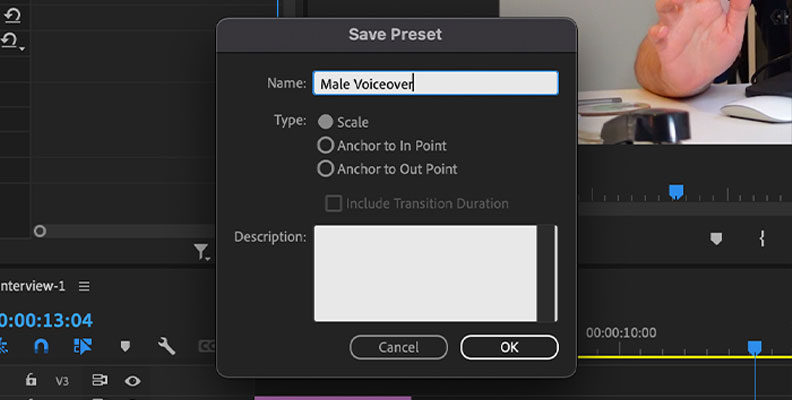
Name your preset and click OK.
Sometimes audio clips are different even when recorded in the same place, so it might be necessary to make some adjustments. Working with presets will give you a starting point for future projects.
Final Tip: Prepare Your Environment for Audio Recording
The best thing to do is treat your room with sound-absorbing panels to reduce reverb and low ambient noises and get the best recording equipment to produce as little background noise as possible. Yet somehow, the background noise will still be there.
When you record your audio professionally, post-processing becomes much easier. Find out which combination of effects works best for you and your audio. After some time, you'll know right away how to reduce noise efficiently directly from your video editor.


