


No recording environment is completely perfect. Whether you are in the studio with a professional set-up or recording a podcast at home, there’s always the chance of stray sound being captured on your recording.
Even the most expensive equipment can sometimes cause problems. Sometimes, a microphone isn’t quite set up correctly, or you left your pop filter at home, or maybe some electronics get captured. Hiss can come from many different sources.
Noise Reduction - Getting Rid of Hiss
Whatever the source of the hiss, it’s going to be a problem for your captured audience. You want to sound as professional as possible, and hiss on your recording is a real barrier to that.
Nobody enjoys listening to a podcast that sounds like it was recorded in a wind tunnel. Or listening to vocal tracks where the hiss is louder than the singer. That means you want to use noise reduction to get rid of the hiss on your audio recording.
GarageBand
GarageBand is Apple’s free DAW (digital audio workstation), and it comes bundled with Macs, iPads, and iPhones. It’s a powerful piece of software, especially considering it’s free. It’s an ideal tool when it comes to cleaning up your recordings. If you want to know how to remove hiss from audio, how to remove background noise, or how to undertake many other post-production tasks like professional music producers do, then GarageBand is an ideal tool.
So, if you want to get rid of hiss, background noise, or anything else you don’t want in your recording, GarageBand has the answer.
Reduce Hiss and Background Noise
To reduce and remove hiss in GarageBand, two approaches can be taken, both of which will assist you in cleaning up your audio.
Noise Gate
The tool that needs to be used for reducing and removing hiss in GarageBand is called Noise Gate. What noise gates do is set a threshold volume for your audio track. Any sound below the threshold is eliminated, whereas any sound above the threshold is left alone.
The first thing that needs to be done is a noise gate needs to be set up.
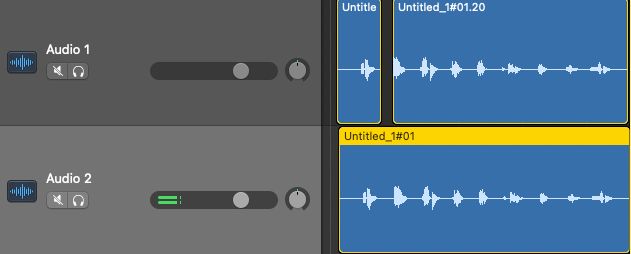
Launch GarageBand, and open the audio file you want to work on. Go to File, Open, and browse to find the track on your computer. Once the track has loaded, type B. This will open GarageBand’s Smart Controls.
On the left corner of the smart controls box, you will see the Noise Gate option. Put a check in the box to activate the noise gate on the plug-in slot.
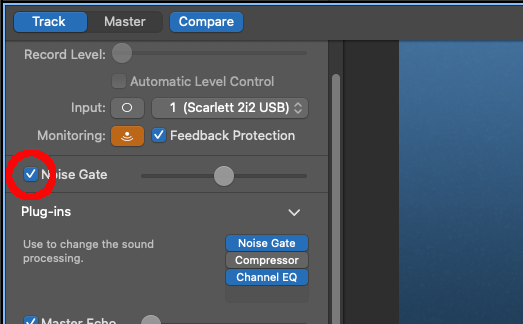
Plug-ins
Click on the Plug-ins menu beneath, then on Noise Gate. This will bring up a series of preset options, another noise gate feature. Choose Tighten Up. You will see that this sets the noise gate threshold level to -30 dB. This is the designated volume beneath which all sound will be eliminated.
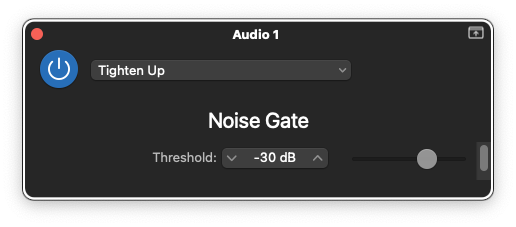
The other presets that are available allow you to tailor the noise gate to a particular instrument, vocal, or unwanted breathing noise, and the threshold level will be adjusted accordingly.
That’s basically it! You have set the level of the noise gate so that it eliminates hiss.
However, different tracks will sometimes call for different levels. The slider next to the noise gate allows you to manually select the threshold for the gate. You can adjust the slider, listen to the audio, and then decide if it is at the correct level to remove background noise.
It can take a little practice to adjust it so that everything you want sounds correct, and every track will be different.
For example, if you apply a noise gate and the threshold is too high, it can result in unwanted effects on the main part of your track. You might end up with clipping — part of the audio distortion.
Or you may end up with artifacts on your track or strange noises that weren’t there originally. If you set it way too high you could even end up eliminating the audio you are trying to improve.
These can all be fixed by moving the noise gate bar (the slider) so the threshold is lower to retain the wanted sound.
Once you have found the correct level, save your audio recording.
Taking a little time to learn what works best will really pay dividends and will result in the best possible way to eliminate background noise and hiss.
Third-Party Plug-ins

In addition to the GarageBand Noise Gate, there are plenty of third-party noise gate plug-ins that will also work with GarageBand. This includes our AudioDenoise plug-in, which isn't so much a noise gate as it will automatically remove just the background noise from your recordings leaving the voice intact. No need to play with settings beyond the amount of noise reduction.
The quality of the third-party plug-ins can be extremely high, add an extra degree of flexibility and control, and can also help with reducing background noise as well as hiss and other undesired sounds.
Although the noise gate that comes with GarageBand is good, more control and finesse are possible, and combining third-party plug-ins like Antares Auto Tune Pro is a great way to expand GarageBand’s capabilities and achieve the desired audio.
Hear It For Yourself
Advanced audio AI removes noise and boosts your vocal quality.
Toggle it on/off to hear the difference.
Remove Wind
Remove Noise
Remove Pops & Plosives
Level Audio
Remove Rustle
Remove Echo
Remove Wind
Manually Remove Hiss and Background Noise
Using noise gates is an effective way of removing hiss from your recordings, but sometimes, it can be a bit of a blunt instrument. The other way to remove hiss and reduce noise is a manual process.
This form of post-processing is more demanding than using a noise gate and can work as a method to eliminate a variety of background noises, including hiss or extraneous noise.
Open the audio file you want to manually reduce noise by going to File, Open, and selecting the file from your computer. Once it has loaded, double-click the track in the Workspace so that it is highlighted.
Zoom into the part where you want to remove the hiss or other background sound. This is normally visible as the “low” area in between where the main speech or vocal is.
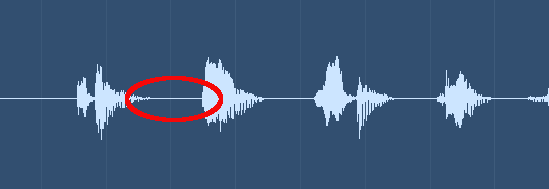
Left-click your mouse and highlight the area you want to remove the hiss from. You are then going to delete this section of the track altogether with the unwanted noise.
Once the section is marked, single-click it so that it becomes a separate section. Then you can cut the section out by using COMMAND + X or selecting Cut from the Edit menu.
This has now deleted the section with the unwanted hiss on it. You can repeat this process as often as you like to eliminate hiss. Once you have completed the removal of hiss this way, you have two options.
Reduce Background Noise Further
If you have been recording a podcast or other spoken-work piece such as a drama, your work is completed and you have removed hiss manually.
However, if you are using this to remove hiss or unwanted background noise from vocals on a song, you may want to loop the vocals or do other sound engineer editing tricks to have the noise removed from them.
For this, you will need to create a noise-free vocal track. Although you have eliminated the background hiss, you need the vocals to be a single unbroken track again, rather than a track that has been broken up.
Press COMMAND + D to create a new track in your recording. Note that this will also duplicate all the other settings on the selected track, such as automation, volume settings, panning, etc.
Copy and paste the file from the old track to the new one so both are the same. Ensure that all parts of the new track are selected
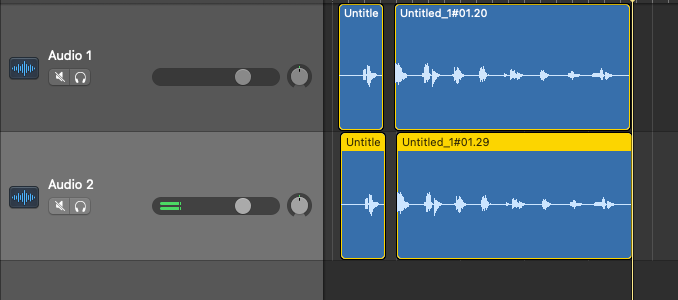
Select the new audio track by clicking it, then press COMMAND + J. This is the Merge option. This will bring up a dialogue box that says, “Non-contiguous regions require the creation of a new audio file!” Click on Create, and your file will become a single, unbroken track without the hiss or background noise that you were trying to eliminate.
It is very important that you don’t do COMMAND + J on the original track. If you do it on the original track, it will simply result in the entire track merging everything you have already removed, and all your hiss will be put back. It must be done on the new track for this to work.
Once that’s done, your work is complete!
This process is far more time-intensive than using a noise gate to eliminate hiss or background noise, but there’s no doubt that it can yield great noise reduction results as well.
Conclusion
If you want to reduce or eliminate hiss from your recording or remove any other kind of background noise, then GarageBand is a great tool for doing it.
A noise gate is a great tool for being able to automate the process of removing hiss and noise reduction. It is relatively simple to use, and the results can be dramatic.
However, manual editing can still produce great results, and though it takes more time, it is still extremely effective to reduce background noise.
Most music producers recommend using low noise room and a pop filter to remove noises and pops for vocals while recording, if you want to avoid post-processing.
Whatever method you use, hiss and unwanted noises will become a thing of the past.


