Recording a voice over for your video can be tricky. If you make a mistake, you’ll need to repeat the scene, perhaps losing some of the valuable footage you just recorded.
Modern audio production nowadays allows us to record audio and visuals independently and mix them in post-production. You can record voice overs for your videos to provide extra information about what's happening in the scene, for YouTube tutorials, or for a film where the characters speak off-camera.
You don't necessarily need a dedicated audio editor, a digital audio workstation (DAW), or to be an expert on audio recording and editing to record voice overs. Today I'll show you how to record audio in DaVinci Resolve, one of the best video editing tools on the market right now.
Understanding how to record audio professionally is as crucial as knowing how to remove background noise in DaVinci Resolve, which is why this powerful software is beloved by professional video makers worldwide: it offers everything you need to deliver high-quality video and audio content!
This step-by-step guide will show you how to record voice overs for your projects. In the final part, I'll also explain how you can edit your new audio track on your current project and do multiple takes using the same program. If you were looking for a guide on how to start recording professional voice over content in DaVinci Resolve, you're in the right place.
Let’s dive in!
Step 1. Initial Setup and Recommendations for DaVinci Resolve
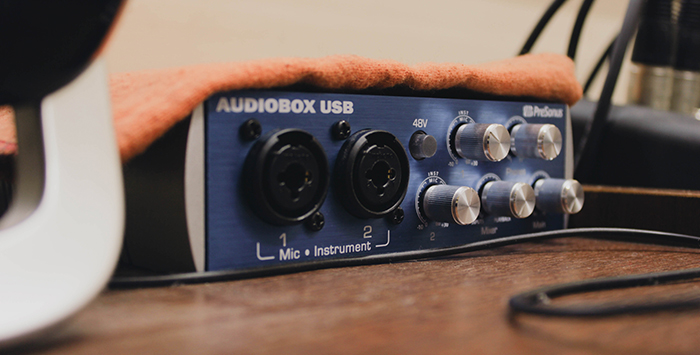
Before you start recording your voice over in DaVinci Resolve, make sure your recording devices are connected. I’d recommend using a dedicated microphone and an audio interface, but any USB microphone will work. Just make sure it's compatible with your computer and that all drivers are installed and up to date to avoid recording issues.
The room where you record should be quiet to avoid any background noise in your audio recording. If you’re recording in a large room, you’ll probably need an echo remover to mitigate unwanted reverb.
Hear It For Yourself
Advanced audio AI removes noise and boosts your vocal quality.
Toggle it on/off to hear the difference.
Remove Wind
Remove Noise
Remove Pops & Plosives
Level Audio
Remove Rustle
Remove Echo
Remove Wind
If possible, treat the room where you’re recording. However, if this is a one-time project, just record in a room as quiet as possible; I'll give you some tips to edit your audio in DaVinci Resolve after recording in the final paragraphs.
Step 2. Set Your Folders in DaVinci Resolve
The next step in learning how to record audio in DaVinci Resolve is choosing where to save your audio files to organize each project. In this way, you can access them outside of DaVinci Resolve if you want to share them or work on them in different software.
Open the project where you want to record the voice over audio in DaVinci Resolve. If you're already working on a project, skip to the next step.

In the bottom right corner, you will see the cogwheel icon. It’ll open the Project Setting window.
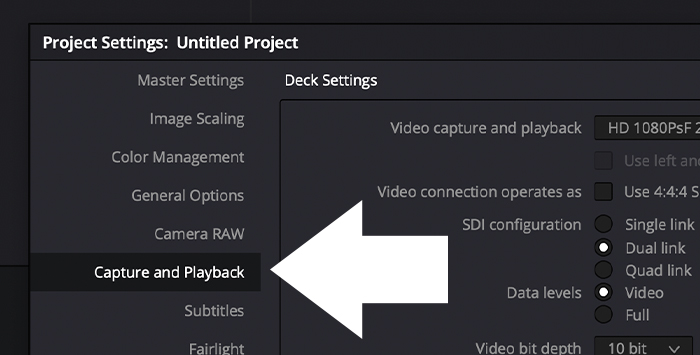
You'll see different options on the left side of the Project Settings window. Scroll down until you see Capture and Playback, and select it.
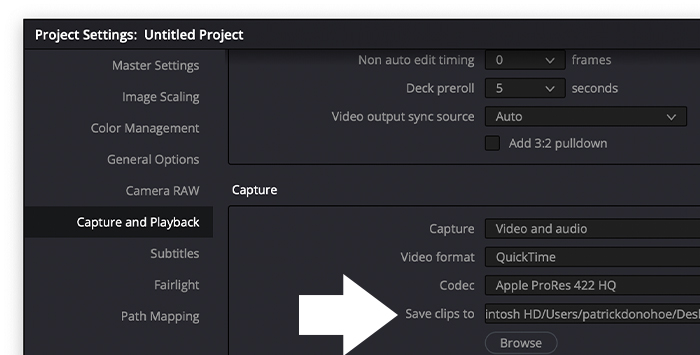
Scroll down under the Capture section and look for Save Clips To.
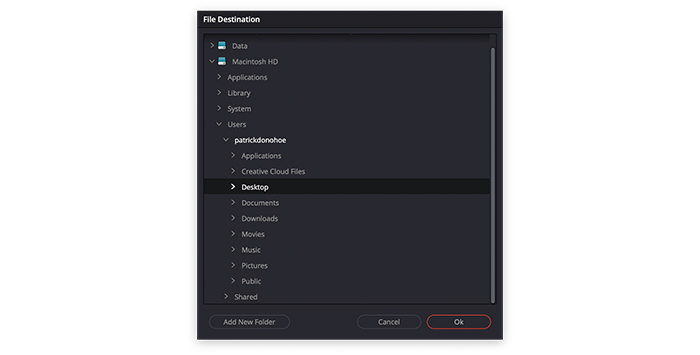
Click on Browse to locate the folder you want your voice-over clips to be saved. Here, you can choose a specific folder for the voice over, the project folder, or select your external storage device.
Having your voice over files organized will make things easier, especially once you start editing your project in DaVinci Resolve. If you erase your voice over from the Timeline by mistake, you can retrieve it quickly. Additionally, if you record your audio on a different device and want to transfer the voice over to your computer to continue editing it, it’ll be easy to transfer the file.
Step 3. Create a New Track in DaVinci Resolve
Most likely, your project already includes audio tracks from the footage or other audio clips recorded separately, which means you’ll need to create a new audio track to record the voice-over. Follow the next steps to create a new voice over track in DaVinci Resolve: you can do this to add any audio track that you need.
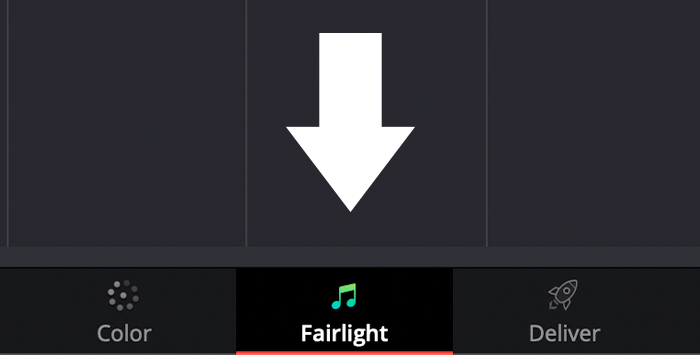
First, let's change to the Fairlight tab at the bottom. It's the icon with the music note symbol. Here's where you can do all audio-related editing.
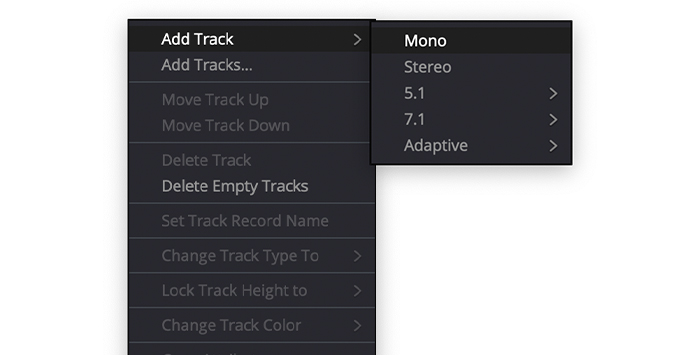
On the left side of the Timeline, you'll see the track number and information on everything in your current project. Right-click on that area, select Add Track from the dropdown menu, and then choose Mono if you only use one microphone. There might be a specific project where you want to record with two microphones from your audio interface, or maybe you want to record using a stereo microphone; in those cases, choose Stereo. Most of the time, for a voice over, a mono track will suffice.
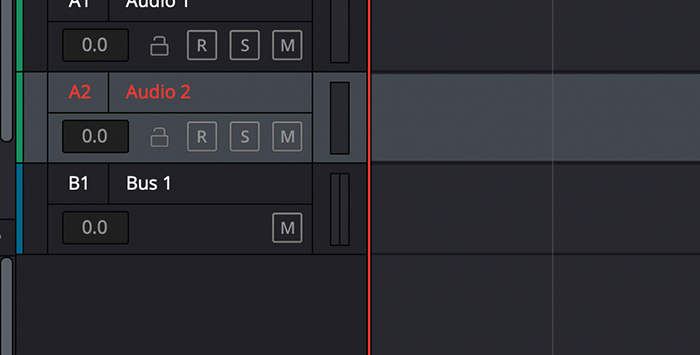
The new track will instantly appear under the other tracks.
The new voice over track will have the ID A plus a track number. Let's say you have the audio track from the video that would be A1, and our recent track would be A2 with the name Audio 2.
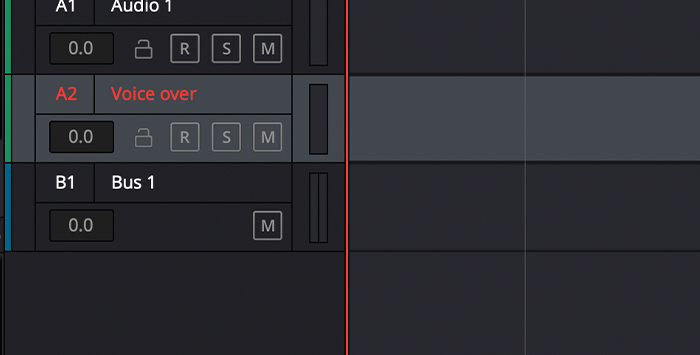
If you’re working with multiple audio files, you might want to rename tracks in DaVinci Resolve to avoid any confusion.
To rename the voice over track, double click on the current name (usually Audio plus a number) and give it a new name, like "speech", "voice over", or the speaker’s name.
With your new voice over track ready, it’s time to get the microphone set up and ready to record.
Step 4. Patch Your Microphone
Now, let’s get your microphone ready to record voiceovers in DaVinci Resolve. There are two ways to do this, so I’ll explain both methods so you can choose how to record audio in DaVinci Resolve based on your workflow.
Method 1: Through the DaVinci Resolve Mixer
Select the new track you created in the previous step to indicate to DaVinci Resolve where you'll record audio. Then, go to your Mixer tab.
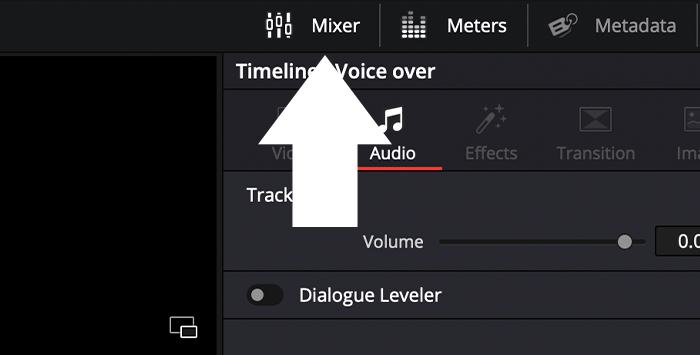
If you don't see the Mixer tab, you should see different icons in the top right corner, including Mixer, Meters, Metadata, and Inspector. Click on Mixer to make the Mixer visible next to the Timeline on your right.
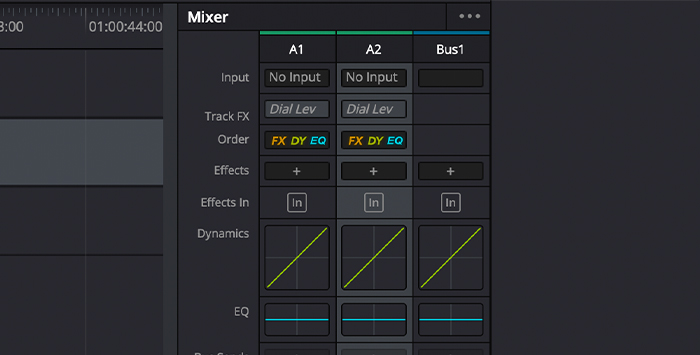
In the Mixer section, you'll see your voice over track in a vertical position; right under each track, it displays "No Input" because you don't have a microphone connected to DaVinci Resolve yet.
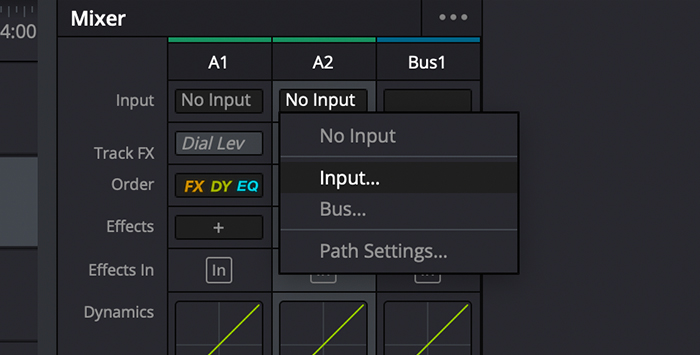
Click on No Input and then on Input from the dropdown menu to open the Patch Input/Output window.
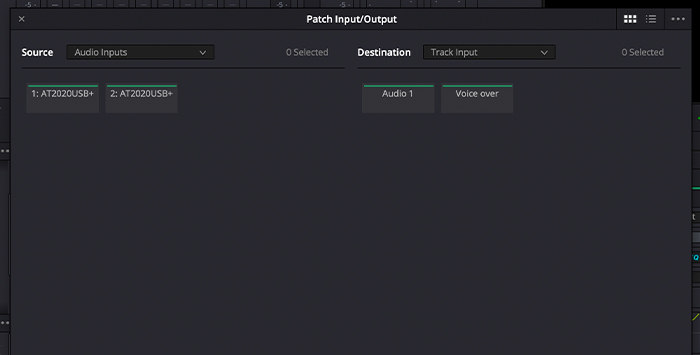
In this window, you'll select inputs and outputs to let DaVinci Resolve identify the audio source and where to send the data. You'll first notice that this window is divided into two sections: on the left side, you'll see Source, and on the right side will be Destination.
First, choose the source that'll record audio: that's the microphone you'll use for your voice over. Depending on the microphone and audio interface, you'll see different options. If you're using a USB microphone, you'll find it here as a single option, but if you're using an interface with more than one input, you will see the number of inputs on your interface. If you know which input your microphone is connected to, select that one. If you don’t, we can get back to this later on.
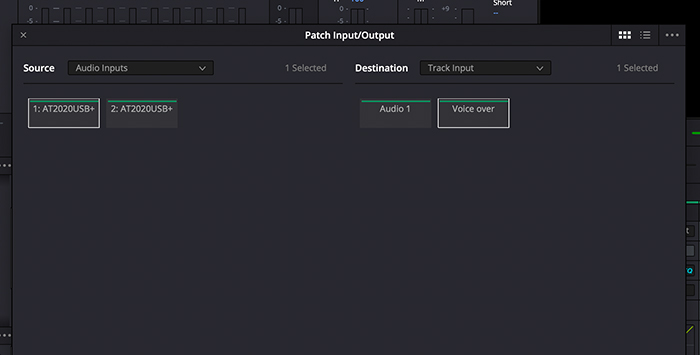
Next, on the right side, select the destination for your audio track. Here, you should see the new track you created, so select it.
Make sure everything is highlighted before continuing.
Click on the Patch button to link the source and destination, then close the window.
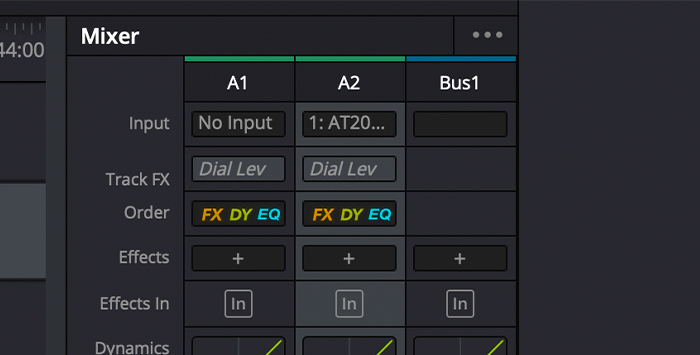
If you look at the Mixer, your microphone should appear under Input now, which means that you're ready to hit Record and start recording.
Method 2: Through the DaVinci Resolve Fairlight menu
In DaVinci Resolve, go over the menu bar and click on Fairlight.
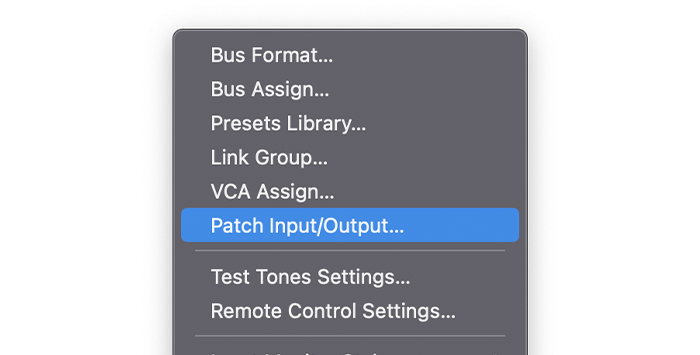
Select Patch Input/Output from the dropdown menu.
The Patch Input/Output window will open, where you’ll select your source device and destination track.
Select your microphone or audio interface on the left side.
Select the track dedicated to voice-over on the right side.
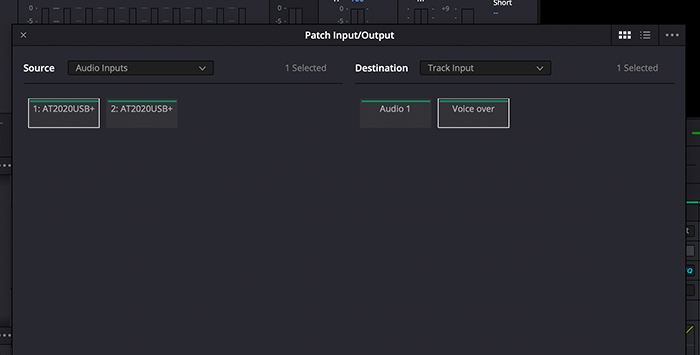
Click the Patch button and close the window.
What if we select the wrong Source/Destination?
If you made a mistake choosing the correct Source or Destination track, don’t panic! Here’s how you can fix it:
Go to the Mixer again and click on the Input.
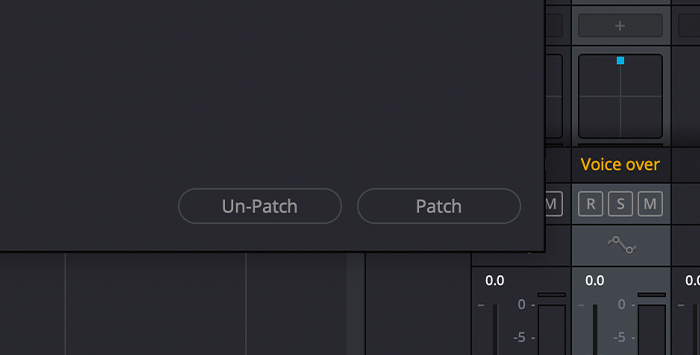
In the Patch Input/Output, click on the Un-Patch button. Your Source and Destination will disconnect, and you can select again.
Choose the correct one and click the Patch button again.
Close the window.
Step 5. Arm the Track
Arming a track means you have everything ready to start recording your voice over, so you notify DaVinci Resolve that the track is ready. You won't record anything if you click on the record button without previously arming the track.
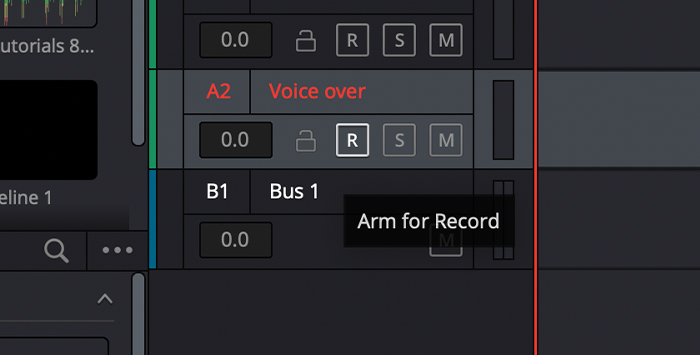
Go over your track. Below it, you should see three letters inside a square: R, S, and M. If you hover over the R, it will display "Arm for record". Click on the R, and it will turn red.
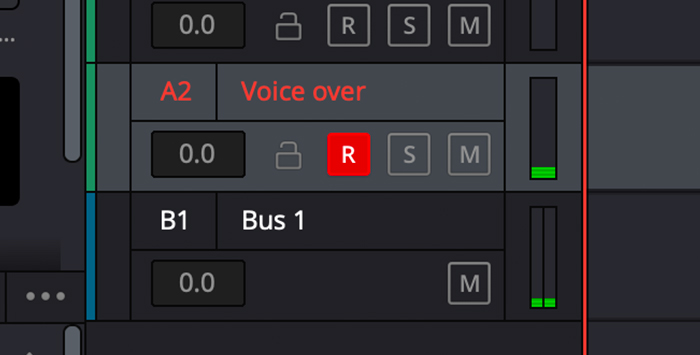
As soon as you hit the R, you'll see the levels on the Mixer moving, and your voice will come out through your speakers or headphones (depending on your output device).
If that's the case, everything is correct, and you are ready to press the record button and create your voice over.
If you don't see anything moving on the Mixer at the moment of arming, it means you've selected the wrong source. To change it, re-patch your source and destination with the correct source and repeat the arming process in DaVinci Resolve.
Step 6. Checking Your Levels
You might need to adjust the gain on your microphone. When you speak, you'll see the level meter in three different colors: green, yellow, and red. You'll want to keep the color green-yellow and below 0. If you go over 0, the levels will show red, and your voice over will clip, causing an unwanted distortion.
To avoid clipping, reduce the gain knob in your interface or microphone. If your microphone doesn’t have a gain knob, you can adjust it in the Mixer tab.
Click on Input.
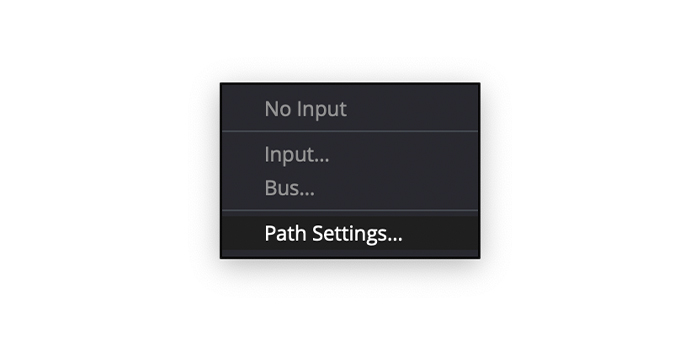
Select Path Settings from the dropdown menu.
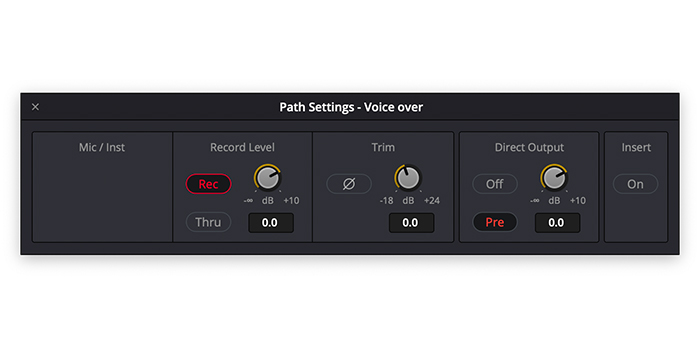
A window with three virtual knobs will open.
Adjust the one under Record Level.
Close the window.
Step 7. How to Record Audio in DaVinci Resolve
Time to record voiceovers!
Before you start recording in DaVinci Resolve, you should mute your project so you won’t hear your voice while recording. If you have a low-latency audio interface, it might not be a problem, and you can record voiceovers and monitor your stereo or mono track simultaneously. But if you have latency, hearing a delayed voice over will cause unnecessary distraction. Follow these steps before pressing the record button.
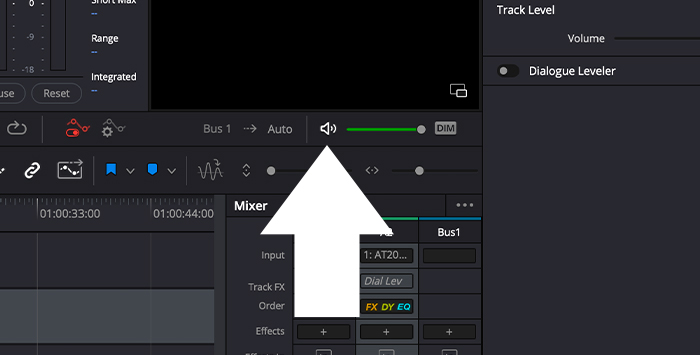
1. Over the Timeline menu, you'll find a speaker icon far to the right.
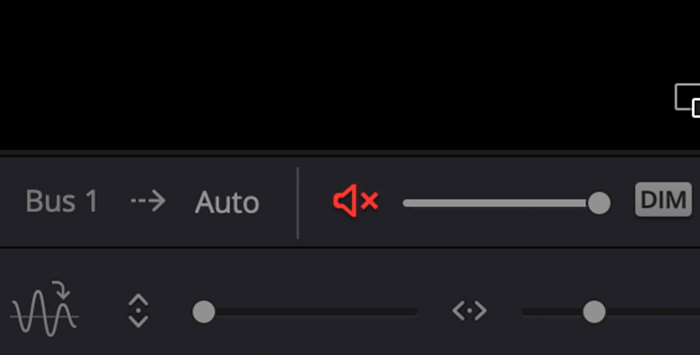
2. Click on the speaker icon; this will mute the playback audio.
Here's how to record audio in DaVinci Resolve:
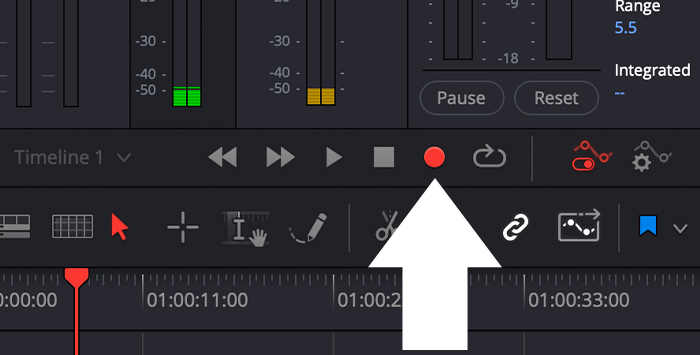
1. Right in the middle of the dashboard, we have our classic media buttons. Click the record button (the circle), and as soon as you push it, it will turn red, and a waveform will appear on the audio track.
2. Record voiceovers and click on the stop button (the square).
3. Unarm the track and unmute the project to play the new track and listen to what you just recorded.
It'll take some time to learn the perfect settings to record voice overs the way you imagine them. However, DaVinci Resolve offers everything you need to make your voice over sound professional, so keep practicing!
Step 8. Recording Multiple Takes on DaVinci Resolve
When you record voice overs, results might not always be perfect, but that's not a problem with the tools DaVinci Resolve provides to record audio. If you made a mistake, stop and start recording again from where you left off.
Stop recording audio in DaVinci Resolve.
Listen to the stereo or mono track and find where the voice over mistake is.
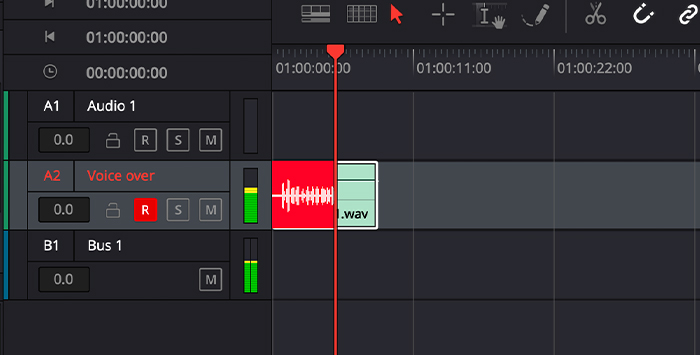
Place the playhead in the Timeline, press the record button, and start recording your voice over again to re-record that part (don't forget to arm the track and mute the project again.)
You'll see the new recording over the old part as if it was overwriting in the Timeline, but if you look at the Media Pool, you will see all the audio clips we've re-recorded in the track.
Record voice overs until you achieve the desired result.
How to Edit Audio in DaVinci Resolve
Learning how to record audio in DaVinci Resolve is not enough: learning to edit audio is just as crucial!
In the same way as you edit your videos in DaVinci Resolve, you can edit your audio tracks too. Here are a few editing tricks to make your recordings sound professional.
Editing Layers
Remember when you recorded multiple takes? You can see all those takes in the Timeline to edit and make them all fit together.
On the upper menu, click on View.
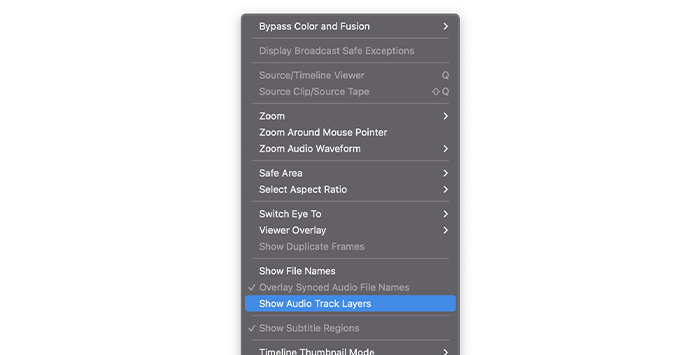
Scroll down, and near the end, you'll find Show Audio Track Layers.
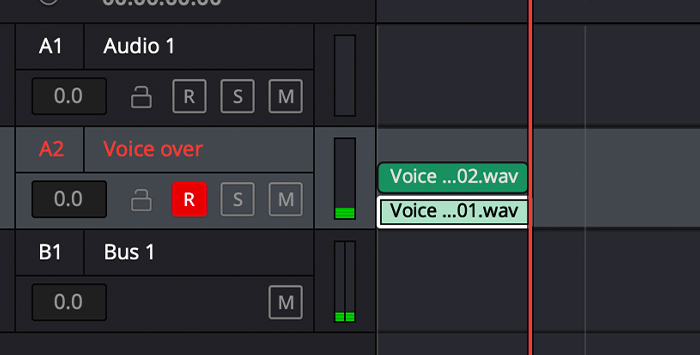
Now all clips recorded will be visible under the same track, and you can click each one, move them across the Timeline, up and down, and synch them with each other. The one on the top will be the one you will hear. If you have multiples across the Timeline, you can reorder them by dragging from the bottom to the top.
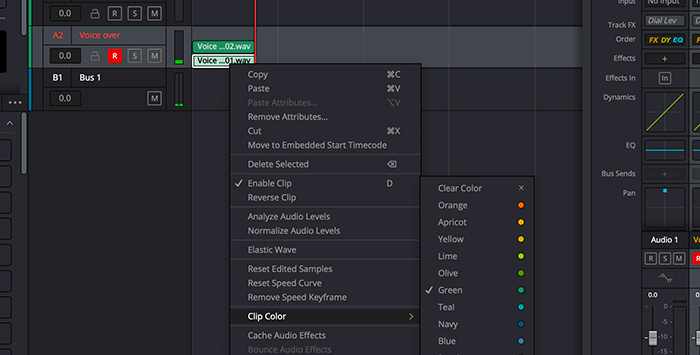
You can also change the color of each take to identify them. Right-click on the clip you want, select Clip Color from the dropdown menu, and choose one of the colors displayed. Changing the color will help us mark those we like to keep on top.
Click on the View menu and un-mark Show Audio Track Layers to see the track as a single and continue editing the project.
EQ Your Track
Let’s add some EQ to your audio in DaVinci Resolve to clean your recording.
Select the track and make sure you can see the Mixer.
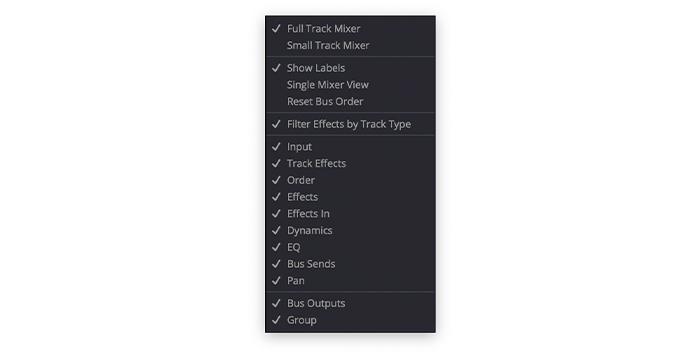
Click on the three dots to ensure EQ is marked, and you should see an EQ section under the Mix. If you still can't see it, try scrolling down.
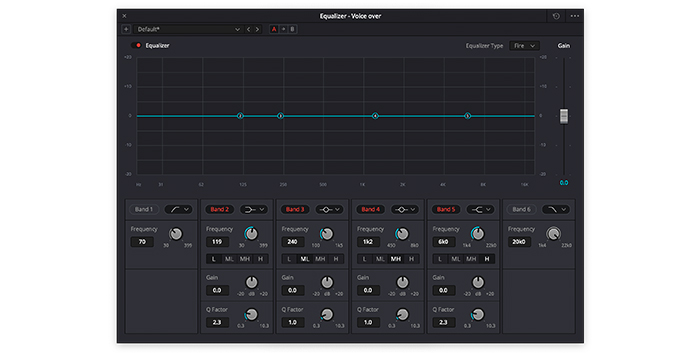
Double-click on EQ to open the Equalizer window. Here, you'll see the graphic and each band with settings.
Here, you can adjust the frequencies; if there’s background noise, you can reduce the low frequencies in band 1. If you have a hissing noise, lower the high frequencies in band 6.
You can adjust the middle frequencies and preview as you make changes until you hear a clear and crispy sound.
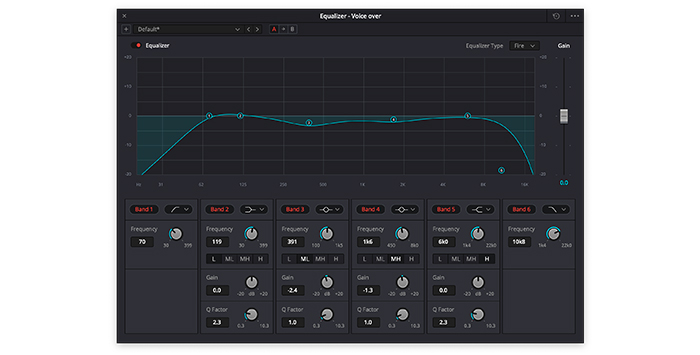
Once you’re satisfied with the way your voice over sounds, close the window in DaVinci Resolve. You can always return to the EQ window if you want to make more changes.
Final words
And that's all! Here's how to record audio in DaVinci Resolve for your video tutorials, commercials, and other voice-over projects you are working on.
You can do far more than this with Fairlight in DaVinci Resolve, so now it's a good time to explore this valuable tool and learn how to craft the perfect sound for your video.
Record voice overs and audio in DaVinci Resolve is intuitive and extremely useful, so take some time to master the craft, and soon you'll start recording high-quality content.
Good luck, and stay creative!


