Platforms like YouTube are the go-to place for education and entertainment, and with that, the need for quality video editing skills and talent are more sought-after than ever.
Quality video editing makes the content much easier to digest for the viewer and can drastically enhance the effect of the message the creator wants to carry over to the audience.
To achieve perfection, a video editor needs to pay attention to detail and rely on finesses such as a screen shake effect to "grab" and maintain the viewer's attention, as well as "compliment" specific parts of the video.
In this guide, you'll find a step-by-step tutorial on how to make screen shake in VEGAS Pro (fka Sony Vegas Pro), one of the industry's most widely-used video editing software.
Without further ado, let's get straight into it.
What is a Shake Effect?
A screen shake effect, often referred to as "an earthquake effect," "jitter," or "tremor," is when the editor makes a specific part of the video (usually just a few seconds) "shake" for either comic purposes, or to "enhance" the effect of things like bass (often seen in music visualizers), punch and hit effects (comic edits of real-life fails), key moments in gaming video edits (getting impressive multi-kills, etc.), and more.
All in all, it's a technically-simple effect meant to emphasize the video's "feel factor," yet a very helpful tool that every experienced editor should have in their toolbox.
Now that you know more about the shake effect and how it could improve your work, let's take a look at the best ways to create it while working in VEGAS Pro (fka Sony Vegas Pro).
Method 1: Boris FX - Sapphire
Sapphire from Boris FX makes adding effects to your videos easier than ever.
It contains a myriad of video effects, transitions, and presets. It works with all industry-leading video editing programs, like Adobe Premiere Pro, Avid, and of course, VEGAS Pro (fka Sony Vegas).
Like all other video effects included in Sapphire, the shake effect is used by many due to its simplicity, but also the ability to get into the tiniest detail through a simple slider-based interface and make it the perfect effect for your specific editing needs.
The steps below will show you how to apply the Sapphire shake effect to your video in VEGAS (and Vegas Pro).
Using Sapphire in VEGAS
Step 1: Download and install Sapphire for VEGAS. A free trial version is available.
Step 2: Open VEGAS and drag a video on your timeline as you normally would when starting a video project.
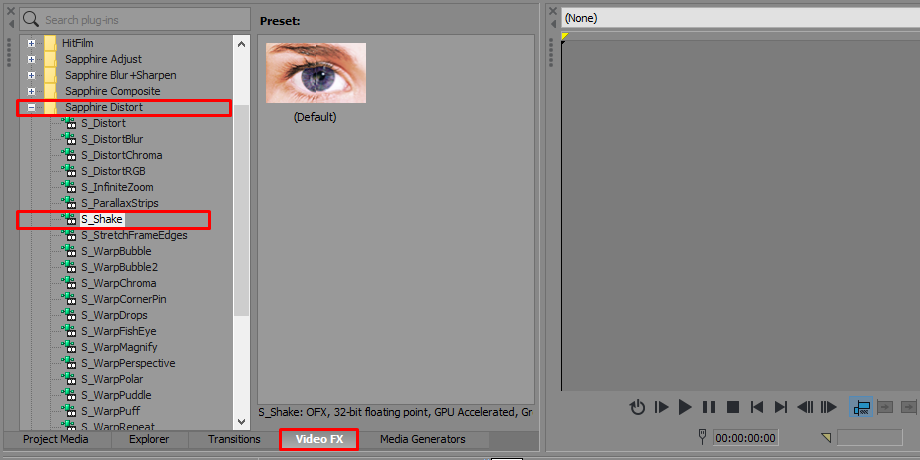
Step 3: Click on Video FX, then scroll down until you see the Sapphire folders. Open the Sapphire Distort folder and look for the effect named "S_Shake" on the list.
![how to make screen shake in sony vegas]()
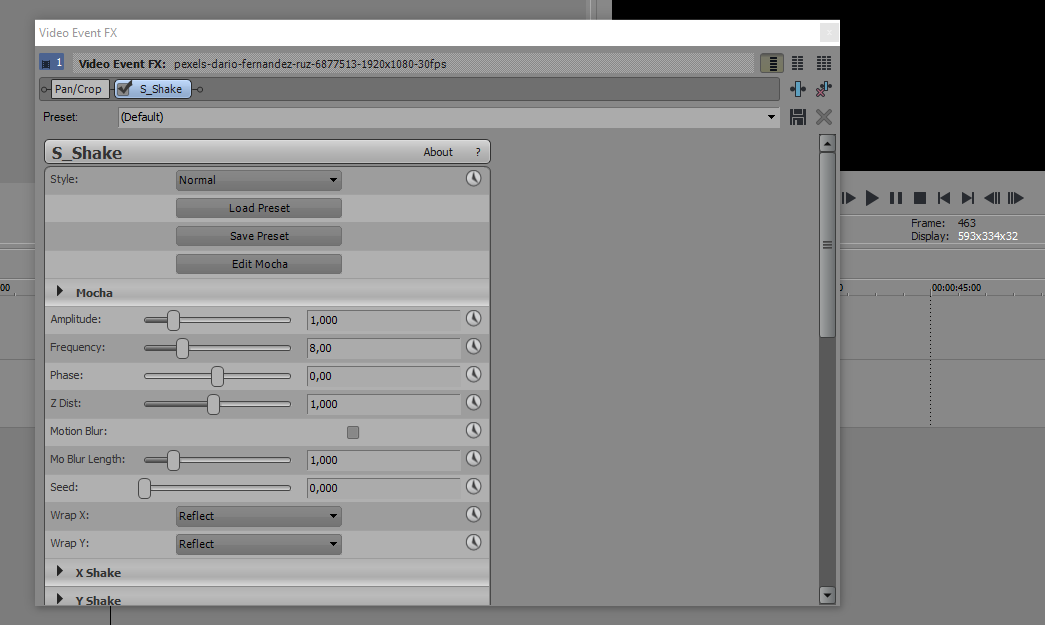
Step 4: Click and drag the screen shaking effect preset over the video on your timeline. You'll see the Video Event FX panel show up on your screen shortly after.
Now the effect is added with default values, but you can modify it infinitely to suit your needs, and doing so is very simple as it only requires moving the sliders and testing it after each change.![]()
Step 5: Once you believe the effect is perfect, feel free to save the preset to be able to use it for future videos you edit in VEGAS or VEGAS Pro.
Done! That's all there's to it!The reason we recommend this method is because it takes the least time to apply the effect, and you can create numerous presets to use with different shots if you're editing on the daily, which will greatly save time. It's also a beginner-friendly method that doesn't require extensive VEGAS (fka Sony Vegas) knowledge.
Besides, this is only one of the effects available in the Sapphire kit.
Method 2: Creating the Screen Shake Effect Using Keyframes
Within VEGAS (and the former Sony Vegas), as well as in other editing programs, you can take advantage of keyframes to create various effects and animations. This is always quicker with a plug-in, but if you want to create a shaking effect for your shot for free, here's how to manually do it.
Step 1: Open VEGAS (or Sony Vegas Pro) and insert any video material on your timeline.
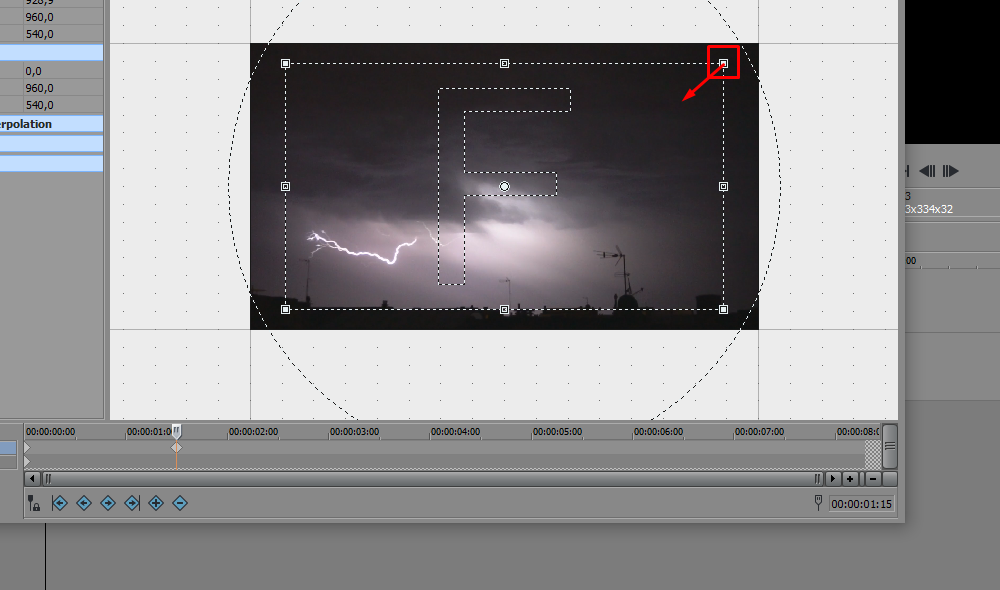
Step 2: Click on the "Event Pan/Crop" icon.
Step 3: Lower the size of the white "box" to "zoom in" on the frame. Otherwise, your shake effect will cause it to move outside of its borders resulting in black parts showing.
![]()
Step 4: Now, position the white box anywhere you want, for example in the bottom-right corner. Then, click on a further point on your timeline and move it again. Doing so will automatically create another keyframe.
Keep making as many keyframes as you think you'll need. The closer they are, the more "violent" the shake effect will be. The further they are, the more "float-like" effect you'll get.
Step 5: Play it and see if it suits your content. If no more changes are required, you've successfully created a free VEGAS screen shaking effect.
Although it's not as easy and customizable like the first method, this can be a good starting point for someone who wants to learn the software's basics.
Final Words
That covers everything you should know about creating a screen shaking effect within VEGAS and the formerly known Sony Vegas Pro. Hopefully, this tutorial was helpful and will improve your video editing skills.


