


In the photo-editing world, there are often requests to turn an old photo into something modern, which looks like it was taken with a high-tier, modern camera.
But, it's equally as common to hear someone requesting their modern photo to be turned into something with a vintage aesthetic. After all, the old photo look can turn an ordinary image into something very cool with a retro vibe.
In this guide, we'll show you how to make a photo look vintage using some of the most popular and easily accessible tools and explain the different types of vintage photo styles.
So, if you like the vintage effect and want to transform your images, keep reading.
We have much to cover, so without further ado, let's get into it.
Different Types of Vintage Photo Looks
Vintage-style photos spark a sense of nostalgia within the viewer and are characterized by various digitally added visual elements that mimic the original aesthetics of older photographs.
In the sections below, you can find the most common types of vintage-style photos.
Black and White
Black and white photography is a classic and timeless art form focusing on composition, lighting, and rich contrasts. One of the easiest and most common ways of giving photography a vintage look is by applying a black-and-white photo filter, as this directly mimics the results you would get from taking a photo with a black-and-white film camera.
The black-and-white images you create with a filter are easily modifiable. Most apps that allow you to create vintage photos by applying this filter also offer various settings, such as intensity and contrast, that you can adjust for the best results.
Sepia Toned
Sepia-toned photos have a warm, "brownish" hue reminiscent of old photographs from the 19th and early 20th centuries. This effect can give photos a nostalgic and romantic feel, which is why you can often see vintage photos of weddings with a sepia look. It's the most common and easiest-to-find vintage filter available on all photo-editing apps.
The sepia style is the opposite of the "cool blue" look that some achieve by editing their photos for an authentic vintage feel.
Grainy Texture
Applying grain or texture to photos can mimic the look of older film stocks, which often had more noticeable grain compared to modern digital photography. This effect can add character and depth to vintage-style photos, even if you haven't taken them with an older film camera.
You can combine grain with some of the other methods listed here to achieve the best vintage photo effects.
Vignetting
Vignetting is the darkening or fading of the edges of a photo, which is common in older cameras and lenses. Adding vignetting to a photo can draw the viewer's eye towards the center and create a vintage look.
To get this vintage effect, you can add a vignette manually. Usually, this effect comes with various parameters, such as the shape of the vignette, the intensity, and, sometimes, color.
Faded Colors
Vintage-style photos may have muted or faded colors, giving them an aged appearance. This can be achieved through color grading or by mimicking the effects of aging on physical photographs.
Some apps offer a fade filter with dedicated settings and parameters (like intensity and the color of the fade layer), and you can adjust them to achieve the vintage effect to the degree that works for your needs.
Film Effects
Various film effects, such as light leaks, scratches, and dust, can be added to modern photos to simulate the imperfections often seen in some of the old film photographs. These effects can add authenticity and charm to digitally made vintage-style photos and often combine multiple elements all in one for ease of application.
Please note that while these digital filters mimic the vintage film photography look, having too many elements applied at once, such as scratches and dust, can also make what's shown in the photo slightly difficult to look at and recognize.
Although, if you're going for the old and "damaged" aesthetic, these effects may be a good choice.
Polaroid
Mimicking the look of Polaroid instant photos, including the signature white border and square format, is another popular vintage style. This aesthetic is often associated with instant photography from the seventies and eighties.
Polaroid filters are sometimes used to create black-and-white pictures as that setting is often automatically applied with it on some applications. The Polaroid filter is also used for wedding photos, as frequently seen on social platforms by social media influencers.
Daguerreotype
Daguerreotypes were one of the earliest forms of photography, popular in the mid-19th century. Recreating the look of daguerreotypes can involve adding a metallic sheen and a soft, dreamlike quality to photos.
They are one of the coolest effects you can add to get a vintage photo effect, but whether you should add it or not depends on your goal, as the style of these types of photos dates way back.
Tintypes
Tintypes were another early form of photography commonly found in 19th-century photos. Recreating the look of tintypes can involve adding a metallic tone and a slightly blurred, vintage appearance to photos. Some filters add all these elements altogether, but you can achieve the same look by manually applying individual filters too.
Vintage Filters
Some photo editing software and apps offer vintage filters that automatically apply a combination of effects to photos to give them a vintage look. These filters often combine elements like sepia toning, grain, and faded colors to create a nostalgic aesthetic.
They can also include elements such as dust and scratches to make the photo look completely old and worn out.
Make a Photo Look Vintage in Photoshop
There are multiple ways to achieve your goal when it comes to creating vintage-looking photos, as mentioned in the previous section.
For this specific tutorial, we'll be using Adobe Photoshop, the world's most popular photo editing software. If you want to learn how to make a photo look vintage using Adobe Photoshop, follow the steps below.
Step 1: Import the Photo and Duplicate the Layer
Your first step for achieving a vintage aesthetic with one of your photos would be to launch Photoshop and create a new project. We recommend creating a new project over using one that's already started so that you don't make any unwanted changes while still learning and experimenting.
Once you create the project, import the images you want to transform into vintage photos.
To achieve the vintage effect, there are multiple approaches. The steps you'll see below are just one of the methods but feel free to use what works best for you.
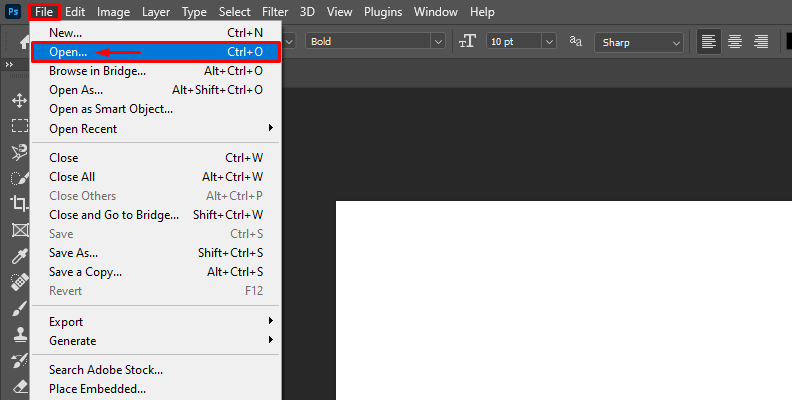
So, once you import the image, select it into the "Layers" panel by clicking on it, then right-click it and choose "Duplicate Layer" or simply use the "Ctrl + J" keyboard shortcut.
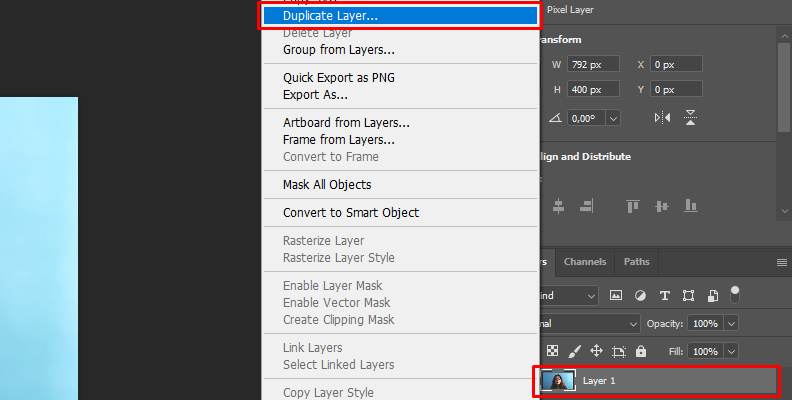
We recommend creating a new layer before each significant change so that you can reverse back something if needed without having to undo most of your work. Now, select the duplicated layer to work on by clicking on it.
Step 2: Add the Camera Raw Filter
We'll first start by adding the "Camera Raw" photo filter to your image and use it to tweak the colors, as nothing speaks vintage aesthetic more than having faded, aged colors.
To do this, go to "Filter" -> "Camera Raw Filter" as shown in the image below.
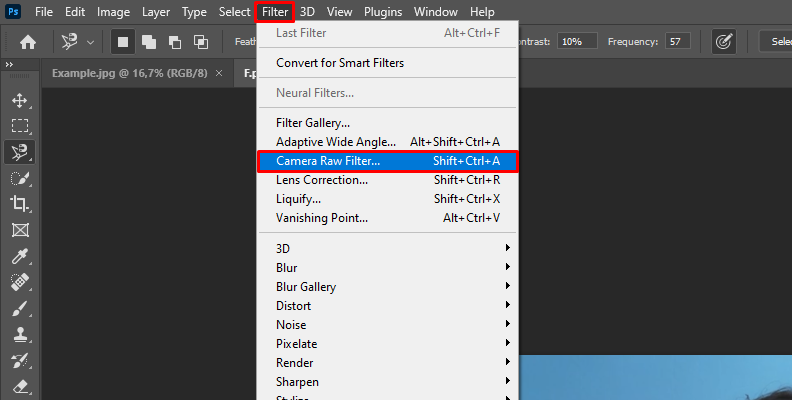
This will open a panel on your screen where you can make various changes to your photo. What we need to do is "tweak" a few parameters to "weaken" the colors in the image, matching the qualities of the old cameras that were once available.
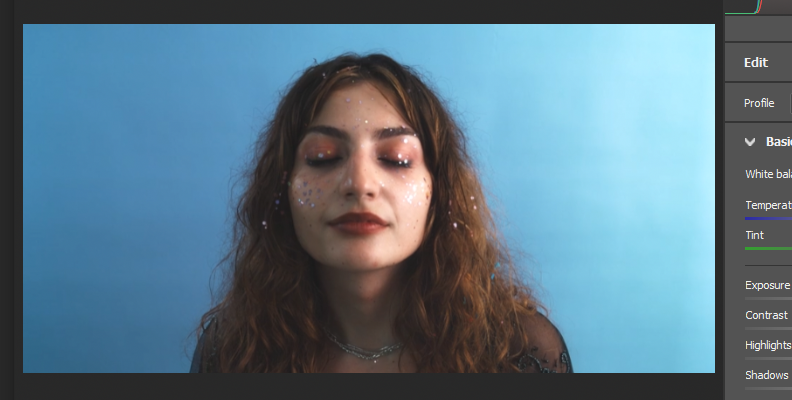
Here's what our image looks like before we start.
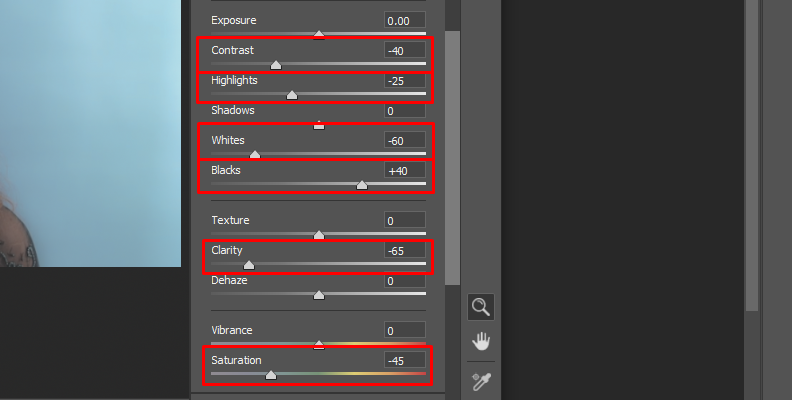
Now, make the following changes:
- Set the "Contrast" to negative forty (-40).
- Set the "Highlights" to negative twenty-five (-25).
- Set the "Whites" to negative sixty (-60).
- Set the "Blacks" to positive forty (+40).
- Set the "Clarity" to negative sixty-five (-65).
- Set the "Dehaze" to positive fifty-five (+55).
- Set the "Saturation" to negative forty-five (-45).
Your final settings should look as what's shown in the image below.
You're free to experiment with other settings too. These are just the ones we use, but depending on your image, the lightning under which it was taken, and the vintage look you're trying to achieve, these may not be ideal for you. Feel free to adjust accordingly.
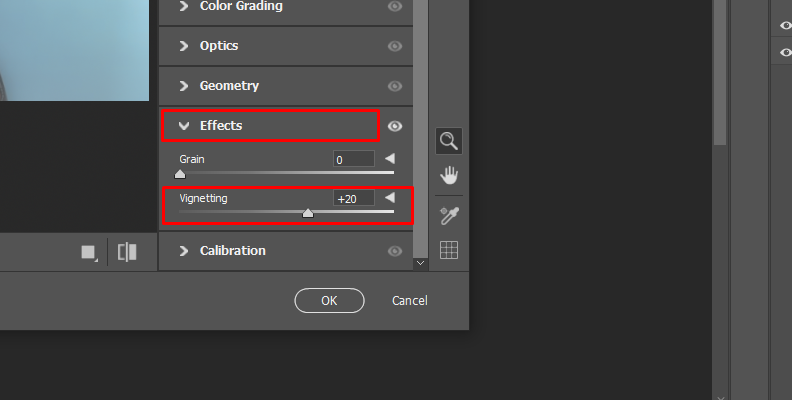
Step 3: Add Vignette to Your Image
One of the most recognized elements that will greatly contribute to your custom vintage photo effect is the vignette.
Scroll down in the "Camera Raw" filter panel until you see the "Effects" section. Click on it to expand it, then add some vignette to your image.
We used the positive twenty (+20) value, as shown in the image below.
Feel free to experiment with different values. The best thing about this is that you can preview the changes in real time.
When done, simply click the "OK" button.
Then, move on to the next step.
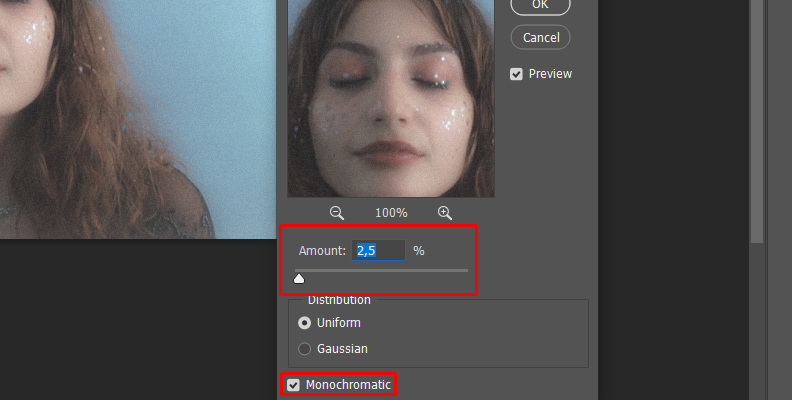
Step 4: Add Noise
One of the best ways to create vintage photo effects for your images is by adding noise to the mixture, making it look as worn out and old as possible.
So, click on "Filter" -> "Noise" -> "Add Noise" as shown in the image below.

Once the panel opens, set the amount to 2.5% and "tick" the "Monochromatic" option at the bottom.
You can experiment with various settings and different values.
When done, press the "OK" button.
Step 5: Add a Vintage Texture
Photoshop allows us to do many cool things, one of which is combining multiple images into one by using overlay modes.
As our final step, we'll add a vintage paper texture to make our image look older and more authentic.
Feel free to download any paper texture from the internet after ensuring that it is free to use. When you have your texture of choice, import it into Photoshop the same way you imported your main image, using the File -> Open approach.
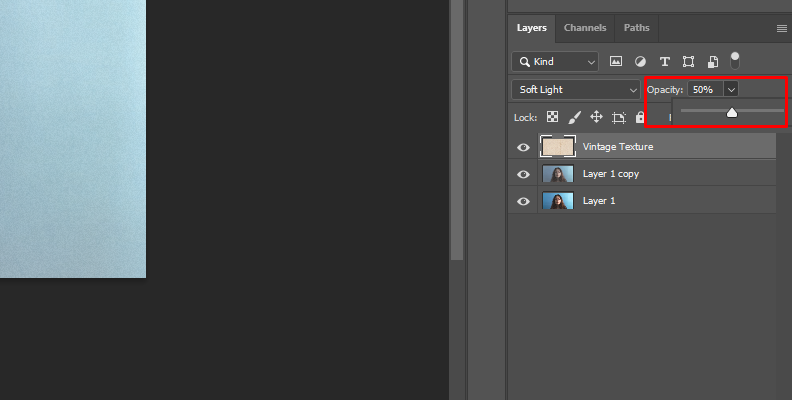
The image will be added to a new tab in Photoshop. From there, click and drag it from the "Layers" panel into your main tab and drop it. It will automatically be added to your "Layers" panel along with your other working layers.
The texture image layer will be at the top, which is how we need it to be since it should be applied over every other layer.
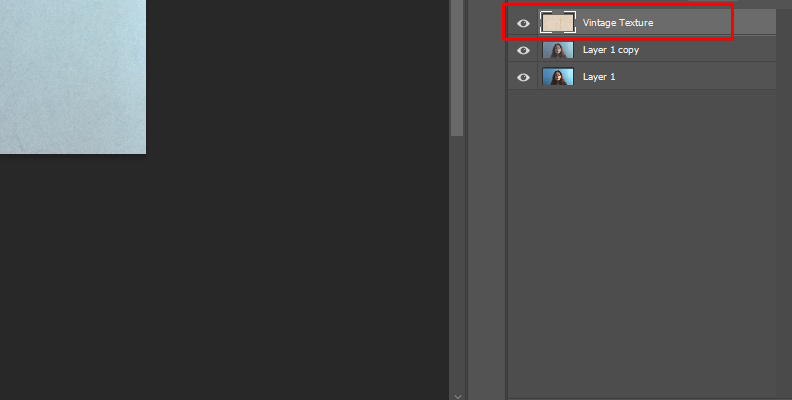
Set the Blending Mode to either "Soft Light" or "Overlay".
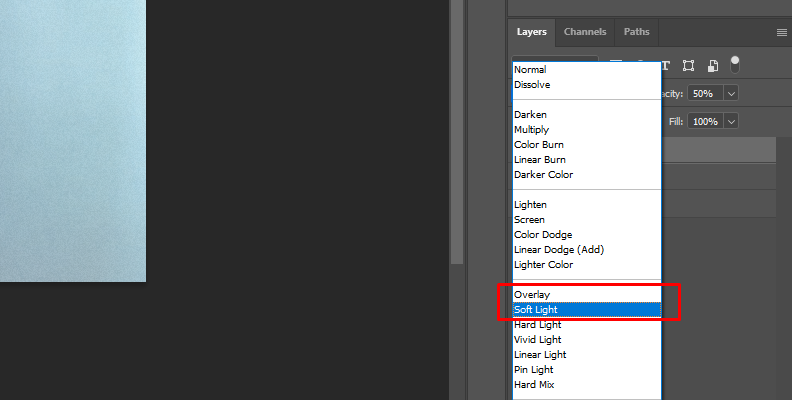
Finally, set the opacity amount to about fifty percent or any other value that you find works best for your image, as every case will be specific on its own.
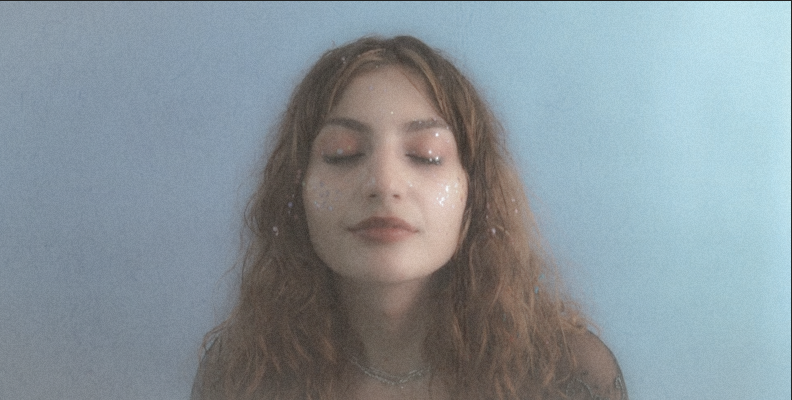
That's all there's to it.
After all the changes we made, our final image looks like this.
There are many other approaches and infinite combinations of settings and parameters that could give you a different look, so feel free to experiment as much as you can and find what works best for your image.
Make a Photo Look Vintage with Boris FX Optics
Plug-ins are not always necessary, but they do make the job a lot easier as they automate most of the process, regardless of what you're trying to accomplish.
In this specific case, we'll be using Optics by Boris FX to create a vintage look for your images, whether they be portraits, romantic photos, or even architectural images you took on your trips.
Here's what you need to do:
Step 1: Open Photoshop and Import Your Image(s)
Optics is available both as a standalone app and a plug-in. If you're using it as a standalone app, load it and import the images in it. If you're using it as a plug-in, load up Photoshop and import your images.
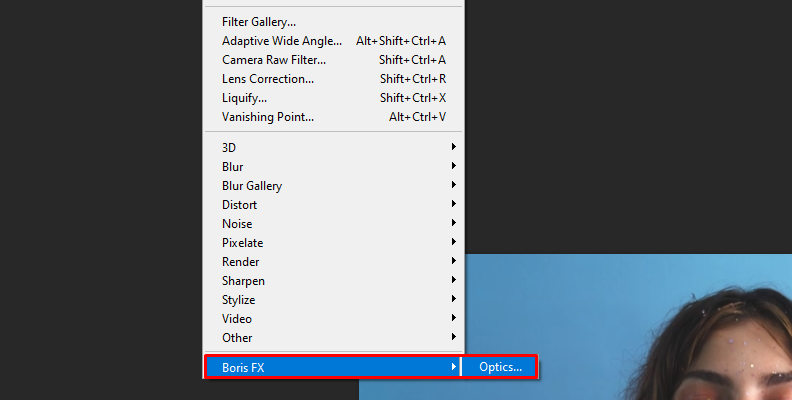
Step 2: Launch Optics within Photoshop
To launch Optics within Photoshop, go to "Filter" -> "Boris FX" -> "Optics" as shown in the image below.
Step 3: Look Up The Effects Within Optics
Once Optics loads, your image will be automatically imported within. From here, all you need to do is use the search bar to find a vintage effect like S_VintageColor2Strip.
There are many different tools in Optics you could use to add vintage effect in Optics like Color Processing, Boarders, Grain, Film Stocks, S_BleachBypass, S_FilmDamage, S_Grunge, Sepia, and Texture. Feel free to try many of these together to find the perfect combination.
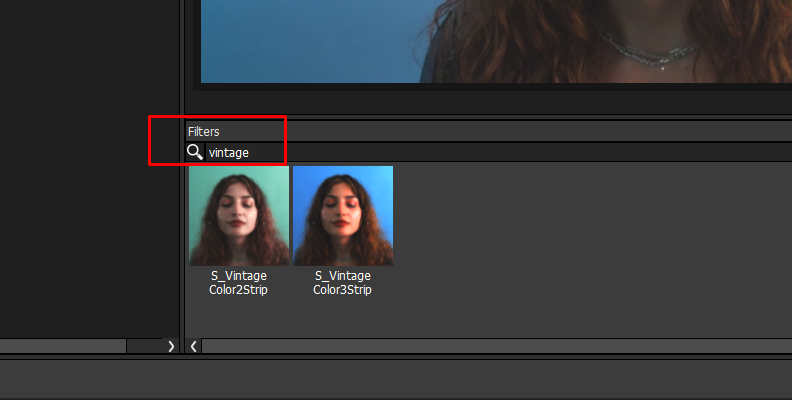
Applying the effect is just as easy as clicking on it with your mouse.
Step 4: Modify The Parameters
Once you apply the effect, Boris FX's Optics offers a separate "Parameters" panel where you can modify different values to fully customize the effect you chose. Optics also offers presets for all of these effects in a drop down menu.
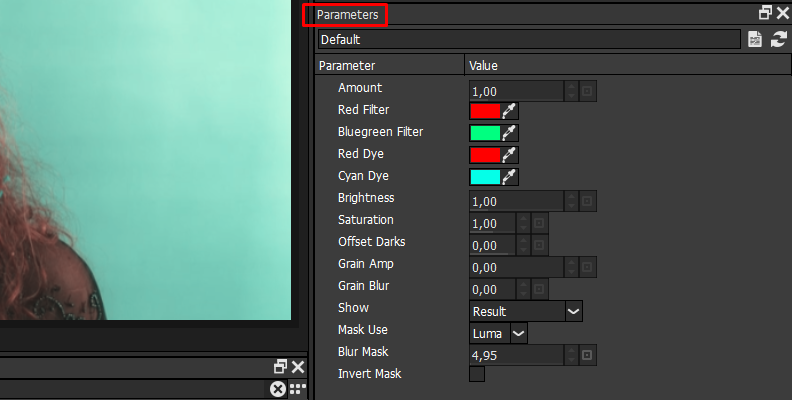
When satisfied with the results, simply press the "Apply" button at the bottom.
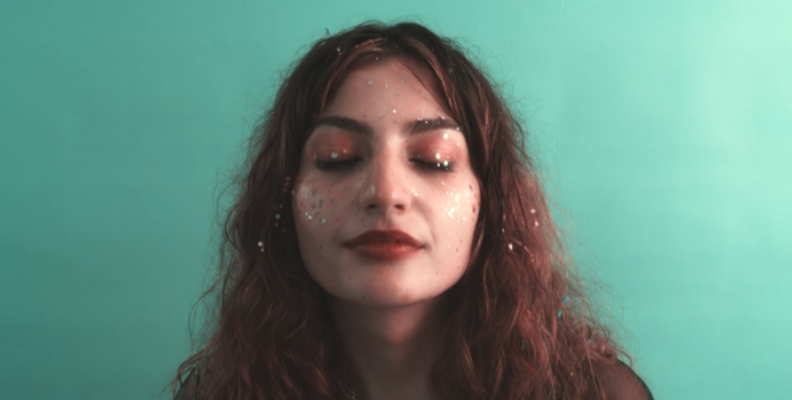
That's all there's to it! Now our image looks like this with just a few clicks, and it was much simpler and more user-friendly compared to the other method where we did everything manually.
Final Words
That's all you need to know about giving a retro look to your images, turning them into old photos with an aged look.
Hopefully, this will help you out in the future with any image editing tasks.
FAQ
How to make photos look like film?
A: You can give your photos the old film camera look by using a color editing tool and some of the tips that we listed in the sections above. Mainly, it's about washing out the colors and giving them a slightly worn-out look, as well as adding a few extra elements, such as a texture or grain, to mimic the retro effect. You can also use Optics effects like Film Stocks to help achieve this look.


