


Whether you are recording a podcast, your latest killer music track, or a great piece of drama, you want your audience to be able to hear everything clearly on your audio recording. There’s no point in putting hard work into great content only for it to be let down by poor audio.
Audio distortion can occur for a variety of reasons, but once it’s there, you definitely won’t miss it. However, just because you have a distorted audio file doesn’t mean there’s nothing you can do to remove distortion.
And with Audacity, there are plenty of approaches to restoring your audio quality, getting your audio file to sound great again and ready for gain staging. It's easy to fix distortion in Audacity with just a few good tools and some knowledge so your audio files sound great again.
What Causes Distorted Audio?

Distorted audio can be caused by a number of different factors and there is no one single event that causes it. It could be something like a hum or a high pitched hiss in the background caused by equipment. Or it could be that the levels aren’t set correctly when the audio is recorded, which can lead to clipping and affect the dynamic range.
If you are outside, traffic noise might cause what’s being said to be drowned out or difficult to hear. Or there could be wind noise if the weather is less than perfect. There could be people talking in the background, dogs barking…
You get the idea. A noisy environment can cause distortion in your audio recording and affect the sound quality.
However, with a little skill and knowledge, these can be easily cleaned up with a graphic EQ, high and low pass filter, noise removal and more.
How to Fix Distorted Audio in Audacity
Even before you begin using Audacity to remove distortion from your audio, it is important to identify the source of the distortion and the frequency area where the problems are in an individual track.
For example, it might be that you only have a small section of your audio that has distorted. This might happen if someone who was speaking quietly suddenly said something loud, causing clipping, but then went back to speaking normally or if the mic gain is set to a high volume.
In this case, you want to select the part of the audio file that has the distortion, so you only apply the fix to the part of the audio clip affected.
However, if the distortion is caused by, for example, some electrical hum in the background that runs throughout the length of the recording, you will need to select the whole audio recording to apply the effect.
Knowing where to apply your effects and knowing what circumstances to use them in will make their implementation much more effective.
Plug-ins

There is a wide range of plug-ins available for Audacity that can help deal with the problem of distorted audio on any audio track. CrumplePop’s range of audio restoration plug-ins are some of the very best tools available to return even heavily distorted audio to pristine condition.
The AudioDenoise plug-in is especially useful when it comes to removing distortion and any background noises that might have plagued your recording. Similarly, the ClipRemover will help deal with any audio that has been clipped during the recording process.
AI Intelligence
All CrumplePop plug-ins use sophisticated AI to understand what’s going on with your audio track, yet they remain simple to use. Select the amount of repair you want to do to your audio with the central knob, listen back to the results, and be amazed at just what a difference they can make to the audio signal.
With a range of additional plug-ins, you can be sure that there will be a tool to help you deal with whatever distorted audio you need to fix and remove background noise.
CrumplePop is one of the best-regarded audio restoration plug-in providers on the market, and once you’ve used them, you will wonder how you ever managed to get by without them.
Cleaning Up Hiss and Background Noise
Hiss and other types of background noise are a perennial problem on recordings and might not even be apparent until you listen to it back. Fortunately, Audacity is a great tool for noise removal and dealing with these types of problems when they've been captured on your audio file.
Firstly, select a small portion of the audio that has the hiss on it — a couple of seconds is usually enough. Ideally, this should be when nobody is talking so that it is just the hiss that is audible.
Once done, go to Effects and select Noise Reduction. This will open the Noise Reduction tool.
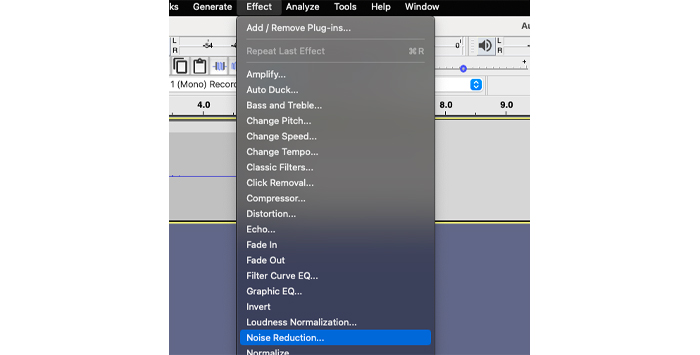
Noise Profile
Click the Get Noise Profile button, and Audacity will use the selected part of the audio to understand the hiss that need to be eliminated with the noise removal. Audacity creates a filter with a frequency response to eliminate the unwanted noise from the target audio track.

Once this has been done, select the part of the audio track that you want to apply the noise reduction to. To select the entire recording use KEYBOARD SHORTCUT: CTRL + A (Windows), COMMAND + A (Mac)
Now go back to Effects > Noise Reduction again. You can click OK, and Audacity will apply the noise reduction to eliminate the hiss or background noise from the target audio clip.
Level, Sensitivity, and Frequency
You can also adjust the noise reduction level, sensitivity, and frequency smoothing of your audio files to achieve more tailored results, though the default settings are often good enough for most people. Either way, the result will ensure that you remove background noise for a cleaner-sounding recording.
You need to repeat the process to use the noise removal on a second track.
Clipping
Signal clipping is the name given to the distortion effect that occurs when a piece of equipment tries to record something that has too much audio signal.
This usually occurs because the gain has been turned up too high and the signal exceeds its maximum level — the result being that Audacity can’t manage to process all of the signals. If you have been recording vocals and the singer is just too loud, clipping can be the result.
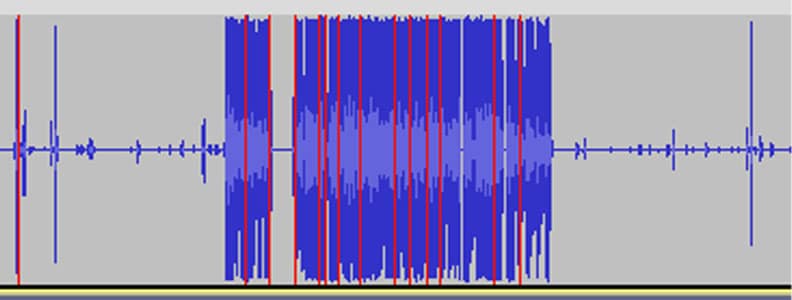
The distortion caused by clipping has a distinctive pattern, which can easily be seen in Audacity’s audio waveform window, but if you have trouble seeing it, Audacity also includes a tool that helps make clipping visible.
Go to the View menu, then choose Show Clipping (on/off).
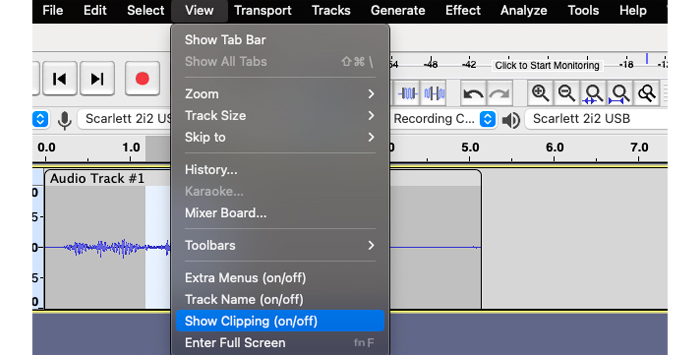
Audacity will then identify where there is clipping in your recording and show it in red within the audio waveform.
Repair Clipped Audio
In order to repair the clipped audio sound using Audacity with just a few clicks, first select it by left-clicking and dragging to cover the entire affected area.
Then, go to Effects and select the Clip Fix tool. Two settings need to be considered: Threshold of Clipping (%) and Reduce Amplitude to Allow For Restored Peaks (dB).
- Threshold of Clipping (%) tells Audacity how close to the maximum sample magnitude it must be to be considered as clipped audio. In other words, it tells Audacity what is and is not clipped.
- Reduce Amplitude to Allow For Restored Peaks (dB) lets you reduce the amplification of the part of your audio you have selected so there is headroom for Audacity to carry out the repair to your audio and adjust the volume.
While both can be adjusted to refine the process of restoring clipped audio, the default settings in the Clip Fix tool are generally very good.
Once you have finished making your setting selection, click Apply and Audacity will repair your clipped audio. The clip fix is now done!
EQing Your Audio
If you want to remove distorted audio in a particular frequency range, you can use EQ-ing to help deal with it. For example, if you had a low bass rumble that was affecting your recording, you could use EQ to help reduce the bass frequencies of your recording to help eliminate it with a high pass filter which allows high frequencies to pass and rejects lower frequencies.
EQing just means adjusting a particular part of the frequency range. Audacity makes this easy by having a Graphics EQ built in. Go to the Effects menu and choose Graphics EQ to open it.
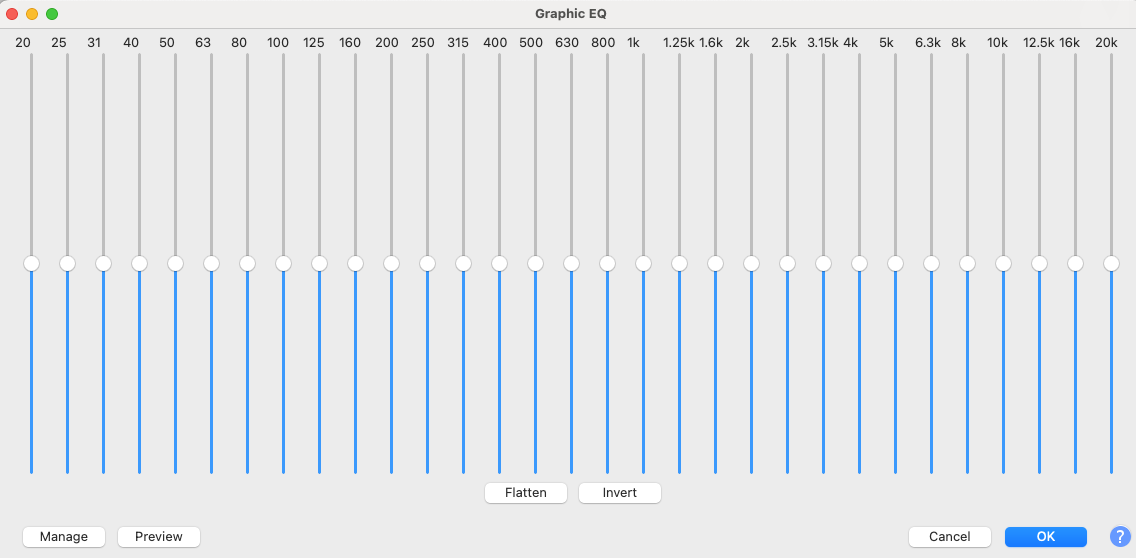
Each slider on the EQ represents a particular frequency area, with low frequencies on the left-hand side gradually rising to higher frequencies on the right-hand side. Adjust the sliders to adjust the frequency and help eliminate the noise from a high pitched hiss on your recording or avoid unwanted frequencies.
Presets
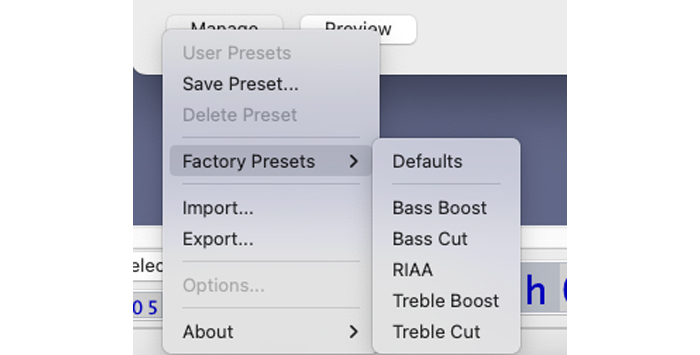
There are also a few presets available. You can access these by clicking on the Manage box in the bottom-left of the box, and then going to Factor Presets.
These can be useful when you just need to make a quick selection rather than painstakingly adjusting everything yourself. You will find a high and low pass filter, notch filter, bass and treble boost, and more.
In addition to the Graphics EQ, there is a Filter Curve EQ available from the Effects Menu as well.
This works in the same way as the Graphics EQ, by altering specific frequencies on your recording. However, the information is shown in graph form rather than as sliders, which can make it easier to interpret.
You can click anywhere on the x-axis to change a particular frequency, which also means it is a little more adaptable than the Graphics EQ, which forces you to stick to specific frequency ranges.
As with the Graphics EQ, there are presets available by going to the Manage option, then clicking on Factory Presets. You will find more filters including Low roll off for speech, Telephone, Walkie-talkie, an more.
EQing takes a little bit of practice to get right, but the results can be impressive, and it’s a great way to help deal with distortion on your audio file.
Audio Ducking
Audio ducking is the process of lowering the volume of a track so that it doesn’t interfere with another track. You “duck” or lower the volume so that the distortion is harder to hear. It’s most effective at dealing with very short distortions rather than ones that affect a whole track.
Audio ducking to deal with distortion is often a last resort if none of the other techniques have been successful in removing the problem.
Because it uses volume reduction on the track it is important to use a gentle touch with it to remove unwanted noise.
You want to duck down the smallest amount of audio and bring the volume back up as quickly as you can so the effect is as unnoticeable as possible.
Select Audio
Once you have identified the small amount of distortion on your recording, zoom in as close as possible to it and select it by left-clicking and dragging.
When the audio is selected, go to the Effects menu and choose the Amplify effect option.

You can then reduce the volume of the selected part of your audio until the distortion can’t be heard.
Be sure to have the Allow Clipping box unticked — this is normally used for increasing rather than decreasing volume, but uncheck it anyway.
Once the effect has been applied, check your audio and make sure the effect is reducing the distortion while keeping the changes to your track as limited as possible.
Repair Audio
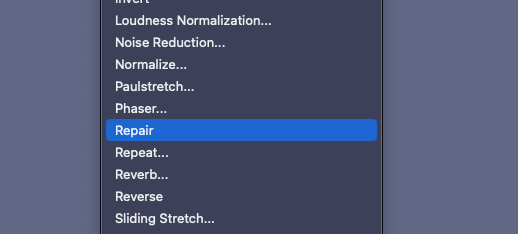
Audacity has a Repair Audio setting available from the Effects menu.
This tool is used to fix extremely short clips of less than a second.
However, it can be valuable if you have distortion caused by things such as a short tape drop-out, a bang caused by something being dropped, or a needle jumping on a vinyl record.
Such short times may not sound like much but it can really make a difference to the listenability of your audio file.
These types of distortions can be fixed by the Repair tool as it “guesses” what sound should be in the distorted part of your audio and fills it in.
Firstly, zoom in as close as possible to where the distortion occurs, then select it by left-clicking and dragging.
Because the Repair tool is designed to work on very short sections of audio, if you select too much, you will get an error message. If this is the case you need to re-select your audio with a shorter length of time. As a general rule, the shorter the amount of time you select, the better the results of the repair job will be.
Repair Tool
Once you have selected the audio, go to Effects, then choose Repair.
There are no options for this tool, the effect will simply be applied to the selected audio.
Audacity will work out what to repair by analyzing the sound to either side of your selection and filling in what is missing as best it can.
While the Repair Audio tool is limited in what it can do because of the short section of time it can work on, it can still be useful to use when it comes to clearing up short, loud bursts of distortion.
Hear It For Yourself
Advanced audio AI removes noise and boosts your vocal quality.
Toggle it on/off to hear the difference.
Remove Wind
Remove Noise
Remove Pops & Plosives
Level Audio
Remove Rustle
Remove Echo
Remove Wind
Conclusion

No matter how careful you are when recording sound to prevent audio distortion, the chances are at some point, you will need to deal with the problem of distorted audio. It can ruin recordings and make even the best content difficult to listen to and hard to care about. But with a powerful digital audio workstation (DAW) like Audacity, there are plenty of ways to undo the damage done by distortion and improve audio quality. Then your content will be ready to be unleashed on the world with high-quality audio and no distortion!


