


When recording audio, it is always important to get the best quality straight off the bat. The better the original quality of your recording is, the less audio production work you will need to do. Eliminating background noise, working somewhere with good acoustics, and getting the right equipment - it all contributes to great sound audio.
But no matter how careful you are, there can always be factors that are beyond your control. No recording is ever perfect, and clipped audio is one of the most common issues that can be faced when doing audio production. And it can happen whether you are working on an audio-only project, such as podcasting, music, radio, or video editing in software like Adobe Premiere Pro.
This sounds like a problem. However, many digital audio workstations (DAWs) have the ability to fix audio clipping. And Adobe Audition has the tools available to help you fix clipped audio problems.
Fixing Clipped Audio in Adobe Audition - A Step-by-Step Process
It's worth noting before you begin that clipping repair will apply to all of your audio, so it's best to start with as clean a recording as possible, so minimize background noise and other unwanted sounds as best you can before beginning. That way, your results will be better.
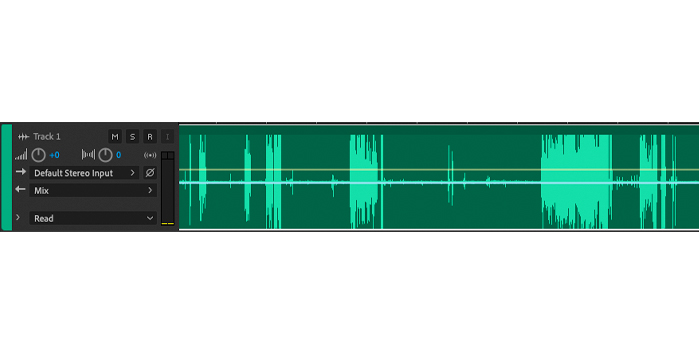
Firstly, import the audio file on your computer into Adobe Audition so you are ready to edit your clip.
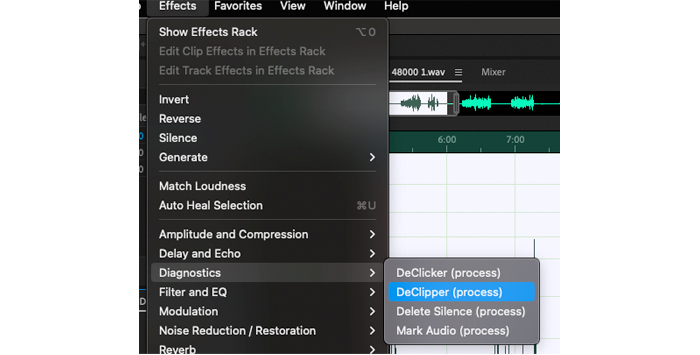
Once you have imported the audio file into Adobe Audition, go to the Effects menu, Diagnostics, and choose DeClipper (Process).
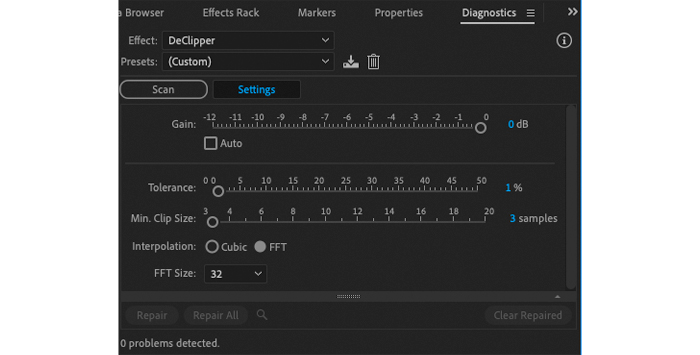
The DeClipper effect will open in the Diagnostics box, which is on the left side of Audition.
Once this is done, you can choose the whole of your audio (CTRL + A on Windows or COMMAND + A on Mac) or part of it by left-clicking and selecting the portion of the audio you want to apply the DeClipping effect to, so you can edit a single clip or clips only.
When this has been done, you can apply the effect to the original clip that needs repair.
Repairing Audio
A simple repair can be carried out by the DeClipper’s default setting. This will work effectively and is a straightforward way to get started.
Click Scan and the software will analyze the selected audio to apply the DeClipping effect. Once you click scan and the process completes, you can listen back to the results to confirm there has been an improvement to the clipping that has occurred.
If the results are what you want, then you are done!
Default Presets
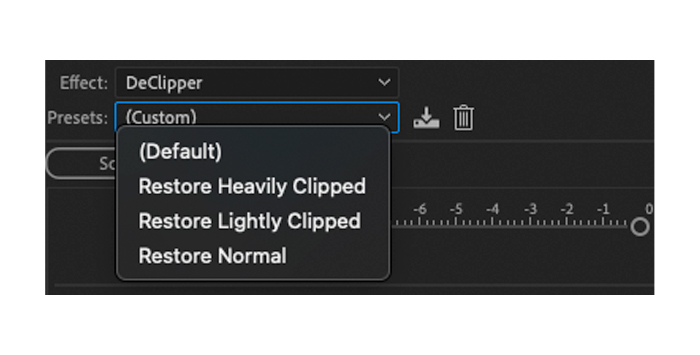
The default setting on Adobe Audition is good and can achieve a lot, but there are other options available. These are:
- Restore Heavily Clipped
- Restore Light Clipped
- Restore Normal
These can either be used on their own or in combination with each other.
Default Settings
Sometimes, when the audio has the default settings applied, the results can be not quite what you were hoping for and can sound distorted. There can be a number of reasons for this, but whatever the cause, it’s something that will need to be dealt with.
This can be done by applying some of the other settings in the DeClipper to your audio. Putting the sound through the DeClipper again can be an effective way of removing this kind of distortion.
Audio Selection
Select the same audio as the first time to apply additional DeClipping. When this has been done you can choose any of the other presets that you think will be most likely to fix the distortion issue in your sound.
Light distortion means you should select the Restore Light Clipped preset. If you don’t think that will be adequate and the distortion is heavy, then you can try the Restore Heavily Clipped option.
Different combinations can be experimented with until you find one that produces the results you want. Editing in Audition is also non-destructive, so you don’t need to worry that you will make changes that can’t be undone later — everything can be put back the way it was if you aren’t satisfied with the results.
Settings
Adobe Audition’s default settings work well. However, sometimes you will need to do some manual adjusting of the settings to fix clipped audio.
If this is the cause, you can choose the Settings button. This is next to the Scan button and will let you access the DeClipping tool’s manual settings.
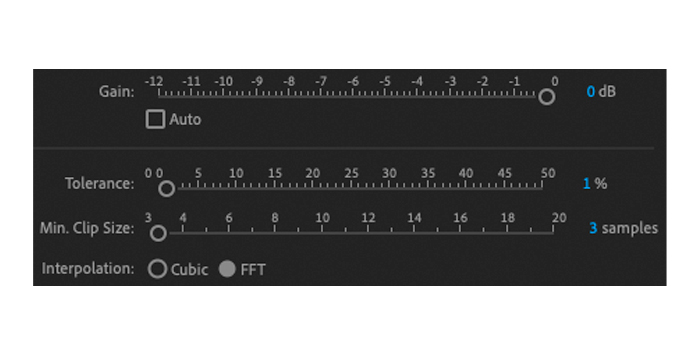
Once this is done, you will be able to see the below settings.
- Gain
- Tolerance
- Min Clip Size
- Interpolation: Cubic or FFT
- FFT (if selected)
Gain
This sets the amplification the Adobe Audition DeClipper tool will apply prior to the process beginning.
Tolerance
This is the setting that's most important to pay attention to, as changing the tolerance will have the biggest effect on the way your audio is going to be repaired. What this setting does is adjust the amplitude variation that has occurred in the part of your audio that has been clipped. This means that changing the amplitude changes the effect of each specific noise on the audio you have recorded. Setting a tolerance of 0% will only affect any clipping that happens when the signal is at maximum amplitude. Setting a tolerance of 1% will, therefore, affect the clipping, which happens at 1% below the maximum amplitude, and so on.
Finding out the correct tolerance level is something that requires a bit of practice. However, anything under 10% will produce good results, as a rule of thumb, although this will depend on the state of the audio you are trying to repair. Experimenting with this setting can yield great results and it is worth taking time to learn the best settings Adobe Audition has.
Min Clip Size
This setting will determine how long the shortest samples of clipped audio runs for what needs to be repaired. A high percentage value will try to fix a lower amount of the clipped audio, and conversely, a low percentage will try to fix a higher amount of the clipped audio.
Interpolation
There are two options here: Cubit and FFT. Cubit uses a technique known as spline curves to try and reproduce portions of the audio waveform that have been cut off by clipping. This is normally the quickest of the processes. However, it can also introduce unpleasant artifacts or sounds onto your audio in the form of distortions.
FFT (Fast Fourier Transform) is a process that takes longer and will yield better results if you want to restore heavily clipped audio. Choosing the FFT option will mean that there is one more option that needs to be considered, the FFT setting.
FFT
This is a value that is selected on a fixed scale. The setting represents the number of frequency bands that will be analyzed and replaced. The higher the number selected (up to 128), the more likely it is you will get good results, but the longer the whole process will take.
All these settings take some practice to learn how to get the results you want. However, taking the time to learn how these settings work and how they affect the end result will give you much better results than simply using the presets the software comes with.
Level Settings
When the levels have been set to your satisfaction, either by manually adjusting them or by using the presets, you can then click on the Scan Button. The affected audio will then be scanned by Adobe Addition and it will regenerate the parts of your clipped audio which have been affected.
Once this process has been completed, Adobe Audition is ready to do the actual repair of the sound wave. You have two options at this point — Repair and Repair All. If you click "Repair All" Adobe Audition will apply the changes you have made to your entire file. Click "Repair", and you will only apply them to areas that have been specifically selected. Under most circumstances, you can click Repair All, but if you want to be more selective with the Repair option, Adobe Audition lets you do that.
Check Your Changes
Once the operation has been completed, the last step is to listen to the changes that have been made to confirm that you are happy with them. If more work needs to be done then you can go back to the DeClipper tool and apply additional changes. If you are happy with the results, then you’re done!
Once you are satisfied, you can save the file. Go to File, Save, and your clip will be saved.
KEYBOARD SHORTCUT: CTRL + S (Windows), COMMAND + S (Mac)
Final Words
The bane of clipped audio is something that most producers will need to handle at some point. But with a good piece of software like Adobe Audition, you can fix clipped audio easily. No need to re-record everything to get clean audio, just apply the DeClipper tool!
Once you’ve done that, your previously clipped audio recording will sound pristine, restored to its former glory, and the problem will be eliminated for good - you now know how to fix clipped audio in Adobe Audition!


