


Have you ever recorded a voice or instrument a little too loud and noticed that it sounds bad or distorted? When this happens, you might be experiencing audio clipping.
In this post, we'll look at audio clipping—what causes it, how to prevent it, and how to fix audio clipping. If audio clipping is an issue for your audio files, then this post may offer just the solution you need!
What Causes Audio Clipping?
Clipping can be caused by:
- Setting your input levels too high, e.g., if you've set the gain on signals from a microphone or instrument too high on your interface or preamp.
- Setting recording levels in your digital audio workstation (DAW) too high.
- Equipment limitations, e.g., devices that can't handle high signal levels without distorting.
- External influences that may be beyond your control or difficult to manage, e.g., sharp increases in volume caused by a loud instrument, a sudden shout, or a loud sound effect.
Clipping can be an issue for the following reasons:
- It causes distortion, making your audio sound harsh, unpleasant, or difficult to understand (e.g., for voice tracks.)
- It results in a loss of detail due to the information that's lost from the clipped regions of audio.
- It can damage your equipment, e.g., by causing the cones in your speakers to move in a way they're not designed for.
Put simply, audio clipping, just like background noise, can detract from the quality of your recordings and make them less enjoyable to listen to (or less intelligible—for instance, in a podcast interview). For these reasons, it's important to be aware of audio clipping and prevent it from occurring. But if it does happen, it's good to know how to reduce its impact or amend it.
What is Audio Clipping?
Audio clipping occurs when an audio signal exceeds the maximum limit of its recording or playback system. It produces an unpleasant, distorted sound due to exceeding the system's peak volume.
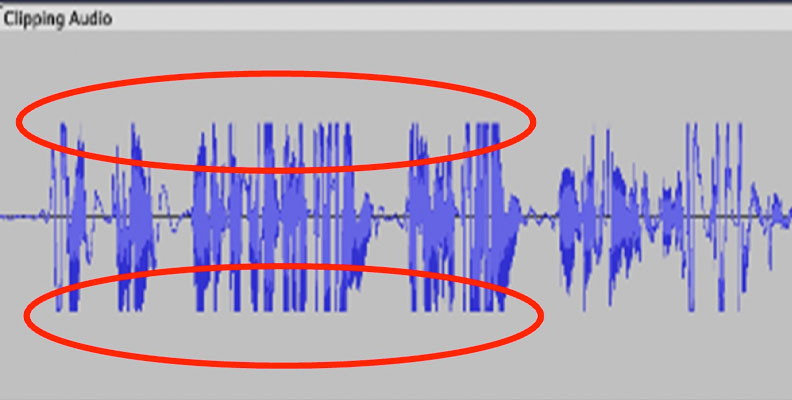
In audio production, an audio clip occurs when the signal level meters on recording equipment enter the red zone. When using DAWs like Audacity or Adobe Audition, you can see this in the resulting track, i.e., as flattened peaks in audio waveforms.
The following image of an audio recording shows what clipping looks like—notice the clipped audio at the loudest parts, i.e., where the waveform appears to flatten as it exceeds its maximum levels at the top and bottom of its range.
How to Prevent Clipping in Your Audio File
To prevent clipping, you should maintain reasonable signal levels and avoid pushing signals beyond their maximum limits during the recording process. You can do this by adjusting your gain, using gain staging, or including limiters in your input signal path, for instance.
Another factor to consider is the dynamic range (DR) of your recording system, i.e., the difference between the quietest and loudest sounds that you can record without clipping. All else equal, the higher your DR, the more scope you have to capture a range of recording levels (i.e., volume dynamics) in your audio.
That said, a lower DR (which you can achieve by using a compressor, for instance) gives you more scope to raise the overall level of your recording so that the faintest sounds are heard without clipping the loudest sounds. Managing your DR, therefore, can be important for preventing audio clipping.
Fortunately, if your audio does get clipped, it's fairly easy to fix using Audacity.
How to Fix Audio Clipping in Audacity
In the following example, we'll use Audacity's Clip Fix tool. For tips on how to use Audacity's other tools to help fix clipped audio, check out our tutorial on Audacity audio clippingul.
Before you start, make sure your track is polished and ready to be edited. Use Audacity's powerful noise reduction to clean up unwanted frequencies, then focus on clip-fixing.
Here's how to fix clipped audio using Audacity:
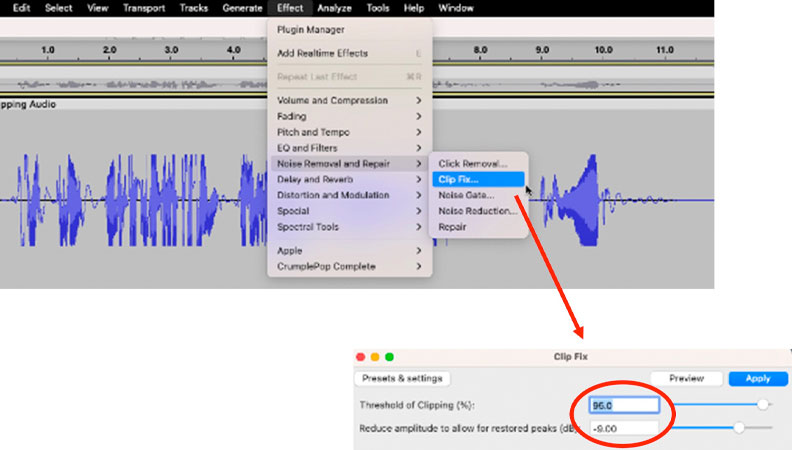
Step 1: Select the track that you want to fix. We'll use the audio file shown above (that has clipped audio) to show how it works.
Step 2: From the Effects menu, select the following drop-down menu, Effect > Noise Removal and Repair > Clip Fix...
Step 3: The Clip Fix pop-up box should appear, and you'll have two parameters to set:
- Threshold of Clipping (%)—this sets how close to the maximum level your signal should get to before being considered clipped, with a default of 95.
- Reduce Amplitude to allow for restored peaks—this sets how much to reduce the signal level by (i.e., reduce amplification) to provide headroom for reconstructing your audio to fix the clipping.
The Clip Fix tool works by reconstructing regions of your audio affected by clipping using a method of interpolation. This involves fitting curves (i.e., replacing the "flat" regions of the signal caused by clipping) to restore the audio to what it should have sounded like if clipping had never occured. It's a sort of "educated guesswork" that can have reasonably good results depending on the extent of clipping.
The signal's headroom is like a "safety margin" below the maximum levels that your recording system can handle before clipping. When you're working with a digital recording device and associated software, headroom is usually measured in decibels full scale (dBFS) and has a negative value. The default setting for the Clip Fix tool is -9.
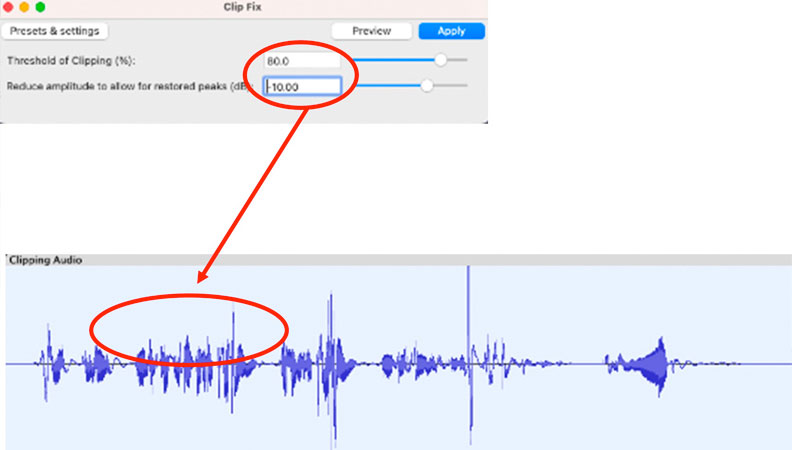
Step 4: Play around with the parameters (same as with the noise reduction tool) until your audio sounds better, i.e., you should hear less distortion as the clipped audio is restored. Remember that you can test what your settings sound like by using the Preview button.
Step 5: Once you're happy with your settings, press the Apply button (a threshold of 80 percent and an amplitude reduction of -10 dB worked well in our example, shown below.)
Once done, you'll see the waveform of your audio track with the clipping removed, i.e., after the Clip Fix tool has reconstructed the clipped regions of your track according to your settings.
Alternative Method to Fix Audio Clipping in Audacity
As handy as the Clip Fix tool is, Audacity's own documentation will tell you that it only works well for lightly clipped audio, just like its noise reduction is not designed for complex, multi-layered noises. This is because the reconstruction method that's used, i.e., interpolation, is limited in how effectively it can amend the affected audio.
But there are many other ways to fix audio clipping. One effective approach is to use a de-clipper plug-in. Let's use CrumplePop's widely acclaimed ClipRemover plug-in to see how this works.
CrumplePop's audio plug-ins work with a variety of DAWs, including Premiere Pro, Logic, GarageBand, and, of course, Audacity. There's a free trial period that you can take advantage of, if you wish, to test how the plug-ins work in your own setup.
ClipRemover is a versatile and easy-to-use plug-in that uses advanced AI techniques to reconstruct regions of your audio that are affected by clipping. It often produces much better results than Audacity's Clip Fix tool. It's easy to download and install by following the instructions on CrumplePop's free download page.
With ClipRemover installed, do the following:
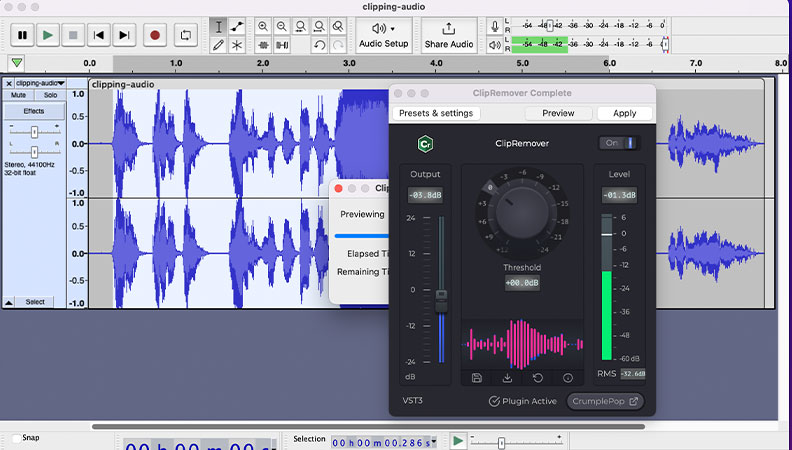
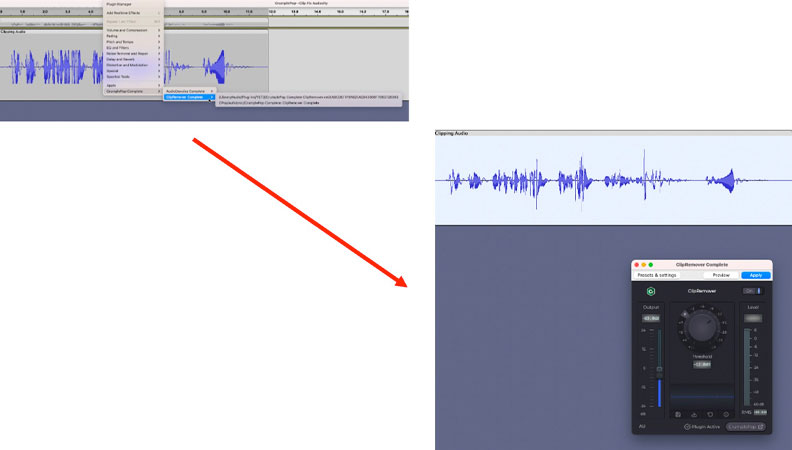
Step 1: Select the track that you want to fix—we'll use the same audio file as before to show how it works.
Step 2: From the Effects menu, select Effect > CrumplePop Complete > ClipRemover Complete (this will appear in the drop-down menu after installing ClipRemover.)
Step 3: The ClipRemover interface appears and gives you several controls to work with—in many cases, you may not need to change any controls, but you can tweak the Threshold and Output levels for the best results.
Step 4: Adjust the controls and use the Preview button to see how your sound changes, and once you're happy with your settings, press the Apply button.
And there you have it—high-quality audio restoration of your clipped track in a few simple steps!
Hear It For Yourself
Advanced audio AI removes noise and boosts your vocal quality.
Toggle it on/off to hear the difference.
Remove Wind
Remove Noise
Remove Pops & Plosives
Level Audio
Remove Rustle
Remove Echo
Remove Wind
Final Thoughts
Audio clipping can be frustrating, as it results in distorted, unpleasant audio sections that are simply too loud for your setup. While it's best to prevent clipping from occurring in the first place, there's no need to discard your existing track and start from scratch when it happens. With the right tools, you can rectify audio clipping relatively easily.
In this post, we've explored how to fix audio clipping using Audacity and an external plug-in—CrumplePop's ClipRemover. If you've been frustrated by audio clipping during your recording sessions, or if you've observed positive or negative peaks in your tracks, these tools can help recover your work and enhance the audio quality of your recordings without too much fuss.


