


When you’re new to editing and compositing software and using programs like Adobe After Effects, it can be daunting to figure out how to navigate them. A common question that beginners always ask is how to save their projects to upload, share, or use in another project.
If you’ve never used editing software before, you might think saving your project is enough, but that won’t export the video file, animation, or motion graphic created. That will only get you an After Effects project file that you can edit later, which is also a good thing to do.
In this tutorial, I’ll show you how to export a video from After Effects. Prepare your best project and follow this guide.
How to Export Video from After Effects
After editing and fine-tuning your composition, you must render and export your project. Rendering is the process of converting all the layers, settings, and effects in a composition into a two-dimensional image for the final video. After rendering, the export process encodes the renders to create the final output file.
Before rendering in Adobe After Effects, you need to place the composition in a queue, where you can establish the render settings for each item.
There are two methods to render and export from After Effects: the After Effects Render Queue, which is preferred when you render the composition to use in another video editing software like Adobe Premiere Pro.
The other method is using the Adobe Media Encoder Queue. It has more formats and audio and video codecs to choose from. It lets you continue working with After Effects and is best for rendering the final compressed video you will distribute via web, DVD, or Blu-ray disc.
I’ll provide the steps for the two rendering methods for you to use.
Step 1: Add Composition to the Render Queue
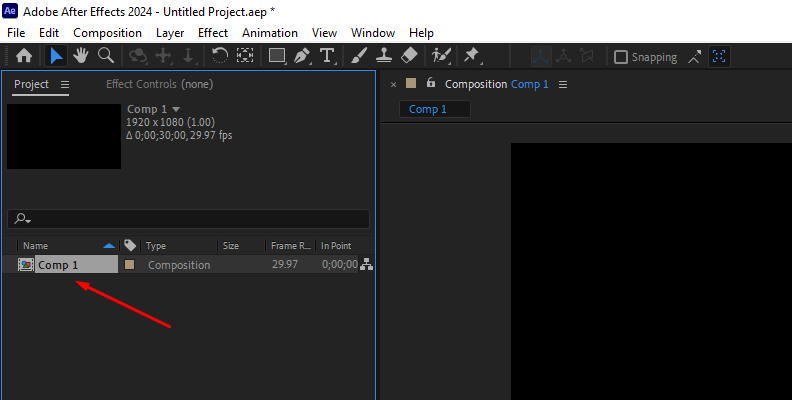
First, select the composition you want to render from the Project panel.
Then, go to the upper menu and click Composition > Add to Render Queue.
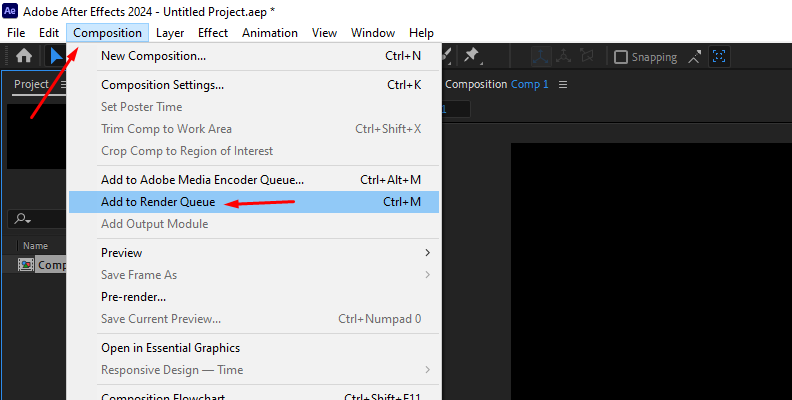
You can also find this option from the File menu, then Export > Add to Render Queue, or use the keyboard shortcut CTRL + M on Windows and Command + M on macOS. The Render Queue panel will appear at the bottom of the screen, replacing the Timeline panel.
When you have more than one composition to render, you can add multiple compositions to the Render Queue. Select all the compositions you want to render in the Project window and drag them to the Render Queue panel.
To open the Render Queue panel, you can use the keyboard shortcut CTRL + ALT + 0 on Windows or Command + Option + 0 on macOS.
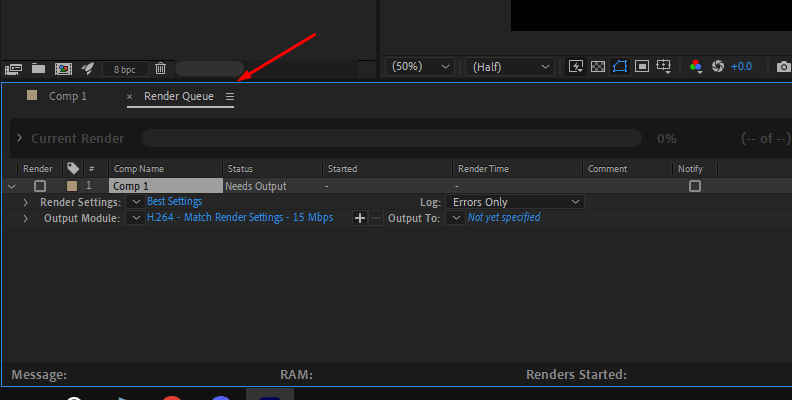
Step 2: The Render Queue Panel
The Render Queue panel is where your composition will rest before rendering. Here, you can manage and export multiple versions of your compositions. Adjust each composition's render settings and output module, select a name for the file export, and select the output location to export.
The default settings will do for occasional and beginner editors, but you can customize the export settings if you need to.
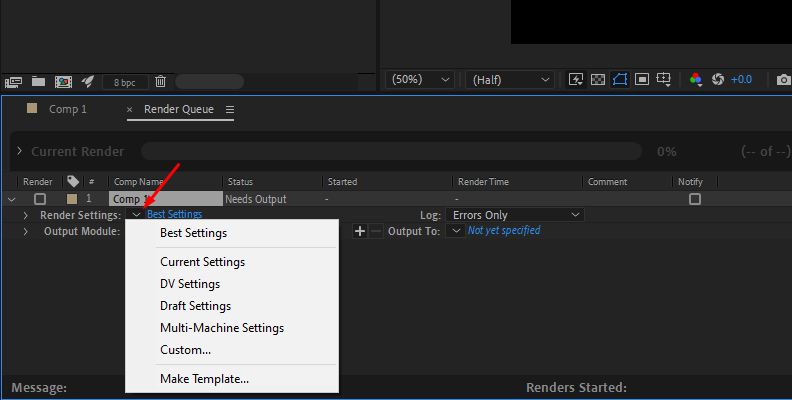
Step 3: Render Settings
The Best Settings preset is selected by default. If you need to make custom adjustments, click the little arrow next to Render Settings to choose a different preset or click the blue text to open the Render Settings window, where you can adjust the composition's quality, resolution, output frame rate, and duration.
Step 4: Output Module Settings
The Lossless output module is the default setting. To choose a specific file format, click the arrow to the right to see more presets, or click the blue word to open the Output Module window and customize your settings.
In the Output Module settings, you can select the file format from the Format dropdown menu and click Format Options to choose the desired video codec and bitrate. At the bottom, you can select your audio output settings.
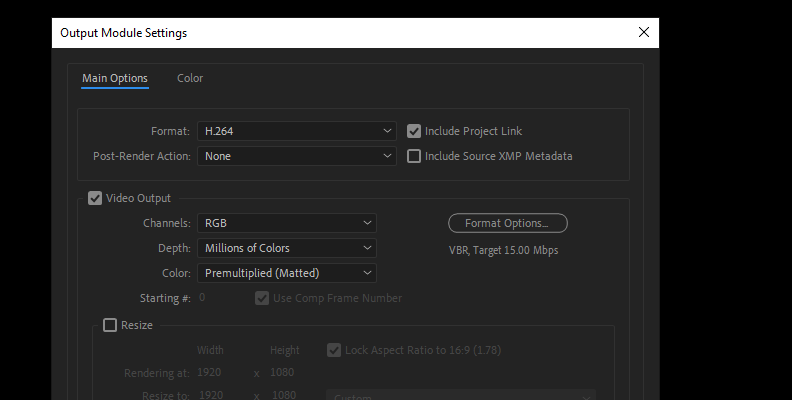
For the Output Module, consider where your render will go next. If you export to another video editing program, a lossless codec will be best if you need to compress it when rendering for the final output.
Step 5: Output To Settings
The next step is to choose the export video location. Click next to Output To and browse the folder where you want to save the export. Type in the file name for the file export and click Save.
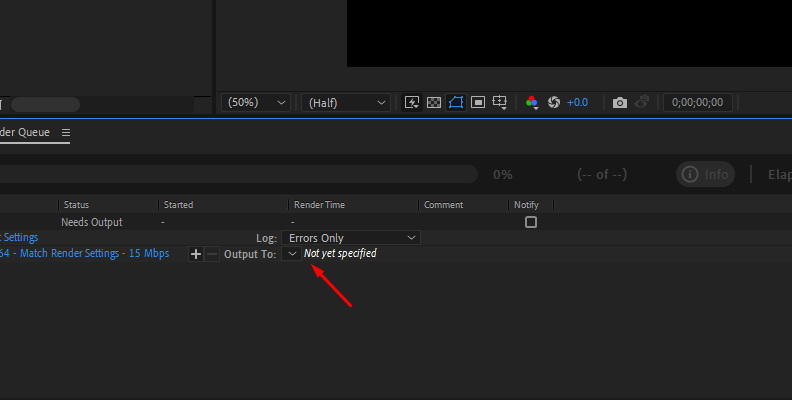
Back in the Render Queue panel, you’ll notice the composition is selected with a checkbox, and its status changes to Queued. This means the composition is ready to render.
Before clicking the Render button, if you need to render the composition in different formats with different codecs and settings, now’s the moment. After selecting your first settings, click the plus icon on the left side of Output To and select the other Output Modules you want, along with the name and folder to save the different render items.
Step 6: Render Your Composition
You can render all compositions that have the status Queued. After Effects allows rendering multiple compositions queued (render items) in batch. Now, click that render button on the upper right corner of the Render Queue window to begin.
The render will start from top to bottom in order. If you want to change the order, you can click and drag the compositions to the new position or use the following keyboard shortcuts:
To move up or down in the queue:
On Windows, use CTRL + ALT + Up/Down Arrow
On macOS, use Command + Option + Up/Down Arrow
To move to the top or bottom of the render queue:
On Windows, use CTRL + ALT + Shift + Up/Down Arrow
On macOS, use Command + Option + Shift + Up/Down Arrow
Depending on the length, file size, effects used, quality selected, compression, and other export settings, the rendering can take a few minutes or even hours to complete. So, take a break! Once the render is complete, the item will remain in the Render Queue panel with the status Done. You can then remove it from the queue or duplicate it to render the item again with different settings.
Bonus Step: Render With the Adobe Media Encoder Queue
Sometimes, you may prefer the Adobe Media Encoder Queue for rendering compositions because you require more video codecs not available in the After Effects Render Queue or because you are in a hurry and need to render while continuing to work on another project.
The Adobe Media Encoder is included with the Creative Cloud subscription. It should be installed automatically with After Effects, but if it’s not, you can install it from the Creative Cloud app.
To add the composition you want to render to the Adobe Media Encoder Queue, you have a few options:
Go to File > Export > Add to Adobe Media Encoder Queue
Go to Composition > Add to Adobe Media Encoder Queue
Use the keyboard shortcut CTRL + ALT + M on Windows or Command + Option + M on macOS
If you have already added the composition to the Render Queue, click the Queue in AME button next to the Render button in the top right corner.
The Adobe Media Encoder will launch. You can select your destination folder, file format, codecs, and other presets to encode. The composition will now have the status ready, and by clicking the green play button on the top right corner, you can start rendering and return to After Effects to continue working.
Remember that if you're exporting with Media Encoder at the same time as using After Effects, that After Effects might work slower than usual, depending on your computer hardware.
Final Words
Even though After Effects is not the most intuitive program for rendering, it becomes easy once you know how to access the Render Queue or use the Adobe Media Encoder. You can work quicker in After Effects by exporting using your favorite render settings.
After Effects can render video in formats like MP4, MOV, AVI, and popular codecs such as H.264, ProRes, and AIFF. When you use the Adobe Media Encoder, you have more and newer codecs like H.265 and WebM. Whichever render settings and method you choose, you're now ready to export with the best quality for your needs.
Good luck!


