


It almost goes without saying that clean, clear audio is one of the hallmarks of a great producer. It doesn't matter if you're recording an award-winning podcast or putting together a demo in your bedroom - sound quality is critical to convincing your audience that what you produce is worth listening to.
But no matter how hard you try, there can always be stray sounds that get in the way of that perfect audio that you want to capture.
And to get great-sounding audio, a great digital audio workstation (DAW) is a prerequisite. Studio One, from PreSonus, is a an excellent example of a popular, powerful DAW. Fortunately, Studio One also makes it easy for you to clean up your audio files and apply all the noise reduction you need.
How to Clean Up Your Audio Files

There are several different ways to clean up audio and apply noise reduction in Studio One. One of the easiest ways to clean up your audio files in Studio One is to use strip silence.
This is a simple, quick way of getting rid of unwanted sound in Studio One. Strip silence works by identifying the gaps between parts of a performance and removing sound from them.
Imagine you have two podcast hosts who are talking. Usually, one person will talk, then the other, so when a host isn't talking there will be a gap. This gap can sometimes be audible because of hum, hiss, background noise, or other unwanted sounds. Strip silence works by identifying this gap and removing sound from it.
First, import the audio you want to work with into Studio One.
After that, remove any unused audio files - it's much easier to work with strip silence when you only have one audio clip that you need to work on.
Parameters
Once this has been done, go to the Edit Window and choose strip silence from the toolbar.
This will open a list of parameters for you with various settings. These are:
- Lots of Silence
- Little Silence
- Noise Floor
- Manual
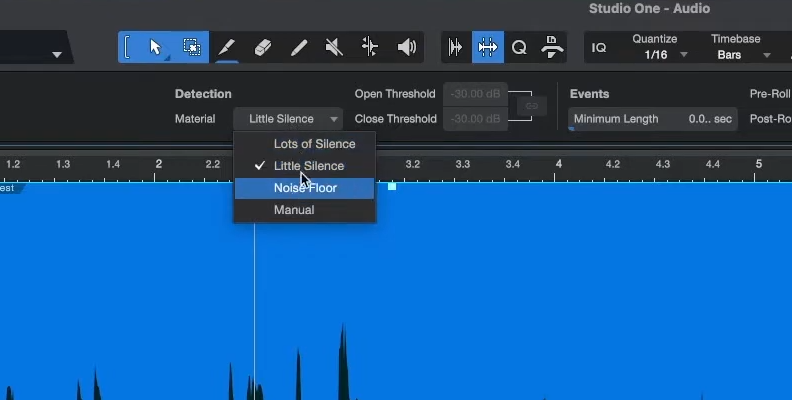
Select the one that best describes the noise on your audio files. As a general rule, Little Silence will suit most people, but it's worth playing around to see what works for you, as it will depend on the quality of the recordings you are trying to clear up.
A Noise Floor refers to the electrical noise or other background noise that can be added to an audio signal. This setting will set a floor below which sound will be cut out.
Manual will let you set the threshold you require manually, which takes a bit of practice.
Once you have selected one of these parameters, you need to decide how long the Minimum Length will be. It's important to get this right as it tells Studio One how long a silence needs to be before it applies the strip silence.
A good rule of thumb is to go for around .500, which is half a second. If the time is too short, your audio track will be cut up into tiny chunks and sound strange and broken up. If it is too long, the strip silence won't be effective.
You can also adjust the pre and post-roll times. This sets how long Studio One gives you before strip silence starts and ends. If this time is too long, you may end up with unwanted sound not being removed. If it is too short, it might not apply properly.
As a rule, set the pre and post-roll times to half of the value of the Minimum Length. So if you have chosen .500 for your Minimum Length, then a good pre and post-roll would be 0.250.
Once you have done this, apply the strip silence, and Studio One will remove the unwanted noise from your audio tracks.
Export

When the effect has been completed, export your audio file.
Go to the File menu and choose Export. You can then choose the format you want to export the audio clip as - MP3, WAV, and so forth.
Choose where on your computer you want to save the new track to and click Export.
Once you have done this, click on Export, and your file will be saved.
Repair Tool
The repair tool in Studio One makes repairing different types of audio problems pretty straightforward and can be a real lifesaver. Before you begin, and though it might seem obvious, it's a good idea to remove unused files before you begin to make any changes to your audio data.
This can be done by simply clicking the "Remove Unused Files" button in Studio One. It will also have the effect of helping to free up processor resources meaning Studio One will run quicker, so your files will be processed quicker.
Noise Reduction
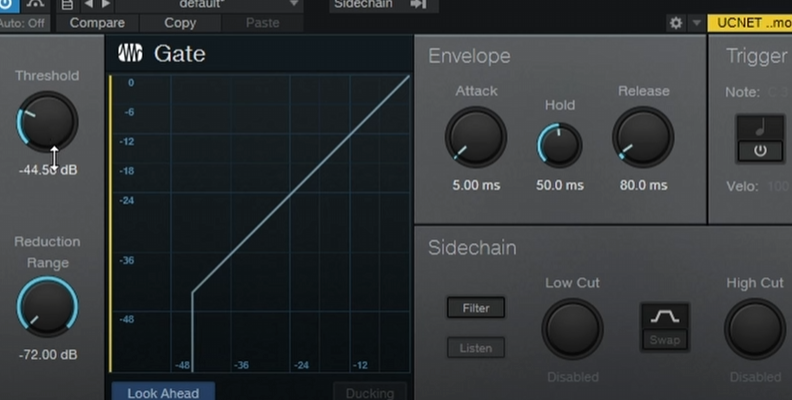
The Noise Reduction tool is a really great built-in way to clean up your Studio One audio. The first thing to do is to select a part of the track that only contains the background noise you want to eliminate from your audio. Then go to the Noise Reduction tab and click Learn. Studio One will then analyze and understand what part of the audio signal you want to eliminate.
Then go back and select the part of the track you want to apply the Noise Reduction effect to or select the whole track if you want to apply it to everything. Go back to the Noise Reduction tab and adjust the Reduction slider to apply as much or as little as the effect as you want to.
Noise Reduction is made very straightforward in Studio One.
EQ
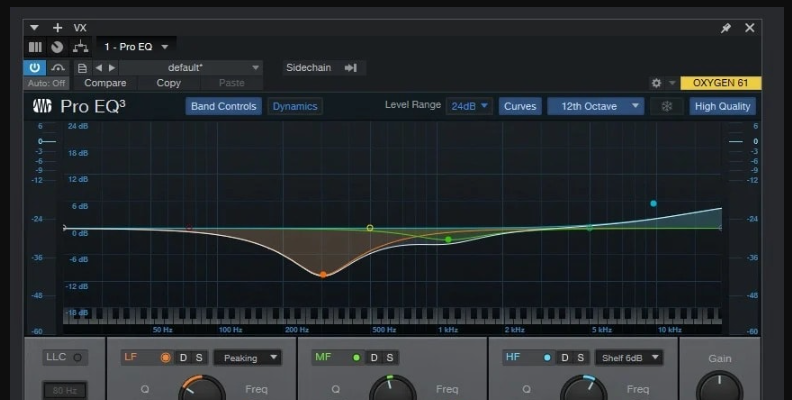
If you explore the channel strip, there are a few different settings there. It lets you make several adjustments such as the volume and the EQ of your track but EQ is what we will focus on.
EQing is especially useful as it provides a quick and easy way to adjust the frequency levels, meaning you can easily eliminate background noise, improve clarity, and work on other issues that are easy to sort out. The controls will allow you to adjust the gain and frequency of different parts of the audio signal. You can also adjust the Q band so you can target whatever part of your frequency you need to work on.
Compression
Compression is another incredibly valuable tool when it comes to cleaning up your audio in Studio One. Compression does what the name implies - it "compresses" the dynamic range of the sound which can male it easier to hear everything in the mix.
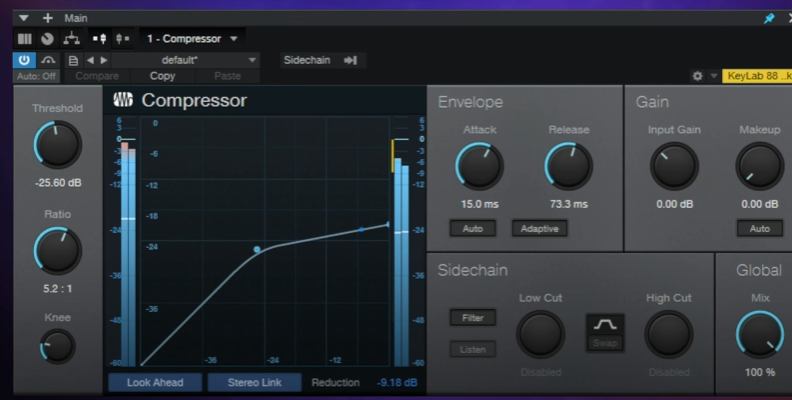
There are four main settings when it comes to compression that you need to pay attention to:
- Threshold: The level at which the compressor will begin working (in dB).
- Ratio: The amount of compression applied once the audio signal gets above the Threshold level.
- Attack: How quickly it takes the audio signal to be completely compressed.
- Release: How quickly it takes to return to the original, non-compressed sound.
When it comes to compression, a little goes a long way. Try to be sparing with the amount you apply, especially if you are just getting to grips with it as a way to clean up your audio.
If you are just starting out, consider settings of -20 dB for the Threshold, 2:1 for the ratio, an attack of 10ms and a release of 100ms. Those settings often set as the defaults in compression and there's a good reason for that - they're an excellent place to begin. But more than number, use your ears to determine what will work for you. Since every audio track is different, the amount of compression you need to apply will be different.
However, when used correctly, compression is a very valuable tool, even if it seems complicated at first glance. It can clean up your audio, make it sound great, and really give what you are producing a professional edge.
How to Clean Up Your Audio in Studio One With CrumplePop
Hear It For Yourself
Advanced audio AI removes noise and boosts your vocal quality.
Toggle it on/off to hear the difference.
Remove Wind
Remove Noise
Remove Pops & Plosives
Level Audio
Remove Rustle
Remove Echo
Remove Wind
If you want the very best in audio cleanup and restoration, then you can't do better than CrumplePop. With a range of different audio restoration plug-ins and unparalleled quality, you'll find just what you need.
CrumplePop's audio restoration plug-ins cover every situation. If you're outside and it's windy, WindRemover will have you covered, making the unwanted wind noise fade away. This is especially useful as wind noise can't be certain to occur during gaps, so using a dedicated plug-in like this will produce better results than strip silence.
EchoRemover can make even the most cavernous environment sound close, natural, and intimate - especially useful for anyone who can't record in the ideal environment of a studio.
There are plenty more besides, all designed to ensure that your audio comes out crisp, clean, and pristine. And with AU, VST3 and AAX plug-ins available, you can be sure of compatibility regardless of what DAW you are using.
And now, CrumplePop have introduced a standalone SoundApp, combining all the CrumplePop audio plug-ins in a single app. With a simple range of settings and an easy, intuitive interface you can start to enhance you audio in no time at all. SoundApp is available for Windows and macOS.
For the very best in audio restoration, CrumplePop is your one-stop-shop for audio perfection.
Conclusion

Cleaning up an audio track can be a tedious, repetitive and frustrating experience. Thankfully, with the range of tools and services that Studio One has available this needn't be the case any more.
So now, even tracks that you might have thought were unusable can be brought back to life with Studio One, and old tracks will sound like new tracks, back to their former glory.


